PDP-505MX
80
1
2
3
4
1
2
3
4
C
D
F
A
B
E
1
2 3
5
4
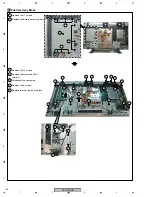
Front Panel Assy
2
• The following are order to remove a Bezel part.
1. Remove the Back Cover.
2. Remove the Frame Assy.
3. Remove the PDP module Assy.
4. Remove the BRACKET FILTER T .
5. Remove the Front panel including a glass filter.
6. Remove the bezel part is completed.
Remove the rear panel cover (Back Cover).
(Screw 4*12 *31 pcs)
(Screw 3*6*9 pcs)
BACK COVER(50XM3)
(HANDLE *4 pcs)
Remove the Frame Assy and the PDP module
Remove above pointed screw, 16 pcs, and 2 connectors.
After that, separate Frame Assy and Front Assy.
(Remove the connector)
(Remove the connector)
(Screw 4*12 *16pcs)
Remove below pointed screws. After that,
remove "BRACKET FILTER T".
Remove 2 screws for holding FRONT PANEL.
After that, remove the Bezel part.
(4*12 *6pcs)
(Screw 4*8 *5pcs)
BRACKET FILTER T
The Bezel part
(Screw 4*12 *2pcs)
∗
The screen of a set puts downward. (Remove the Stand.)
Содержание PDP-505MX
Страница 7: ...PDP 505MX 7 5 6 7 8 5 6 7 8 C D F A B E ...
Страница 21: ...PDP 505MX 21 5 6 7 8 5 6 7 8 C D F A B E ...
Страница 46: ...PDP 505MX 46 1 2 3 4 1 2 3 4 C D F A B E Sensor Board IR Board Power Switch Board ...
Страница 47: ...PDP 505MX 47 5 6 7 8 5 6 7 8 C D F A B E Button ...
Страница 48: ...PDP 505MX 48 1 2 3 4 1 2 3 4 C D F A B E Audio Board ...
Страница 49: ...PDP 505MX 49 5 6 7 8 5 6 7 8 C D F A B E ...
Страница 50: ...PDP 505MX 50 1 2 3 4 1 2 3 4 C D F A B E PS250 PWR 500W ...
Страница 51: ...PDP 505MX 51 5 6 7 8 5 6 7 8 C D F A B E ...

