background image

7

En

English

10

˚

10

˚

2

˚

2

˚

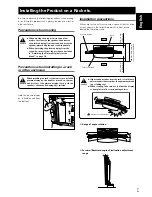
Installing the Product on a Rack etc.

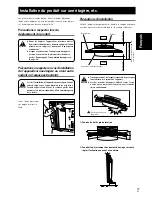
Be sure to observe the following precautions when moving
or installing this product with a plasma display into a rack or
other enclosure.

Precautions when moving

When moving the product more than a few

meters, first remove the speaker, then remove

the plasma display from the stand and move the
speaker, plasma display, and stand separately.

When detaching the plasma display from the

stand, be sure to follow the procedure described
in “Detaching the Plasma Display from the

Stand” on page 10.

Precautions when installing in a rack
or other enclosure

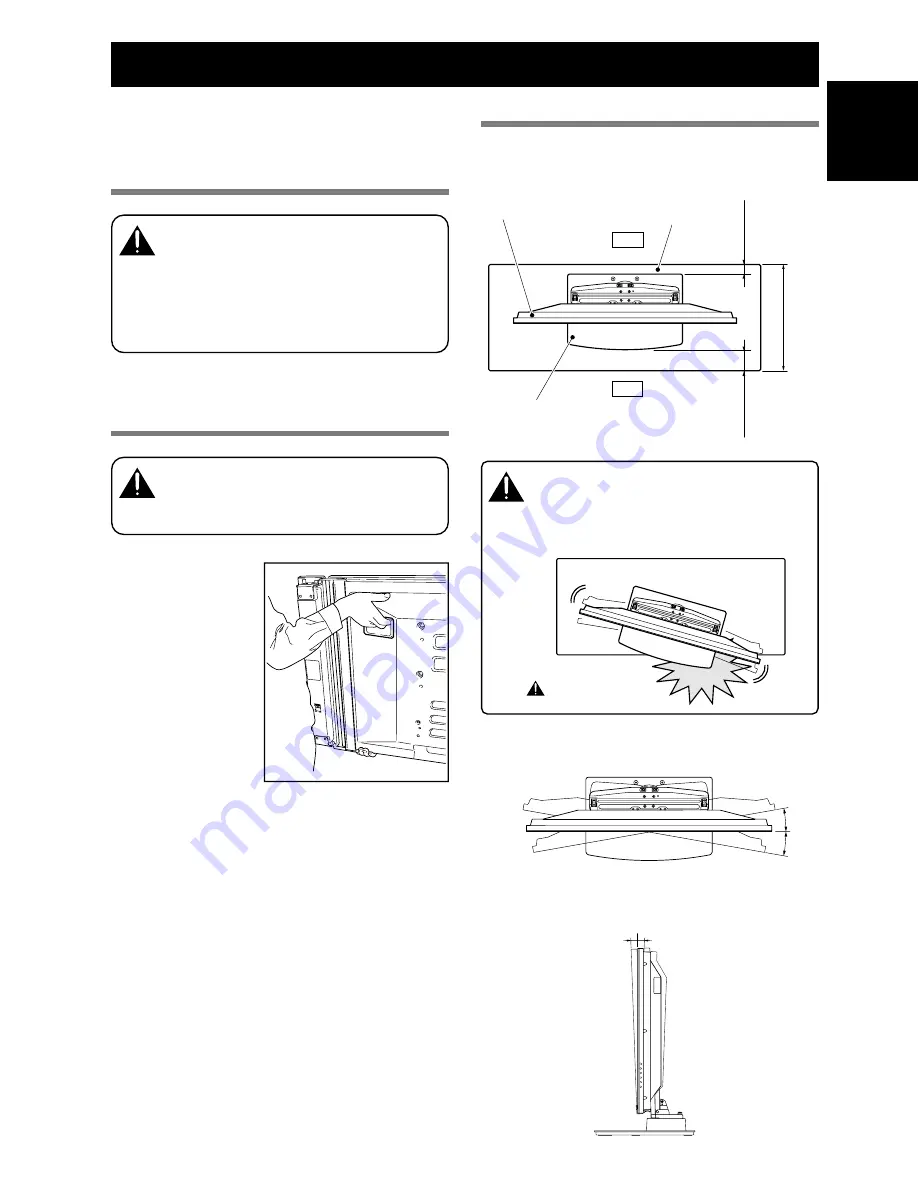
When installing in a rack or other enclosure, hold the
plasma display by the handles located on the rear

and bottom of the plasma display. If you hold the

speakers, they may be damaged or twisted.

Hold the plasma display
by its handles and from
the bottom.

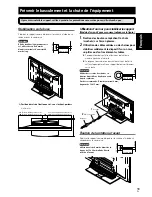
Installation precautions

Make sure that you always secure a space at least as large
as that shown in the following diagram in front of and
behind the table top stand.

If the stand protrudes from the rack, it could cause

unforeseen accidents such as the equipment break-
ing or falling over.

When rotating, take care not to allow the display

to bump into walls or surrounding objects.

Min. 10 mm

(13/32 inch)

Plasma display

Rack

Table top stand

Min. 30 mm

(1-3/16 inch)

Back

Depth of the rack

420 mm (16-9/16 inch)

or more recommended

Front

Range of angle rotation

Forward/Backward angle of inclination adjustment
range

Caution

Caution

Caution

Protrusion is dangerous.

Содержание PDK-1012

Страница 1: ...Operating instructions Mode d emploi Manual de instrucciones Table top stand Support de couverture de table Soporte de mesa PDK 1012 ...

Страница 2: ... falling over or other accident Installation Location Select a location that is strong enough to support the weight of the stand and the displays Make sure to place it in a level and stable location Do not install it outdoors at a hot spring or near a beach Do not install the stand where it may be subjected to vibration or shock Assembling and Installation Assemble the stand in accordance with the...

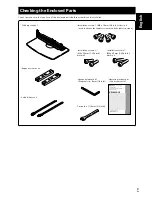
Страница 3: ...lack x 2 Installation screws 3 M8 x 40 mm 1 9 16 inch black x 2 Hexagonal wrench x 1 Diagonal size 6 mm 1 4 inch Operating instructions this document x 1 C wrench x 1 10 mm 3 8 inch Checking the Enclosed Parts Check to make sure that you have all the enclosed parts before assembly and installation Operating instructions Mode d emploi Manual de instrucciones Table top stand Support de couverture de...

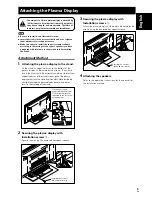
Страница 4: ...ys assemble it on a flat table etc Insert the screws in the holes vertically and do not tighten them with more force than necessary Assembly Procedure 1 Secure the support column to the stand with the Installation screws 1 4 locations on the left and right Using the enclosed hexagonal wrench first loosely attach the top attachment screw then loosely attach the bottom attachment screw ...

Страница 5: ...and s support columns to the bottom of the plasma display as indicated by the arrows then slowly insert them vertically Be extremely careful not to insert the support columns of the stand into any part of the plasma display other than the stand insertion slots Note that doing so might damage the plasma display panel or its ports or result in the warping of the stand Line up the column supports wit...

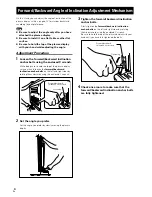
Страница 6: ... backward inclination anchor bolts on the left and right sides by rotating them upwards using the enclosed C wrench 2 Set the angle you prefer Set the angle you prefer by slowly moving the plasma display 3 Tighten the forward backward inclination anchor bolts Firmly tighten the forward backward inclination anchor bolts on the left and right sides by rotating them downward using the enclosed C wren...

Страница 7: ...the plasma display by the handles located on the rear and bottom of the plasma display If you hold the speakers they may be damaged or twisted Hold the plasma display by its handles and from the bottom Installation precautions Make sure that you always secure a space at least as large as that shown in the following diagram in front of and behind the table top stand If the stand protrudes from the ...

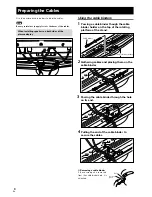
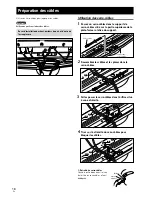
Страница 8: ...ers 1 Passing a cable binder though the cable binder holder on the top of the rotating platform of the stand Cable binder Cable binder holder 2 Gathering cables and placing them on the cable binder 3 Passing the cable binder through the hole on its end 4 Pulling the end of the cable binder to secure the cables Removing a cable binder If the secured part is removed from the cable binder hole it is ...

Страница 9: ...s shown in the diagram using screws that are available on the market Note To stabilize the equipment on the floor use screws that have a nominal diameter of 6 mm 1 4 inch and that are at least 20 mm 13 16 inch long After installing the stand be sure to take measures so that the equipment will not fall over Position of floor screws Without speakers Unit mm inch Using a wall for stabilization 43 inc...

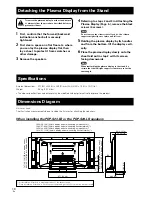
Страница 10: ...sheet to protect it from scratches or other damage 3 Remove the speakers 4 Referring to steps 2 and 3 in Attaching the Plasma Display Page 5 remove the black screws 4 screws Note Do not remove the silver screws If you do the column supports might slip out of place and fall over 5 Holding the plasma display by its handles and from the bottom lift the display verti cally 6 Place the plasma display s...

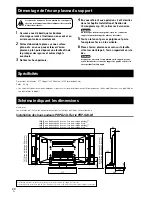
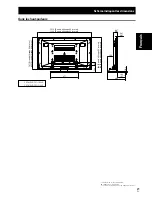
Страница 11: ...odel 814 32 1 16 50 inch display model 729 28 3 4 43 inch display model 380 15 18 5 3 4 143 5 11 16 80 3 3 16 125 162 6 7 16 1 157 6 3 16 2 93 3 11 16 1 98 3 7 8 2 23 15 16 1 28 1 1 8 2 Dimensions Diagram Without speakers Published by Pioneer Corporation Copyright 2004 Pioneer Corporation All rights reserved 1 PRO 920HD PRO 1120HD 2 PRO 910HD PRO 1110HD ...

Страница 12: ...isez pas à des fins autres que celles pour lesquelles il a été conçu Une installation incorrecte est extrêmement dangereuse car elle peut provoquer la chute du support ou un autre accident Lieu d installation Sélectionnez un emplacement assez solide pour supporter le poids du support et de l écran Assurez vous de placer le produit à un emplacement stable et plat N installez pas le support à l exté...

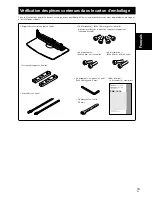
Страница 13: ...M8 x 40 mm noir x 2 unités Clé hexagonale à six pans x 1 unité Taille en diagonale 6 mm Mode d emploi ce document x 1 exemplaire Clé hexagonale x 1 unité 10 mm Vérification des pièces contenues dans le carton d emballage Cette vérification vous permettra de vous assurer que vous possédez bien toutes les pièces nécessaires avant de procéder au montage et à l installation du support Operating instru...

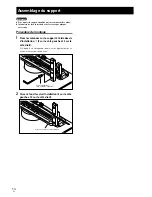
Страница 14: ...roit Remarques Pour monter le support travaillez toujours sur une surface plane Introduisez les vis à la verticale et ne les serrez pas plus que nécessaire Procédure de montage 1 Fixez les colonnes sur le support à l aide des vis d installation 1 2 sur le côté gauche et 2 sur le côté droit A l aide de la clé hexagonale fournie vissez légèrement les vis en commençant par celle du haut ...

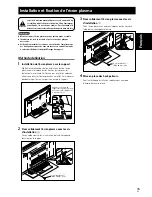
Страница 15: ...port Mettez les colonnes de soutien en place au bas de l écran plasma comme indiqué par les flèches puis insérez les lentement à la verticale Veillez à ne pas insérer les colonnes ailleurs que dans les fentes prévues à cet effet Cela risquerait d endommager l écran ses ports ou encore le support Alignez les colonnes du support sur la partie inférieure de l écran comme indiqué sur le schéma ci join...

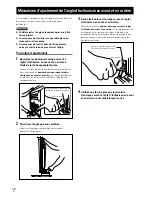
Страница 16: ...t vers le haut à l aide de la clé hexagonale fournie 2 Choisissez l angle que vous préférez Choisissez l angle que vous préférez en manipulant doucement l écran plasma 3 Serrez les boulons d ancrage servant à régler l inclinaison en avant et en arrière Serrez fermement les boulons d ancrage servant à régler l inclinaison en avant et en arrière sur le côté gauche et sur le côté droit en les tournan...

Страница 17: ...ne étagère ou dans endroit exigu tenez l écran plasma par les poignées à l arrière et par le fond Si vous le soulevez par les haut parleurs ces derniers risqueraient d être endommagés ou de se tordre Tenez l écran plasma par ses poignées et par le fond Précautions d installation Veillez à toujours ménager devant et derrière le support un espace au moins égal à celui qui est indiqué sur le schéma c...

Страница 18: ...s dans le support de serre câbles situé sur la partie supérieure de la plate forme rotative du support Serre câbles Support de serre câbles 2 Rassemblez les câbles et les placer dans le serre câbles 3 Faites passer le serre câbles dans l orifice situé à son extrémité 4 Tirez sur l extrémité du serre câbles pour bloquer les câbles Retrait d un serre câbles Quand la partie bloquée est retirée de l o...

Страница 19: ...l et d au moins 20 mm de long Après avoir installé le support veillez à prendre les précautions nécessaires pour qu il ne tombe pas Position des vis de fixation au sol sans les haut parleurs Unité mm Utilisation d un mur pour stabiliser le support Modèle d écran 43 pouces comme indiqué sur la figure 1 Fixation des boulons empêchant la chute crochets sur l écran plasma 2 Utilisation de câbles solid...

Страница 20: ...rant aux opérations 2 et 3 décrites dans le chapitre Installation et fixation de l écran plasma p 15 retirez les 4 vis noires Remarque Ne retirez pas les boulons argentés sinon les colonnes de support risquent de bouger de place et de tomber 5 Tout en le tenant par ses poignées et par le fond placez l écran à la verticale 6 Placez l écran plasma avec soin sur la feuille citée lors de l étape 2 l é...

Страница 21: ...43 pouces 814 Ecran d affichage 50 pouces 729 Ecran d affichage 43 pouces 380 18 5 143 80 125 162 1 157 2 93 1 98 2 23 1 28 2 Schéma indiquant les dimensions Sans les haut parleurs Publication de Pioneer Corporation 2004 Pioneer Corporation Tous droits de reproduction et de traduction réservés 1 PRO 920HD PRO 1120HD 2 PRO 910HD PRO 1110HD ...

Страница 22: ...uada ya que puede tener como resultado la caída de la pantalla o accidentes de otro tipo Lugar de instalación Elija un lugar lo suficientemente resistente como para aguantar el peso del soporte y la pantalla Asegúrese de que el lugar de instalación sea una superficie llana y estable No lo instale en exteriores en fuentes termales ni cerca de una playa No instale el soporte donde pueda sufrir vibra...

Страница 23: ... negros x 2 Tornillos de instalación 3 M8 x 40 mm negros x 2 Llave Allen x 1 tamaño diagonal 6 mm Manual de instrucciones este documento x 1 Llave de maquinista x 1 10 mm Comprobación de las piezas incluidas Antes de proceder al montaje e instalación asegúrese de tener todas las piezas incluidas Operating instructions Mode d emploi Manual de instrucciones Table top stand Support de couverture de t...

Страница 24: ...elo siempre en una mesa plana o similar Introduzca los tornillos verticalmente en los agujeros y no los apriete más de lo necesario Procedimiento de montaje 1 Asegure la columna en el soporte mediante los Tornillos de instalación 1 4 posiciones a la derecha e izquierda Utilice la llave Allen suministrada para primero apretar ligeramente el tornillo de acoplamiento superior y a continuación el torn...

Страница 25: ...odúzcalas lentamente de forma vertical Tenga muchísimo cuidado de no insertar las columnas del soporte en ningún otro lugar de la pantalla de plasma que no sean las ranuras de inserción del soporte Tenga en cuenta que si eso ocurriera se podrían producir daños en el panel de la pantalla de plasma o sus puertos o deformaciones en el soporte Alinee los soportes de las columnas con la parte inferior ...

Страница 26: ... lado derecho e izquierdo haciéndolos girar hacia arriba con llave de maquinista suministrada 2 Determine el ángulo que usted prefiera Determine el ángulo que usted prefiera moviendo lentamente la pantalla de plasma 3 Apriete los pernos de anclaje que permiten la inclinación delantera y posterior Apriete firmemente los pernos de anclaje que permiten la inclinación delantera y posterior situados en...

Страница 27: ...ar en un bastidor o similar sujete la pantalla por las asas que hay en la parte posterior y por debajo de la pantalla de plasma Si la sujeta por los altavoces puede dañarlos o doblarlos Sujete la pantalla de plasma por las asas y por la parte inferior Precauciones para la instalación Asegúrese de dejar siempre libre delante y detrás del soporte un espacio de la medida indicada en la siguiente figu...

Страница 28: ...bles 1 Pase una brida para cables a través del soporte de bridas que hay en la parte superior de la plataforma giratoria del soporte Brida para cables Soporte de brida para cables 2 Reúna los cables y colóquelos sobre la brida para cables 3 Pase la brida para cables por el agujero que tiene en su extremo 4 Tire del extremo de la brida para asegurar los cables Retirar una brida para cables Para abr...

Страница 29: ...s tornillos asegurados en el suelo sin altavoces Unidad mm Utilización de una pared para estabilizar la pantalla en la figura se muestra un modelo de pantalla de 43 pulgadas 1 Fije pernos ganchos a la pantalla de plasma para evitar su caída 2 Utilice cuerdas fuertes o cadenas para estabilizarla de forma segura a una pared pilar u otro elemento resistente Realice este procedimiento de la misma form...

Страница 30: ...antalla de arañazos u otros daños 3 Desmonte los altavoces 4 Consulte los pasos 2 y 3 de Montaje de la pantalla de plasma página 25 para quitar los tornillos negros 4 tornillos Nota No extraiga los tornillos plateados Si lo hace los soportes de las columnas podrían salirse de su sitio y caerse 5 Mientras sujeta la pantalla de plasma por las asas y por la parte inferior deslícela hacia arriba 6 Col...

Страница 31: ...delo de pantalla de 43 pulgadas 814 modelo de pantalla de 50 pulgadas 729 modelo de pantalla de 43 pulgadas 380 18 5 143 80 125 162 1 157 2 93 1 98 2 23 1 28 2 Diagrama de dimensiones Sin altavoces Publicado por Pioneer Corporation Copyright 2004 Pioneer Corporation Todos los derechos reservados 1 PRO 920HD PRO 1120HD 2 PRO 910HD PRO 1110HD ...

Страница 32: ...B 9120 Melsele Belgium TEL 03 570 05 11 PIONEER ELECTRONICS ASIACENTRE PTE LTD 253 Alexandra Road 04 01 Singapore 159936 TEL 65 6472 7555 PIONEER ELECTRONICS AUSTRALIA PTY LTD 178 184 Boundary Road Braeside Victoria 3195 Australia TEL 03 9586 6300 PIONEER ELECTRONICS DE MEXICO S A DE C V Blvd Manuel Avila Camacho 138 10 piso Col Lomas de Chapultepec Mexico D F 11000 TEL 55 9178 4270 Printed in Jap...

Отзывы: