background image

6

<PRB1268>

En

R

L

R

L

CONNECTIONS

A

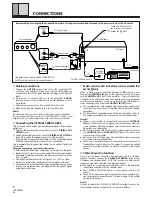
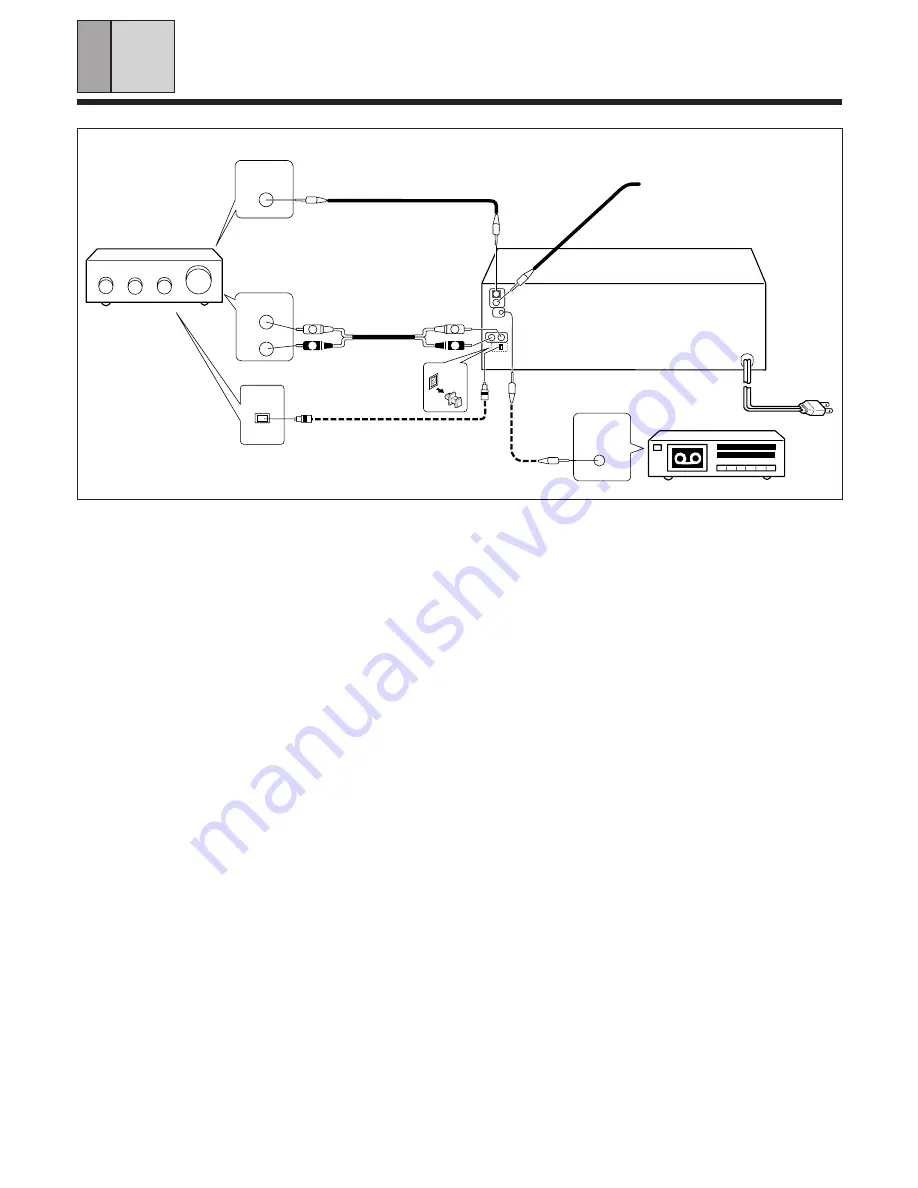
Making connections

1

Connect the 

OUTPUT

 jacks of this unit to the input jacks (CD

or AUX) of the amplifier.  Make sure that the white plugs are
connected to the left (L) jacks and the red plugs to the right (R)
jacks.

÷

Be sure not to connect this unit to the amplifier’s 

PHONO

jacks, as sound will be distorted and normal playback will not
be possible.

2

Connect the power cord to a household AC wall outlet.

÷

Make sure plugs are inserted fully into the wall outlet.

Note!!

Do not connect the power cord to an AC outlet on your amplifier.
If you connect the power cord to a "SWITCHED" AC outlet on an
amplifier, you will not be able to use this unit's memory function.

Before making or changing the connections, switch off the power switch and disconnect the power cord from the AC outlet.

DIGITAL
INPUT

OPTICAL

CD

 L

White

 R

Red

A

-

1

Output cable

White

Red

OUT

IN

CONTROL

OUT

Stereo amplifier

C

Control cable

=

To the CONTROL IN jack of
the Pioneer component
bearing the

  Î

 mark.

CD player

A

-

2

CD-DECK

SYNCHRO

CD-DECK SYNCHRO cable

D

Cassette deck

B

Optical fiber cable

Control cable

C

Power cord

(Be sure to use the supplied CD-DECK SYN-
CHRO control cord with the cassette deck.)

C

System remote control with a Pioneer stereo amplifier that
has the 

Î

 mark

When a Pioneer stereo amplifier bearing the 

Î

 mark is used,

connect the 

CONTROL IN

 jack on the rear panel of the CD player

to the 

CONTROL OUT

 jack of the amplifier.  This will enable the

CD player to be controlled using the remote control unit supplied
with the stereo amplifier.  If you do not plan to use this feature, it
is not necessary to connect the 

CONTROL IN/OUT

 jacks.

÷

The remote control unit supplied with the amplifier can be used
to control Play, Stop, Pause, Track/Disc Search and Disc Change
operations.

÷

For instructions regarding connections and operation, refer to
the operating instructions provided with your stereo amplifier.


Notes!!

÷

When a control cable is connected to the player’s 

CONTROL

IN

 jack, direct control of the player with the remote control unit

is not possible.  Operate the player with the remote control unit
by aiming it at the amplifier.

÷

Be sure to connect both of the control cable's plugs securely to
the 

CONTROL IN

 and 

CONTROL OUT

 jacks. Do not connect

only one end of the cable.

÷

Be sure to turn off the power of the amplifier before connecting
the power cord and output cable.

÷

When only the digital output is connected, the remote sensor of
the amplifier does not function. To operate it, connect the output
cable to the stereo amplifier as well as connecting the digital
output.

D

CD-Deck synchro function

If you have a Pioneer cassette deck provided with the CD-Deck
synchro function, connect the 

CD-DECK SYNCHRO

 jacks of the

CD player and cassette deck.  With this function, synchro record-
ing can be carried out between the player and deck.

÷

For details on connections and operation, refer to the operating
instructions supplied with the cassette deck.

÷

The CD-DECK SYNCHRO cable is not supplied with the CD
player.

÷

When CD-Deck synchro recording is carried out on several discs,
use the program playback function. (Refer to page 15 for details
of program playback.)

Note!!

In order to enable the CD-DECK SYNCHRO recording function, the
Output cable must be connected to the stereo amplifier.

B

Connecting the OPTICAL FIBER CABLE

This unit can be connected to an amplifier equipped with an optical
digital jack.
1. Remove the protective dust cap from this unit’s  

DIGITAL OUT

OPTICAL

 jack.

2. Use an optical fiber cable to connect the 

DIGITAL OUT  OPTICAL

jack of this unit to the optical input jack of the amplifier.

Align the plug of the optical fiber cable with the optical digital jack
and fully insert the plug to make a secure connection.

Use a separately sold optical fiber cable for the optical digital jack
connections.

Precautions concerning use of optical fiber cables

Fully insert the optical fiber cable plugs all the way into the jacks.

Be careful not to fold or crimp the cable. When coiling an optical
fiber cable for storage, make sure the diameter of the coil is 15 cm
(6 in.) or larger.

Use an optical fiber cable with a length of 3 m ( 10 ft.) or less.

Protect the optical fiber cable plugs from scratches and dust.

When the unit is not connected using an optical fiber cable, be sure
to keep the protective dust cap plugged into the optical digital
output jack at all times.

Содержание PD-F907

Страница 1: ...isc 17 To use the TIME button 18 TROUBLESHOOTING 19 SPECIFICATIONS 20 POWER ON DEMO display mode allows you to see variations of the display To enter the POWER ON DEMO display mode press STANDBY ON and then 4 1 within 1 sec ond after turning on the power POWER ON DEMO display To cancel the POWER ON DEMO display mode press any button BASIC OPERATIONS BEFORE OPERATING VARIOUS OPERATIONS 7 8 3 1 4 RA...

Страница 2: ...s and requirementsforthegroundingelectrode SeeFigure A LIGHTNING For added protection for this product duringalightningstorm orwhenitisleftunattended and unused for long periods of time unplug it from the wall outlet and disconnect the antenna or cable system This will prevent damage to the product due to lightning and power line surges POWER LINES An outside antenna system should notbelocatedinth...

Страница 3: ...ent from that to which the receiver is connected Consult the dealer or an experienced radio TV technician for help Information to User Alteration or modifications carried out without appropriate authorization may invalidate the user s right to operate the equipment For Canadian model CAUTION TO PREVENT ELECTRIC SHOCK DO NOT USE THIS POLARIZED PLUG WITH AN EXTENSION CORD RECEPTACLE OR OTHER OUTLET ...

Страница 4: ...ough the previously played discs auto memory of last 20 discs played CONFIRM SUPPLIED ACCESSORIES Size AA R6P dry cell batteries x 2 Control cable x 1 7 8 3 1 4 RANDOM DISC DISC SET 0 TRACK SET 7 8 9 4 5 6 1 2 3 TIME HI LITE BEST PREVIOUS POWER MODE CLEAR PGM REPEAT D Î FILE TYPE CD PLAYER REMOTE CONTROL UNIT CU P0090 PUT BATTERIES INTO THE REMOTE CONTROL UNIT Open the lid of the battery compartme...

Страница 5: ...isted on disc labels CD lens cleaner The player s pickup lens should not become dirty in normal use but if for some reason it should malfunction due to soiling consult your nearest PIONEER authorized service center Lens cleaners for CD players are commercially available but special care should be exer cised in their use since some may cause damage to the lens Condensation When this unit is brought...

Страница 6: ...th the remote control unit by aiming it at the amplifier Be sure to connect both of the control cable s plugs securely to the CONTROL IN and CONTROL OUT jacks Do not connect only one end of the cable Be sure to turn off the power of the amplifier before connecting the power cord and output cable When only the digital output is connected the remote sensor of the amplifier does not function To opera...

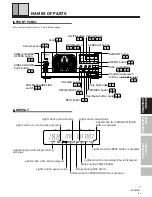
Страница 7: ...I III SINGLE RANDOM REPEAT 1 REMAIN PGM PREVIOUS DISC SCAN BEST 1 BIT DLC DIRECT LINER CONVERSION MODE HI LITE CLEAR PROGRAM RANDOM REPEAT UNLOAD BEST PREVIOUS DISC OPEN CLOSE D FILE TYPE COMPACT DISC PLAYER Û X Î ACSESS SINGLE LOADER PLAY STANDBY ON POWER 6 7 41 FILE TYME CD MECHANISM DISC MIN SEC CUSTOM ALL TRACK I II III SINGLE RANDOM REPEAT 1 REMAIN PGM PREVIOUS DISC SCAN BEST Remote sensor P ...

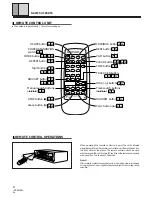
Страница 8: ...ees REMOTE CONTROL OPERATIONS The numbers in parenthesis are reference pages D 7 m 23 ft 30º 30º 7 8 3 1 4 RANDOM DISC DISC SET 0 TRACK SET 7 8 9 4 5 6 1 2 3 TIME HI LITE BEST PREVIOUS POWER MODE CLEAR PGM REPEAT D Î FILE TYPE CD PLAYER REMOTE CONTROL UNIT CU P0090 PREVIOUS button BEST button P 16 HI LITE button P 17 POWER STANDBY ON switch P 10 MODE button P 10 P 12 REPEAT button P 13 DISC button...

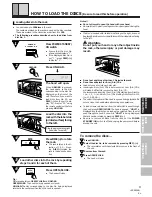
Страница 9: ...disc slot Inserting an 8 cm 3 in CDs in between two 12 cm 5 in CDs will make it difficult to remove the 8 cm 3 in CD We recommend inserting 12 cm 5 in CDs starting from Disc No 1 i e 1 2 3 and 8 cm 3 in CDs starting from Disc No 100 i e 100 99 98 The unit will not operate if the hood is opened during playback Be sure to close the hood before attempting any operations D To remove the discs Press UN...

Страница 10: ...DE during play or stop mode Pressafewtimestochoosethemode you desire Playback occurs according to the cho sen mode When you select SINGLE during playback only the current disc will be played If you press MODE during program mode the program contents will be erased Notes When you turn the power ON playback starts according to the last selected play mode If you did not select a play mode playback st...

Страница 11: ...disc stored in the rack To play the disc in the Single Loader slot using the remote control unit press 0 and DISC SET The hood can be opened or closed during playback HOLD is displayed after the hood is opened In this case the rack does not rotate When the playback of the current disc has completed the unit enters stop mode The next disc is played after the hood has been closed 1 2 3 OPEN CLOSE Lo...

Страница 12: ...e digit buttons and DISC SET on the remote control during CUSTOM playback to choose a disc not stored in the CUSTOM file no dISC will be displayed for approximately 3 seconds When a disc appointed to the CUSTOM file is not loaded in the rack no dISC is displayed for approximately 3 seconds the disc is erased from memory and CUSTOM searches for the next disc The discs stored in the CUSTOM file will...

Страница 13: ...PERATIONS Press the REPEAT button duringplayback Eachtime you press the button the repeat mode changes as follows 3 ALL SINGLE CUSTOM To repeat playback REPEAT play 3 One track repeat ALL repeat OFF 2 One track repeat Repeats the current or a selected track in during other play operations than HI LITE scan and PREVIOUS scan ALL repeat Repeats in one of the following 3 ways according to the play mo...

Страница 14: ...NS 7 You can also use the remote control Notes Randomplaycannotbeactivatedduringtheprogrammode Ifyou press RANDOM during program play the program contents will be erased and the unit will start to play tracks at random from all the discs In the ALL or CUSTOM I II or III mode if less than 100 discs are loaded the same track may be played more than once If you press REPEAT during random play the con...

Страница 15: ...also erase the program by pressing MODE RANDOM PREVIOUS or SINGLE LOADER PLAY in either play or stop mode or by pressing BEST in stop mode To cancel a program step In stop mode each time you press CLEAR the last step in the program is erased If a programmed disc is missing or inserted backwards during program play no dISC appears in the display the step is automatically erased and playback proceed...

Страница 16: ...ast disc you played 13 12 9 2 1 Press 3 or 6 when you reach the disc you want to hear Previous disc scan is canceled and normal play resumes To cancel the scanning press 7 Discs played during random program HI LITE scan Best and Single Loader playback are not included in the PREVIOUS scan If the first track is less than 1 minute long about 10 seconds from the beginning will be played If the first ...

Страница 17: ... program Press once The SCAN indicator blinks Best selection memory scan Press HI LITE during best selection memory play back The unit plays a 10 second por tion located 1 minute into each track in the best selection mem ory Press once The SCAN indicator blinks To return to normal playback Press 3 or 6 when you reach the track you want to hear HI LITEscaniscanceledand normal play resumes To cancel...

Страница 18: ...lapsed Time Remaining time TRACK Remaining time DISC Total elapsed time TOTAL Notes Time remaining on the track may not be displayed for tracks numbered greater than 24 Time remaining on the disc is not displayed during RANDOM PROGRAM or BEST play During PROGRAM play During BEST play Disc number Track number and Elapsed Time Remaining time TRACK Total number of steps memorized in BEST TOTAL Disc n...

Страница 19: ... Remedy SELF DIAGNOSTICS FUNCTION The unit incorporates a self diagnostic function When an abnormality is detected during operation of the unit an error message service no appears on the unit s display automatically Treat the error by following the instructions in Countermeasures Reload the discs properly Insert only one disc in a slot Check if there is a foreign object attached onto the disc Chec...

Страница 20: ... sound equipment will provide a lifetime of fun and enjoyment Since hearing damage from loud noise is often undetectable until it is too late this manufacturer and the Electronic Industries Association s Consumer Electronics Group recommend you avoid prolonged exposure to excessive noise This list of sound levels is included for your protection Information courtesy of the Deafness Research Foundat...

Отзывы: