background image

5

38

Customising TV Settings

GB

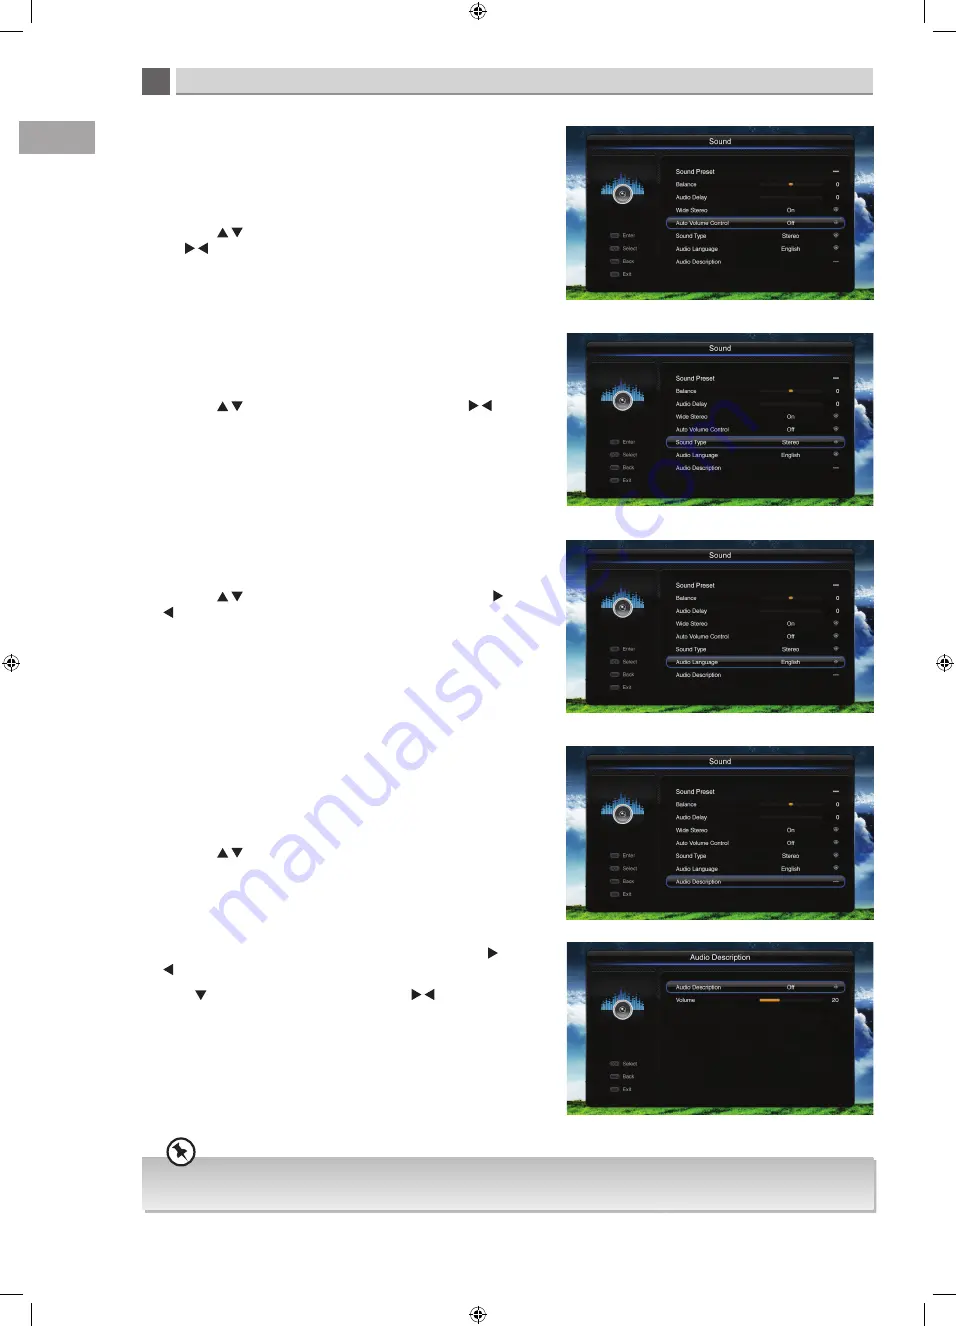
Auto volume control - 

sound

This feature automatically adjusts the volume level when the 
broadcast level is higher than your TV is set to. For example 
adverts are often louder than the TV programme you are 
watching, this setting will even out the volume levels.

•  Press the     to highlight auto volume control, then press 

the      buttons to adjust the setting.  

Sound type - 

sound

This feature is only adjustable in analogue TV mode. In analogue 
mode you can select mono or nicam stereo sound.

•  Press the     to highlight sound type, then press the      

buttons to adjust the setting.  

Audio language - 

sound

You can select your desired audio language.

•  Press the     to highlight audio language, then press the   

  buttons to adjust the setting.  

Audio description - 

sound

This will only work if the programme you are watching 
broadcasts the audio description. You will hear a description of 
what is happening on screen, it is designed for people with a 
visual impairment.

•  Press the     to highlight audio description, then press the 

OK button.

The audio description volume is a percentage of the TV volume e.g. if you set the audio description volume to 80, the 
volume level of the audio description will be 60% of your TVs volume. So a little bit quieter.

•  You will now enter the audio description menu, press the   

  buttons to switch audio description on.

•  Press   to highlight volume then press the       buttons to 

adjust the volume of the audio description.

Pioneer L50/55USD14N_IB_English.indd   38

25/04/2014   10:37

Содержание L50USD14N

Страница 1: ...Instruction Manual GB L50USD14N L55USD14N UHD Smart 3DTV Pioneer L50 55USD14N_IB_English indd 1 25 04 2014 10 37 ...

Страница 2: ...s 24 Basic functions 24 Changing channels 24 Channel information 24 Adjusting the volume 25 Using headphones 25 ECO mode 25 Changing the source mode 25 Options menu 25 T Link connecting a soundbar using ARC 26 T Link connecting a Bluray player using ARC 26 Navigating the menus 27 Channel lists 28 Creating a favourite list 28 Viewing a channel from your favourite list 28 Navigating the Picture menu...

Страница 3: ...your 3D glasses to your TV 70 Using the 3D glasses 70 Viewing range when watching 3D 71 Playing a 3D movie 71 Changing 2D TV into 3D 71 Gaming in split screen mode 72 8 PVR Personal Video Recorder 73 Time Shift Function 73 Recording TV Programmes onto a USB Storage Device 74 Setting a timer recording 75 Playing Recorded Programmes 75 9 Using the Smart TV 76 Smart TV overview 76 Setting your countr...

Страница 4: ... unit in a bookcase built in cabinet or in another confined space Ensure the unit is well ventilated Safety Always disconnect the unit from the mains supply before connecting disconnecting other devices or moving the unit Unplug the unit from the mains socket during a lightning storm Mains Cable Make sure the unit or unit stand is not resting on top of the mains cable as the weight of the unit may...

Страница 5: ...his may result in malfunction Ensure you are within the working distance of the TV when using your 3D glasses remove any objects located in front of the transmitter to avoid the signal being hindered The 3D glasses may not work properly due to the interference from magnetic fluorescent light 50Hz 60Hz Do not wear the 3D glasses if they are broken or damaged Disassembly or modification of the 3D gl...

Страница 6: ...ly understand these features You will also find some hints and tips to help you resolve any issues Read all the safety instructions carefully before use and keep this instruction manual for future reference 1x YPbPr adapter cable 1x Audio in adapter cable 1x Scart adapter cable 6 x TV stand screws 1 x TV stand 2 x 3D glasses 1 x power cable 1 x cable tidy strap 1 x Remote control 2 x CR2032 batter...

Страница 7: ...e TV Stand The LCD display is very fragile and must be protected at all times when installing and removing the TV stand Be sure that no hard or sharp object or anything that could scratch or damage the LCD display comes into contact with it DO NOT exert pressure on the front of the TV at any time because the screen could crack 3 Carefully slide the stand into the slot on the back of the TV Then fi...

Страница 8: ...en slide it out of the slot x6 400mm 200mm 2 This TV is designed to be wall mounted with a standard 400 mm x 200 mm mounting kit sold separately designed for flat panel TVs Mount this TV according to the instructions included in the mounting kit Due to space restrictions we recommend that you make all connections before mounting on to the wall Mounting holes for M6 size screws Pioneer L50 55USD14N...

Страница 9: ... for flat panel TVs Mount this TV according to the instructions included in the mounting kit Due to space restrictions we recommend that you make all connections before mounting on to the wall Attaching the cable tidy The cable tidy attaches to the back of your TV under the sockets Attach by pressing the cable tide into the small square and circle as shown Fold the cable tidy back on itself to kee...

Страница 10: ...ect and adjust a setting in the OSD menu 4 VOL Adjusts the volume Press to select and adjust a setting in the OSD menu 5 MENU Press to select the menu 6 OK Press to confirm a command in the menus 7 Switches the TV on from standby mode Switches the TV back to standby mode 1 2 3 6 4 5 7 Always disconnect the TV from the mains socket when not in use for a long period of time The button on the right s...

Страница 11: ...VGA Connects to a computer or other devices with a VGA interface 7 Satellite INPUT Connects to the satellite socket on the wall with the Satellite input on your TV 8 Antenna Cable input Connects to the aerial socket on the wall with the RF coaxial cable 9 USB 1 USB 2 USB 3 Allows the insertion of a USB storage device to play video audio photo and text files USB mode and record TV programmes on to ...

Страница 12: ...en and this is dangerous Keep loose button cells away from young children and make sure that the battery holder tray is secure in the remote control Seek medical advice if you believe a cell has been swallowed Handling the Remote Control Take care of your fingernails when opening the battery compartment Do not drop or cause impact to the remote control Do not spill water or any liquid on the remot...

Страница 13: ...he glasses as shown below Inserting the battery 2 Slide the battery compartment up 3 Open the battery compartment 4 Insert the supplied battery CR2025 making sure that the symbol is facing down 5 Close the battery compartment 6 Slide the battery compartment closed Pioneer L50 55USD14N_IB_English indd 13 25 04 2014 10 37 ...

Страница 14: ...ct items 9 Select menu items Scroll around webpages 10 BACK Go back through menus or webpages 11 EXIT Exit from meuns or Smart mode 12 INFO Display programme information 13 V Adjust the volume 14 P Select a channel Scroll up and down web pages 15 OPTION Selects the Quick Access menu where you can adjust Picture preset Sound preset Picture preset T Link Timeshift PVR Schedule list Remote Control 1 ...

Страница 15: ... the TV back to TV mode from other viewing modes 19 SUBTITLE Switch subtitles on or off 20 LIST Displays the last channel list menu 21 PRE CH Selects the previous channel 22 MEDIA MODE buttons Select the previous next photo music or video Stops playback Plays a recording or video Pauses play back and starts Timeshift recording Fast reverse forward Record 23 COLOURED BUTTONS Access teletext items S...

Страница 16: ...l not need to tune it in All you will need to do is select the HDMI socket in the source menu Do not connect the TV to the mains supply until you have made all the connections Aerial Connection Satellite Connection If you receive your television signal via an aerial or if you want to connect your cable box via an RF cable use the aerial connection as shown If you receive your television signal via...

Страница 17: ...cable if possible If you can t connect an ethernet cable try to position your wireless router as close as you can to your TV to obtain the best connection speed Connecting the power cable Once you have made all the connections connect the power cable to the back of your TV as shown an the other end to the mains socket If you have decided to connect to the internet via a wireless connection try to ...

Страница 18: ...s the button to go to the next screen 3 Press the buttons to select your desired country Then press the button to go to the next screen You will now be asked how you would like to connect to the internet if you don t want to connect to the internet at the moment you can skip this section and do it later If you do want to connect to the internet we recommend you choose the Wired option for the best...

Страница 19: ...assword is case sensitive so you may need to check this 8 Press the buttons to select each letter then press the OK button to confirm the letter 9 Once the password is entered scroll down to the OK button and press OK You will now see the following messages when you see the Connection Successful message press the button Depending how you receive your TV choose Antenna or Cable If you have an aeria...

Страница 20: ...utton to go to the next screen 12 Press the buttons to select Scan Then press the button to go to the next screen Your TV will now start to tune in all available TV channels Please be patient this will take a few minutes When all of the TV channels have been tuned in the Congratulations screen will appear 13 Press the OK button to exit the menu and start watching TV Pioneer L50 55USD14N_IB_English...

Страница 21: ...n to go to the next screen 3 Press the buttons to select Scan Then press the button to go to the next screen You will now see the Please configure the cable info screen 4 Press the buttons to select Full Then press the OK button Your TV will now start to tune in all available TV channels Please be patient this will take a few minutes When all of the TV channels have been tuned in the Congratulatio...

Страница 22: ...ons to select a symbol rate Polarization Press to select HORIZONTAL or VERTICAL Signal quality Displays the signal quality Signal level Displays the signal level Tuning via Satellite If you receive your TV via a satellite follow the tuning instructions below 1 Press the buttons to select Satellite Then press the button to go to the next screen 2 Press the buttons to select your satellite operator ...

Страница 23: ...on may take longer to scan so please be patient 6 Press the button to select channels then press the buttons to select Free or All Free This will scan for Free to air channels only All This will scan for all available channels 7 Press the OK button to start scanning for channels The scanning process can take up to 20 minutes so please be patient When all of the TV channels have been tuned in the C...

Страница 24: ...RCE EXIT BACK MENU 0SPACE Channel information Your TV can display information about the TV programme you are currently watching It will show you information in 3 different ways from basic programme information to a more detailed synopsis of the programme Press the INFO button once for basic channel information Press the INFO button twice to see more detailed information about the programme This wi...

Страница 25: ... to select your desired source TV SCART YPbPr VGA HDMI1 HDMI2 HDMI3 Options menu The options menu is a short cut to some of the most popular menus on your TV Press the OPTION button the menu will appear Press the buttons to highlight option you desire then press OK If you select picture freeze and select ON the picture will freeze on the screen You will still be able to hear the sound Adjusting th...

Страница 26: ...press the button In a second or two you should hear sound coming out of your Soundbar Surround Sound System With T Link switched on your TV talks to the devices you have connected So if you turn your TV off the connected devices will switch off Be patient this may take a few seconds T Link connecting a Bluray player using ARC If you have connected a Bluray player to your TV using the HDMI ARC conn...

Страница 27: ...ect for all picture adjustments Select to enter Smart mode Select to view the source menu or press the SOURCE button Select to enter Media centre a USB storage device must be connected Select to view the channel list Main menu for TV adjustments Select for all internet adjustments Select for all sound adjustments The look of the menus may change if you are viewing a UHD source This is normal Pione...

Страница 28: ...ant to add to your favorite list and press OK A heart will appear next to the channel to show its in your favourites Press the BLUE button to exit the menu you will now see your selected channels are in your favorite list You can now use the favorite list to quickly find your favorite channel Viewing a channel from your favourite list To view a channel from your favorite list highlight the channel...

Страница 29: ...our TVs picture Press the to highlight brightness contrast colour or sharpness then press the buttons to adjust the setting This will adjust the setting with the main menu on the screen meaning you will not be able to see your changes very well So you can see what you are changing press the OK button and a smaller menu will appear Press the buttons to adjust the setting To go back to the main pict...

Страница 30: ...s 4 settings custom cool normal warm Selecting custom will allow you to select White Balance in the advanced settings menu Press the to highlight colour temperature then press the buttons to adjust the setting Screen mode Picture You can adjust the aspect ratio of the picture it has 6 settings 16 9 format 4 3 format cinerama 14 9 zoom 16 9 zoom 16 9 zoom up Press the to highlight screen mode then ...

Страница 31: ...ected side You can select VGA HDMI 1 HDMI 2 HDMI 3 CMP You will only hear sound from the selected side the one with the music note above it Advanced settings picture menu The advanced settings menu has more advanced picture settings These setting are not something that you should really need to adjust very often Follow the instructions below for descriptions of the settings and how to adjust them ...

Страница 32: ...e to highlight RGB Mode then press the buttons to adjust the setting Dynamic contrast picture advanced settings You can set dynamic contract to on or off Press the to highlight dynamic contract then press the buttons to adjust the setting Flesh tone picture advanced settings You can set flesh tone to on or off Press the to highlight flesh tone then press the buttons to adjust the setting If you no...

Страница 33: ...ghlight game mode then press the buttons to adjust the setting White Balance picture advanced settings Make sure custom is select in Colour Temperature setting so that you can select the White Balance menu Select White Balance to adjust the R Gain G Gain B Gain These setting will add or remove a little red green and blue to the picture Press the to highlight White Balance then press the OK button ...

Страница 34: ...ings You can set black stretch to on or off Press the to highlight black stretch then press the buttons to adjust the setting Overscan picture menu You can set overscan to on or off Press the to highlight overscan then press the buttons to adjust the setting Gamma picture menu The gamma level is a subtle adjustment to make the picture crisper You will notice the screen getting slightly lighter or ...

Страница 35: ...djust the setting 3D to 2D picture 3D You can only switch 3D to 2D on and off when you have selected side by side top and bottom sensio modes in the 3D mode Press the to highlight 3D to 2D then press the buttons to adjust the setting Depth of field picture 3D You can adjust the depth of field of the 3D picture This effect will make objects appear deeper in the screen Press the to highlight depth o...

Страница 36: ... reset your picture settings Press the to highlight reset picture settings then press the OK button Press the buttons to select OK the press the OK button L R switch picture 3D You can switch L R switch on and off This adjusts the 3D video between the right and left eyes for a better 3D effect Press the to highlight L R switch then press the buttons to adjust the setting 3D navigation picture You ...

Страница 37: ...ghlight balance then press the buttons to adjust the setting Audio delay sound If you are watching TV and the sound isn t matching the person speaking you can adjust the audio delay to match up the sound lip sync Press the to highlight audio delay press OK so you can see the screen then press the buttons to adjust the setting Wide stereo sound This is an audio setting to give a sense of more space...

Страница 38: ...dio language Press the to highlight audio language then press the buttons to adjust the setting Audio description sound This will only work if the programme you are watching broadcasts the audio description You will hear a description of what is happening on screen it is designed for people with a visual impairment Press the to highlight audio description then press the OK button The audio descrip...

Страница 39: ...t internet connection then press the buttons to adjust the setting Interface network network settings This is how you want to connect to the internet either using an ethernet cable wired or wireless network Press the to highlight interface then press the buttons to adjust the setting Network menu In the Network menu you can adjust everything to do with your TVs internet settings and file sharing v...

Страница 40: ... would like to search for your wireless network We recommend you select SCAN this will automatically find all the wireless networks in your area Select Scan and press OK Your TV will now search for your wireless network Press to highlight your network its probably the one at the top of the list and press OK You will now have to enter your router password The password is case sensitive so make sure...

Страница 41: ...If you are having trouble to activate Smart TV then you may wish to run a connection test to see if you are connected to the internet Press the to highlight connection test then press the OK button Your TV will now test the connection and display the result on the screen Unless you are having problems connecting to the internet we recommend you keep the IP settings set to AUTO Information network ...

Страница 42: ...edia players instruction on how to connect to another device your TV and share files You should see Pioneer TV on your PC share your files with this device How to view play files from your PC Once DLNA is all set up you use MEDIA CENTRE to access your files Make sure DLNA is switched on otherwise your TV will only look for files on a USB device Press the MENU button and select media Press the butt...

Страница 43: ...5 Customising TV Settings 43 GB Settings menu map The Setting menu has many setting and submenus the diagram below shows a map of the submenus Pioneer L50 55USD14N_IB_English indd 43 25 04 2014 10 38 ...

Страница 44: ...OK button Language settings setup Press the to highlight language then press the OK button You can now select your desired Language Preferred audio language Preferred audio language 2nd Country settings setup Press the to highlight country then press the buttons to select your county Tuner mode settings setup Select tuner mode to change the way you receive your TV channels either through an antenn...

Страница 45: ...erial lead you may need to manually tune in an analogue channel Make sure the device is switched on before starting the scan Press the to highlight analogue manual scan then press the OK button Press the to highlight search then press OK Your TV will now search for the analogue signal Antenna manual installation manual digital tuning settings setup channel install Select antenna manual installatio...

Страница 46: ...will delete all of your channels you will need to retune your TV after this Press the to highlight clean channel list then press the OK button Press the buttons highlight OK then press OK Cable manual installation settings setup channel install You can select a certain frequency that you want to scan in the manual installation Press the to highlight Cable manual installation then press the OK butt...

Страница 47: ...install You can manually adjust the tuning setting before tuning into your satellite Press the to highlight Satellite manual tuning then press the OK button Press the OK button to see all the settings for your selected satellite You can now adjust the LNB POWER LNB FREQUENCY DISEQC INPUT TONE 22KHz TONE BURST TRANSPONDER Press the OK button then the to start the scan Clean channel list settings se...

Страница 48: ...Skip settings setup organiser Press the buttons to highlight channel skip then press OK Press the buttons to highlight the channel s you want to skip then press OK A tick will appear next to the channel you have chosen to skip When you change channel using the P buttons these channels will now NOT be selected Channel Sort settings setup organiser Press the to highlight channel sort then press OK Y...

Страница 49: ...o delete then press OK A tick will appear next to the channel Press the GREEN button then highlight yes and press OK The channel will now be deleted Input settings settings setup You can name each of the devices that you have connected to your TV to help you easily choose which input you would like to view Press the to highlight input settings then press OK Press the to highlight the input you wou...

Страница 50: ...hifts default setting is ON Lock menu settings The lock menu lets you set an pin code to prevent certain settings from being use and to prevent channels from being viewed Press the to highlight lock then press the OK button Channel Lock settings lock In the channel lock menu you can lock individual channels When you have locked a channel you will need to enter the lock password to view the channel...

Страница 51: ...el lock settings lock You can lock the control panel so that none of the buttons on the TV s control panel will work This is to prevent anyone from changing the TV settings from the TV the remote control will still work as normal Press the to highlight control panel lock then press the buttons to select ON or OFF If a button on the control panel is pressed a message will appear on the screen sayin...

Страница 52: ... then press the OK button Press the NUMBER buttons to enter a new password Press the NUMBER buttons to confirm the new password You will see the message The password have been changed successfully Reset lock setting settings lock If you want to reset all of your lock setting select reset lock settings Press the to highlight reset lock setting then press the OK button Press the buttons to highlight...

Страница 53: ...tal subtitle language Select your preferred subtitle language if broadcast Digital subtitle language 2nd Select your second choice of subtitle language if broadcast Subtitle type Switches between NORMAL and HEARING IMPAIRED The hearing impaired option will also describe the sounds being broadcast e g if a loud noise happens it will show BANG Decoding page language select your country area your TV ...

Страница 54: ...ed on and off when you switch your TV on and off This will also need to be switched on if you have an ARC device e g a soundbar to allow sound to and from your TV to the other device Press the to T Link then press the buttons to adjust the setting Network update settings Switch network update on or off to allow your TV to automatically update if your service provider updates the network Press the ...

Страница 55: ...TV Press the to highlight software update then press the OK button Location settings Select location to change from home mode to shop mode We recommend you leave your TV set to home mode Press the to highlight location then press the buttons to select HOME or SHOP By network Select by network to download the latest software via the internet Highlight by network then press OK the message searching ...

Страница 56: ...settings timer You can manually change your time zone Press the to highlight time zone then press the buttons to select your time zone Clock settings timer In the clock menu you can set the time and date You can also set your TV to automatically switch on and off at a preset time Press the to highlight clock then press the OK button Setting the time If you select Auto synchronization to ON the tim...

Страница 57: ...ill switch off Setting the TV to switch on 1 Highlight power on timer and select Daily or once 2 Highlight timer and press the NUMBER buttons to set the time you would like your TV to switch on 3 Then highlight power on channel and press OK Press the buttons to select last status the last channel watched or user select and press OK A channel list will appear press the buttons to highlight the chan...

Страница 58: ... programme at the bottom of the screen If you press the buttons and highlight a programme on a different channel the TV will automatically change channel You will notice the sound change in the background If you exit the Guide you will be viewing the last highlighted channel Searching for a particular type genre of programme 3 Press the BLUE button The filter menu will appear 4 Press the buttons t...

Страница 59: ...nt to record or be reminded about 3 Press the OPTION button to view the schedule Info screen The Schedule info menu will appear This will automatically be set to the programme you selected in the guide Manually setting the schedule information If you would like to alter the settings you can manually enter them follow the instructions below to do this 4 Press the buttons to highlight channel number...

Страница 60: ... programme to your USB storage device 9 Press the button to highlight repeat type Then press the buttons to select once daily week Once Will will set the reminder recording to work just once Daily Will will set the reminder recording to work at the same time every day Week Will will set the reminder recording to work once every week Press the then the buttons to highlight the day Press OK the sele...

Страница 61: ...highlight the sections you want to edit 5 Once you have made all your changes scroll to the bottom of the menu and highlight replace then press OK All your changes will now be saved in the schedule list Deleting a recording reminder 1 Highlight the recording reminder in the schedule list that you want to delete then press the OK button 2 Press the buttons to select delete then press OK Your schedu...

Страница 62: ...s the buttons and then press the OK button to select the teletext channel Press the LIST button to exit the Channel List and the teletext page will be displayed after a few seconds Alternative Press the TEXT button while watching some programmes to reveal the teletext page MHEG 2 Follow the instructions on digital teletext and move onto the next step by pressing OK RED GREEN YELLOW BLUE or 0 9 but...

Страница 63: ...exceed 500mA The maximum supported storage space of the hard disk is 1 TB The file system only supports FAT32 format If you want to store the video streaming of a TV programme the transfer rate of the USB storage device must not be less than 2MB sec otherwise the picture and sound of the programme will be affected and a warning statement will be shown on the screen If this happens please upgrade y...

Страница 64: ... press the to highlight picture mode then press the buttons to select Standard Dynamic Studio Personal Movie Play mode To change the play mode press the to highlight play mode then press the buttons to select Normal Repeat All Shuffle Rotate To rotate a picture press the to highlight rotate then continuously press the OK button and the picture will rotate Zoom To zoom into a picture press the to h...

Страница 65: ...s Deleting pictures You can delete pictures from your USB storage device directly from your TV 1 Select the picture you want to delete 2 Press the MENU button 3 Press the buttons to select edit and press OK 4 Press the buttons to select delete and press OK A message will be displayed asking you if you are sure you want to delete the file S 5 Select OK then press the OK button Your picture will now...

Страница 66: ...ess the or the button Stopping a track Press the button or the button Fast forward fast reverse a track Press the buttons or the buttons Press once 2x speed Press twice 4x speed Press three times to return to normal playback Skip to next or previous track 1 Press the buttons 4 Press the OK button to listen to your selected track While listening if you press the MENU button you will see a play opti...

Страница 67: ...ble press the to highlight show lyrics then press the buttons to select ON or OFF Audio only If you would like to switch the TV display off press the to highlight audio only then press the buttons to select ON or OFF Press the OK button to see the display again Sound preset To select one of the pre programed sound presets press the to highlight sound preset then press the buttons to select Off Roc...

Страница 68: ...ntrols movie Playing and pausing a track Press the or the button Stopping a track Press the button or the button once to stop resume Press the button or the button twice to stop Fast forward fast reverse a track Press the buttons or the buttons Press once 2x speed Press twice 4x speed Press three times 8x speed Press three times 16x speed Press three times 32x speed Skip to next or previous movie ...

Страница 69: ...the buttons to select 16 9 format 4 3 format Cinerama 14 9 zoom 16 9 zoom up Automatic 3D Navigation If you would like to change the 3D navigation press the to highlight 3D navigation then press the buttons to select Auto Manual Semi Auto 3D Mode To select the 3D mode press the to highlight 3D mode then press the OK button Press the buttons to select Off 2D to 3D Side by Side Top and Bottom Frame ...

Страница 70: ...ke sure the TV is in 3D mode and all other TVs close to the glasses are switched off before pairing My picture doesn t look 3D If you have connected your 3D glasses and you are watching a 3D movie and it doesn t appear to be 3D you may have accidentally selected left eye or right eye modes Handy tip Switch your TV back to normal TV mode and wait 30 seconds Your 3D glasses will automatically switch...

Страница 71: ...u can change normal TV into 3D to enhance the viewing experience 1 Press the MENU button 2 Press the buttons to highlight PICTURE then press the OK button 3 Press the buttons to highlight 3D NAVIGATION then press the buttons to select MANUAL 4 Press the button to highlight 3D then press OK 5 Press the buttons to select 2D to 3D The message Please wear 3D glasses will briefly appear on the screen 6...

Страница 72: ...ges and will look blurry 3 Pair both sets of 3D glasses to your TV 4 On one pair of the glasses press the STANDBY button for 1 second to select LEFT EYE MODE 5 On the other pair of the glasses press the STANDBY button for 1 second to select LEFT EYE MODE then press STANDBY again for 1 second to select RIGHT EYE MODE Both players should now be able to see their gaming area on the full screen Player...

Страница 73: ...if you want to go out for a while e g going to the bathroom kitchen When you have returned press the button to play the missed broadcast programme The PVR Time Shift progress bar will be displayed on the screen There may be a few seconds delay in video and sound when the unit starts to playback the missed broadcast programme It will return to normal Time Shift Mode and Recording functions may not ...

Страница 74: ...ing and the LED on the front of your TV will flash to indicate its still recording Recording will stop automatically when the disk is full 1 Press the REC button the recording progress bar will display 2 Press the REC button again and your TV will start to record 3 Press the Stop button to stop recording While your TV is recording you will not be able to change channel or source It you try to chan...

Страница 75: ...e instruction Manually setting the schedule information on page 53 to set a timer recording Playing Recorded Programmes When you connect a USB storage device your TV will create a folder titled PVR All of your recordings will be stored in this folder The folder can be accessed in Media Centre from the VIDEO section 1 Press the MENU button 2 Press buttons to highlight MEDIA then press OK 3 Press bu...

Страница 76: ... overview In smart mode you can use any of the pre installed apps to chat with friends on social media stream movies using Netflix or just surf the internet Press the SMART TV button to enter smart mode The Smart TV logo will appear on the screen while the smart function is loading please be patient this may take a few seconds Press the buttons to move around the smart screen A red box will appear...

Страница 77: ...ch on you have selected Press the buttons to highlight the app you desire then press the OK button to activate the app Adding apps to your favourites In the all apps menu highlight the app that you wish to add to your favourites and press the GREEN button The message This application has been added to your favourites list will briefly appear on the screen The app will now be in the favourites sect...

Страница 78: ...t 5 website will be stored in the list on the right hand side and they can be selected rather than typing out the website address each time 4 To navigate around the website press the buttons to select something press the OK button To scroll up and down the page press the P buttons If you need to type into a text field first select the text field by pressing the OK button Then press the MENU button...

Страница 79: ...ch app please refer to the individual apps instructions Skype As part of the Smart functionality your TV has a Skype app pre installed With Skype on your TV you can speak to family and friends from the comfort of your sofa For Skype to work you have to use the following webcam FREETALK TALK 7291 The webcam is not supplied with your TV you can purchase the webcam from http freetalk me Pioneer L50 5...

Страница 80: ...any water or dampness to evaporate before switching the TV on Maintenance Careful and regular cleaning can prolong the life of your TV Be sure to press the button on the right side panel of the TV or on the remote control to turn off the TV Disconnect the mains cable from the mains socket before any cleaning Never use alcohol benzine paint thinner cleaning fluid or other chemicals Do not use compr...

Страница 81: ...ing it off Try another channel The problem may be caused by the broadcaster Check if the video cables are connected properly Check you are in TV mode press the TV button Horizontal Vertical bar or picture shaking Check for local interference such as an electrical appliance or power tool Poor reception on some channels Station or cable channel may be experiencing problems tune to another station St...

Страница 82: ...ge device Smart TV will not work properly You are not connected to the internet Run a connection test from the Network setting menu Is your router switched on Have you selected wireless as your connection method Have you connected your Ethernet cable Connect the cable Try to reconnect by selecting Wireless setting in the Network settings menu Smart TV is very slow Check the location of your router...

Страница 83: ...is too strong If you are still experiencing blocking and the signal is strong consult your local aerial installer for advice Can I watch my TV using a portable set top aerial Some but only a few homes may be able to use a set top aerial However for a much better reception we strongly recommend that you use a rooftop aerial If you do not have access to a rooftop aerial for example if you rent a fla...

Страница 84: ...0 C 40 C Operating Humidity 10 80 10 80 Reference Period 2010 1062 2014 2010 1062 2014 Speaker Power 8 W 8 W 8 W 8 W Dimension W x D x H with stand 1125 x 240 x 708 mm 1236 x 240 x 770 mm Dimension W x D x H without stand 1125 x 50 x 660 mm 1236 x 50 x 720 mm Weight Net 18 45 kg 24 kg Inputs Output SCART with adapter supplied 1 1 HDMI supports V1 4 3 3 PC IN 1 1 PC AUDIO 1 1 YPbPr with adapter sup...

Страница 85: ...10 85 GB Other Information 93 2010 1062 2014 F 136 127 50 L50USD14N A B C D E F A 86 2010 1062 2014 A B C D E F 126 139 55 L55USD14N A Pioneer L50 55USD14N_IB_English indd 85 25 04 2014 10 38 ...

Страница 86: ...aboratories Dolby and the double D symbol are trademarks of Dolby Laboratories All trademarks are the property of their respective owners and all rights are acknowledged DSG Retail Ltd co no 504877 Maylands Avenue Hemel Hempstead Herts HP2 7TG UK IB Pioneer L55 50USD14N GB 140425V1 MPEG 2 NOTICE Any use of this product in any matter other than personal use that complies with the MPEG 2 standard fo...

Отзывы: