GM-3400T/XJUC
14
1
2
3
4
1
2
3
4
C
D
F
A
B
E
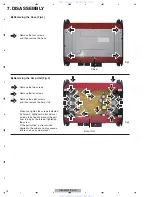
7. DISASSEMBLY
1
1
2
-
Removing the Case (Fig.1)
Remove the four screws
and then remove the Case.
Fig.1
3
1
1
1
1
1
2
2
2
2
2
1
2
2
2
2
2
3
3
3
3
3
3
3
3
Case
-
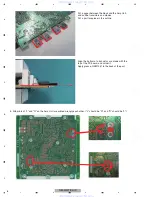
Removing the Amp Unit (Fig.2)
Remove the eight screws
and then remove the Amp Unit.
Remove the two screws.
Amp Unit
Fig.2
Remove the ten screws.
When you tighten the screws indicated
by Arrow 2, tightly hold a transistor or
a diode to be fixed to prevent the part
from turning by the force of tightening
the screw.
(If the part turned, a stress will be
applied to the solder and may cause a
failure such as a solder crack.)
www. xiaoyu163. com
QQ 376315150
9
9
2
8
9
4
2
9
8
TEL 13942296513
9
9
2
8
9
4
2
9
8
0
5
1
5
1
3
6
7
3
Q
Q
TEL 13942296513 QQ 376315150 892498299
TEL 13942296513 QQ 376315150 892498299

