background image

43

Changing the Audio Language
(Multi-Language Function)

 – DVD

Dolby Digital, PCM, and other audio data can be
recorded on DVDs in a number of languages or audio
tracks, letting you choose the desired language or audio.

Press 

AUDIO

 repeatedly to select the desired

language.

Pressing 

AUDIO

 once displays the currently selected

language. Subsequent presses rotates through the audio
languages available on the DVD.

Notes

• You cannot switch languages if there is only one language

recorded on the disc.

• Switching the audio language may not be possible with some

titles. In this case, the 

 mark is displayed.

• For some titles, selection can be made using the DVD menu.

In these cases, press 

MENU

 to display the DVD menu screen

and then make your selection.

Changing Audio Type

– Super VCD/Video CD/CD

For enjoyment of karaoke or similar format Super VCDs,
Video CDs and CDs, it is possible to select stereo audio,
or either right or left channel mono depending on the
requirements of the source.

Video CD/CD

Press 

AUDIO

 repeatedly during playback to

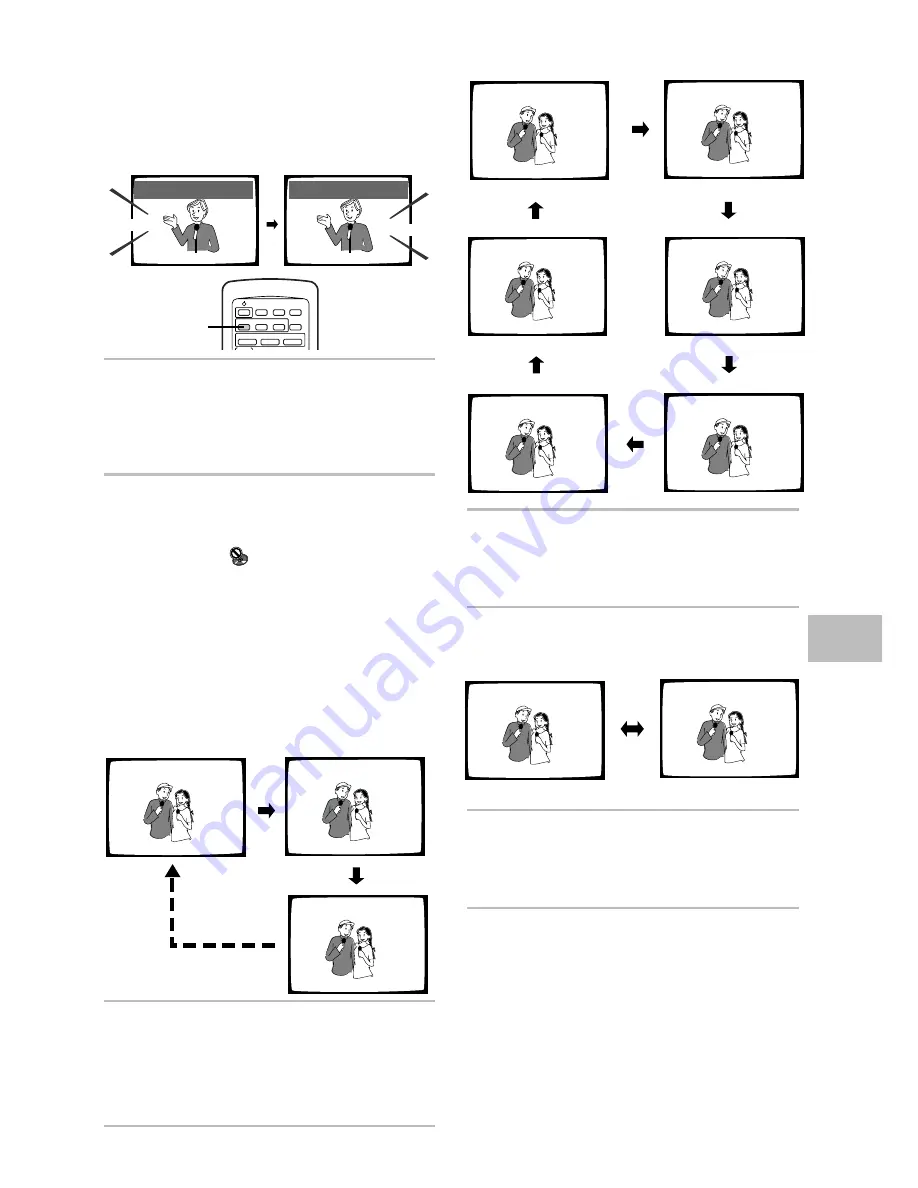
switch the audio type.

Audio output changes from “1/L” (Left channel) to
“2/R” (Right channel) to “Stereo”.

This function is possible only in Normal mode.

SETTING THE LANGUAGE OPTIONS

Audio         : 1    English

Dolby Digital 

5.1CH

Audio         : 2    Spanish

HELLO

HOLA

Dolby Digital 

5.1CH

Super VCD (Normal mode)

Press 

AUDIO

 repeatedly during playback to

switch the audio type.

In Normal mode, the audio changes according to the
diagram above.

Super VCD (Karaoke mode)

Press 

AUDIO

 repeatedly during playback to

switch the audio type.

In Karaoke mode, the audio changes according to the
diagram above.

AUDIO

Audio         : 1/L

Audio         : 2/R

Audio         : Stereo

Audio         : 1 R

Audio         : 1 L

Audio         : 1 Stereo

Audio         : 2 Stereo

Audio         : 2 L

Audio         : 2 R

Audio         : 2

Audio         : 1

Содержание DV-K302CD

Страница 1: ...DV K302CD DVD V630 Operating Instructions DVD PLAYER ...

Страница 2: ... circuits or where it can fall into such power lines or circuits When installing an outside antennasystem extremecareshouldbetaken to keep from touching such power lines or circuits as contact with them might be fatal OVERLOADING Do not overload wall outlets extension cords or integral convenience receptacles as this can result in a risk of fire or electric shock OBJECT AND LIQUID ENTRY Never push...

Страница 3: ...comply with the limits for a Class B digital device pursuant to Part 15 of the FCC Rules These limits are designed to provide reasonable protection against harmful interference in a residential installation This equipment generates uses and can radiate radio frequency energy and if not installed and used in accordance with the instructions may cause harmful interference to radio communications How...

Страница 4: ...eiver with 6 channel discrete input and utilize the player s built in Dolby Digital decoding capabilities Manufactured under license from Dolby Laboratories Dolby AC 3 and the double D symbol are trademarks of Dolby Laboratories Confidential unpublished works 1992 1997 Dolby Laboratories All rights reserved DTS is a trademark of Digital Theater Systems Inc You can enjoy the unique operation of a 3...

Страница 5: ...ons and explain the options available Below are just a few examples Answer a few questions and have all the necessary audio video and on screen language adjustments set automatically by the player using the Setup Navigator page 22 Setup the on screen speaker system to match your home audio system in the Audio 2 menu for ideal presentation of multichannel audio page 32 This product incorporates cop...

Страница 6: ... disc When all the connections and setups have been made you are ready to play a DVD Super VCD Video CD or CD with the player The section Getting Started Using Your DVD Player starting on page 26 outlines the basic player operations Enjoy the many features available Once you are comfortable using the basic player functions you are ready to take advantage of the various options DVD and this player ...

Страница 7: ...isplay 35 Karaoke Operation 36 Karaoke Entertainment 36 Adjusting to Create the Desired Sound 37 One Touch Karaoke 38 Reserving a Desired Song 38 Making Settings on the Karaoke Setup Menu 39 Setting the Language Options 42 Selecting a Subtitle Language Multi Language Subtitles 42 Changing the Audio Language Multi Language Function 43 Setting Language and Subtitle Preferences in the Setup Screen Me...

Страница 8: ...3 Close the cover Notes Do not mix old and new batteries When replacing batteries use all new batteries When not using the remote control for a long period of time over 1 month remove the batteries to avoid possible damage from battery corrosion If battery leakage occurs wipe the battery liquid from the battery component then insert new batteries Before Using CheckingAccessories Please confirm tha...

Страница 9: ... a 30 angle on each side of the sensor Notes Exposing the remote sensor to direct sunlight or strong light may cause faulty operation If the CONTROL IN jack on the player s rear panel is connected to the CONTROL OUT jack of another component point the remote control at the other component to operate the player Operation will not be possible when pointed at this player page 21 BEFORE USING 30 30 7m...

Страница 10: ...nation Lights when a DVD is loaded and when no disc is loaded Turns off when a disc other than a DVD is played back 6 DISC buttons and indicator Use to select discs in the player directly page 26 7 OPEN CLOSE 0 button Press to open and close the disc tray pages 26 and 29 8 DISC CHANGE button Press to select the next disc in the player pages 26 and 29 9 4 1 reverse button Press to go back to previo...

Страница 11: ...d indicator Use to switch One Touch Karaoke mode on or off page 38 5 1 CH MODE button and indicator Press to switch the audio output between 5 1 channel audio and 2 channel audio It is also possible to set the default audio output in the Setup screen Audio 2 menu pages 24 and 31 Display window Displays system information page 12 Disc tray When loading discs place discs in the disc tray with the la...

Страница 12: ...ed DOLBY DIGITAL indicator Indicates Dolby Digital audio playback on DVDs Counter display Displays the playback mode type of disc title and chapter track numbers playback time etc Program Format indicators During Dolby Digital playback depending on the audio format recorded on the disc loaded in the player the following indicators light to show the channels being played back L Left front 1 2 C Cen...

Страница 13: ...n page 20 6 VIDEO OUT SELECT switch Use to set which output is used to output the video signals Select either video S video or component video signal output depending on the connections you make page 20 7 COMPONENT VIDEO OUT jacks If your projection monitor projector or similar component has component video inputs you can produce a higher quality picture on your projection monitor or projector by ...

Страница 14: ... to select one of the subtitle languages programmed on a DVD or to turn the subtitles off page 42 5 SETUP button Press when the player is in either play or stop mode to open and close the Setup screen page 30 6 KARAOKE SETUP button Press to open or close the Karaoke Setup screen page 39 7 PREVIOUS 4 NEXT buttons During playback press PREVIOUS 4 to go back to a previous chapter track and NEXT to ad...

Страница 15: ...tton Use to go one menu back current settings are maintained Use RETURN when you do not want to change the option setting in a menu pages 27 31 and 52 Cursor buttons 2 3 5 Use to move through the options on menu screens and to change settings pages 22 26 and 30 ENTER button Use to implement settings selected with the cursor buttons or to set items highlighted in a menu pages 22 26 and 30 _ PLAY 3 ...

Страница 16: ... record and playback the contents of a disc with a VCR the playback picture may not be normal Connecting Your DVD Player Unlike any other audiovisual media format DVD offers a wide array of audio and video output options which allows playback to be enjoyed in any number of system configurations from a standard TV with stereo audio input to a home theater system with a projection monitor and full s...

Страница 17: ...select 5 1 Channel in the Setup Navigator Analog Jacks screen in the Setup screen Audio 2 menu Audio Out setting or by pressing 5 1 CH MODE on the front panel pages 24 and 31 Make connections from the DIGITAL OUT coaxial on the player to the digital coaxial input on an AV receiver amplifier or other component with internal multichannel decoding capabilities AV amplifier or receiver Home Theater Co...

Страница 18: ... adjusted manually in the Setup screen Audio 1 menu page 33 DIGITAL OUT Optical The digital signal is transmitted as light pulses through a optical cable Use to connect to an AV amplifier or receiver with built in Dolby Digital DTS or MPEG decoder Use a optical cable not supplied to connect the digital optical output on the player to the digital optical input on an AV amplifier or receiver DIGITAL...

Страница 19: ...aking analog audio connections be sure to match the color of the plugs with the color of the jacks red and white Stereo amplifier or receiver TV or monitor 5 1 CHANNEL AUDIO OUT 5 1 channel audio refers to the current industry surround sound standard requiring two front speakers a center speaker two surround rear speakers and a sub woofer Although in actuality there are 6 channels because the sub ...

Страница 20: ...tput VIDEO OUT Make composite video connections to a standard TV or monitor with a video input jack Use the supplied video cable to connect the video output jack on the player to the video input on the TV or monitor Be sure to match the color of the plug with the color of the jack yellow When making video connections make sure to set the VIDEO OUT SELECT switch on the rear panel of the player to t...

Страница 21: ...Ds Video CDs PAL NTSC conversion is not possible on DVDs When the TV SYSTEM switch is set to the AUTO position the disc s format will be output as is When a CD or disc is not loaded the previous video output format will be selected About MOD Modulation PAL SHRINK Most models of the newly developed countdown PAL TV system detect 50 Hz PAL 60 Hz NTSC and automatically switch vertical amplitude resul...

Страница 22: ...once this screen only appears the first time SETUP is pressed 3 Use the cursor buttons 5 to make a selection If you are going to use the Setup Navigator it is not necessary to change the setting on the first screen Please proceed to the next step If you want to set up the player without using the Setup Navigator use the cursor button to select Not Used at this time The Setup Navigator function may...

Страница 23: ...isplay Language Chinese model only The OSD Language screen establishes the OSD language or on screen display language which refers to the language that is used by the player in menus and on screen messages Additionally the language that is established at this setting will also be used for the default audio and subtitle language Settings English Factory setting Note In addition to setting the OSD l...

Страница 24: ...s to an AV amplifier or receiver with the appropriate inputs When this setting is selected several screens will follow to determine the configuration of your speaker system These screens are described in the section To coordinate your speaker system for 5 1 channel output on this page Not Connected Select if you have not made analog audio connections Factory setting Note Connect the ANALOG AUDIO O...

Страница 25: ...nnections select Not Connected Settings Dolby Digital Dolby Digital DTS Dolby Digital MPEG Dolby D DTS MPEG PCM Not Connected Factory setting Note The Karaoke function cannot be used with the DIGITAL OUT jack Setting compatibility with 96 kHz output The 96 kHz PCM Audio screen establishes whether or not the AV component the player is connected to is capable of processing an audio signal with a sam...

Страница 26: ...d to step 6 6 Select the item you want to view When a DVD is loaded Use the cursor buttons 2 3 5 to select the item then press ENTER You may also be able to use the number buttons for direct selection Depending on the disc you may not be able to use the number buttons When a Super VCD or Video CD is loaded Use the number buttons to select the item Notes Noise is output if you make digital audio co...

Страница 27: ...n the menu screen is displayed If this happens set the PLAYBACK CONTROL function to OFF and then use the Super VCD To play Super VCDs Video CDs without displaying menu screens Super VCDs Video CDs with Playback Control PBC display a menu screen when play is started It is possible however to playback Super VCDs Video CDs without displaying menu screens When a Super VCD Video CD with PBC is loaded p...

Страница 28: ... appears in the display Chapter Track Skip Forward Skip Back DVD Super VCD Video CD CD Forward and Reverse Scanning DVD Super VCD Video CD CD Fast forward scanning Press and hold FWD on the front panel during playback Release FWD when you reach the desired location Normal playback resumes When the Scan indicator on the screen changes from flashing to lit fast forward scanning will continue even if...

Страница 29: ...TOP 7 twice to turn off resume playback and then start playback again When STOP 7 is pressed RESUME appears in the display for as long as resume playback is possible If the function is canceled RESUME disappears and the disc format appears in the display Note Resume play is only possible when the disc is loaded and STOP 7 has not be pressed twice in succession RESUME appears in the display If you ...

Страница 30: ... page provides a basic outline for using the Setup screen menus When setting up for the first time It is recommended to set up player using the Setup Navigator page 20 If you selected Not Used when the Setup Navigator appears you may still set up the player using the Setup Navigator in the General menu screen If you choose not to use the Setup Navigator be sure to make the necessary settings in th...

Страница 31: ...xpert menu mode are identified by the icon Make changes to the Setup Menu Mode setting in the Setup screen General menu Settings Expert Settings Basic Note Factory setting On screen information only appears in the Basic menu mode ADJUSTING AUDIO AND VIDEO SETTINGS Expert Parental Lock Level 8 Setup Navigator Setup Menu Mode Audio1 General Language Video 2 Move Exit Expert Basic SETUP Detailed setu...

Страница 32: ...mponents of the center and surround signals will be mixed in the LFE signal and output from the SUB WOOFER jack When the sub woofer is Off the low range components of the center and surround signals will be mixed in the L and R signals and output from the front speakers About source audio output When the source input mode has been switched between the 5 1 CH and 2 CH mode settings using the Audio ...

Страница 33: ...al bitstream be sure to select Off If a DTS signal is output to an AV component without decoding capabilities the output is digital noise that could potentially cause damage to your speakers 96 kHz PCM Out This player is capable of outputting digital signals with a sampling frequency of 96 kHz If you have made connections to a component capable of processing this signal rate select 96 kHz for the ...

Страница 34: ...4 3 Letter Box is selected in the TV Screen setting the disc will be shown in Pan Scan format When viewing a wide screen TV or monitor Standard screen format DVD Super VCD When viewing a standard screen format DVD Super VCD on a wide screen TV black bars may be automatically placed at the side of the screen to adjust to the DVD Super VCD format Wide setting Wide screen format DVD Super VCD Please ...

Страница 35: ... Factory Setting Setting the position of the on screen display When watching conventional software on a wide screen TV the operation display is at the very top of the screen and may be difficult to see When this occurs selecting Wide changes the position of the display and lets you see operation indicators clearly even on a wide screen TV Otherwise select Normal Make changes in the OSD Position in...

Страница 36: ...s To select number 3 press 3 To select number 21 press 10 twice then 1 Playback begins 9 Turn the mic volume level knobs to adjust volume level Adjust overall volume level with the TV or amp Howling If sound from the speakers is picked up by a mic and output again through the speakers the result is a screeching sound known as howling Perform the following steps to eliminate howling 1 Move the mic ...

Страница 37: ...sting to Create the Desired Sound DVD Super VCD Video CD CD KARAOKE OPERATION Echo adjustment Adjust with the digital echo level knob Note Depending on the room there may be howling if the echo level is too high page 36 Changing performance key Press KEY CONTROL Each button can be used to raise or lower the key in 5 steps High The key is raised Low The key is lowered Note Adjustments can also be m...

Страница 38: ...tically determines whether the disc should be played by titles or by chapters the user is unable to select whether playback is performed according to titles or chapters 5 Repeat steps 2 through 4 to reserve other discs and songs After the currently playing song is finished playback of the selected title chapter or track starts Notes Up to 24 songs can be reserved Reserved songs play one after the ...

Страница 39: ...AM button does not work while a disc is being read Making Settings on the Karaoke Setup Menu DVD Super VCD Video CD CD When you press KARAOKE SETUP a menu of the karaoke functions that you can set for the disc that is being played back appears on the screen You can then set these functions as desired Displaying the Karaoke Setup menu Press KARAOKE SETUP The karaoke setup menu appears Depending on ...

Страница 40: ...t be reduced by much even when you sing In the case of software that contains two vocals on a Dolby Digital multiplex compatible DVD karaoke disc the Vocal Partner feature works on the vocal that is selected through the Vocal Select menu item Refer to Selecting the vocal Selecting the vocal Dolby Digital multiplex compatible DVD karaoke Discs If a track has two vocals this item appears in the Kara...

Страница 41: ...the cursor button 2 3 to select Audio in the Karaoke Setup menu 2 Use the cursor button 5 to set the desired settings Settings 1 Settings Settings 8 Maximum The values that are actually displayed depend on the disc in question It can also be switched by the AUDIO button on the remote control The above display will then disappear Setting multiplexed or stereo Super VCD Video CD CD Some types of dis...

Страница 42: ...btitles turned on or off and even opt to select assist subtitles for viewers who are hard of hearing page 45 Select the language of subtitles that appear even when the subtitles are turned off page 45 Note DVDs differ in content and do not all contain multiple language or subtitle information Therefore making settings in this section may have no effect on some DVDs Selecting a Subtitle Language Mu...

Страница 43: ...pe Super VCD Video CD CD For enjoyment of karaoke or similar format Super VCDs Video CDs and CDs it is possible to select stereo audio or either right or left channel mono depending on the requirements of the source Video CD CD Press AUDIO repeatedly during playback to switch the audio type Audio output changes from 1 L Left channel to 2 R Right channel to Stereo This function is possible only in ...

Страница 44: ...how to select other languages see When Other is selected on this page Factory setting Note The menu settings may be different from those shown above When Other is selected When you want to select one of the 136 languages as the main audio language follow the steps below when the following screen appears A language code list can be found on page 59 1 Use the cursor buttons to select Other and press...

Страница 45: ...ubtitle Display setting in the Setup screen Language menu in the Expert menu mode page 31 Settings On Off Assist Subtitle Factory setting Notes If there is no subtitle information recorded on the DVD no subtitles are displayed even if this function is set to On This setting serves as a default as whether or not to display subtitles Even if this option is set to Off subtitles can be displayed by pr...

Страница 46: ...nd do not all contain the same information Therefore some functions in this section may not work or have no effect on some DVDs Adjusting the Dynamic Range of the Audio Soundtrack DVD Audio DRC stands for Audio Dynamic Range Compression When Audio DRC is on soft sounds such as dialog can be heard more clearly without making loud sounds even louder Select from three levels of compression depending ...

Страница 47: ...n viewing frame by frame playback pressing PLAY 3 restores normal playback operation Notes There is no sound when viewing still frames or slow playback or when advancing one frame at a time Still frame slow play or frame advance playback may not be possible with certain titles In this case the mark is displayed ADVANCED FUNCTIONS 2 PLAY 1 STEP SLOW pause Viewing a still frame Press 8 pause When vi...

Страница 48: ...screen General manu in the Expert menu mode page 31 Settings Auto The player evaluates the disc s composition and selects the appropriate type of search according to the number of titles and maximum number of chapters on the disc Title Title search is performed when direct search is selected Chapter Chapter search is performed when direct search is selected Factory setting Note 1 Press SEARCH MODE...

Страница 49: ...r the playback picture is recorded in multiple angles or not Turn the angle indicator on or off in the Angle Indicator setting in the Setup screen Video menu in the Expert menu mode page 31 Settings On is displayed Off Not Displayed Factory setting Note Even when the Angle Indicator setting is set to Off the ANGLE indicator in the display panel of the player lights during multi angle playback Ther...

Страница 50: ...d section Press A B at the beginning and end of the section you want to repeat When A B is pressed a second time the disc returns to the location where A B was pressed first and plays the selected section repeatedly You can only perform A B repeat within the same title This function is not possible with Super VCD To cancel A B repeat play Press CLEAR Playback continues but the repeat function is c...

Страница 51: ...r the number buttons on the remote control to select a number between 0 and 9 You can also use the number buttons to enter the numbers directly When entering your password for the first time or changing it you will be asked to reenter your password When using the number buttons to confirm the password the numbers appear as asterisks and the cursor advances automatically to the next position 2 Use ...

Страница 52: ...ying documentation If you use the Condition Memory function to save the settings for a particular disc the Parental Lock level is saved as well Because it is saved in memory Parental Lock levels can be set for individual discs according to their content rather than a set level for all DVDs 1 Select Level Change in the Parental Lock setting and press ENTER The screen changes to the password input s...

Страница 53: ...while Last Memory is still being displayed on the screen The LAST MEMORY indicator disappears from the display window Continuing Playback from a Specified Location Last Memory DVD Video CD The Last Memory function is convenient when you want to continue viewing a disc from the point where you were watching before Unlike the resume function the Last Memory function is effective even if the DVD is r...

Страница 54: ...rized in Condition Memory press CONDITION MEMORY during playback to memorize new settings Switching of the multi language mode etc is automatic on some discs Memorizing Settings for Often Viewed DVDs Condition Memory DVD You can store in memory settings for DVDs you often watch Settings remain in memory even if you remove the disc from the player or switch power to the player to standby If you loa...

Страница 55: ... elapsed time of current title Bottom Row time in current chapter total time of current chapter Display off Viewing Disc Information DVD Super VCD Video CD CD Use DISPLAY to get current information about the disc currently loaded You can get information about the titles and chapters on a DVD or tracks on a Super VCD Video CD or CD When viewing DVDs you can also check the digital bitstream transmis...

Страница 56: ...ed time of Video CD Bottom Row track time total time of current track Track information Top Row disc number track number total elapsed time of Video CD Bottom Row remaining time of track total time of current track Note Information for Super VCD is not displayed Changing the Background Color of the Screen You can select a blue or black background to appear when the player is in the stop mode Make ...

Страница 57: ...at they have a diameter of at least 15 cm 6 in When connecting push all the way into the terminal Do not use cords with a length of over 3 m If moisture or dust has collected on the plug wipe it with a soft cloth before connecting Disc Care HOW TO HOLD DISCS When loading or removing discs try not to touch their playing surfaces CLEANING Fingerprints or other dirt on the disc may affect sound and p...

Страница 58: ...o avoid the heat generated by the amplifier or other audio equipment CAUTION WHEN PLACING THE UNIT IN A STEREO RACK WITH GLASS DOORS Be sure there is ample space between the unit and the glass doors when opening the disc table using the remote control If the disc table opens against strong resistance such as a closed glass door damage to the unit may result CONDENSATION Moisture may form in the op...

Страница 59: ...ian km Kannada kn Kashmiri ks Kurdish ku Kirghiz ky Latin la Lingala ln Laothian lo Lithuanian lt Latvian lv Malagasy mg Maori mi Macedonian mk Malayalam ml Mongolian mn Moldavian mo Marathi mr Malay ms Maltese mt Burmese my Nauru na Nepali ne Norwegian no Occitan oc Oromo om Oriya or Panjabi pa Polish pl Pashto Pushto ps Portuguese pt Quechua qu Rhaeto Romance rm 0809 0818 0821 0825 0901 0905 091...

Страница 60: ... VCD Video CD or CD loaded in the player and the setting that was changed only applies to DVD performance The setting will be effective the next time a DVD is loaded Settings are canceled When the power is turned off by power failure by switching the POWER off or by unplugging the power cord settings will be canceled Before unplugging the power cord press on the remote control and check that OFF d...

Страница 61: ...Audio Out settings according to the connection used If the audio is switched to 2 when playing a Super VCD that contains only one stereo soundtrack there may be no sound at all To restore the sound return the AUDIO switch back to its original position page 43 Digital output is not possible for audio There is no digital output during Karaoke mode Set to Normal mode The menu screen is not displayed ...

Страница 62: ...s from external units such as an AV amplifier or receiver Dolby Digital The maximum 5 1 channels of audio used in the surround system Surround Digital for movie theaters is digital data compressed by the third generation algorithm encoder AC 3 DTS DTS stands for Digital Theater System DTS is a surround system different from Dolby Digital that has become a popular surround sound format for movies a...

Страница 63: ...ilt in to DVD players and DVD discs for each sales region If the regional code of the DVD player does not match one of the regional codes of the DVD disc playback is not possible The region number can be found on the rear panel of the DVD player The illustration below shows the regions and corresponding region numbers Sampling Frequency When a sound wave is converted to a digital signal the sound ...

Страница 64: ... or lower Digital output Optical digital output Optical digital jack Coaxial digital output RCA jack Other terminals CONTROL IN Minijack 3 5 ø Accessories Remote control unit 1 AA R6P dry cell batteries 2 Audio cord 1 Video cord 1 Power cord 1 Operating Instructions 1 Note The specifications and design of this product are subject to change without notice due to improvement Printed in Japan VRB1233...

Отзывы: