background image


Connecting up

02


14


En


player may also not be compatible with 
some combination TV/VCRs for the same 
reason; refer to the manufacturer for 
more information.)


1

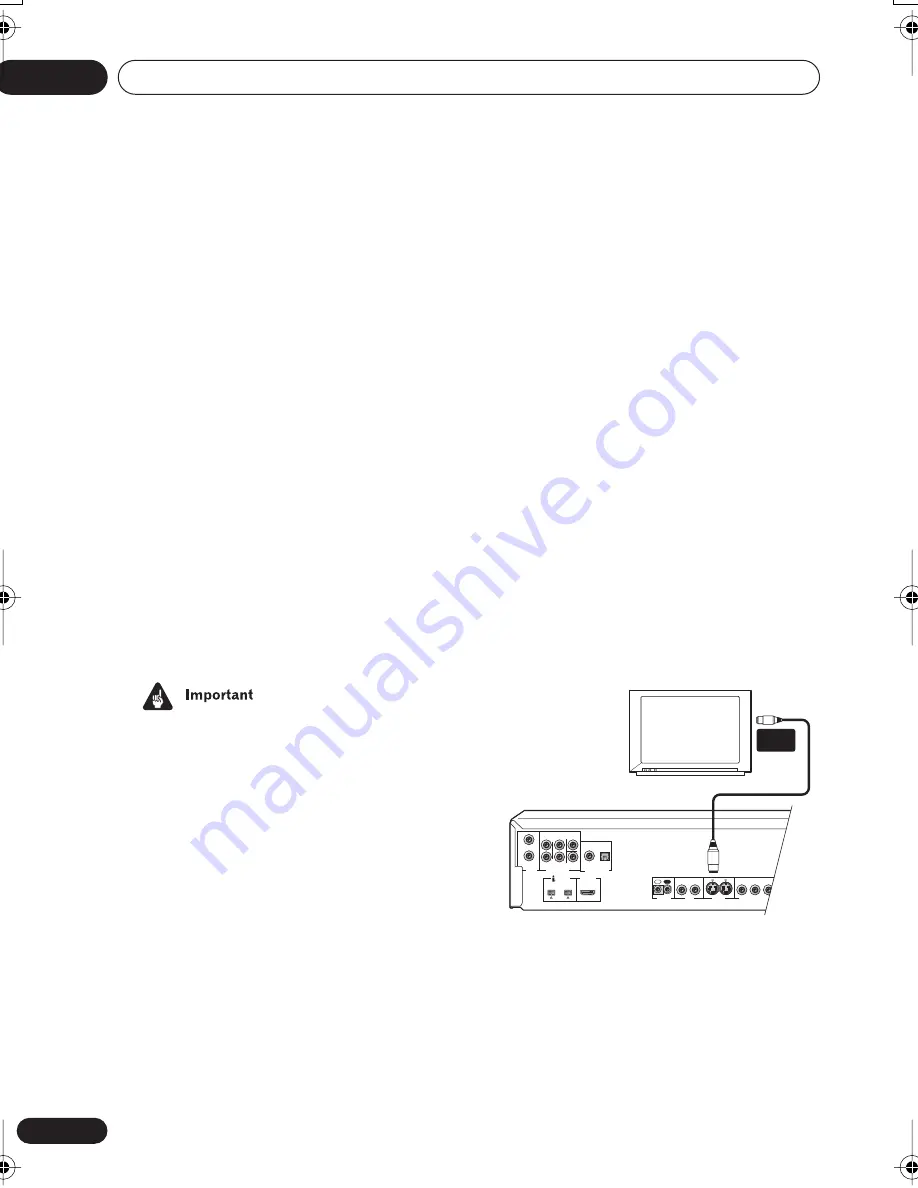
Connect the VIDEO OUT and AUDIO 

OUT (2ch) jacks to a set of A/V inputs on 
your TV.


Use the supplied red/white stereo audio and 
yellow video cable. Make sure you match up 
the left and right audio outputs with their 
corresponding inputs for correct stereo 
sound.

See 


Using other types of video output


 below if 

you want to use a different type of connection.

• If you need another pair of stereo outputs 

(and don’t need to use the multichannel 
analog outputs), you can use the 


AUDIO 

OUT (5.1ch) FRONT L / R


 jacks (page 15).


2

Connect the supplied AC power cord 

to the AC IN inlet, then plug into a power 
outlet.


• Do not unplug the player from the power 

outlet while it is switched on.

• Do not plug this player into a switched 

power supply found on some amplifiers 
and AV receivers.


Using other types of video 
output


This player has standard (composite), S-video, 
component video outputs and D video 
connector for component video 


(


Except 

Australian model


), as well as an HDMI 

connector (for digital video/audio).The main 
difference between them is the quality of the 
picture. 

S-video delivers a better picture than standard 
composite video, while component video 
gives better picture quality still. The variety of 
outputs also gives you the flexibility of 
connecting your particular equipment using 
the best connection type available.

HDMI provides highest quality digital video 
(and audio) using one simple digital connec-
tion, provided your monitor or display is also 
equipped with HDMI. See 


Connecting using 

HDMI


 on page 20 for more on this.


Connecting using an S-Video output


You can use the S-Video output instead of the 


VIDEO OUT


 jack to connect this player to 

your TV (or other equipment).


Use an S-Video cable (not supplied) to 

connect the S-VIDEO OUT to an S-Video 
input on your TV, monitor or AV receiver.


Line up the small triangle above the jack with 
the same mark on the plug before plugging 
in.

• If you connect both S-video jacks, but one 

of the connected components is not S1/
S2 compatible, the automatic aspect ratio 
switching will not work with either 
connected component.

AUDIO

OUT

(2ch)

AUDIO OUT

(5.1ch)

CONTROL

OPTICAL

COAXIAL

IN

R

L

L

R

CENTER

SUB

WOOFER

SURROUND

FRONT

S-VIDEO

OUT

VIDEO

OUT

COMPONENT  VIDEO OUT

P

B

P

R

Y

2

1

2

1

(AUDIO)

S400

DIGITAL AUDIO

OUT

HDMI OUT

OUT

TV

S-VIDEO

INPUT

DV-989AVi _YP.book Page 14 Thursday, August 11, 2005 3:28 PM

Содержание DV-989AVi-G

Страница 1: ...DVD Player DV 989AVi G Operating Instructions ...

Страница 2: ...r unit Location On the top of the player CLASS 1 LASER PRODUCT D3 4 2 1 8_A_En CAUTION The POWER switch on this unit will not completely shut off all power from the AC outlet Since the power cord serves as the main disconnect device for the unit you will need to unplug it from the AC outlet to shut down all power Therefore make sure the unit has been installed so that the power cord can be easily ...

Страница 3: ...idity 5 ºC 35 ºC 41 ºF 95 ºF less than 85 RH cooling vents not blocked Do not install this unit in a poorly ventilated area or in locations exposed to high humidity or direct sunlight or strong artificial light D3 4 2 1 7c_A_En For U S and Australia Model C67 7 3_En This product complies with the following i LINK interface specifications 1 IEEE Std 1394a 2000 Standard for a High Performance Serial...

Страница 4: ...ling this player from another Pioneer component 22 03 Controls and displays Front panel 23 About progressive scan video 24 Display 25 Remote control 26 04 Getting Started Setting the TV System 28 Watching NTSC on a PAL TV 28 Switching on 28 Let s Get Started 29 Using the on screen displays 30 Setting up with the Setup Navigator 31 Playing discs 34 Basic playback controls 34 DVD disc menus 35 Video...

Страница 5: ...D Playback Mode 67 SACD Playback 68 HDMI Settings 68 CD Playback 70 DTS Downmix 71 Speakers 71 Audio Output Mode 71 Speaker Installation 71 Speaker Distance 72 Channel Level 73 i LINK Setup 74 Audio Out 74 Connections Setup 74 Auto Select Play 75 DVD Audio Out 75 09 Additional information Taking care of your player and discs 76 Handling discs 76 Storing discs 76 Discs to avoid 76 Cleaning the pick...

Страница 6: ...nd DVD Audio discs Other advantages of using i LINK include smart features such as automatic configuration and automatic function selection start playback of a disc and the receiver automatically changes the input function to this player 4 Pure Audio listening The Pure Audio feature allows you to listen to analog audio sources with the video and digital outputs disabled and the front panel display...

Страница 7: ...patibility This player is compatible with CD R CD RW and CD ROM discs that contain MP3 audio tracks See also Compressed Audio Compatibility on page 10 Graphical on screen displays Setting up and using your DVD player is made very easy using the graphical on screen displays 1 HDMI the HDMI logo and High Definition Multimedia Interface are trademarks or registered trademarks of HDMI licensing LLC 2 ...

Страница 8: ...ifferent batteries may have different volt ages Make sure that the plus and minus ends of each battery match the indications in the battery compartment Remove batteries from equipment that isn t going to be used for a month or more When disposing of used batteries please comply with governmental regulations or environmental public instruction s rules that apply in your country or area H048 En Usin...

Страница 9: ...sed by a number of possibilities including but not limited to the type of disc used the type of recording damage dirt or condensation on either the disc or the player s pick up lens See below for notes about particular software and formats About DualDisc playback A DualDisc is a new two sided disc one side of which contains DVD content video audio etc while the other side contains non DVD content ...

Страница 10: ...session discs but only plays sessions that are closed Use CD R or CD RW media for recording your MP3 files This player can recognize a combined total of up to 250 tracks and folders If a disc containing over 250 tracks folders is loaded only the first 250 tracks folders recorded on the disc will be playable Folder and track names excluding the mp3 extension are displayed There are many different r...

Страница 11: ...rry a region mark on the case somewhere that indicates which region s of the world the disc is compatible with Your DVD player also has a region mark which you can find on the rear panel Discs from incompatible regions will not play in this player Discs marked ALL will play in any player The diagram below shows the various DVD regions of the world Title 1 Title 2 Title 3 Chapter 1 Chapter 2 Chapte...

Страница 12: ... 5 AUDIO i LINK connectors 4 pin S400 i LINK connectors for connection to i LINK equipped receivers and other components Each i LINK connector acts simultaneously as both input and output page 18 6 HDMI OUT HDMI output providing a high quality inter face for digital audio and video page 20 7 CONTROL IN OUT For passing remote control signals to other Pioneer components page 22 8 VIDEO OUT 1 2 Stand...

Страница 13: ...ou come across any unfamiliar terms in this section of the manual take a look at the Glossary on page 84 Easy connections The setup described here is a basic setup that allows you to play discs using just the cables supplied with the player In this setup stereo audio is played through your TV This player is equipped with copy protec tion technology Do not connect this player to your TV via a VCR u...

Страница 14: ...nector for digital video audio The main difference between them is the quality of the picture S video delivers a better picture than standard composite video while component video gives better picture quality still The variety of outputs also gives you the flexibility of connecting your particular equipment using the best connection type available HDMI provides highest quality digital video and au...

Страница 15: ...ect ratio switching will not work with any of the connected components Connecting for multichannel surround sound To enjoy multichannel surround sound from DVD Video DVD Audio and SACD discs we recommend connecting this player to an AV receiver using the 5 1 channel analog outputs or the i LINK connector The player also has optical and coaxial digital outputs should you want to use an external dec...

Страница 16: ...he S Video or component video connections if they re available or D video Except Australian model 3 Connect the AV receiver s video output to a video input on your TV You usually have to connect the same kind of video cable between your DVD player and AV receiver and between your AV receiver and TV Connecting using a digital audio output Connect the optical or coaxial digital outputs if you want t...

Страница 17: ...ONT L R jacks for the analog audio connection 3 Connect the VIDEO OUT jack on this player to a video input on your AV receiver Alternatively you can use the S Video or component video connections if they re available or D video Except Australian model 4 Connect the AV receiver s video output to a video input on your TV AUDIO OUT 2ch AUDIO OUT 5 1ch CONTROL OPTICAL COAXIAL IN R L L R CENTER SUB WOO...

Страница 18: ...ect i LINK cables or switch off any components connected using i LINK while this player is on Copy protected 96kHz DVD Video discs are downsampled to 48kHz when using the i LINK connection 1 Use the supplied i LINK cable to connect one of the i LINK connectors on this player to an i LINK connector on your AV receiver The arrow on the cable connector body should be face down for correct align ment ...

Страница 19: ...at the same time so only one cable is required to connect components for two way commu nication i LINK and the i LINK logo are trademarks of Sony Corporation Creating an i LINK network Using i LINK it is possible to chain up to 17 components together so that the digital audio and control signals from each component is available to other components in the network With the addition of an i LINK repe...

Страница 20: ...ns supplied with individual components Note that the audio may be momentarily inter rupted if a component in the i LINK network is switched on off or its i LINK connection is switched on off Connecting using HDMI If you have a HDMI or DVI with HDCP equipped monitor or display you can connect it to this player using a commercially available HDMI cable The HDMI connector outputs uncompressed digital...

Страница 21: ...omponent see HDMI Settings on page 68 to do this However the settings for each component are then stored in memory for up to 5 compo nents The HDMI connection is compatible with 2 channel linear PCM signals 44 1 to 192kHz 16 20 24 bit and Dolby Digital DTS and MPEG audio bitstream 5 1 channel signals up to 96kHz 16 20 24bit It is not possible to output SACD source from the HDMI connection About HD...

Страница 22: ...ts My TV only has one input for the sound What should I plug it into If you don t mind mono sound you can buy a stereo RCA to mono RCA cable from an electronics store Connect the stereo end to this player and the mono end to your TV If you want stereo sound connect this player to your amplifier or stereo system using a stereo audio cable I connected the DVD player to my AV receiver and although th...

Страница 23: ...he indicator lights in progressive scan mode See also Component Out on page 60 This player is compatible with both PAL and NTSC progressive scan formats However your TV must also be progressive scan compatible to take advantage of this feature 5 PURE AUDIO button indicator When the player is stopped press to switch off on the front panel display and disable the video and digital outputs Use this w...

Страница 24: ...atibility with DVD RW discs recorded on a DVD recorder in Video Recording mode About progressive scan video Compared to interlace video progressive scan video effectively doubles the scanning rate of the picture resulting in a very stable flicker free image Progressive scan video is available only from the component video output Use the PROGRESSIVE button on the front panel to switch the component...

Страница 25: ...aracter display is showing a DVD Audio group number 7 TITLE Indicates that the character display is showing a DVD Video title number 8 Lights when 2V TruSurround is active see Virtual Surround on page 52 9 TRK Indicates that the character display is showing a track number 10 CHP Indicates that the character display is showing a DVD chapter number 11 REMAIN Lights when the character display is show...

Страница 26: ...splay the Video Adjust menu see Video Adjust on page 55 8 Press to stop the disc you can resume playback by pressing play 9 Press to start or resume playback 10 Press to jump to the start of the previous next chapter track 11 PLAY MODE Press to display the Play Mode menu see page 42 page 47 You can also get to the Play Mode menu by pressing HOME MENU and selecting Play Mode 12 Number buttons 13 ME...

Страница 27: ...tor Lights when multi dial is in jog mode see Using the Multi Dial on page 41 20 JOG JOG MODE Press to put switch jog mode on off When on use the MULTI dial to advance or reverse frames see Using the Multi Dial on page 41 21 FL DIMMER Press to change the display brightness 22 Press to pause playback press again to restart 23 and and Use for reverse forward slow motion playback frame reverse advanc...

Страница 28: ...V you will only be able to see interlace video Progressive scan video is not compatible with the MOD PAL setting Watching NTSC on a PAL TV Most models of the newly developed count down PAL TV system detect 50 Hz PAL 60 Hz NTSC and automatically switch vertical amplitude resulting in a display without vertical shrinkage If your PAL TV does not have a V Hold control you may not be able to watch NTSC...

Страница 29: ... five minutes the screen saver starts See Screen Saver on page 64 for how to switch it on Let s Get Started When you switch on the player for the first time you should see a welcome screen displayed on your TV From here you can let the player know what kind of TV you have then either use the Setup Navigator to make more settings or jump right in and start playing some discs Before continuing make ...

Страница 30: ...highlighted item and pressing ENTER to select it Throughout this manual Select means use the joystick to highlight an item on screen then press ENTER Information at the bottom of every OSD screen explains the currently selected menu item and shows which buttons can be used for that screen Let s Get Started Menu What kind of TV do you have Use the cursor buttons to choose then press ENTER Wide scre...

Страница 31: ...Note that the language you choose here may not be available on all discs If you want to select a language other than those listed select Other Language See Selecting languages using the language code list on page 84 for detailed information 5 Is your TV monitor compatible with progressive scan video Select Compatible Not Compatible or Don t Know This setting is only applicable if you used the comp...

Страница 32: ...elected Not Connected in step 8 that completes the setup Press ENTER to leave the Setup Navigator Questions 12 through 15 are concerned with the digital decoding capabilities of your AV receiver Connected Not Connected AV Receiver Language Settings TV Functions Audio Out Settings Speaker Settings AV Receiver Func Setup Navigator Connected Not Connected AV Receiver 5 1ch Audio Out Language Settings...

Страница 33: ...ttings TV Functions Audio Out Settings Speaker Settings AV Receiver Func Setup Navigator Compatible Not Compatible Don t Know Dolby Digital DTS Language Settings TV Functions Audio Out Settings Speaker Settings AV Receiver Func Setup Navigator Compatible Not Compatible Don t Know Dolby Digital DTS 96kHz Linear PCM Language Settings TV Functions Audio Out Settings Speaker Settings AV Receiver Func ...

Страница 34: ... disc at a time 4 Press play to start playback If you re playing a DVD or Video CD Super VCD a menu may appear See DVD disc menus on page 35 and Video CD Super VCD PBC menus on page 36 for how to navigate these If you re playing an MP3 disc it may take a few seconds before playback starts depending on the complexity of the file struc ture on the disc Basic playback controls The table below shows t...

Страница 35: ...tails Sometimes menus are displayed automati cally when you start playback others only appear when you press MENU or TOP MENU Stops playback DVD Video and DVD RW and Video CD Press stop again to cancel the resume function The resume function is also cancelled when you eject the disc tray Press to start fast reverse scan ning Press play to resume normal playback Press to start fast forward scan nin...

Страница 36: ... the same as the top menu Joystick Moves the cursor around the screen ENTER Selects the current menu option RETURN Returns to the previously dis played menu screen On some DVD Audio discs featuring browsable pictures press to dis play the browser screen Numbers Highlights a numbered menu option some discs only Press ENTER to select or wait a few seconds E E SETUP TOP MENU MENU MULTI SPEED ENTER VI...

Страница 37: ... button to switch the video output back to interlace See also Front panel on page 23 I have a widescreen TV so why are there black bars at the top and bottom of the screen when I play some discs Some movie formats are such that even when played on a widescreen TV black bars are necessary at the top and bottom of the screen This is not a malfunction I have a standard 4 3 TV and set the player to sh...

Страница 38: ...ts Some DVD Audio discs do not output anything through the digital outputs and multichannel discs are downmixed to stereo for the optical and coaxial digital outputs In addition high sampling rate DVD Audio discs 96kHz or higher auto matically downsample audio output from the optical coaxial digital outputs Using the multichannel analog audio outputs or the i LINK connector for DVD Audio have none...

Страница 39: ... to play You can use the Disc Navigator when a disc is playing or stopped It s not possible to use the Disc Navigator when playing a Video CD Super VCD in PBC mode or when a DVD disc menu is displayed 1 Press HOME MENU and select Disc Navigator from the on screen display Alternatively if a DVD RW CD Video CD Super VCD or MP3 disc is loaded you can press MENU which takes you straight to the Disc Na...

Страница 40: ...back press or to start scanning 2 Press repeatedly to increase the scan ning speed MP3s can only be scanned at one speed The scanning speed is shown on screen 3 To resume normal playback press play Sound can be heard while scanning SACDs audio CDs and MP3 discs There is no sound while scanning DVDs and Video CD Super VCDs and no subti tles while scanning DVD Video Depending on the disc normal play...

Страница 41: ...re remains paused until you restart playback To resume normal playback press You can scan Video CD Super VCDs in the same way as DVD Video discs see above However reverse slow motion scanning is not possible and there are just two fast scanning speeds Playing in slow motion You can play DVD Videos DVD R RW and Video CD Super VCDs at four different forward slow motion speeds and DVD Videos DVD R RW...

Страница 42: ...isc The A B Repeat function allows you to specify two points A and B within a track DVD Audio CD and Video CD or title DVD Video and DVD RW that form a loop which is played over and over A B Repeat is not available with SACDs MP3s Super VCDs or Video CDs in PBC mode or while a DVD disc menu is being displayed 1 During playback press PLAY MODE and select A B Repeat from the list of functions on the...

Страница 43: ...f SACD CD and Video CD Super VCD discs Disc Repeat Track Repeat Repeat Off MP3 discs Disc Repeat Folder Repeat Track Repeat Repeat Off If you ve made a program list the Program Repeat option also appears as a repeat option To stop the disc and cancel repeat play press stop You can also cancel repeat play without stopping playback by pressing CLEAR The disc will play to the end then stop You can t ...

Страница 44: ...ndom play the and buttons function a little differently to normal returns to the beginning of the current track chapter You can t go back further than this selects another track chapter at random from those remaining You can t use random play together with program or repeat play Creating a program list This feature lets you program the play order of titles group chapters folders tracks on a disc P...

Страница 45: ...oup to the program list To add a group select the group To add a track first highlight the group then move the cursor right and select a track from the list Create Edit Playback Start Playback Stop Program Delete Program Memory Off A B Repeat Repeat Random Program Search Mode Play Mode Program Step 01 01 02 03 04 05 06 07 08 Title 1 38 Title 01 Title 02 Title 03 Title 04 Title 05 Title 06 Title 07...

Страница 46: ...m list After creating a program list you can add delete and change steps 1 Press PLAY MODE and select Program from the list of functions on the left 2 Select Create Edit from the list of program options 3 To clear a step highlight the step number and press CLEAR 4 To insert a step in the middle of the program list highlight the step where you want the new step to appear then select a title group c...

Страница 47: ...he disc loaded After saving a program list using the Program Memory feature whenever you load that disc the program list is auto matically recalled and program play switched on You can save program lists for up to 24 discs After that the oldest one is replaced with the new one saved Searching a disc Using the search mode function from the Play Mode menu you can quickly jump to a partic ular part o...

Страница 48: ...le languages are available You can switch subtitle language during play back 1 Press SUBTITLE repeatedly to select a subtitle option While the above display is showing you can also use the joystick up down and ENTER to select a subtitle language from a drop down menu Some discs only allow you to change subtitle language from the disc menu Press TOP MENU to access To set subtitle preferences see Su...

Страница 49: ... just the left channel or just the right channel of a CD MP3 Video CD Super VCD To change the audio channel of a CD it must be playing 1 Press AUDIO repeatedly to select an audio channel option Switching camera angles Some DVD discs feature scenes shot from two or more angles check the disc box for details When a multi angle scene is playing a icon appears on screen to let you know that other angl...

Страница 50: ...main 7 02 Total Tr Rate 6 0Mbps Chapter Pause DVD 8 0 06 15 2 36 Current Total Elapsed 1 40 Remain 1 46 Total Audio 1 Linear PCM Angle Subtitle 1 Track Play DVD Audio 3 3 20 1 14 Current Total Elapsed 2 41 Remain 6 01 Total 192kHz 24bit 2 0CH Tr Rate 9 5Mbps Group Play DVD 3 3 21 1 3 Current Total Elapsed 53 20 Remain 56 41 Total Audio Audio Dolby Digital 2 0CH 1 Subtitle Title Play DVD RW Origina...

Страница 51: ...d select Audio Settings from the on screen display 2 Highlight Audio DRC then use the Joystick left right to change to On or Off as required 3 Press ENTER to make the setting and exit the Audio Settings screen Audio DRC is only effective with Dolby Digital audio sources Audio DRC is only effective through the digital output when Digital Out is set to On and Dolby Digital Out see page 59 is set to ...

Страница 52: ...fective dynamic range of the front left right channels from 16 or 20 bit to 24 bit to reveal more detail in low level sounds 1 Press HOME MENU and select Audio Settings from the on screen display 2 Highlight Hi Bit then use the Joystick left right to change the setting to On or Off as required 3 Press ENTER to make the setting and exit the Audio Settings screen Virtual Surround Default setting Off...

Страница 53: ...t the level of each channel sent to the 5 1 channel analog outputs 1 Press HOME MENU and select Audio Settings from the on screen display 2 Highlight Channel Level then use the Joystick left right to change to Fix or Variable as required Fix Channel levels are fixed but you can set the speaker distances Variable You can specify variable channel levels as well as speaker distances 3 If you chose Va...

Страница 54: ...m the on screen display 2 Move the cursor down until you reach the Speaker Distance setting screen Use the joystick up down to select a speaker Use the joystick left right to adjust the distance from your listening position to that speaker Front left right L R speaker distances can be set from 30 cm to 9 m in 10 cm increments The center speaker C and subwoofer SW can be set from 2 m to 2 m relativ...

Страница 55: ...I output is connected the following options appear instead Direct The picture appears simply according to how the source was encoded Natural Edges are softer making this setting good for movies Enhanced Edges are sharper making this setting ideal for animation and mate rial with computer generated effects Memory1 3 Use for saving your own presets see below 3 Press ENTER to make the setting and exi...

Страница 56: ...lements in the picture Detail Adjusts the sharpness of edges in the picture White Level Adjusts the intensity of white Black Level Adjusts the intensity of black Black Setup Setup to correct the floating black color for better 3 dimen sional realism Gamma Adjusts the brightness of darker images Hue Adjusts the overall color balance between red and green Chroma Level Adjusts how saturated colors ap...

Страница 57: ... You can see whether video on a DVD disc is film or video material by displaying the video transmission rate see Displaying disc information on page 49 If a hash mark appears next to the transmis sion rate display it is film material ...

Страница 58: ...ay not correspond to those available in your country or region Digital Audio Out settings None of the Digital Audio Out settings affect the audio output from the i LINK interface For i LINK settings see i LINK Setup on page 74 Digital Out Default setting On You only need to make this setting if you connected this system to an AV receiver or other component using one of the digital outputs If at an...

Страница 59: ...his setting if you connected this player to an AV receiver or other component using one of the digital outputs If your AV receiver or other connected component is compatible with high sampling rates 96 kHz set this to Down Sample Off otherwise set it to Down Sample On 96 kHz audio is converted to a more compatible 48 kHz Check the manual that came with the other component if you re unsure whether ...

Страница 60: ...th black bars at the top and bottom of the screen Pan Scan chops the sides off wide screen material to make it fit the 4 3 screen so even though the image looks larger on the screen you re actually seeing less of the picture See also Screen sizes and disc formats on page 78 You can t change the video output setting when an HDMI component is connected Component Out Default setting Interlace You onl...

Страница 61: ... region Audio Language Default setting English This setting is your preferred audio language for DVD discs If the language you specify here is recorded on a disc the player auto matically plays the disc in that language The DVD format recognizes 136 different languages Select Other Language if you want to specify a language other than those listed See also Selecting languages using the language co...

Страница 62: ...e languages usually allow you to select the subtitle language from the disc menu Press TOP MENU to access the disc menu Auto Language Default setting On When set to On the player always selects the default audio language on a DVD Video disc French dialog for a French movie for example and displays subtitles in your preferred subtitle language only if that is set to something different In other wor...

Страница 63: ...s sets whether operation displays are shown on screen Play Resume Scan and so on Angle Indicator Default setting On If you prefer not to see the camera icon on screen during multi angle scenes on DVD discs change this setting to Off Digital Audio Out Video Output Language Display Options Speakers i LINK Setup Audio Language Subtitle Language Auto Language DVD Menu Lang Subtitle Display w Subtitle ...

Страница 64: ... the Parental Lock level or Country code whenever you like You can also change the password Not all discs that you may consider inap propriate for your children use the Parental Lock feature These discs will always play without requiring the pass word first If you forget your password you ll need to reset the player to its factory settings see Resetting the player on page 78 then register a new pa...

Страница 65: ...ptions Speakers i LINK Setup Parental Lock Register Code Number Initial Settings 1 2 3 4 Digital Audio Out Video Output Language Display Options Speakers i LINK Setup Parental Lock Bonus Group Auto Disc Menu Group Playback DVD Playback Mode SACD Playback HDMI Settings Password Change Level Change Country Code Initial Settings Digital Audio Out Video Output Language Display Options Speakers i LINK ...

Страница 66: ...c is reloaded Bonus Group Digital Audio Out Video Output Language Display Options Speakers i LINK Setup Parental Lock Level Change Initial Settings Password 1 2 3 4 5 6 7 8 off Digital Audio Out Video Output Language Display Options Speakers i LINK Setup Parental Lock Bonus Group Auto Disc Menu Group Playback DVD Playback Mode SACD Playback HDMI Settings Password Change Level Change Country Code I...

Страница 67: ... this mode Set to All if you want to play all the groups on a disc consecutively Even if the players is set to All but you select a group to play from the disc menu only that group will play If you stop play back all groups will play again when you restart playback DVD Playback Mode Default setting DVD Audio Some DVD Audio discs contain DVD Video content in addition to the DVD Audio Set to DVD Vid...

Страница 68: ...owing menu should be displayed With DVI compatible devices with HDCP the same screen is shown but with the audio setting grayed out there is no audio with DVI Use the joystick up down to select a setting Use the joystick left right to adjust the current setting After you ve finished press ENTER to confirm any settings you ve made and return to the Initial Settings menu You can adjust any or all of...

Страница 69: ...in Resolution above to the disc type you re using and the setting on your monitor See also Screen sizes and disc formats on page 78 4 3 Letter Box Widescreen discs are shown with black bars top and bottom 4 3 Pan Scan Widescreen discs are shown with the left and right sides cropped 16 9 Wide Use this setting if you have a widescreen monitor 16 9 Compressed Progressive scan 4 3 material is shown wi...

Страница 70: ...pressed multi channel formats you should set this to Linear PCM otherwise set to Auto Linear PCM All audio signals are output as linear PCM Auto Dolby Digital DTS and MPEG sources are processed according to how they were encoded and linear PCM sources are heard with no processing Even with Auto selected if the monitor or device you have connected using HDMI is not compatible with multi channel for...

Страница 71: ... When set to 5 1 Channel you ll only get sound from all speakers when playing multichannel discs When set to 5 1 Channel the AUDIO OUT 2ch jacks output the front L R channels of multichannel discs When set to 5 1 Channel there is no optical coaxial digital output when playing DVD Audio discs Some DVD Audio discs don t allow down mixing of audio These discs always output multi channel audio regardl...

Страница 72: ...s 3 m You only need to make this setting if you connected this player to your amplifier using the 5 1 channel analog outputs These settings do not affect any digital audio output To get the best surround sound from your system you should set up the speaker distances from your listening position 1 Use the Joystick to move the cursor up down to select a speaker The L and R speakers are paired you ca...

Страница 73: ...all channels sounds the same from your usual listening position Note that Audio Output Mode page 71 must be set to 5 1 Channel in order to use the test tone Automatic Select Auto to start the test tone output No sound will be heard from the subwoofer As the test tone plays through each speaker in turn it is highlighted on screen Use the Joystick up down to adjust the channel output level of the cu...

Страница 74: ...INK interface Components which are able to receive i LINK Audio are shown in black an i LINK receiver for example those which can t a DV camcorder for example are shown in gray If the player can t display the name of a component is shown if the name can t be determined Unknown is displayed Select the component that you want to set up the audio output formats for This screen shows the output settin...

Страница 75: ...er to this player Note that some AV receivers may not be compatible with this feature DVD Audio Out Default setting 5 1 Channel You only need to make this setting if you connected this player to other equipment using the i LINK interface Set this to 5 1 Channel to enjoy surround sound when playing multichannel discs To downmix a multichannel source when using the i LINK connection set to 2 Channel...

Страница 76: ...a cloth soaked in alcohol or a commercially available CD DVD cleaning kit to clean a disc more thoroughly Never use benzine thinner or other cleaning agents including products designed for cleaning vinyl records Storing discs Although CDs and DVD discs are more durable than vinyl records you should still take care to handle and store discs correctly When you re not using a disc return it to its ca...

Страница 77: ...res or humidity including near radia tors and other heat generating appliances Place on a window sill or other place where the player will be exposed to direct sunlight Use in an excessively dusty or damp envi ronment Place directly on top of an amplifier or other component in your stereo system that becomes hot in use Use near a television or monitor as you may experience interference especially ...

Страница 78: ... a widescreen TV these discs will still play in a letter box style with black bars at the top and bottom of the screen Standard TV users If you have a standard TV the TV Screen setting page 60 of this player should be set to 4 3 Letter Box or 4 3 Pan Scan depending on which you prefer Set to 4 3 Letter Box widescreen discs are shown with black bars top and bottom Set to 4 3 Pan Scan widescreen dis...

Страница 79: ...page 71 5 Discs that prohibit downmixing also mute the digital output 6 If the sound is mono the Left and Right channels will be the same Disc audio format Player setting 2 Ch Front L R Surround L R Center LFE Surround L R Center LFE Surround L R Center LFE Surround L R Center LFE Surround L R Center LFE 2ch downmix Front L R Front L R Left Right Left Right Left Right Left Right Left Right 6 Left ...

Страница 80: ... it is not possible to output CPPM copy controlled DVD Audio sources from the HDMI connection see HDMI output with DVD Audio sources below for more on this 4 It is not possible to listen to SACDs using the HDMI connection 5 Only applicable to discs that have a CD area Disc audio format HDMI Audio Setting Linear PCM Auto Dolby Digital 1 Dolby Digital Karaoke Linear PCM 1 DTS MPEG 1 DVD Audio withou...

Страница 81: ...put resolution is VGA 480i 576i 480p or 576p audio output may be limited to 2 channel depending to the connected component 4 If the Speakers Audio Output Mode page 71 is set to 2 channel multichannel sources will be downmixed to stereo In cases where the source is downmix prohibited only the front left right channels are output 5 If CPPM shows in the front panel display it means it is not possible...

Страница 82: ...ly applicable to discs that have a multichannel area 4 Only applicable to discs that have a CD area Disc audio format Connections Setup Bitstream 1 Bitstream PCM 2 SACD Playback 2 ch Area CD Area Multi ch Area DVD Audio Out 2 Channel 5 1 Channel Dolby Digital Dolby Digital Karaoke Linear PCM DTS MPEG DVD Audio Super Audio CD DTS CD CD MP3 Video CD DTS Left Right Left Right Left Right Left Right 4 ...

Страница 83: ...311 Malayalam ml 1312 Mongolian mn 1314 Moldavian mo 1315 Marathi mr 1318 Malay ms 1319 Maltese mt 1320 Burmese my 1325 Nauru na 1401 Nepali ne 1405 Norwegian no 1415 Occitan oc 1503 Oromo om 1513 Oriya or 1518 Panjabi pa 1601 Polish pl 1612 Pashto Pushto ps 1619 Portuguese pt 1620 Quechua qu 1721 Rhaeto Romance rm 1813 Kirundi rn 1814 Romanian ro 1815 Kinyarwanda rw 1823 Sanskrit sa 1901 Sindhi s...

Страница 84: ...e as wide as it is high Bonus Group DVD Audio only An extra group on some DVD Audio discs that requires a key number to access Browsable pictures DVD Audio only A feature of some DVD Audio discs in which the user can browse still pictures recorded on the disc as the audio is played See also Slide show Digital audio An indirect representation of sound by numbers During recording the sound is measur...

Страница 85: ... the next See also Progressive scan video ISO 9660 format International standard for the volume and file structure of CD ROM discs MP3 MP3 MPEG1 audio layer 3 is a compressed audio file format Files are recognized by their file extension mp3 or MP3 MPEG audio An audio format used on Video CD Super VCDs and some DVD discs This unit can convert MPEG audio to PCM format for wider compatibility with d...

Страница 86: ...mat includes aspect ratio information 4 3 or 16 9 within the video signal TVs which are compatible with S1 S video automatically switch aspect ratio according to the signal S2 S video output S2 is an enhanced version of S video which in addition to aspect ratio information contains letterbox pan scan information Wide screen TVs which are compatible with S2 S video automatically switch aspect ratio...

Страница 87: ...er If the region number on a DVD Video disc does not match the number on the player the disc cannot be used see DVD Video regions on page 11 Condensation inside the player Allow time for condensation to evaporate Avoid using the player near an air conditioning unit DVD Audio playback stops The disc may have been illegally copied Picture playback stops and the operation buttons cannot be used Press...

Страница 88: ...video output is set to progressive but your TV monitor is not compatible with progressive scan Press the PROGRESSIVE button on the front panel to set to interlace the indicator above the button should not be lit see About progressive scan video on page 24 Screen is stretched or aspect does not change The TV Screen setting in the Initial Settings menu is incorrect See TV Screen on page 60 for how t...

Страница 89: ...ceiver SACDs and some DVD Audio discs do not output digital audio Listen through the player s analog audio outputs Check that the PURE AUDIO indicator is not lit If it is press the PURE AUDIO button See also Front panel on page 23 Noticeable difference in DVD and CD volume This is due to differences in the audio format and is not a malfunction Cannot play multi channel audio Make sure that Audio O...

Страница 90: ...at the cable is properly connected Audio mix does not sound right or sounds incomplete for example inaudible dialog Make sure that Audio Output Mode is set to 2 Channel if you ve connected to the stereo inputs on your amplifier or TV see Audio Output Mode on page 71 Disc containing the MP3 tracks won t play This player is compatible with multi session discs but only plays sessions that are closed ...

Страница 91: ...e HDMI connection If the front panel HDMI indicator is unlit then Make sure that you ve selected this player as the HDMI input in the settings for the component you re using You may need to refer to the instruction manual of the component to do this Check that the HDMI cable is connected properly and that the cable isn t damaged Check that components connected using the HDMI interface are switched...

Страница 92: ...transfers may result Check that the PURE AUDIO indicator is not lit If it is press the PURE AUDIO button See also Front panel on page 23 Make sure the resolution on this player matches that of the component you have connected using HDMI See HDMI Settings on page 68 to change the HDMI resolution No multichannel HDMI audio Make sure the Audio setting in the HDMI menu is set to Auto see HDMI Settings...

Страница 93: ... the PURE AUDIO button See also Front panel on page 23 Auto Select Play doesn t work Make sure that the receiver has been selected in the Auto Select Play on page 75 Make sure that i LINK Audio Out is set to On see Audio Out on page 74 Auto Select Play doesn t work while LINK CHECK shows in the front panel display see i LINK related messages opposite i LINK audio is temporarily interrupted See i L...

Страница 94: ...PQLS feature works only when the player is connected to a single receiver PQLS OFF Displayed when the player receives a rate control off request from the receiver during playback The sound may be interrupted momentarily when this happens LOOP CONNECT The i LINK network cannot function because it is connected in a loop see Creating an i LINK network on page 19 BUS FULL The i LINK bus has reached it...

Страница 95: ... Ω Jack RCA jack Audio output 1 stereo pair Output level During audio output 200 mVrms 1 kHz 20 dB Number of channels 2 Jacks RCA jack Audio output multi channel L R C SW LS RS Output level During audio output 200 mVrms 1 kHz 20 dB Number of channels 6 Jacks RCA jack Audio characteristics Frequency response 4 Hz to 44 kHz DVD fs 96 kHz 4 Hz to 88 kHz DVD Audio fs 192 kHz S N ratio 118dB Dynamic ra...

Страница 96: ...laan 1 B 9120 Melsele Belgium TEL 03 570 05 11 PIONEER ELECTRONICS ASIACENTRE PTE LTD 253 Alexandra Road 04 01 Singapore 159936 TEL 65 6472 7555 PIONEER ELECTRONICS AUSTRALIA PTY LTD 178 184 Boundary Road Braeside Victoria 3195 Australia TEL 03 9586 6300 PIONEER ELECTRONICS DE MEXICO S A DE C V Blvd Manuel Avila Camacho 138 10 piso Col Lomas de Chapultepec Mexico D F 11000 TEL 55 9178 4270 K002_A_...

Отзывы: