


En
23
Advanced
Operation
FLANGER
A 1-cycle flanger effect is produced according to the beat fraction set
with the [
BEAT
c
,
d
] buttons.
Short delay
Cycle
Time
BEAT
c
,
d
buttons
(parameter 1)
Use these to set the
1/4
–
64/1
effect time with
respect to the time of one beat of the BPM.
SHIFT
+
BEAT
c
,
d
button
(parameter 2)
Sets the maximum value for the feedback amount.
LEVEL/DEPTH
control
(parameter 3)
The further the control is turned clockwise, the more
the effect is stressed.
When turned all the way counterclockwise, only the
original sound is output.
PHASER
The phaser effect changes according to the beat fraction set with the
[
BEAT
c
,
d
] buttons.
Cycle
Phase shift
Time
BEAT
c
,
d
buttons
(parameter 1)
Use these to set the cycle for moving the phaser
effect as of time of
1/4
–
64/1
with respect to the time
of one beat of the BPM.
SHIFT
+
BEAT
c
,
d
button
(parameter 2)
Sets the maximum value for the feedback amount.
LEVEL/DEPTH
control
(parameter 3)
The further the control is turned clockwise, the more
the effect is stressed.
When turned all the way counterclockwise, only the
original sound is output.
ROLL
The sound being input at the point when the [
ON/OFF
] is pressed is
recorded, and the recorded sound is output repeatedly according to the
beat fraction set with the [
BEAT
c
,
d
] buttons.
Effect turned on
Repeated
Original
1/1 roll
BEAT
c
,
d
buttons
(parameter 1)
Use these to set an effect time of
1/16
–
16/1
with
respect to the time of one beat of the BPM.
SHIFT
+
BEAT
c
,
d
button
(parameter 2)
Sets the ratio of the
ROLL
sound to be cut.
LEVEL/DEPTH
control
(parameter 3)
Use this to set the balance between the original
sound and
ROLL
.
BACK SPIN
The playback speed of the input sound changes according to the beat
fraction set with the [
BEAT
c
,
d
] buttons.
It produces the effect as if the fast reverse playback is performed with
the input sound.
Cycle
Time
Maximum speed for
reverse playback
Maximum speed
Stop
BEAT
c
,
d
buttons
(parameter 1)
Sets the cycle for changing the playback speed for the
input sound between
1/4
and
64/1
with respect to 1
beat of BPM time.
SHIFT
+
BEAT
c
,
d
button
(parameter 2)
Sets the BACK SPIN speed.
LEVEL/DEPTH
control
(parameter 3)
Sets the balance between the original sound and the
effect sound.
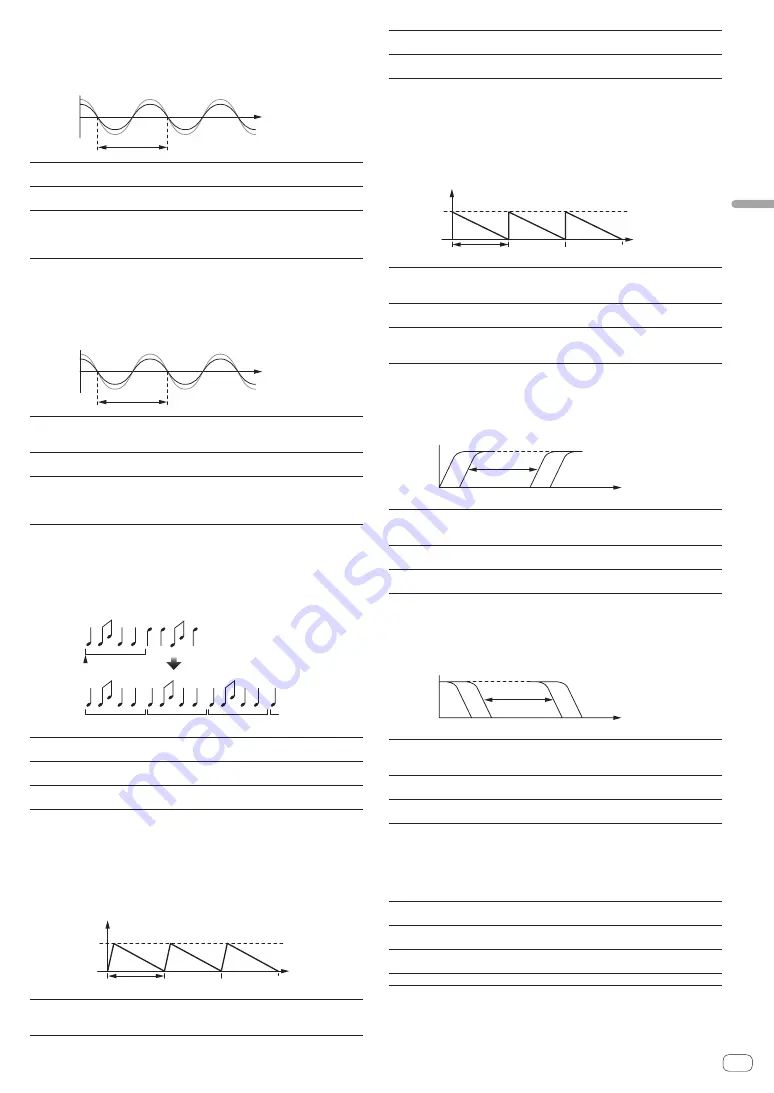
VINYL BRAKE
The playing speed of the input sound changes according to the beat
multiple set with the [
BEAT
c
,
d
] buttons.
The playback speed for the input sound slows down gradually and stops
eventually.
Cycle
Time
Playing speed
Single speed
Stop
BEAT
c
,
d
buttons
(parameter 1)
Sets the cycle at which the playing speed of the input
sound changes to
1/4
–
64/1
with respect to the time
of one beat of the BPM.
SHIFT
+
BEAT
c
,
d
button
(parameter 2)
Sets the VINYL BRAKE speed.
LEVEL/DEPTH
control
(parameter 3)
Sets the balance between the original sound and the
effect sound, as well as the amount of change in the
playing speed.
HP FILTER
The high-pass filter’s cut-off frequency changes according to the beat
fraction set with the [
BEAT
c
,
d
] buttons.
Frequency
BEAT
c
,
d
buttons
(parameter 1)
Sets the cycle for moving the cut-off frequency
between
1/4
and
64/1
with respect to 1 beat of BPM
time.
SHIFT
+
BEAT
c
,
d
button
(parameter 2)
Sets the maximum value for resonance.
LEVEL/DEPTH
control
(parameter 3)
The further the control is turned clockwise, the more
the effect is stressed.
LP FILTER
The low-pass filter’s cut-off frequency changes according to the beat
fraction set with the [
BEAT
c
,
d
] buttons.
Frequency
BEAT
c
,
d
buttons
(parameter 1)
Sets the cycle for moving the cut-off frequency
between
1/4
and
64/1
with respect to 1 beat of BPM
time.
SHIFT
+
BEAT
c
,
d
button
(parameter 2)
Sets the maximum value for resonance.
LEVEL/DEPTH
control
(parameter 3)
The further the control is turned clockwise, the more
the effect is stressed.
FADER SYNTH (SINE/SAW/SQUARE)
The SYNTH sound is output as the audio source of the base oscillation
frequency set with the [
BEAT
c
,
d
] buttons.
BEAT
c
,
d
buttons
(parameter 1)
Sets the base oscillation frequency in seven levels
between
–3
and
+3
.
SHIFT
+
BEAT
c
,
d
button
(parameter 2)
Sets the echo volume applied to the effect sound.
LEVEL/DEPTH
control
(parameter 3)
Sets the volume of the effect sound.
Channel fader (parameter 4) Changes the sound in a stepwise manner.
1
The effect sound cannot be monitored.


