background image

44

Finding Your Destination by Selecting the Type of Facility

Information about various facilities (Points Of Interest - POI), such as petrol stations, amuse-
ment parks or restaurants is available. By selecting the category, you can search for a Point Of 
Interest.

Searching for Points of Interest (POI)

1

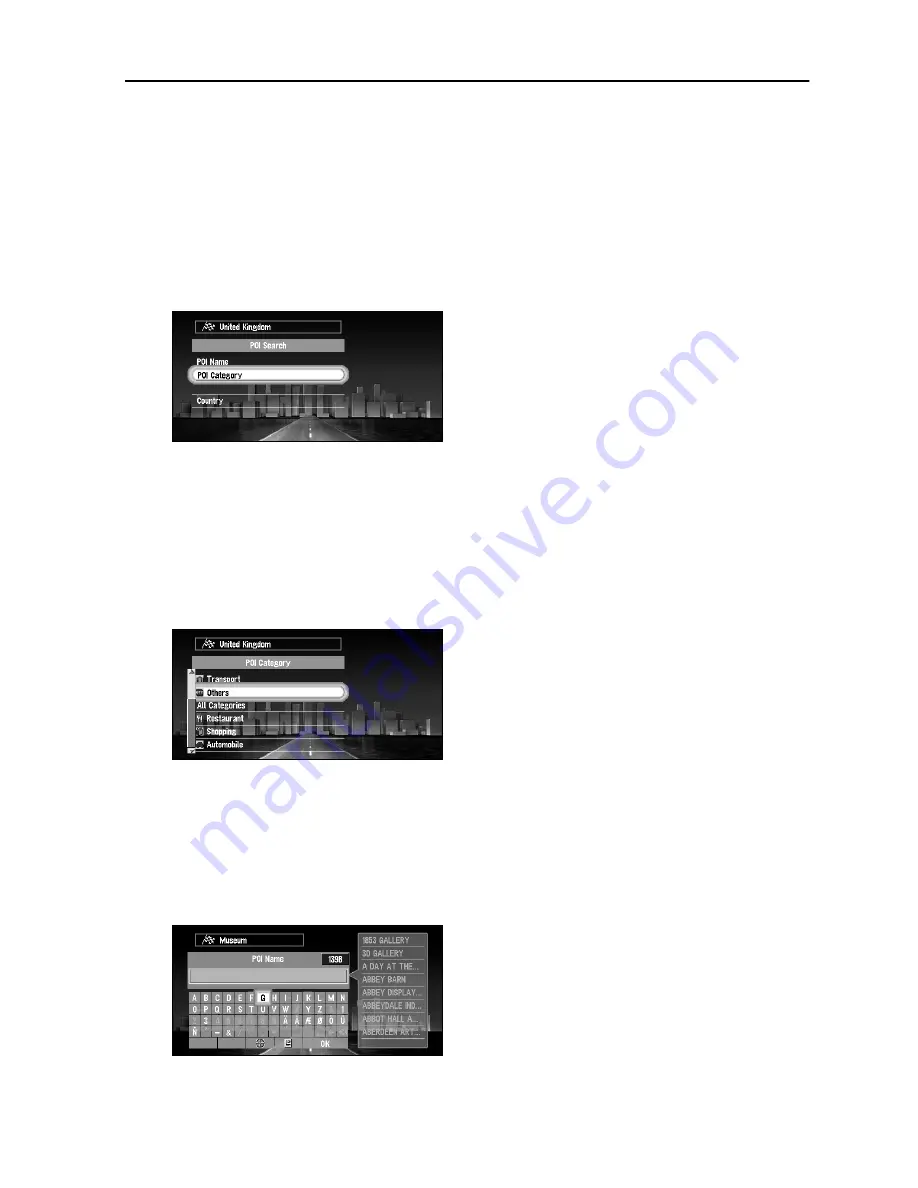
Select “New Destination” on the Main menu, and then select “POI search”. Click the 
OK button.

The display for selecting a search method appears.

2

Select “POI Category” and click the OK button.

If you already know the name of the facility, select “POI Name” and click the OK button, 
then proceed to Step 5.

If necessary, change the country setting. For the details, see “Selecting the country 
where you want to search”.

3

Select the category and click the OK button.

POI are divided into several categories. Select one and click the OK button to proceed to 
the next step. 

A list of more detailed subcategories appears if you click the OK button.
If the category is not sub-divided into more detailed categories, the list will not be dis-
played. Proceed to Step 5.

4

Select the subcategory and click the OK button.

The display for entering the name of the POI appears.

5

Enter the name of POI and select “OK”. Click the OK button.

Содержание AVIC-8DVD-II

Страница 1: ...AVIC 9DVD AVIC 8DVD The application program of the AVIC 9DVD or AVIC 8DVD are updated by using the CNDV 20 update disc Please read the cautions on the next page before updating There s a slight chance that stored user registered data will be lost upon completion of the update Please be aware that the manufacturer cannot take any responsibility for lost data n the event data is lost ...

Страница 2: ......

Страница 3: ...ted documentation solely for your own personal use or for internal use by your business only on such Pioneer products You shall not copy reverse engineer translate port modify or make derivative works of the Software You shall not loan rent disclose publish sell assign lease sublicense market or otherwise transfer the Software or use it in any manner not expressly authorized by this agreement You ...

Страница 4: ...SES OF ACTION IN THE AGGREGATE INCLUD ING WITHOUT LIMITATION BREACH OF CONTRACT BREACH OF WARRANTY NEGLIGENCE STRICT LIABILITY MISREPRESENTATION AND OTHER TORTS IF PIONEER S WARRANTY DISCLAIMER OR LIMITATION OF LIABILITY SET FORTH IN THIS AGREEMENT SHALL OR FOR ANY REASON WHATSOEVER BE HELD UNENFORCEABLE OR INAPPLICABLE YOU AGREE THAT PIONEER S LIABILITY SHALL NOT EXCEED FIFTY PERCENT 50 OF THE PR...

Страница 5: ...u regarding its subject matter No change in this Agreement shall be effective unless agreed to in writing by Pioneer If any pro vision of this Agreement is declared invalid or unenforceable the remaining provisions of this Agreement shall remain in full force and effect ...

Страница 6: ...eliability fitness for a particular purpose usefulness use or results to be obtained from the NAVTECH Data Disclaimer of Warranty NAVTECH AND ITS LICENSORS INCLUDING THEIR LICEN SORS AND SUPPLIERS DISCLAIM ANY WARRANTIES EXPRESS OR IMPLIED OF QUALITY PERFORMANCE MERCHANTABILITY FITNESS FOR A PARTICULAR PURPOSE OR NON INFRINGEMENT Some States Territories and Countries do not allow certain warranty ...

Страница 7: ...nd its licensors including their respective licensors suppliers assignees subsidiaries affiliated companies and the respective officers directors employees shareholders agents and representatives of each of them free and harmless from and against any liability loss injury including injuries result ing in death demand action cost expense or claim of any kind or character including but not limited t...

Страница 8: ... adapt translate disassemble decompile or reverse engineer any portion of the OS Code Point data LIMITATION OF LIABILITY Ordnance Survey does not warrant or represent that any of the Code Point data is accurate error free or suitable for your purposes In no event shall OS or the supplier of the Navigation System using the OS Code Point data be liable for any consequential special incidental or ind...

Страница 9: ... 9DVD and AVIC 8DVD 18 About the difference in the operation of the Remote Control AVIC 9DVD 18 About the difference in the operation of the Remote Control AVIC 8DVD 19 Installing the Program 20 Chapter 1 Basic Operation 23 Switching On and Off 23 Types of Menu 24 Main menu 24 Shortcut menu 25 Basic Navigation 26 Operate navigation by indicating menu 27 How to use the text palette 29 When the rout...

Страница 10: ...xit of a Motorway as Your Destination 47 Checking the Set Route 48 Checking the set route with the map 48 Checking the set route with text 49 Checking the set route from the Information menu 49 Chapter 3 Guidance to Your Destination 51 Route Guidance by Your Navigation System 51 Route guidance by display and voice 51 Confirming Traffic Information Ahead on the Set Route 53 Avoiding traffic ahead o...

Страница 11: ...n relevant to the current route 73 Selecting the radio station 75 Using a PC Card 77 Initialising a PC card 77 Storing the data of registered locations in the PC card 77 Loading data from a PC card 78 Deleting PC card data 79 Recording the Driving Information 80 Changing Background Picture 82 Select a picture stored in PC Card 82 Changing background picture stored on a disc AV Background only 84 C...

Страница 12: ...ing the RDS TUNER MENU 111 Selecting alternative frequencies 111 Receiving traffic announcements 112 Using PTY functions 113 Using radio text 114 PTY list 115 COMPACT DISC AVH P6400CD only 116 How to listen to a CD 116 Displaying the COMPACT DISC MENU 117 Repeating play 117 Playing tracks in a random order 117 Scanning tracks of a CD 118 Playing back from the track list 118 Pausing CD playback 118...

Страница 13: ...broadcast stations 135 Recalling broadcast stations 135 Changing a band 135 Selecting the country group 135 DVD 136 How to watch DVD 136 Displaying the DVD MENU 137 Information indications are displayed 137 Disc Playback 137 Chapter and Track Advance Return 138 Returning to the Previous Chapter Track 138 Specifying Title Chapter Track Direct Search 138 Disc Fast Forward Reverse 138 Stopping Playba...

Страница 14: ...er controller 152 Switching the Muting Attenuation 152 Other Functions 153 Displaying the SETUP MENU 153 Selecting the video 153 Setting the automatic open mode 154 Switching the image of rear display 154 Chapter 7 Operating Your Navigation System with Voice 155 Basics of Voice Operation 155 Flow of voice operation 155 Operating by only voice when the Navigation System is started 156 Available voi...

Страница 15: ...ors 166 Troubleshooting 167 Messages and how to react to them 170 Route Setting Information 173 Route search specifications 173 Route highlighting 174 Junction enlargement 174 Tracking 174 About traffic information 174 Copyright 175 DVD Operation Reference Table For SDV P7 XDV P9 XDV P9 176 For CD playback 176 For DVD playback 176 Glossary 177 Display Information 179 ...

Страница 16: ...nditions or traffic restrictions Traffic restrictions and advisories currently in force should always take precedence over guidance given by this product Always obey current traffic restrictions even if this product provides contrary advice Failure to input correct information about the local time may result in the product provid ing improper routing and guidance instructions Never set the volume ...

Страница 17: ...g you when driving after dark or in dull conditions the map background changes automatically to a darker colour when you switch on your vehicle lights You can however turn off this automatic switching see Day Night Map Display on page 92 The examples in this manual are illustrated using the daytime display When driving at night the colours you see may differ from those shown To use this function t...

Страница 18: ...irmed on a map using RDS TMC road traffic information In addition should a traffic jam occur along the route being taken under guidance a new route guidance avoiding this traffic jam is possible Display of various guidance screens Integration between navigation and audio has been implemented Pioneer s audio equipment can be used with the navigation screen by addition of the AVH P6400CD or AVH P640...

Страница 19: ...pter to learn how to interpret the guidance given by your Navigation System 4 Utilising Various Information This chapter provides information about the various information available Read it to learn more about the useful features available to you 5 Customising Your Navigation System The behaviour of your Navigation System depends on a number of settings If you need to change any of the initial set...

Страница 20: ...g to Dipswitch settings for AVIC 9DVD and AVIC 8DVD and About the differ ence in the operation of the Remote Control below Dipswitch settings for AVIC 9DVD and AVIC 8DVD Set the dipswitches as following About the difference in the operation of the Remote Control AVIC 9DVD If the Remote Control included with AVIC 9DVD is used there will be the following changes in operation Using PGM Function You c...

Страница 21: ...s the Display button CANCEL ROUTE button while the Operation mode switch is set to DVD The display switches over as you press the button About the difference in the operation of the Remote Control AVIC 8DVD If the Remote Control included with AVIC 8DVD is used there will be the following changes in operation Using PGM Function You can use the PGM Function Starting voice operation Press the joystic...

Страница 22: ...ke is on 2 Insert the disc to the main unit of the Navigation System If updating the version from AVIC 9DVD or AVIC 8DVD the installation of the updated program will start immediately Caution Once the installation of the program starts do not stop the engine of your vehicle and switch off the Navigation System until the installation is completed and the map of your surroundings appears 3 Select Ye...

Страница 23: ...ighlight the language you want 5 Click the OK button Installation of the program in the language you chose begins During the installation the following display appears to show the progress When the installation is complete the opening display appears 6 Check the details of the cautionary message and click the OK button ...

Страница 24: ...mmer time Summer time is off by default Off is shown on the right hand side of Summer Time If summer time is in effect move the joystick to select Off and click the OK button When the list of selectable options On and Off appears move the joystick to select On and click the OK button The summer time setting is then turned On 9 Select Done and click the OK button The map of your surroundings appear...

Страница 25: ...t to On you can also say OK into the microphone and display the map of your surroundings For details of driving history see Recording the Driving Information on page 80 When the password is set After your Navigation System starts and the cautionary message appears you are asked to enter the password Enter your password and select OK and click the OK button You can not enter your password using num...

Страница 26: ...dress Book Past destinations way points and the list of the registered locations are shown If you select your destination from this menu your route is calculated see Chapters 2 and 4 Return Home Set your home as your destination and your route is calculated see Chapter 2 Go to Set your favourite location such as your workplace as your destination and your route is calculated see Chapter 2 Settings...

Страница 27: ... picked up Registration Registering the location pointed by cross pointer to Address Book see Chapter 4 Vicinity Search You select a location with cross pointer and POIs Points Of Interest nearby are found Vicinity Search in the Shortcut menu searches the area around the cross pointer On the other hand in the case of Vicinity Search in the search method selection menu dis played when selecting New...

Страница 28: ... operation 1 Press the MENU button and display the Main menu See Operate navigation by indicating menu on page 27 2 Select New Destination from the Main menu 3 Select the method of searching for your destination See Chapter 2 4 Enter the information about your destination See How to use the text palette on page 29 5 Your Navigation System sets the route to your destination and the map of your surr...

Страница 29: ... that this item is being selected On the right hand side of the display a small list appears This shows that the item currently being selected is further divided into sub menus Move the joystick up or down while the menu is indicated As you move the joystick the item being highlighted also changes When the item you want is highlighted click the OK button If the selected item is sub divided into mo...

Страница 30: ...tion you selected from the list appears Here the information of the selected location is displayed by letters at the bottom of the screen If you click the OK button with this display the Shortcut menu appears see Shortcut menu on page 25 and you can select the location displayed as your destination or look at the detailed information If the arrow is indicated on the right side of the item If the l...

Страница 31: ...Space You can enter a space 4 Delete backward Deletes the previous character 5 All delete All the letters entered are deleted When the DELETE button of the Remote Control is pressed for more than two seconds all the letters entered can be deleted as well 6 Function button If you highlight each of these buttons the functions assigned to that button appear in a popup display 7 Number of matching can...

Страница 32: ... the Navigation System When you are new to using the Navigation System it may take you a little time to work out what to do next After a few seconds of inactivity a help message may appear which tells you what you can do on the screen The message disappears when you move the joystick When you are using your Navigation System with voice operation examples of the commands you can say appear on the s...

Страница 33: ...types of map display You can switch the indication method of the map by clicking the OK button Map Mode Driver s View Arrow Mode during route guidance only Mixed Mode during route guidance only When Close up of Junction see Close up of Junction on page 91 is set ON an enlarged map showing the area around a junction appears as you approach the junction Caution In Driver s view the speedometer is in...

Страница 34: ...Mode The map of your surroundings is shown on the left and an arrow showing the direction of travel is shown on the right Enlarged map of the intersection When Close up of Junction in the Settings Menu is on an enlarged map of the junction appears 6 1 2 4 9 10 12 5 8 7 3 14 Normal condition 13 4 12 10 11 14 When approaching an intersection When Close up of Junction is off 3 4 5 10 1 9 8 7 2 6 14 1...

Страница 35: ...rival or travel time to your destination 11 Tracking mark The tracking mark shows the route your vehicle has travelled 12 Map of your surroundings 13 Distance to an intersection It is displayed in Arrow Mode and Mixed Mode The green bar gets shorter as your vehicle approaches an intersection 14 Next traveling direction 15 Area to Avoid This is indicated only when Display Area to Avoid is set to On...

Страница 36: ...emote Control up and down left and right or diagonally If you move the joystick towards the location you want to see the map moves accordingly If you press down the joystick while moving the map you can move the map more quickly At this time the cross pointer appears at the centre of the screen Also a line connecting between the current location and cross pointer appears 1 Scroll location The posi...

Страница 37: ...e several items of information In this case if you turn the scale control up or down other information appears There may be no information for that location Types of information Information of the street Name of the registered location Information of the Points Of Interest POI displayed on the map see Displaying Certain Points Of Interest on the Map on page 59 RDS TMC traffic information see Using...

Страница 38: ...stination Then click the OK button The Shortcut menu appears 3 Select Destination and click the OK button Some information on the streets around the cross pointer or the area of the house number is picked up then information about the specified place appears on the display If you display the Shortcut menu select Destination and click the OK button to pro ceed to Step 4 4 Switch between multiple it...

Страница 39: ...nd Cancelling the Route Guidance on page 56 During the search of your destination if you click the joystick to the left while the triangle mark is displayed on the left hand side of the list you can check the location being selected on the map Some information on traffic regulations by days or time is indicated according to the time when the route calculation is performed Thus it may not correspon...

Страница 40: ...and click the OK button When you are returned to the previous display proceed to the searching operation Perform the route calculation of the several route options and select one You can get route calculations of several route options By confirming route options on the screen you can select your favourite route After route options are calculated select the one you want 1 Change the setting of Rout...

Страница 41: ... you start driving the route guidance begins If the above operations are not done within 30 seconds after the route calculation is completed and you have started your vehicle the route selected at the time is automat ically chosen It may take some time until detailed information of the route can be checked after a route calculation About the route condition When the calculation of only one route i...

Страница 42: ... change the registered information later When your favourite location is not registered Go to is displayed on menu Once you register the location it changes to favourite location name Selecting your Destination from the Address Book Destinations and way points you have searched before or registered locations are stored in the Address Book By simply selecting your destination from the Address Book ...

Страница 43: ... Search Click the OK button 2 Enter the street name For example for West Higgins Road you can just enter the part of the name such as Higgins If there are several streets with the same name a screen will appear to enter the name of the city or settlement where the specified street passes through When there are no other streets with the same name proceed to Step 6 You can select following item If n...

Страница 44: ...of city or settlement where your destination is located After entering the name of city or settlement select the name of city or settlement you want from the list The previous display appears again You can select the following items If necessary change the country setting For the details see Selecting the country where you want to search on page 38 After specifying the name of city or settlement y...

Страница 45: ...e you want to set as your destination and click the OK button to start the route calculation 7 Click the OK button Route calculation starts Quick Route Cal Calculation The route is calculated with the well known point mostly it is the middle point of the street selected previously as your destination Cross Point You enter the name of the second street and search for the surround ing area of its in...

Страница 46: ...now the name of the facility select POI Name and click the OK button then proceed to Step 5 If necessary change the country setting For the details see Selecting the country where you want to search 3 Select the category and click the OK button POI are divided into several categories Select one and click the OK button to proceed to the next step A list of more detailed subcategories appears if you...

Страница 47: ...o visit during a journey 1 Select New Destination from the Main menu and then select Vicinity Search Click the OK button The list of Points Of Interest categories appears 2 Select the category and click the OK button If you want to search with more detailed categories move the joystick to the left The list of subcategories appears Select the subcategory you want and click the OK button 3 Select PO...

Страница 48: ...re sponding to the selected post code appears If you move the joystick to the left the map of the area corresponding to the selected post code appears 4 Search your destination following the instructions from the Step 2 of Searching for your Destination by Address on page 41 If a city which is set as your destination is located in areas outside the map displayed when selecting a post code or so ma...

Страница 49: ...country setting For the details see Selecting the country where you want to search on page 38 2 Enter the name of the motorway and select OK Then click the OK button The list of the motorways matching the name appears 3 Select the motorway and click the OK button The display for selecting your destination to the entrance or to the exit of the motorway appears 4 Choose Entrance or Exit and click th...

Страница 50: ... point to start scrolling and click the OK button You can select the following items Place of departure Way point If this is set Way points already passed cannot be selected Destination 4 Move the joystick up or down to scroll the map Change the scale of the map as necessary If you move the joystick upward you can scroll the map forward while moving it down scrolls the map backward If you press do...

Страница 51: ... a long distance route is calculated your Navigation System may not be able to list all the roads In this case the remaining roads will be shown in the list as you drive on Checking the set route from the Information menu You can also check the information about the set route from the Information menu 1 Select Information from the Main menu then Route Information Click the OK button The screen to ...

Страница 52: ...50 ...

Страница 53: ...ng adjusted to the speed of your vehicle Distance to the next turning point Travelling direction Road number of the motorway Way point Your destination If you did not hear the voice guidance properly press the GUIDE button on the Remote Control to listen to it again Display during the route guidance There are four types of displays available during the route guidance Map Mode Driver s View Arrow M...

Страница 54: ...vigation System automatically switches to Map Mode If you stop during the route guidance If you stop at a petrol station or a restaurant during the route guidance your Navigation Sys tem remembers your destination and route information When you start your car engine again the route guidance resumes from your current location If you parked off the set route the route guidance resumes when you retur...

Страница 55: ... Modifying the Default Settings on page 89 If the route avoiding the traffic jam is not found The message notifying it appears On this display you can select the following items If you do nothing and continue driving after the message informing you that the route can not avoid the traffic jam is displayed the message disappears and returns to the map screen while a route guidance is continued New ...

Страница 56: ... If it has not been possible to determine a route to avoid a traffic jam a map of the area around the traffic jam appears for a certain time and then the display returns to a map screen If there is no traffic jam information on the route If there is no traffic jam information the message informing that there is no traffic jam infor mation on the route is indicated If receiving traffic jam informat...

Страница 57: ...ton On this display you can select the following items Route calculation starts if you click the OK button Distance of detour can be selected from 1 2 5 10 20 50kilometres 1 3 5 10 30 50miles For details of switching the display between km and mi miles see KM Mile Setting on page 91 Based on the traffic information received from RDS TMC stations you can set the route cal culation for avoiding the ...

Страница 58: ...his screen you can also select the following items Changing your destination If you want to change your destination during the route guidance search the new destination and set the route 1 From Main menu select New Destination and click the OK button 2 Search for the new destination When the location search is completed a message appears asking whether the location is your destination or a way poi...

Страница 59: ...s asking whether you want to set this loca tion as your destination or as a way point 2 Select Way point and click the OK button A list giving your currently set destination and its way points appears 3 Confirm the contents of the list and select Done Click the OK button Route calculation with the specified location as a way point starts if you click the OK but ton On this display you can select t...

Страница 60: ...t can be deleted from the list of way points and the route can be recalculated 1 Press the CANCEL ROUTE button on the Remote Control A message asking whether you want to cancel the route appears 2 Select Yes one and click the OK button The list of way points currently set appears 3 Select the way point you want to delete and click the OK button 4 Select Delete and click the OK button You can selec...

Страница 61: ...tegory you want to show on the map and click the OK button a check mark appears on the right hand side of the selected sub category Select OK and click the OK button to return to the list of POI category 3 When you have finished selecting categories select OK and click the OK button POIs in the selected category appear on the map If you want to set a POI as your destination point to the location w...

Страница 62: ...60 ...

Страница 63: ...or way points are automatically memorised and stored in the Address Book as Destination History When the number of locations exceeds 298 the oldest location is overwritten automatically Therefore to ensure that a particular location is kept in the Address Book you must register it manually as one of your Registered Locations Information edited as described in Editing a location s information below...

Страница 64: ...you set are registered and the Address Book menu appears On the map a pin mark appears at the registered location You can change this mark On this display you can select following options In the Address Book you can register up to 298 locations except your home and your favourite location When you change the name a mark is shown on the left side of the location name dis played in the Address Book ...

Страница 65: ...tory it is registered in Address Book as a Registered Location To edit the information about the location 1 Select Address Book in the Main menu and click the OK button The Address Book menu appears 2 Select the location to edit the information and move the joystick to the left 3 Select Information Edit and click the OK button Click the OK button and the Address Information menu appears Refer to t...

Страница 66: ... click the OK button 2 Select the Pictograph select Done and click the OK button The Address Information menu appears You cannot change the mark of your home or of your favourite location Selecting sound 1 Select Select Sound and click the OK button 2 After selecting the sound click the OK button After the selected sound is played a message asks whether you want to set it 3 Select Yes and click th...

Страница 67: ...Book Entries by mistake Confirming the location contained in the Address Book on the map You can select a location in the Address Book and display its surroundings on the map 1 Select the location to edit in the Address Book menu and move the joystick to the left 2 Select View Map and click the OK button The map of the selected area and its surroundings appears Delete This Item Delete the location...

Страница 68: ...on select Return Home and click the OK button 2 Search for a location and display a map The search method is the same as that for your destination see Chapter 2 If you select Map Search you can specify the location to register by showing a map You can also register the items included in the Address Book 3 Point the cross pointer to the location you want to register and click the OK button A messag...

Страница 69: ...pears and a voice message confirming the pronunciation is played 7 If the pronunciation is correct select Yes and click the OK button A specific place is registered as your favourite location and the Others menu appears Switch to Main menu an item Go to is changed to the item favourite location name Afterwards you can set a route by selecting this item and clicking the OK button During voice opera...

Страница 70: ...ge a registered location appears To change your home location select Return Home and click the OK button 2 Select Change and click the OK button A display for selecting the search method appears See Registering a location above for the next steps Alternative option Delete Select Delete to delete your favourite home location A message asking you to confirm the deletion appears and then select Yes a...

Страница 71: ...ur password at first enter the password that is currently set You cannot enter using the numeric keypad When the display for entering your password appears again enter the new password Once Auto Voice Recognition in the Settings menu is turned ON the Navigation System will be ready to perform voice recognition when booted next time and all the operations including entering password and route calcu...

Страница 72: ... Area number in range 1 to 5 A message to specify a search method for a location appears When Display Areas to Avoid is set to On if you perform the above operation the message confirming whether to recalculate the current route is displayed Select Yes and click the OK button then proceed to the next step 3 Search for a location for registration and display a map The search method is the same as t...

Страница 73: ... is set only when Display Areas to Avoid is set to On the map of your sur roundings appears If you want to register another Area to Avoid repeat Steps 2 to 6 If you want to stop registration push the BACK button The previous menu appears Depending on the setting of route search conditions you may not be able to avoid the specified areas In that case the message Your journey cannot avoid the specif...

Страница 74: ...e is displayed Select Yes click the OK button and proceed to the next step 3 Select the desired operation and click the OK button On this display you can select the following options Rename Changing a name After entering a new name select OK and click the OK button the Route Guidance menu appears Change A specified area can be changed For the next steps see Step 2 onwards in the Registering an Are...

Страница 75: ...button The list of received traffic information is shown By pressing the GUIDE button on the Remote Control for more than two seconds you can check the traffic information of your route For details see When confirming traffic information manually on page 54 You can also call up the traffic information list by voice For details see Chapter 7 2 Select the information you want to see from the list Th...

Страница 76: ...ncy currently being received and elapsed time since the last reception within 5 minutes green between 5 and 20 min utes red 20 minutes or more not displayed 2 Icon to indicate the presence of traffic information appears only when the scale on the map is 20 km or lower 3 A line to indicate the area of traffic jam displayed only when the scale on the map is 1 km or lower Congestion orange Traffic ja...

Страница 77: ...tion 1 Select Information in the Main menu then select RDS TMC and Manual Station Search Click the OK button 2 Select Next and click the OK button Available radio stations can be searched automatically If a radio station with a good reception is found the tuning mode is stopped and the tuned station name frequency is displayed Alternative option If you want to continue to search for another statio...

Страница 78: ...st select one to be overwritten by the details of the newly selected radio station When you click the OK button a mes sage confirming that you want to overwrite the data appears Select Yes and click the OK button to overwrite the unwanted station Selecting from pre registered radio stations You can pre select up to five radio stations Preset Station From the list of the radio stations you can sele...

Страница 79: ...ick the OK button Once initialisation is complete a message to select the operation of the PC card automat ically appears If you want to cancel the initialisation select No Do not stop the engine until initialisation of the PC card is complete Storing the data of registered locations in the PC card You can select any item registered in the Address Book and store the data in the PC card Data can be...

Страница 80: ...K button The data of the registered location is stored in the entered group and a map of your sur roundings appears If there is little or no space in the PC card or you have already stored 300 locations in a group a message Memory is full or You cannot store more than 300 items in the same group appears To remedy delete unnecessary data or create a new group Loading data from a PC card Address Boo...

Страница 81: ...e data for a specified location or a whole group However if there is no data of Registered Locations in the PC card you cannot use this function 1 Select Settings in the Main menu then select PC Card and Delete PC Card Data Click the OK button 2 Select a group where the location you want to delete is stored and click the OK but ton A list of locations stored in the specified group appears 3 Select...

Страница 82: ...iness 1 Insert a PC Card 2 Select Settings from the Main menu then select Others and Driving Log His tory Click the OK button After the purchase the Navigation System is set not to record the tracking Off is indi cated on the right side of the item Driving Log History showing that this function is turned currently Off 3 Select Off and click the OK button The list of the options you can select appe...

Страница 83: ...ing is left ON the location where the engine was started becomes the starting point of the drive and the location where the power is turned off becomes the end point If the information for the end point cannot be stored properly an error may occur for a few minutes of driving information data When a PC Card does not have any more space to record the message informing that data cannot be stored any...

Страница 84: ...kground picture of the navigation Select a picture stored in PC Card 1 Insert a PC Card to the main unit 2 Select Settings Background Picture Setting from the Main menu and click the OK button Background Picture Setting menu is displayed The picture selected at each screen is indi cated on the right side of AV Background and Navigation Background items 3 Select Navigation Background or AV Backgrou...

Страница 85: ...ound picture starts When the change is completed the selected picture appears 7 Select Done and click the OK button On this screen you can select the following items Click the OK button to return to Settings menu Centre Selected picture is displayed at the center of the screen Repetition Selected picture is patterned and displayed as covering the whole screen Select another picture This is selecte...

Страница 86: ...f both cases A Z a z and numbers 0 9 for the file name of a background picture international accented characters cannot be used Up to maximum 2048 1536 pixels picture can be used We cannot guarantee a proper operation for a picture bigger than this size Progressive format JPEG pictures cannot be used When storing original pictures in a PC card create a folder named BG in a PC card and store the pi...

Страница 87: ...tatus screen appears 1 Position of satellites and radio wave reception status The position of GPS satellites from which data is currently being received is shown Satellites used for positioning are shown in orange any other satellites from which data is currently being received are shown in yellow and satellites from which data cannot be received are shown in black 2 Longitude and latitude If curr...

Страница 88: ...tion System can learn the driving status of two types of tyres for summer and winter independently by using the different memories To change memories select Sensor memory and click the OK button Then select Memory 1 or Mem ory 2 which you want to use and click the OK button 4 Learning Status Current driving mode is indicated 5 Degree of learning Learning situations of Distance Right Turn Left Turn...

Страница 89: ...ion The Installation position of the main unit is shown If No good is displayed refer to Installation Manual for the installation position 4 Hand brake When the handbrake is applied On is displayed When the handbrake is released Off is displayed Keep the foot brake on while checking that the parking brake con nection works properly 5 Power Voltage The power supply reference value provided from the...

Страница 90: ... signal switches to High or Low Check that it is properly displayed when the selector lever is shifted with the brake pedal depressed if the reversegear signal input lead see Installation Manual is connected 2 Push the BACK button The previous screen appears ...

Страница 91: ...of each setting is shown on the right Off appears to the right of the Avoid Motorway setting showing that this function is set off 2 Select Avoid Motorway and click the OK button 3 Using the joystick select Off to the right of Avoid Motorway and click the OK button A list of options possible to select under Avoid Motorway appears 4 Using the joystick select On and click the OK button 5 Select Done...

Страница 92: ...r whether it calculates several route options one of which you select Fastest Shortest This setting controls conditions for calculating a route Avoid Motorway This setting controls conditions for calculating a route A route using motorway may be cal culated in some cases such as when setting your destination far away Avoid Ferry This setting controls conditions for calculating a route Avoid Toll R...

Страница 93: ...or calculating the Estimate Time of Arrival ETA and travel time to your destination When the KM Mile Setting is set to km select one from 40 km h 60 km h or 80 km h When the KM Mile Setting is set to mile select one from 30 mile h 40 mile h or 50 mile h Voice Guidance You can change the gender of the guidance voice You cannot change the setting during route guidance so perform an operation after d...

Страница 94: ...eading Up To ensure that the driving direction always faces up the map automati cally rotates according to the direction of your vehicle North Up The map is always displayed with North at the top Illuminated display You can change the combination of the colours of a map accord ing to whether the vehicle lights are On or Off Daytime display The map is always displayed with bright colours On Areas t...

Страница 95: ...select Off the sound from the AV Head Unit may interfere with the voice recognition system Voice Guidance Mute This can be set when your Navigation System is combined with the Pioneer AV Head Unit with a muting function one that has an Yellow black lead This setting controls whether the volume of the AV Head Unit is automatically muted during voice guidance Auto Voice Recognition This setting enab...

Страница 96: ...d see Registering a Password on page 69 Help Menu If there are a few seconds of inactivity during menu operation the Help Menu is displayed Voice Recognition Help This setting controls the list of available voice commands displayed during voice operation Language Selection The language displayed can be set see Installing the Program on page 20 Once you change the language installation of the progr...

Страница 97: ...and left right Adjust to the optimal position making sure that all four corners of the display are visible Driving Log History This setting enables to record the actually journey into a PC card see Recording the Driving Information on page 80 RDS TMC menu Auto Traffic Reroute This section controls whether the system automatically recalculates the route to avoid a traffic jam For details see Avoidi...

Страница 98: ...96 ...

Страница 99: ...tion Characteristics of the Navigation System when combined with Pioneer AV Head Unit When the Navigation System is combined with Pioneer AV Head Unit AVH P6400CD or AVH P6400R you can connect Pioneer AV equipments by using IP BUS or AV BUS When the AV equipment and navigation units are connected together it is possible to mix the infor mation displayed on the screen If Navigation is selected as a...

Страница 100: ... player combined with the AV Head Unit switch the Remote Control operation mode to AUDIO When the operation mode is set to AUDIO the operations for pioneer DVD player become possible with this remote control SDV P7 AVX P7300DVD XDV P9 XDV P9 etc Used when operating audio When resetting AV Head Unit When pressing the reset button of AV Head Unit while Navigation System and AV Head Unit AVH P6400CD ...

Страница 101: ...2 3 3 3 3 5 5 5 5 button These are used when selecting items such as skipping a track of a CD return to a previous track fast forward or fast rewind 5 A MENU AUDIO button Display audio menus 6 BACK FUNC button Returns you to the previous display 7 DISP button When the operation mode switch is set to NAVI the display of the Pioneer AV Head Unit screen is switched over When the operation mode switch...

Страница 102: ...r than those mentioned above When Navigation is combined with the AV Head Unit AVH P6400CD AVH P6400R functions 2 to 6 and 8 remain the same For the other buttons func tions change according to the setting of the mode switch NAVI This is set when the navigation is mainly used AUDIO When operating the Pioneer DVD player combined with the AV Head Unit switch the Remote Control operation mode to AUDI...

Страница 103: ...ion if you want to cancel voice operation push the control stick down 12 Joystick OK button Use this for selecting items on a menu screen or to confirm a selection This is mainly used for naviga tion 13 BACK button Use this button to move back to a previous screen in a default setting screen 14 Operation mode switch Changes the remote control s mode 15 VOL dial When you turn the dial downwards the...

Страница 104: ...sed for switching voice language used for voice recording type when oper ating DVD player 24 SUB T DELETE button This button is used for switching a subtitle when operating DVD player 25 ANGLE OK button This button is used for switching angles when operating DVD player With some discs the prohibited mark may be displayed and operation may not be possible Operation of the DVD player When using the ...

Страница 105: ...nit 2 AUX NAVI Depending on the equipment connected the source you can select differs When the power of AV equipment is off or a disc is not set you may not be able to select the source In such a case turn the power of the AV equipment on and insert a disc before switching the source 2 Adjust the volume using theVOL dial In the following cases the sound source will not change When a product corres...

Страница 106: ... selected as the source operate again after inserting DVD or CD disc Displaying information screen 1 The operation mode switch is set to NAVI 2 Press the DISP button and switch the screen display If you press the DISP button while using the navigation display the information plate for source appears at the bottom of the screen If you repeat this operation this display will appear and disappear If ...

Страница 107: ...want to operate 2 Press the A MENU AUDIO button The menu of selected source appears Menus displayed on the screen differ according to the selected source 1 SOURCE name 2 You can operate the functions of each source 3 Audio is adjusted 4 Other settings are performed 5 MENU name 3 and 4 are common for the screen of each source 3 Press 5 5 5 5 or to select an item and press the A MENU AUDIO button Th...

Страница 108: ...nge the setting As you press the BACK FUNC button the previous screen is displayed If you want to change other settings repeat the Steps 3 to 5 You can also select BACK and press the A MENU AUDIO button to return to the previous screen 6 Press the BAND ESC button to end the operation Original screen appears ...

Страница 109: ...cator This is indicated unless local seek turning is turned OFF How to listen to the radio 1 Press SOURCE button to select the tuner 2 UseVOL dial to adjust the sound level Rotate to increase or decrease the volume 3 Press BAND ESC button to select a band Press BAND ESC button until the desired band is displayed FM 1 FM 2 FM 3 for FM or MW LW 4 To perform manual tuning press 2 2 2 2 or 3 3 3 3 wit...

Страница 110: ...to the frequency display Storing the strongest broadcast frequencies BSM Best Station Memory lets you automatically store the six strongest broadcast frequen cies 1 Select BSM BEST STATIONS MEMORY from theTUNER MENU and press A MENU AUDIO button 2 Press 5 5 5 5 to turn BSM on BSM turns to green While BSM is green the six strongest broadcast frequencies will be stored Preset memory in order of thei...

Страница 111: ...ies for later recall with the press 5 or 1 Press 5 or to select P CH MEMORY from theTUNER MENU and press A MENU AUDIO button 2 Adjust frequency with 2 or 3 If you continue pressing 2 or 3 a strong broadcast frequency is automatically searched for and search ends when it is found 3 Select a preset channel number with 5 or and press A MENU AUDIO button to preset that frequency 4 If you want to prese...

Страница 112: ...desired station BAND Shows which band the radio is tuned to MW LW or FM FREQUENCY Shows to which frequency the tuner is tuned Program service name Shows the type of broadcast program PTY Information Icons for Traffic and News The icon changes depending on the setting of the TA and NEWS function and the status of the incoming data AF indicator This is indicated when the AF indicator is ON TEXT indi...

Страница 113: ...RDS station Selecting alternative frequencies If you are listening to a broadcast and the reception becomes weak or there are other prob lems the Pioneer AV Head Unit AVH P6400CD or AVH P6400R will automatically search for a different station in the same network which is broadcasting a stronger signal AF is on as a default 1 Press 5 or to select AF ALTERNATIVE FREQUENCY from theTUNER MENU and pres...

Страница 114: ...on 3 Press to turn the regional function off Regional programming and regional networks are organized differently depending on the country i e they may change according to the hour state or broadcast area The preset number may disappear on the display if the tuner tunes in a regional station which differs from the originally set station REGIONAL can be turned on or off independently for each FM ba...

Страница 115: ...automatically seek out a TP station with the strongest signal after a 10 or 30 second delay The delay is 10 seconds if TA is on and 30 seconds if TA and AF are on Using PTY functions You can tune in a station by using PTY information Searching for a RDS station by PTY information You can search for general types of broadcasting programs such as those listed on page 115 1 Press 5 or to select PTY f...

Страница 116: ...revious source An emergency announcement can be cancelled by pressing TA NEWS button on the Pio neer AV Head Unit AVH P6400CD or AVH P6400R Using radio text Pioneer AV Head Unit AVH P6400CD or AVH P6400R can display radio text data trans mitted by RDS stations such as station information the name of the currently broadcast song and the name of the artist The tuner automatically memorizes the three...

Страница 117: ...ategorized music Jazz Jazz Country Country music Nat Mus National music Oldies Oldies music golden oldies Folk mus Folk music Classics L Class Light classical music Classic Serious classical music Others Educate Educational Programs Drama All radio plays and serials Culture National or regional culture Science Nature science and technology Varied Light entertainment Children Children s Social Soci...

Страница 118: ...When playing CD TEXT disc each of TRACK TITLE DISC ARTIST or TRACK ART IST is displayed When the operation mode switch is set to NAVI press DISP button repeatedly to swich those items How to listen to a CD 1 Set a CD to the CD player For details of setting a CD to CD player see your CD player s manual 2 Press SOURCE button to select CD source 3 UseVOL dial to adjust the sound level Rotate to incre...

Страница 119: ...not operate the function within about 30 seconds the display is automatically returned to the playback display Repeating play Repeat play lets you hear the same track over again 1 Press 5 or to select REPEAT from the COMPACT DISC MENU and press A MENU AUDIO button 2 Press 5 to turn repeat play on The track presently playing will play and then repeat 3 Press to turn repeat play off The track presen...

Страница 120: ...ack list 1 Press 5 or to select TRACK LIST from the COMPACT DISC MENU and press A MENU AUDIO button 2 Press 5 or to select the track you want to play in the LIST and press A MENU AUDIO button Playback of the selected track begins After that tracks play in order Up to six tracks in the list can be displayed at once Press 2 or 3 to display previous or next list When the first or sixth track is indic...

Страница 121: ...n A B C XY Z numbers and sym bols in 1 2 3 order Each press of will display a letter in the reverse order such as Z Y X C B A order 5 Press 3 to move the cursor to the next character position When the letter you want is displayed press 3 to move the cursor to the next position and then select the next letter Press 2 2 2 2 to move backwards in the display 6 Move the cursor to the last position by p...

Страница 122: ...CK ARTIST When playing CD TEXT disc each of TRACK TITLE DISC ARTIST or TRACK ART IST is displayed Press DISP button repeatedly to swich these items How to listen to a CD 1 Press SOURCE button to select M CD source 2 UseVOL dial to adjust the sound level Rotate to increase or decrease the volume 3 Select a disc you want to listen to with the 5 or 4 To perform fast forward or reverse press and hold ...

Страница 123: ...o the previous display To return to the playback display press BAND ESC button If you do not operate the function within about 30 seconds the display is automatically returned to the playback display Repeating play There are three repeat play ranges for the multi CD player MAGAZINE multi CD player repeat TRACK one track repeat and DISC disc repeat 1 Press 5 or to select REPEAT from the MULTI CD ME...

Страница 124: ...TI CD MENU and press A MENU AUDIO button 3 Press 5 to turn scan play on The first 10 seconds of each track of the present disc or the first track of each disc is played 4 When you find the desired track or disc press to turn scan play off The track or disc will continue to play If the display has automatically returned to the playback display select SCAN again by pressing A MENU AUDIO button Playi...

Страница 125: ... of the track or CD that you are listening to 1 Press 5 or to select COMP COMPRESSION from the MULTI CD MENU and press A MENU AUDIO button If the multi CD player does not support COMP DBE NO COMP is displayed when you attempt to select it 2 Press 2 or 3 to select your favorite setting Press 2 or 3 repeatedly to switch between the following settings COMP OFF COMP 1 COMP 2 COMP OFF DBE 1 DBE 2 Using...

Страница 126: ...ack from your ITS playlist begins If there are no tracks from your playlist in the current range ITS EMPTY is displayed and normal play resumes 5 Press BAND ESC button to return to the playback display If you do not operate the function within about 30 seconds the display is automatically returned to the playback display Playback from your ITS playlist ITS play lets you listen to the tracks that y...

Страница 127: ...Play a CD that you want to enter the title 2 Press 5 or to select TITLE EDIT from the MULTI CD MENU and press A MENU AUDIO button When playing a CD TEXT disc you cannot select to TITLE EDIT The disc title will have already been recorded on a CD TEXT disc 3 Press A MENU AUDIO button to select the desired character type Press A MENU AUDIO button repeatedly to switch between the following character t...

Страница 128: ...disc NO TITLE is displayed Depending on the multi CD player you use with the AV Head Unit display of disc titles is possible Using CD TEXT functions You can use these functions only with a CD TEXT compatible multi CD player Some discs have certain information encoded on the disc during manufacture These discs may contain such information as the CD title track title artist s name and playback time ...

Страница 129: ...AB3 PRESET NUMBER Shows what preset has been selected Service label Shows to which Service the tuner is tuned Icons for AS Announcement support The icon changes depending on the setting of the announcement support function and the status of the incoming data AS Announcement support status Icon ex Traffic icon White characters Information interruption is ON but you will not receive data since there...

Страница 130: ...label Using dynamic label Dynamic label provides character information concerning the service component you re cur rently listening to You can scroll the displayed information The tuner automatically memorizes the three latest dynamic label received replacing text from the least recent reception with new text when it is received Displaying dynamic label 1 PressTEXT button on the Pioneer AV Head Un...

Страница 131: ...on or off Press TA NEWS button on the Pioneer AV Head Unit AVH P6400CD or AVH P6400R for 2 seconds to turn the news flash on The NEWS icon lights Refer to page 127 Press TA NEWS button on the Pioneer AV Head Unit AVH P6400CD or AVH P6400R for 2 seconds again to turn the news flash off Displaying the DAB TUNER MENU 1 Press A MENU AUDIO button when source is DAB 2 Select DABTUNER and press A MENU AU...

Страница 132: ...uncements operated with the Function Menu WEATHER WTHR icon Weather Flash ANNOUNCE ANNC icon Warning Service Warning Event Announcement Event Special Event Special Event Finance Finance Sports Sports Information Information 1 Press 5or to select AS ANNOUNCEMENT SUPPORT from the DABTUNER MENU and press A MENU AUDIO button 2 Press 2 2 2 2 or 3to select ANNOUNCE or WEATHER 3 Press 5 or to select ON o...

Страница 133: ...s A MENU AUDIO button 2 Press 2 2 2 2 or 3 to select the item you want to adjust Service Follow Function If reception of the selected Service worsens this automatically searches for other Ensemble supporting the same Service Depending on conditions an Ensemble supporting Alarm and Road Traffic Flash is received 1 Press 5 or to select SF SERVICE FOLLOW from the DABTUNER MENU and press A MENU AUDIO ...

Страница 134: ...u can memorised the desired service and recall the service from the P CH lists of every 6 services displayed 1 Press 5 or to select P CH RECALL MEMORY from the DABTUNER MENU and press A MENU AUDIO button 2 Press 2 2 2 2 or 3for 0 5 seconds or more to select a ensamble 3 Press 5 or to select the ensamble you want to memorize 4 Press A MENU AUDIO button for 2 seconds or more to memorize the selected...

Страница 135: ...eset chan nel list as one additional function Press DISP button to switch between TV and P CH list displays BAND Shows which band the TV is tuned to TV1 TV2 PRESET NUMBER Shows what preset has been selected CHANNEL Shows what channel has been selected How to watch TV 1 Press SOURCE button to select theTV tuner 2 UseVOL dial to adjust the sound level Rotate to increase or decrease the volume 3 Pres...

Страница 136: ... is automatically returned BSSM Best Station Sequential Memory The BSSM function automatically memorizes strongly transmitted broadcast stations in order from the lowest channel up 1 Press BAND ESC button to display the BAND you want to use for BSSM 2 Select BSSM BEST STATIONS SEQUENTIAL MEMORY from theTVTUNER MENU and press A MENU AUDIO button 3 Press 5 to turn BSSM on BSSM turn to green While BS...

Страница 137: ...d Recalling broadcast stations 1 Press 5 or to select a Preset CH Changing a band 1 Press BAND ESC button to select the desired band Press BAND ESC button repeatedly to switch between the following bands TV 1 TV 2 Selecting the country group In the Pioneer AV Head Unit AVH P6400CD or AVH P6400R channels are preset for your reception area enables reception of multiple channels 1 Press 5 or to selec...

Страница 138: ...s the chapter number currently playing TIME Shows the elapsed playing time of the current chapter or track How to watch DVD 1 Set a DVD or CD to DVD player Playback will automatically start The DVD disc s menu may be displayed 2 UseVOL dial to adjust the sound level Rotate to increase or decrease the volume 3 To perform fast forward or reverse press and hold control stick right or control stick le...

Страница 139: ... displayed 1 When the source is DVD press DISP button Each time you press DISP button the displayed information changes When the operation mode switch is AUDIO PLAYBACK MODE play time DVD Display DVD s video When the operation mode switch is DVD Information Display 1 Information Display 2 No information display Return to Informa tion Display 1 The DISP on Pioneer AV Head Unit AVH P6400CD or AVH P6...

Страница 140: ...o select 10 press 10 and 0 in order To select 23 press 10 10 and 3 in order Specifying Track 1 Press the numeric keypad corresponding to a desired track number To select 3 press 3 To select 10 press 10 and 0 in order To select 23 press 10 10 and 3 in order With some discs the prohibited mark may be displayed and operation may not be possible Disc Fast Forward Reverse Fast Forward 1 During play mov...

Страница 141: ...Still Frame by Frame and Slow Motion Playback Still Playback This lets you pause playback and view a still picture 1 Move the control stick up during playback To return to normal playback move the control stick up once more Frame by Frame Playback This lets you move ahead one frame at a time during playback 1 Press E E E E GUIDE button Each time you press E E E E GUIDE button you move ahead one fr...

Страница 142: ... a time from which playback starts Time search 1 Push the joystick left right to selectTime in Information Display 1 The selected item is indicated in green 2 Input the desired time with the numeric keypad Examples 10 minutes 09 seconds press 1 0 0 and 9 in order 78 min 00 sec press 7 8 0 and 0 in order Press CLEAR button to delete input numbers 3 Press the joystick directly down to complete selec...

Страница 143: ...dicated in green 2 Push the joystick up down to select the desired setting and press With Repeat play of a Disc when the last track on the disc has been played a menu is dis played or playback stops Push the joystick left right to select AUDIO S TITLE or ANGLE in Information Display 1 Switching audio L R You can select between Audio L R and L R 1 Push the joystick left right to select Audio in Inf...

Страница 144: ...and press A MENU AUDIO button 2 Press 2 or 3 to select the desired key number 3 Press 5 or to transmit signals of key command FUNCTION1 4 1 Press 5 or to select FUNCTION1 FUNCTION4 and press A MENU AUDIO button 2 Press 5 or to transmit signals AUTO MANUAL 1 Press 5 or to select AUTO MANUAL and press A MENU AUDIO button 2 Press 2 or 3 3 3 3 to select AUTO or MANUAL AUX VIDEO External ...

Страница 145: ...of the alphabet in A B C XY Z numbers and sym bols in 1 2 3 order Each press of will display a letter in the reverse order such as Z Y X C B A order 4 Press 3 to move the cursor to the next character position When the letter you want is displayed press 3 to move the cursor to the next position and then select the next letter Press 2 2 2 2 to move backwards in the display 5 Move the cursor to the l...

Страница 146: ...N FADING is only displayed when S W CONTROL EXTERNAL is set in INI TIAL SETTINGS MENU SUB WOOFER is not displayed When the subwoofer controller setting is S W CONTROL INTERNAL or REAR SPEAKER SUBWOOFER you can switch the SUB WOOFER Refer to page 152 When the subwoofer controller setting is only S W CONTROL EXTERNAL you can switch the non fading output on off mode Refer to page 152 When selecting t...

Страница 147: ...itch the SFEQ mode the HPF HIGH PASS FILTER function is automatically switched off By switching the HPF HIGH PASS FILTER function on after selecting the SFEQ mode you can combine HPF HIGH PASS FILTER function with SFEQ function Using balance adjustment You can select a fader balance setting that provides an ideal listening environment in all occu pied seats 1 Press 5 or to select AUDIO from the ME...

Страница 148: ...es If you make adjustments when the CUSTOM2 curve is selected the CUSTOM2 curve is updated When FLAT is selected no supplement or correction is made to the sound This is useful to check the effect of the equalizer curves by switching alternatively between FLAT and a set equalizer curve 1 Press EQ button on Pioneer AV Head Unit AVH P6400CD or AVH P6400R to select the equalizer Press EQ button on Pi...

Страница 149: ...creases or decreases the bass level 6 6 is displayed as the level is increased or decreased 3 Select the desired frequency with 2 2 2 2 or 3 3 3 3 40 63 100 160 Hz Adjusting treble You can adjust the cut off frequency and the Treble level In FRONT1 and FRONT2 modes treble adjustment affects only the front output rear output cannot be adjusted 1 Press 5 or to select TREBLE from the AUDIO MENU and p...

Страница 150: ...n When the subwoofer controller setting is S W CONTROL EXTERNAL you cannot select SUB WOOFER 2 Press 3 to turn subwoofer output on You can turn off subwoofer output by pressing 2 2 2 2 If you do not set to ON you cannot select PHASE LEVEL or FREQUENCY 3 Press 5 or to select the item you want to adjust 4 Press 2 or 3 to adjust the item Only frequencies lower than those in the selected range are out...

Страница 151: ...are output from the front or rear speakers If you switch the SFEQ mode the HPF HIGH PASS FILTER function is automatically switched off By switching the HPF HIGH PASS FILTER function on after selecting the SFEQ mode you can combine HPF HIGH PASS FILTER function with SFEQ function Adjusting source levels SLA Source level adjustment lets you adjust the volume level of each source to prevent rad ical ...

Страница 152: ...tuning step employed by seek tuning is 50 kHz When AF or TA is on the tuning step automatically changes to 100 kHz It may be preferable to set the tuning step to 50 kHz when AF is on 1 Press 5 or to select FM STEP from the INITIAL SETTINGS MENU and press A MENU AUDIO button 2 Select the FM tuning step with 2 2 2 2 3 3 3 3 Pressing 2 2 2 2 3 3 3 3 will switch the FM tuning step between 50 kHz and 1...

Страница 153: ...ne will sound You can turn off this warning tone 1 Press 5 or to select DETACH WARNING from the INITIAL SETTINGS MENU and press A MENU AUDIO button 2 Select the warning tone on or off with 5 Pressing 5 will switch WARNING TONE between ON and OFF Switching the auxiliary setting It is possible to use auxiliary equipment with Pioneer AV Head Unit AVH P6400CD or AVH P6400R Activate the auxiliary setti...

Страница 154: ...d simultaneously in this setting mode 1 Press 5 or to select REAR SPEAKER from the INITIAL SETTINGS MENU and press A MENU AUDIO button 2 Change the rear output setting with 5 Pressing 5 will switch between REAR SPEAKER FULL full range speaker and REAR SPEAKER SUBWOOFER subwoofer When no subwoofer is connected to the rear output select REAR SPEAKER FULL When a subwoofer is connected to the rear out...

Страница 155: ...from the SETUP MENU and press A MENU AUDIO button 2 Press 2 2 2 2 3 3 3 3 to select VIDEO Press 2 or 3 until the desired video setting appears in the display OFF off VIDEO video BACK UP CAMERA back up camera M DVD Multi DVD If the equipment is connected to a RCA video input choose VIDEO to view video of the equipment When using a DVD player connected with an RCA cable if you do not select M DVD th...

Страница 156: ...ress 5 or to select AUTO FLAP from the SETUP MENU and press A MENU AUDIO button 2 Press 2 2 2 2 to select the manual Press 2 2 2 2 until the OPEN CLOSE MANUAL setting appears in the display Each time you press a manually set display s EJECT button the display opens or closes 3 Press 3 to select the auto Press 3 until the OPEN CLOSE AUTO setting appears in the display With auto setting the display ...

Страница 157: ...n using the Remote Control With the CD SR80 Steering Remote Control sold separately you can press the BAND button and the F button to switch on the operation mode of the Steering Remote Control When the operation mode is switched on by pressing the BAND button of the Steering Remote Control you can activate voice operation which is equivalent of pressing the TALK button CD SR90 and CD SR100 can be...

Страница 158: ...ed Available voice commands related to Navigation You can say the following commands Common commands for all the operations Next Page Previous Page Back Next Option Repeat Specifying your destination New Destination Address Book Return Home your favourite location Registered loca tion name Points of Interest Local Search Post Code Address Search Entering characters or symbols one by one See To spe...

Страница 159: ...m Play Disc 1 6 ITS Play Next Page Previous Page For NAVI source CD Track 1 20 Repeat Play Random Play Next Page Previous Page Some commands may be cancelled according to the condition of audio unit being com bined If you are not used to voice operation While you are still learning voice operation features and want to use voice commands it is recommended that you first park your vehicle in a safe ...

Страница 160: ...es that it is now your turn to speak and the mark showing that you can speak is displayed In this example you want to search for the nearest petrol station When presented with a list of search options you say the number to the left of the option you want to select 1 Press theTALK button A list of commands for voice operation appears After the Please make your request message the beep indicates tha...

Страница 161: ...on say Yes With the location shown on the map set as the destination or way point the route calcu lation starts If you want to see maps with other options at Step 5 say Next If you say No the message You can return to previous mode by pressing the Back button appears If you perform other operations instead of pressing the Back button voice operation is cancelled and the map screen appears To spell...

Страница 162: ...e If no possible item is found the display returns to the previous page 2 Say the number of the item you want The map of the selected location appears on the display The message Do you want to stop in follows 3 If you want to select this location as your destination say Yes With the location shown on the map set as the destination or way point the route calcu lation starts If you want to see the m...

Страница 163: ...sounds entering from outside If you have problems with voice recogni tion try closing the vehicle windows Position the microphone carefully For optimum pick up the microphone should be fixed at a suitable distance directly in front of the driver Make sure that you do not need to alter your position or look away from the road ahead when giving voice commands not only is this awkward but it can also...

Страница 164: ...162 ...

Страница 165: ...direction with the Gyrosensor and inclina tion of the road with the G sensor The 3D Hybrid Sensor can even calculate changes of altitude and corrects for discrepancies in the dis tance travelled caused by driving along winding roads or up slopes Also the Navigation System learns the driving conditions and stores information in the memory thus as you drive more the precision of the positioning beco...

Страница 166: ...imates gradually increases So after you have driven some distance you can expect your position as shown on the map to show fewer errors If you use chains on your wheels for winter driving or if you put on the spare wheel the errors may appear to suddenly increase because of the increased wheel diameter To pre vent the contamination of previously acquired learning data learning automatically stops ...

Страница 167: ...one or cellular phone is used near the GPS aerial GPS reception may be lost temporarily Do not cover the GPS aerial with spray paint or car wax because this may block the reception of GPS signals Snow buildup can also degrade the signals so keep the aerial clear If for any reason GPS signals cannot be received learning and error correction are not possible If GPS positioning has been operating for...

Страница 168: ... or exit a multi storey car park or similar with a spiral layout If your vehicle is turned on a turntable or similar If your vehicle s wheels spin such as on a rough track or in snow If you put on chains or change your tyres for some of a different size If trees or other obstacles block the GPS signals for a considerable period If you drive very slowly or in a start and stop manner as in a traffic...

Страница 169: ... limitation of the installation angle 7 Indication of the position of your vehicle is misaligned after a U turn or reversing Solutions 1 Check the GPS signal reception using GPS Status see Checking positioning information by sat ellite on page 85 and the position of the GPS aerial if necessary or continue driving until reception improves 2 Check that the cables are properly connected If necessary ...

Страница 170: ...dance or the volume is low Possible causes The volume setting is low Solutions Check the volume setting on the display or turn the volume up according to Hardware Volume see Hardware Volume on page 93 and or turn up the volume on the display The Remote Control fails to work Possible causes 1 The batteries are low 2 The batteries have been inserted incorrectly 3 The Remote Control is pointing at th...

Страница 171: ...Park your vehicle at a safe place and cut the engine off Turn the ignition key back to Acc off Then start the engine again and turn the power to the main unit back on If this does not solve the problem press the reset button on the main unit ...

Страница 172: ... you have checked please re boot the system and press OK When If the Navigation unit does not receive the vehicle speed pulse What to do Consult your Pioneer dealer 4 Speed pulse wire is not connected System will start to learn without speed pulse Please keep in mind that accuracy is not fully ensured without speed pulse When The speed signal input pink lead wire of the power cable is not connecte...

Страница 173: ...hen If the distance to the destination is too far and cannot be set What to do Change the destination to a location that is closer and divide up the route 9 Your journey cannot avoid the specified area When If route setting cannot avoid a specified Area to Avoid What to do Choose whether or not to try setting a route through the area 10 More than 6 characters are required When If you enter a name ...

Страница 174: ...tion What to do Enter a word that can be pronounced 15 An error has occurred Please note the following error code and switch power off When In the case of a system failure What to do Note down the error code shown on the screen turn off the power and then contact your nearest Pioneer service facility 16 DVD Player is overheating Discontinue until temperature drops When The DVD ROM drive has overhe...

Страница 175: ...et If you want to set a long distance route going across several areas set way points along the way During voice guidance turns and junctions from the motorway are announced However if you pass junctions turns and other guide points in rapid succession some may not be announced Incorrect guidance may be given at motorway junctions if the exit lane is particularly long It is possible that guidance ...

Страница 176: ...e map in certain increments This is called tracking It is handy when you want to check a route travelled without guidance or if returning along a complex route A maximum of about 200 km 125 miles is marked and as you travel beyond this limit tracking marks are erased in order from the most distant Tracking can also be set for automatic erasing when ever the Navigation System is switched off see Tr...

Страница 177: ...ento anche cartografia numerica ed al tratto prodotta e fornita dalla Regione Toscana Portugal Source IgeoE Portugal Spain Información geográfica propiedad del CNIG Sweden Based upon electronic data National Land Survey Sweden Switzerland Topografische Grundlage Bundesamt für Landestopographie Norway Copyright 2000 Norwegian Mapping Agency 2002 DENSO CORPORATION All rights reserved 2001 Lernout Ha...

Страница 178: ...to the left and hold Skipping to the next track Push the NEXT PREV control upward Returning to the previous track Push the NEXT PREV control downward Repeat play Random play or Scanning on or off 1 Move the Joystick to the right and left to select the required func tion 2 Move the Joystick up or down for on off On off of Pausing Push the Control Stick upward pushing it upward again turns it off IT...

Страница 179: ...for a variety of pur poses Guidance mode The mode in which guidance is given as you drive to your destination the system automatically switches to this mode as soon as a route has been set Guidance point These are important landmarks along your route generally intersections The next way point along your route is indicated on the map by the yellow flag icon Home location Your registered home locati...

Страница 180: ...It is highlighted in bright green on the map Tracking Marks on the map indicating the route you have travelled Voice guidance The giving of directions by a recorded voice while in guidance mode Voice recognition The technology that allows the system to understand the driver s voice commands Way Point A location that you choose to visit before your destination a journey can be built up from multipl...

Страница 181: ...menu New Destination Address Book Return Home P 40 66 Go to P 40 66 Settings Information Address Search P 26 41 POI Search P 44 Vicinity Search P 45 Postal Code Search P 46 Motorway Search P 47 Map Search P 36 Address Book operation menu Information Edit P 63 Registration P 61 Delete This Item P 65 Delete All Destinations P 65 Delete All Address Book Entries P 65 View Map P 65 Last Destination P 6...

Страница 182: ...ll Road P 90 KM Mile Setting P 91 Close up of Junction P 91 Average Speed Motorway P 91 Average Speed Ordinary Road P 91 Voice Guidance P 91 AV Guide Mode P 91 Route Guidance menu 2 Map Orientation P 92 Day Night Map display P 92 Display Areas to Avoid P 92 Tracking Display P 92 Map Display menu Hardware Volume P 93 Monitor Type P 93 Hardware menu Demo Mode P 93 Voice Recognition Mute P 93 Voice G...

Страница 183: ... to P 40 66 Modify Current Location P 95 Adjust Display Position P 95 Driving Log History P 80 Others menu 3 Auto Traffic Reroute P 53 95 Avoid Traffic on Route P 95 RDS TMC menu Store on PC Card P 77 Read from PC Card P 78 Delete PC Card Data P 79 Initialise PC Card P 77 PC Card menu AV Background P 82 Navigation Background P 82 Background Picture Setting menu ...

Страница 184: ... 73 Overlay POI P 59 Route Profile P 49 Route Scroll P 48 Route Information menu GPS Status P 85 3D Calibration Status P 86 Connection Status P 87 Location Status menu View Traffic Information P 73 Recall Preset Station P 76 Manual Station Search P 75 Traffic Information menu ...

Страница 185: ...183 Appendix ...

Страница 186: ...MEMO Write your registered password here remove this page from the manual and store it in a safe place CAUTION Never leave any note of your password in your vehicle ...

Страница 187: ......

Страница 188: ......

Отзывы: