background image

2

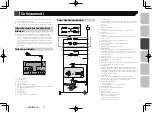
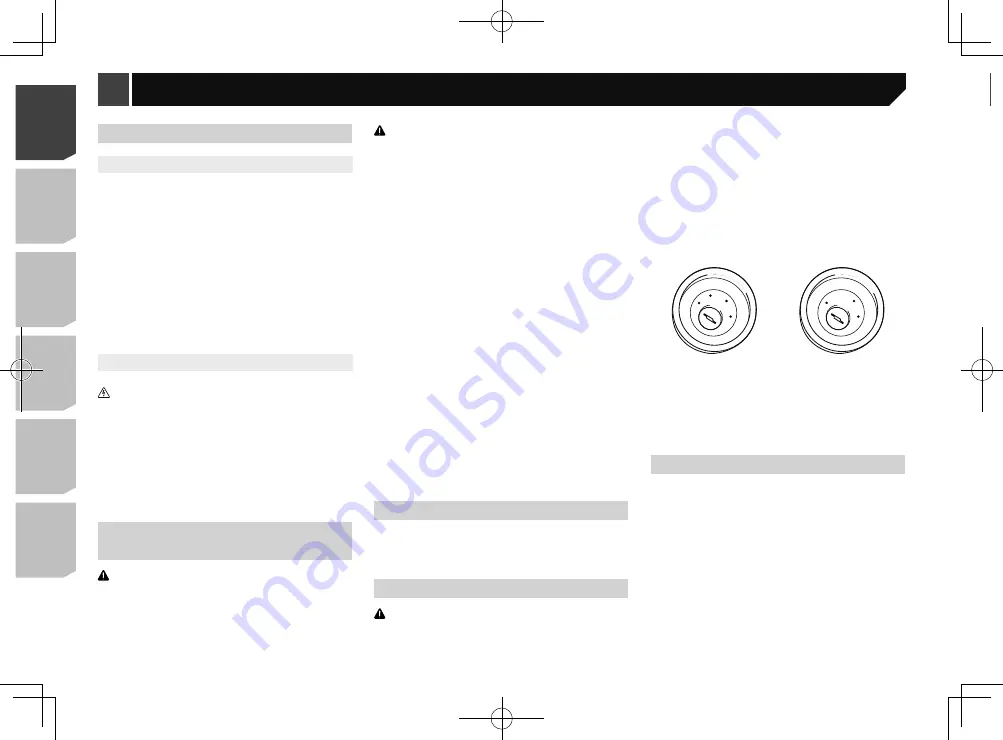
This product

1

2

3

4

5

6

7

8

1

  Microphone 4 m

(AVH-280BT)

2

  This product

3

  Aerial jack

4

  Wired remote input 

Hard-wired remote control adapter can be connected (sold 

separately).

5

  Power supply

6

  Fuse (10 A)

7

  Front output

8

  Rear output or subwoofer output

Precautions

Your new product and this manual

  Do not operate this product, any applications, or the rear 

view camera option (if purchased) if doing so will divert your 

attention in any way from the safe operation of your vehicle. 

Always observe safe driving rules and follow all existing 

traffic regulations. If you experience difficulty in operating 

this product or reading the display, park your vehicle in a 

safe location and apply the handbrake before making the 

necessary adjustments.

  Do not install this product where it may (i) obstruct the driv-

er’s vision, (ii) impair the performance of any of the vehicle’s 

operating systems of safety features, including airbags, haz-

ard lamp buttons, or (iii) impair the driver’s ability to safely 

operate the vehicle. In some cases, it may not be possible to 

install this product because of the vehicle type or the shape 

of the vehicle interior.

Important safeguards

WARNING

Pioneer does not recommend that you install this 
product yourself. This product is designed for 
professional installation only. We recommend that only 
authorised Pioneer service personnel, who have special 
training and experience in mobile electronics, set up and 
install this product. NEVER SERVICE THIS PRODUCT 
YOURSELF. Installing or servicing this product and its 
connecting cables may expose you to the risk of electric 
shock or other hazards, and can cause damage to this 
product that is not covered by warranty.

Precautions before connecting 
the system

WARNING

Do not take any steps to tamper with or disable the 
handbrake interlock system which is in place for your 
protection. Tampering with or disabling the handbrake 
interlock system could result in serious injury or death.

CAUTION


Secure all wiring with cable clamps or electrical tape. 
Do not allow any bare wiring to remain exposed.


Do not directly connect the yellow lead of this product 
to the vehicle battery. If the lead is directly connected 
to the battery, engine vibration may eventually cause 
the insulation to fail at the point where the wire 
passes from the passenger compartment into the 
engine compartment. If the yellow lead’s insulation 
tears as a result of contact with metal parts, short-
circuiting can occur, resulting in considerable danger.


It is extremely dangerous to allow cables to become 
wound around the steering column or gearstick. Be 
sure to install this product, its cables, and wiring 
away in such so that they will not obstruct or hinder 
driving.


Make sure that the cables and wires will not interfere 
with or become caught in any of the vehicle’s moving 
parts, especially the steering wheel, gearstick, 
handbrake, sliding seat tracks, doors, or any of the 
vehicle’s controls.


Do not route wires where they will be exposed to 
high temperatures. If the insulation heats up, wires 
may become damaged, resulting in a short circuit or 
malfunction and permanent damage to the product.


Do not shorten any leads. If you do, the protection 
circuit (fuse holder, fuse resistor or filter, etc.) may 
fail to work properly.


Never feed power to other electronic products by 
cutting the insulation of the power supply lead of 
this product and tapping into the lead. The current 
capacity of the lead will be exceeded, causing 
overheating.

Before installing this product

  Use this unit with a 12-volt battery and negative earthing 

only. Failure to do so may result in a fire or malfunction.

  To avoid shorts in the electrical system, be sure to discon-

nect the (–) battery cable before installation.

To prevent damage

WARNING


Use speakers over 50 W (output value) and between 
4 Ω to 8 Ω (impedance value). Do not use 1 Ω to 3 Ω 
speakers for this unit.


The black lead is earth. Please earth this lead 
separately from the earth of high-current products 
such as power amps. Do not earth more than one 
product together with the earth from another product. 
For example, you must separately earth any amp 
unit away from the earth of this product. Connecting 
earths together can cause a fire and/or damage the 
products if their earths became detached.


When replacing the fuse, be sure to only use a fuse of 
the rating prescribed on this product.

  This product cannot be installed in a vehicle without ACC 

(accessory) position on the ignition switch.

ACC

ON

S

T

A

R

T

O

FF

ON

S

T

A

R

T

O

FF

ACC position

No ACC position

  To avoid short-circuiting, cover the disconnected lead with 

insulating tape. It is especially important to insulate all 

unused speaker leads, which if left uncovered may cause a 

short circuit.

  For connecting a power amp or other devices to this product, 

refer to the manual for the product to be connected.

Notice for the blue/white lead

  When the ignition switch is turned on (ACC ON), a control 

signal is output through the blue/white lead. Connect to an 

external power amp’s system remote control terminal, the 

auto-aerial relay control terminal, or the aerial booster power 

control terminal (max. 300 mA 12 V DC). The control signal is 

output through the blue/white lead, even if the audio source 

is switched off.

Connection

2

< QRD3355-A >

< QRD3355-A >

Connection

Connection

Содержание AVH-180DVD

Страница 1: ...ión Installationsanleitung Installatiehandleiding AVH 280BT AVH 180DVD DVD RDS AV RECEIVER AUTORADIO AV RDS LECTEUR DE DVD SINTOLETTORE DVD RDS CON AV RADIO AV RDS CON DVD DVD RDS AV EMPFÄNGER DVD RDS AV ONTVANGER English 1 QRD3355 A English Français Italiano Español Deutsch Nederlands ...

Страница 2: ...ay in such so that they will not obstruct or hinder driving Make sure that the cables and wires will not interfere with or become caught in any of the vehicle s moving parts especially the steering wheel gearstick handbrake sliding seat tracks doors or any of the vehicle s controls Do not route wires where they will be exposed to high temperatures If the insulation heats up wires may become damage...

Страница 3: ...r will differ depending on the type of vehicle Connect 5 and 6 when Pin 5 is an aerial control type In another type of vehicle never connect 5 and 6 b Blue white 6 Connect to auto aerial relay control terminal max 300 mA 12 V DC c Blue white Connect to system control terminal of the power amp max 300 mA 12 V DC d Violet white Of the two lead wires connected to the back lamp connect the one in whic...

Страница 4: ...ker and Rear speaker signals are output from the speaker leads when this connection is in use 1 3 2 4 8 8 1 System remote control Connect to Blue white cable 2 Power amp sold separately 3 Connect with RCA cable sold separately 4 To Rear or subwoofer output Connect a cable according to the preout setting 5 Rear speaker or subwoofer 6 To Front output 7 Front speaker 8 Subwoofer You can change the RC...

Страница 5: ...t 5 Brown R C IN 6 Power supply 7 Power cord 8 Violet white REVERSE GEAR SIGNAL INPUT Power cord on page 3 Connect only the rear view camera to R C IN Do not connect any other equipment Some appropriate settings are required to use rear view cameras For details refer to Operation Manual External video component and the display 1 2 3 6 7 8 9 3 a b c d e 5 4 1 Rear display with RCA input jacks 2 To ...

Страница 6: ...ons of the vehicle Before making a final installation of this product temporarily connect the wiring to confirm that the connections are correct and the system works properly Installation notes Do not install this product in places subject to high tempera tures or humidity such as Places close to a heater vent or air conditioner Places exposed to direct sunlight such as on top of the dashboard Pla...

Страница 7: ...plied with this product Installing the microphone 280BT Install the microphone in a place where its direction and dis tance from the driver make it easiest to pick up the driver s voice Be sure to turn off ACC OFF the product before connecting the microphone Mounting on the sun visor 1 Fit the microphone lead into the groove 1 2 1 Microphone lead 2 Groove 2 Attach the microphone clip to the sun vi...

Страница 8: ...in câb cho des Pr br A N e de vot 2 1 1 Double sided tape 2 Clamps Use separately sold clamps to secure the lead where neces sary inside the vehicle 3 Keeping it away from the steering wheel Adjusting the microphone angle 8 QRD3355 A Installation ...

Страница 9: ...it ses câbles et les fils de telle façon qu ils n obstruent ni ne gênent la conduite Veillez à ce que la trajectoire des câbles et des fils n interfère pas avec les pièces en mouvement du véhicule Fixez les câbles de manière à les empêcher d être happés par notamment le volant le levier de vitesse le frein à main les glissières de siège les portes ou tout autre élément de commande du véhi cule La ...

Страница 10: ...de même couleur les uns aux autres 8 Orange blanc Vers borne du commutateur d éclairage 9 Noir terre Vers châssis du véhicule métal a Bleu blanc 5 La position de la broche du connecteur ISO diffère en fonc tion du type de véhicule Raccordez 5 et 6 si la Broche 5 est un contrôle de type antenne Dans un autre type de véhicule ne raccordez jamais 5 et 6 b Bleu blanc 6 Raccordement à une borne de cont...

Страница 11: ...t Les signaux du haut parleur avant et du haut parleur arrière sont générés depuis les fils du haut parleur quand cette connexion est utilisée 1 3 2 4 8 8 1 Commande à distance du système Raccordement au câble Bleu blanc 2 Amplificateur de puissance vendu séparément 3 Raccordement avec un câble RCA vendu séparément 4 Sortie arrière ou haut parleur d extrêmes Raccorde un câble conformément à la con...

Страница 12: ...de stationnement étroit Ne pas utiliser dans un but de divertissement Les objets dans la caméra de rétrovisée peuvent paraître plus proches ou plus éloignés qu en réalité La zone d image des images plein écran affichées en recu lant ou en vérifiant l arrière du véhicule peut légèrement différer 1 2 3 4 5 6 7 8 1 Caméra de rétrovisée ND BC8 vendue séparément 2 Vers sortie vidéo 3 Câble RCA fourni a...

Страница 13: ... véhicule en toute sécurité N installez jamais ce produit devant ou à côté d un endroit sur le tableau de bord une portière ou un pi lier à partir duquel un des airbags du véhicule doit se déployer Veuillez vous reporter au mode d emploi du véhicule pour en savoir plus sur les zones de déploie ment des airbags frontaux Avant de procéder à l installation Consultez le concessionnaire le plus proche ...

Страница 14: ...radio d usine Positionnez ce produit de sorte que les trous des vis soient alignés avec ceux du support puis serrez les vis aux trois empla cements de chaque côté Utilisez les vis à tête bombée 5 mm 9 mm ou les vis à tête plate 5 mm 9 mm en fonction de la forme des trous de vis du support 1 3 4 2 1 Support de montage radio d usine 2 Si le cliquet interfère avec l installation vous pouvez l incli n...

Страница 15: ...ssée Installation sur la colonne de direction 1 Retirez la base du microphone de l agrafe pour micro en faisant glisser la base du microphone tout en enfonçant la languette 1 2 1 Languette 2 Base du microphone 2 Montez le microphone sur la colonne de direction 2 1 1 Bande adhésive à double face 2 Serre fils Utilisez des serre fils vendus séparément pour fixer le fil conducteur aux endroits nécessa...

Страница 16: ...lliche può causare cortocir cuiti con corrispondenti gravi pericoli I cavi potrebbero costituire una seria fonte di pericolo qualora si attorcigliassero alla colonna dello sterzo o alla leva del cambio L apparecchio i relativi cavi e ogni altro collegamento devono essere sistemati in modo che non ostruiscano o impediscano la guida in sicurezza del veicolo Assicurarsi che i cavi e i fili non interf...

Страница 17: ... Rosso 3 Collegare al terminale controllato dall interruttore di accen sione 12 V CC 7 Collegare insieme i cavi dello stesso colore 8 Arancione bianco Al terminale dell interruttore di alimentazione 9 Nero massa Al telaio parte metallica del veicolo a Blu bianco 5 La posizione dei pin del connettore ISO sarà diversa a seconda del tipo di veicolo Collegare 5 e 6 quando il Pin 5 è del tipo controllo...

Страница 18: ...quando si usa questo collegamento 1 3 2 4 3 6 5 5 7 7 2 1 Con amplificatore interno Importante I segnali dei diffusori anteriori e posteriori vengono trasmessi dai cavi dei diffusori quando si usa questo collegamento 1 3 2 4 8 8 1 Controllo remoto di sistema Collegare al cavo blu bianco 2 Amplificatore di potenza venduto separatamente 3 Collegare con cavi RCA venduti separatamente 4 All uscita pos...

Страница 19: ...teriore possono apparire più vicini o più distanti rispetto alla realtà L area delle immagini a schermo intero visualizzate duran te la retromarcia o quando si controlla la parte posteriore del veicolo può differire leggermente 1 2 3 4 5 6 7 8 1 Telecamera di visione posteriore ND BC8 venduta separatamente 2 All uscita video 3 Cavo RCA in dotazione con ND BC8 4 Questo prodotto 5 Marrone R C IN 6 A...

Страница 20: ...dare il veicolo in sicurezza Il prodotto non deve essere installato in un punto del cruscotto delle portiere o dei montanti in cui potreb be interferire con l apertura degli airbag Per informa zioni sull ingombro di apertura degli airbag frontali si raccomanda di consultare il manuale del veicolo Prima dell installazione Rivolgersi al più vicino rivenditore se l installazione richiede la trapanatu...

Страница 21: ...il prodotto in modo che i fori delle viti siano allineati ai fori delle viti sulla staffa quindi serrare le viti nelle tre posizioni per ogni lato Usare le viti a testa tonda 5 mm 9 mm o le viti a testa piatta 5 mm 9 mm a seconda della forma dei fori della vite della staffa 1 3 4 2 1 Staffa di montaggio radio predisposta in fabbrica 2 Se il nottolino interferisce con l installazione è possibile ab...

Страница 22: ...iconoscere la voce del conducente se è in posizione abbassata Installazione sulla colonna di sterzo 1 Scollegare la base del microfono dal mor setto facendola scorrere mentre si preme la linguetta 1 2 1 Linguetta 2 Base del microfono 2 Montare il microfono sulla colonna di sterzo 2 1 1 Nastro a doppio lato 2 Morsetti Usare dei morsetti venduti separatamente per fissare il cavo nei punti necessari ...

Страница 23: ...s hilos no afecten a las piezas móviles del vehículo ni queden atrapados en las mismas especialmente el volante la palanca de cambios el freno de mano los asientos deslizan tes las puertas o cualquier control del vehículo No enrute cables que vayan a estar sometidos a altas temperaturas Si se calienta el aislamiento los cables pueden resultar dañados y como consecuencia puede producirse un cortoci...

Страница 24: ...ul blanco 5 La posición del alfiler del conector ISO variará en función del tipo de vehículo Conecte 5 y 6 cuando el Alfiler 5 sea un tipo de control de antena En otro tipo de vehículo no conecte 5 ni 6 b Azul blanco 6 Conéctelo al terminal de control de relé de la antena auto mática máx 300 mA 12 V CC c Azul blanco Conéctelo al terminal de control del amplificador de poten cia del sistema máx 300...

Страница 25: ...dor interno Importante Las señales del altavoz delantero y del altavoz trasero se emiten desde los cables del altavoz cuando esta conexión está en uso 1 3 2 4 8 8 1 Control remoto del sistema Conéctelo al cable azul blanco 2 Amplificador de potencia se vende por separado 3 Conéctelo al cable RCA se vende por separado 4 A la salida del subwoofer o trasera Conecte un cable según el ajuste del preamp...

Страница 26: ...la vista trasera es posible que parezca que los objetos están más cerca o más lejos de lo que están en realidad El área de la imagen de las imágenes a pantalla completa que aparece al dar marcha atrás o comprobar la parte trasera del vehículo puede diferir ligeramente 1 2 3 4 5 6 7 8 1 Cámara de retrovisor ND BC8 se vende por separado 2 A la salida de vídeo 3 Cable RCA suministrado con ND BC8 4 Es...

Страница 27: ...cir de forma segura No instale este producto delante o cerca del tablero de instrumentos la puerta o el pilar desde los que se abriría uno de los airbags del vehículo Consulte el manual del propietario de su vehículo para obtener información sobre el área de uso de los airbags delan teros Antes de la instalación Póngase en contacto con su distribuidor más cercano si la instalación requiere la perf...

Страница 28: ...l lateral de este producto 1 Fije este producto al soporte de montaje de radio de fábrica Coloque este producto de manera que sus orificios de tornillo estén alineados con los orificios de tornillo del soporte y apriete los tornillos en tres puntos de cada lado Utilice los tornillos de cabeza segmentada 5 mm 9 mm o los tornillos de superficie plana 5 mm 9 mm dependiendo de la forma de los orificio...

Страница 29: ... la voz del conductor si el parasol está bajado Instalación en la columna de dirección 1 Desconecte la base del micrófono del clip del mismo deslizándola a la vez que pulsa la lengüeta 1 2 1 Lengüeta 2 Base del micrófono 2 Monte el micrófono en la columna de dirección 2 1 1 Cinta de doble cara 2 Abrazaderas Utilice abrazaderas se venden por separado para fijar el cable en el interior del vehículo ...

Страница 30: ...en beschädigt wird kann ein Kurzschluss auftreten und zu erhebli chen Gefahren führen Es ist extrem gefährlich wenn zugelassen wird dass sich das Kabel um die Lenksäule oder den Schalthe bel wickelt Achten Sie darauf dieses Produkt seine Kabel und die Verdrahtung fernzuhalten damit sie die Fahrt nicht blockieren oder behindern Es muss sichergestellt sein dass die Kabel nicht die Bedienung von bewe...

Страница 31: ...geben Stellen Sie eine Verbindung zum System Fernsteuerungsterminal eines externen Leistungsverstärkers zum Auto Antennenrelais Steuerungsterminal oder zum Antennenverstärker Leistungssteuerungsterminal her max 300 mA 12 V Gleichspannung Das Steuersignal wird über die blaue weiße Leitung ausgegeben selbst wenn die Audioquelle abgeschaltet wird Dieses Produkt 1 2 3 4 5 6 7 8 1 Mikrofon 4 m AVH 280B...

Страница 32: ...eteilt werden In diesem Fall müssen Sie beide Anschlüsse verbinden Die Position des Handbremsenschalters ist vom Fahrzeugmodell abhängig Einzelheiten erfahren Sie aus der Fahrzeuganleitung oder vom Händler Wenn ein Subwoofer an diesem Produkt anstatt eines Hecklautsprechers angeschlossen ist ändern Sie die Heckausgangseinstellung in der Ersteinstellung Der Subwoofer Ausgang diese Produktes ist mon...

Страница 33: ...ter Ihnen befindet WARNUNG EINGANG NUR FÜR DAS RÜCKWÄRTSFAHREN ODER DIE SPIEGELFUNKTION DER HECKKAMERA VERWENDEN ANDERE VERWENDUNGSZWECKE KÖNNEN ZU VERLETZUN GEN ODER SCHÄDEN FÜHREN VORSICHT Das Bild kann spiegelverkehrt angezeigt werden Mit der Heckkamera können Sie Anhänger im Auge behal ten oder rückwärts in einen engen Parkplatz einparken Darf nicht zu Unterhaltungszwecken verwendet werden In ...

Страница 34: ...en Installation sicher die mitgelieferten Teile in der an gegebenen Weise zu nutzen Falls irgendwelche Teile nicht mit diesem Produkt geliefert werden nutzen Sie kompatible Teile auf die angegebene Weise nachdem Sie die Kompatibilität der Teile über Ihren Händler geprüft haben Falls andere als die gelieferten oder kompatiblen Teile verwendet werden können sie in terne Teile dieses Produktes beschä...

Страница 35: ...kring Ziehen Sie die obere und die untere Seite des Abdeckrings nach außen um den Abdeckring zu entfernen 1 1 Abdeckring 2 Führen Sie die mitgelieferten Entriegelungsschlüssel bis zum Einrasten an beiden Seiten des Geräts ein 3 Ziehen Sie das Gerät aus der Halterung 1 1 Entriegelungsschlüssel Einbau mit der Halterung 1 Installieren Sie die Halterung im Armaturenbrett 2 Befestigen Sie den Montagera...

Страница 36: ...kabel in die Nut 1 2 1 Mikrofonkabel 2 Nut 2 Befestigen Sie den Mikrofon Clip an der Sonnenblende 1 2 1 Mikrofon Clip 2 Kabelklemmen Das Kabel je nach Bedarf mit getrennten erhältlichen Kabelklemmen im Fahrzeuginnenraum sichern Installieren Sie das Mikrofon an der Sonnenblende wenn sie nach oben geklappt ist Es kann die Stimme des Fahrers erken nen wenn die Sonnenblende nach unten geklappt ist Bef...

Страница 37: ... kabels en de bedrading zo installeren en wegwerken dat ze de besturing niet kunnen belemmeren of hinderen Zorg ervoor dat de kabels en de bedrading niet in de weg zitten bij of vast kunnen komen in de bewegende onderdelen van het voertuig met name het stuur de versnelling de handrem de rails van de verstelbare stoelen of andere bedieningsorganen van het voer tuig Laat de draden niet langs plaatse...

Страница 38: ... DC 7 Sluit draden van dezelfde kleur op elkaar aan 8 Oranje wit Voor het verlichten van de schakelterminal 9 Zwart aarding Naar chassis voertuig metaal a Blauw wit 5 De pinpositie van de ISO aansluiting verschilt afhankelijk van het type voertuig Sluit 5 en 6 aan wanneer pin 5 een antennebesturingstype is Sluit nooit 5 en 6 aan in een ander type voertuig b Blauw wit 6 Aansluiten op de bedieningsa...

Страница 39: ...uik is 1 3 2 4 3 6 5 5 7 7 2 1 Met interne versterker Belangrijk Signalen van de luidspreker voor en achter worden uitgevoerd via de luidsprekerdraden wanneer deze aansluiting in gebruik is 1 3 2 4 8 8 1 Systeem afstandsbediening Aansluiten op de blauw witte kabel 2 Eindversterker los verkrijgbaar 3 Aansluiten met RCA kabel los verkrijgbaar 4 Naar uitvoer achter of subwooferuitgang Sluit een kabel...

Страница 40: ...en Objecten op het beeld van de achteruitkijkcamera kunnen dichterbij of verder weg lijken dan ze in werkelijkheid zijn Het beeldgebied van beelden op volledig scherm dat wordt weergegeven tijdens het achteruitrijden of tijdens het controleren van de achterkant van het voertuig kan iets verschillen 1 2 3 4 5 6 7 8 1 Achteruitkijkcamera ND BC8 los verkrijgbaar 2 Naar video uitgang 3 RCA kabel meege...

Страница 41: ...voor noodverlichting of iii de bestuurder kan hinderen bij het veilig bedienen van het voertuig Installeer het product in geen geval voor of naast de locaties in het dashboard het portier of de deurstijl van waar de airbags van uw voertuig tevoorschijn zullen komen Raadpleeg het instructieboekje van uw voertuig voor de locatie van de voorairbags Voor de installatie Raadpleeg uw dichtstbijzijnde de...

Страница 42: ...fgaten aan de zijkant van dit product 1 Het product op de montagebeugel van de origi nele autoradio vastzetten Plaats het product zo dat de schroefgaten uitgelijnd zijn met de schroefgaten in de beugel en draai aan elke kant op drie plaat sen de schroeven vast Gebruik afhankelijk van de vorm van de schroefgaten van de beugel schroeven met afgeplatte bolvormkop 5 mm 9 mm of schroeven met platte kop...

Страница 43: ...r niet opvan gen wanneer de zonneklep naar beneden is geklapt Installatie op stuurkolom 1 Maak de microfoonvoet los van de micro foonklem door de microfoonvoet te schuiven terwijl op het lipje wordt gedrukt 1 2 1 Lipje 2 Microfoonvoet 2 Bevestig de microfoon op de stuurkolom 2 1 1 Dubbelzijdig plakband 2 Klemmen Gebruik los verkrijgbare klemmen om de draad waar nodig binnenin de auto te bevestigen...

Страница 44: ...44 44 QRD3355 A ...

Страница 45: ...45 45 QRD3355 A ...

Страница 46: ...46 46 QRD3355 A ...

Страница 47: ...47 47 QRD3355 A ...

Страница 48: ...901 TEL 905 479 4411 PIONEER EUROPE NV Haven 1087 Keetberglaan 1 B 9120 Melsele Belgium Belgique TEL 0 3 570 05 11 PIONEER ELECTRONICS ASIACENTRE PTE LTD 253 Alexandra Road 04 01 Singapore 159936 TEL 65 6472 7555 PIONEER ELECTRONICS AUSTRALIA PTY LTD 5 Arco Lane Heatherton Victoria 3202 Australia TEL 03 9586 6300 PIONEER ELECTRONICS DE MEXICO S A DE C V Blvd Manuel Avila Camacho 138 10 piso Col Lo...

Отзывы: