Pioneer Eclipse PE225FP Скачать руководство пользователя страница 12

12

How to Operate the Machine

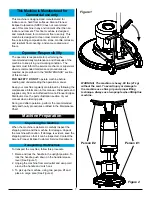
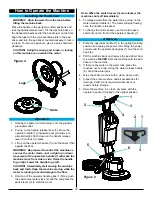
Installing the Pad Driver

WARNING!  Drain the water from the tank before 

tilting the machine back.

Place the handle in the upright (vertical) positions and 

lock the handle release lever. Tilt the machine back on 

the transport wheels and let the handle rest on the floor. 
Align the lugs with the corresponding slots in the pad 

driver and turn the pad driver counterclockwise to lock it 

in place. To remove pad driver, give it a quick hard turn 

clockwise.

CAUTION!  Using the wrong pad, brush, or tooling 

on this machine can overload the motor.
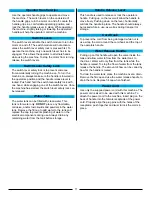
Operation

1.  Unwrap the power cord and plug it into the properly 

grounded outlet.

2.  Pull up on the handle release lever (5). Move the 

operator handle (7) downward until your arms are 

almost straight. Push down on the handle release 

lever (5) to lock it in place.

3.  Lift up on the operator handle (7) until the driver if flat 

against the floor.

WARNING!  Be prepared to control the machine as 

soon as the motor starts. Just a slight up or down 

movement of the operators handle (7) will make the 

machine move from side to side. Raise the handle 

to go right. Lower the handle to go left.
CAUTION!  Immediately start moving the machine 

back and forth. Keep the machine moving while the 

motor is running to avoid damage to the floor.

4.  Hold one of the operator handle grips (1) firmly, push 

the switch lever safety lock (2) and the compress the 

switch lever (3) to start the motor.

Note: When the switch levers (3) are released, the 

machine shuts off immediately.

5.  To release water from the water tank, pull up on the 

water release handle (4). The water will stop flowing 

once the handle is released.

6.  To change the motor speed, use the motor speed 

switch (8) on the front of the operators handle (7).

After Use

1.  Place the operators handle (7) in the upright (vertical) 

position and unplug the power cord. Wrap the power 

cord around the operator hand grips (1) and the cord 

hook (6).

2.  Tilt the machine back and remove the pad driver from 

the machine. 

NEVER

 store the machine with the pad 

driver on the machine.

3.  If there is any water in the water tank, place the 

machine over a drain. Using the water release handle 

(8), drain the water tank.

4.  Wipe the entire machine with a clean, damp cloth.
5.  Inspect the entire machine and all accessories for 

damage. Perform any required maintenance or 

repairs before storage.

6.  Store the machine in a clean, dry place with the 

operator handle (7) locked in the upright position.
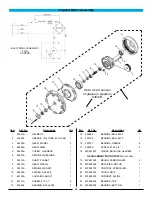
Slots

Lugs

Figure 4

6

3

5

2

1

7

Figure 5

4

2 1

3

Содержание PE225FP

Страница 1: ...1 Floor Polisher PE225FP Operator s Manual...

Страница 2: ...ng Law to cause cancer birth defects or other reproductive harm In certain locations including the State of California purchasers of these Products that place them in service at an employment job site...

Страница 3: ...ION statements are ignored Read and observe all CAUTION statements included in the Operation Manual and attached to the machine Safety Precautions 4 Technical Specifications 5 Operator Responsibility...

Страница 4: ...cation or alteration to the machine Any unauthorized modification or alteration to this machine voids all warranties WARNING Electrical components of this machine can short out if exposed to water or...

Страница 5: ...st Aluminum Tank Capacity Optional 2 50 gal 9 5 L 2 50 gal 9 5 L 2 50 gal 9 5 L Description 225FP17EB 225FP20EB 225FP17E 225FP20E Voltage V 127 127 230 230 Frequency Hz 60 60 50 50 Current A 15 15 8 8...

Страница 6: ...Brush Size 17 43 cm 20 51 cm Cord HO5VVF3G1 5mm sq HO5VVF3G1 5mm sq Cord Length 40 12 m 40 12 m Height w Handle 46 117 cm 46 117 cm Width 16 5 42 cm 19 5 50 cm Length 23 59 cm 24 5 62 cm Weight w cord...

Страница 7: ...enance information in this manual Order parts and supplies only from an Authorized Amano Pioneer Eclipse Distributor Use the parts illustration section of your manual when ordering parts During and af...

Страница 8: ...T modify the plug provided with the product if it will not fit the outlet have a proper outlet installed by a qualified electrician This product is for use on a nominal 120 volt circuit and has a grou...

Страница 9: ...ING Always use this machine with an AC three conductor electrical system connected to the electrical ground Replace any worn cut or damaged cords Peplace any damaged plugs receptacles or connector bod...

Страница 10: ...10 Power Cord Water Release Handle Operator Handle Grips Water Tank Handle Release Lever Cord Hook Switch Lever Safety Lock Switch Levers Machine Components...

Страница 11: ...ic liquids and powders in the water tank Remove the fill cap to add water to the tank and replace the cap to prevent splashing of water on the electrical components during use Always drain any remaini...

Страница 12: ...ION Immediately start moving the machine back and forth Keep the machine moving while the motor is running to avoid damage to the floor 4 Hold one of the operator handle grips 1 firmly push the switch...

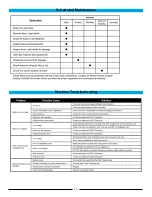
Страница 13: ...13 Machine Troubleshooting Scheduled Maintenance...

Страница 14: ...________________________________________________ ________________________________________________ ________________________________________________ ________________________________________________ ____...

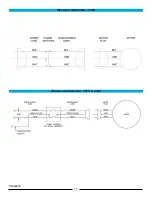
Страница 15: ...15 Electrical Schematic 120V Electrical Schematic 127V 230V RF068800...

Страница 16: ...16 Main Assembly RF050600 111814 32 33 33 34 35 37 31 36 5 1 11 15 30 15 2 3 4 7 16 17 14 18 19 22 21 26 28 27 25 20 23 24 15 8 13 29 9 12 10 6...

Страница 17: ...0 61741A ARM LINK RIGHT 1 21 61725A AXLE 1 22 61740A ARM LINK LEFT 1 Item Ref No Description Qty 23A 53650A MOTOR GEARBOX 120V 1 23B 53652A MOTOR GEARBOX 230V 1 23C AS001900 MOTOR GEARBOX 120V 2SPD 1...

Страница 18: ...18 Main Assembly 225FP17E6 225FP20E6 RF072800 080117 20 19 7 2 17 16 15 14 13 1 5 12 8 1 3 11 10 18 9 4 13 15 14 16 17 6...

Страница 19: ...00 1 6 MOTOR GEARBOX 1 5HP 230 60 MP521800 1 7 MAIN FRAME 21088A 1 8 SCREW 5 16 18X1 63 HRCS SEMS 80294A 4 9 AXLE 50 X 11 34 61725A 1 10 LINK ARM LEFT 61740A 1 11 LINK ARM RIGHT 61741A 1 12 WASHER BOW...

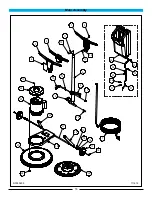
Страница 20: ...20 Handle Assembly 225FP E E6 Models RF071600 060917 4 6 3 2 11 10 1 7 9 1 5 12 8...

Страница 21: ...1 2 CLAMP HANDLE C2K 50781A 1 3 HANDLE TUBE 61373A 1 4 HANDLE REAR CFP 21075A 1 5 HANDLE FRONT CFP 21074A 1 6 INTERLOCK ASM 10687A 1 7 SCREW 10 32 UNF X 75 80284A 6 8 WASHER LK 10 EXT TOOTH 980603 2 9...

Страница 22: ...22 HANDLE ASSEMBLY 225FP17EB AND 225FP20EB MODELS RF066700...

Страница 23: ...ENSION C2K 2 9 85383A SCREW 10 32 X 3 4 PAN HD 6 10 920722 BUT 10 32 ELASTIC STOP ZN PL 7 11 962957 SCREW 10 16 X 1 2 HI LO 2 12 50930A CORD RETAINER C2K 1 13 77094A LABEL GROUND SYMBOL 1 14 170686 NU...

Страница 24: ...y 1 40694A CAPACITOR START 1 2 53191A CAPACITOR RUN 1 3 53360A COVER CAPACITOR 2 4 53190A SWITCH START 1 5 902550 BEARING BALL 6203 1 Item Ref No Description Qty 6 53848A PLATE MOUNTING 1 7 40698A END...

Страница 25: ...313A GEAR PINION 1 9 58314A RETAINER SHAFT 1 Item Ref No Description Qty 10 58520A SPACER SLEEVE 1 11 69195A COUPLING SHAFT 1 12 80141A SCREW SH 10 X 1 6 13 902606 BEARING BALL 6002 3 14 902654 BEARIN...

Страница 26: ...BEARING BALL 6002 3 Item Ref No Description Qty 14 902654 BEARING BALL 6204 1 15 902736 BEARING BALL 6010 1 16 902737 BEARING NEEDLE 6 17 84808A SCREW 10 X 3 4 6 18 MP487800 FLANGE MOUNTING GEARBOX 1...

Страница 27: ...are warranted only during the balance of the original warranty period All defective parts replaced under these warranties become the property of Amano Pioneer Eclipse Corporation WARRANTY SERVICE To o...

Страница 28: ...75 l USA www pioneereclipse com 1 336 372 8080 1 800 367 3550 Fax 1 336 372 2913 2017 Amano Pioneer Eclipse Corporation LT071200 225FP_G Machinery Directive 2006 42 EC ROHS Directive 2011 65 EU EMC Di...

Отзывы: