background image


2. Please insert a 2G SIM card into the device. Please note the device only supports a Micro SIM card, which 
also needs to be GSM band and GPRS enabled. 
3. Check the GSM and GPS signal on the display screen after turning on the device. If there is no GSM signal, 
the SIM card may not be installed correctly. 
4.  Please  change  the  SIM  card  only  when  the  device  is  powered  off,  otherwise  the  SIM card  may be 
damaged. 
5. The device can’t be turned off using the power button on the watch, after it is powered on and the central 
phone number is programmed in. If you need to turn it off, please send shutdown command via App. 
6. Don’t disassemble or modify the product, to avoid damage to the product. 
7.  If  the  product  is  damaged  as  a  result  of  the  breach  of  the  warnings  above,  we  will  not  bear  any  legal 
responsibility.


Chapter 2 - Getting Started


2.1 Install the SIM card 

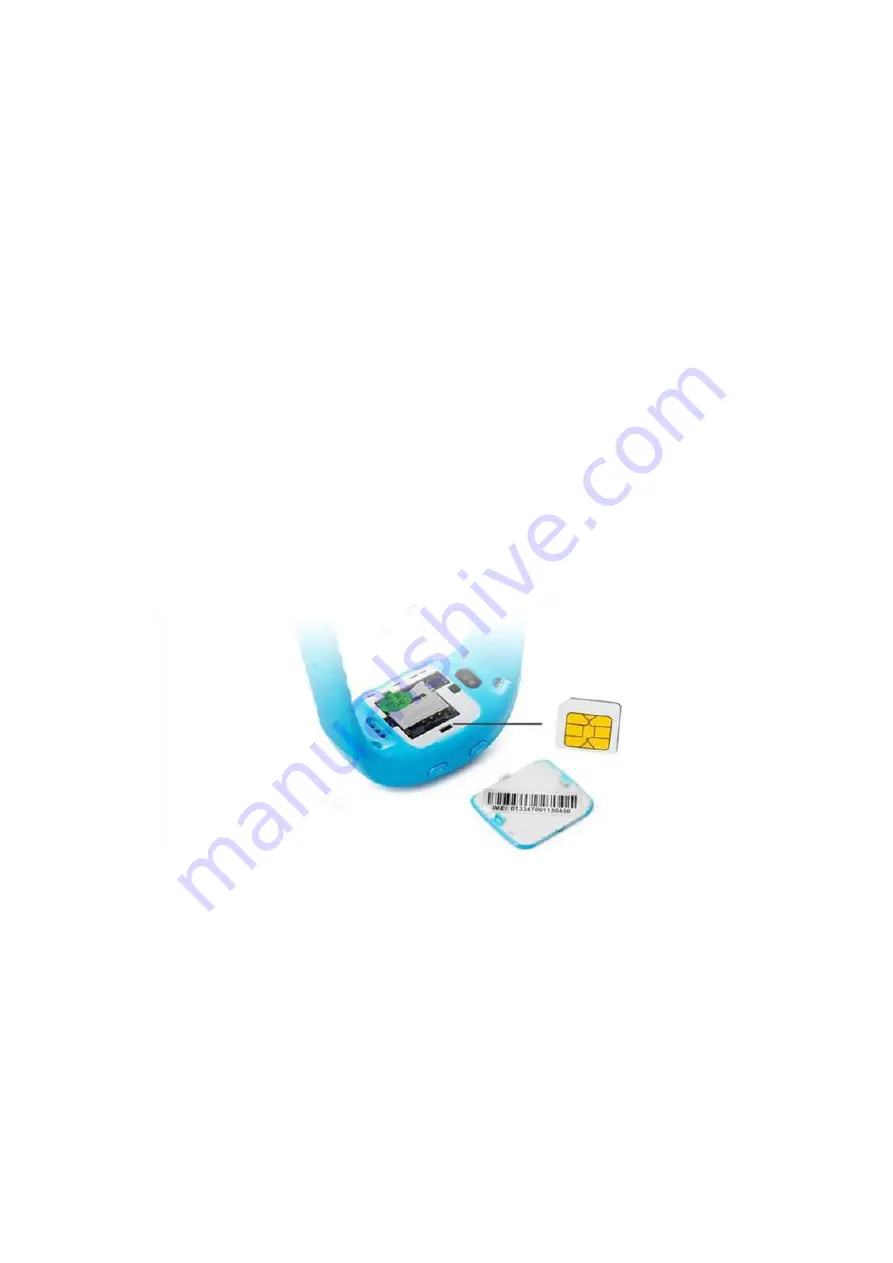
1. Open the cover on the underside of the watch and then insert the micro SIM card into the SIM card slot, 
shown in the photo below. 


2. Clip cover back into place and then press the power button for 3 seconds to start the device after the SIM 
card is installed correctly. 

2.3 Download the App


For Android,   

You can download the App from "Play Store" by searching "GREATGPS" 

For iPhone,   

You can download the App from "Apple Store" by searching "GREATGPS" 


Содержание TK89

Страница 1: ...1 PingMe GPS Watch Phone User Guide ...

Страница 2: ...ll button and two way voice function the user can have a voice conversation with their kids whenever and wherever required 1 2 Product interface 1 SOS button User can press call button to initiate a phone call to the emergency number Press to answer incoming phone call Short Press to playback audio messages 2 Power To switch watch on press power button for 3 5 seconds to power on the device To swi...

Страница 3: ...t volume up Toggle between Time and Date screens 1 3 In the box 1 4 How to charge Connect one end of the USB charging cable to a USB port and the charger end with four gold teeth into the allotted slot on the underside of the PingMe GPS watch phone for charging as pictured below Usually needs 2 3 hours for charging fully 1 5 Warnings 1 Please check the device and accessories after receiving the pa...

Страница 4: ...If you need to turn it off please send shutdown command via App 6 Don t disassemble or modify the product to avoid damage to the product 7 If the product is damaged as a result of the breach of the warnings above we will not bear any legal responsibility Chapter 2 Getting Started 2 1 Install the SIM card 1 Open the cover on the underside of the watch and then insert the micro SIM card into the SIM...

Страница 5: ...at the same time please let us know and we will set you up correctly Chapter 3 How to use the App Functions 3 1 Live tracking User can locate and track both the position of the PingMe GPS Watch Phone and the parent s Smart Phone via the app For indoor location the PingMe watch can locate the position by WiFi mapping and LBS For locating outdoors the integrated GPS tracker in the PingMe watch obtai...

Страница 6: ... the watch select the Previous Track button This function can playback the movement history of the watch as far back as three months Select your date range for which movement history is required for and then select the Search button The movement history will be shown on the map ...

Страница 7: ...ecommended radius is 500 meters Type the Name of your Geofence and save settings by clicking Save The device will send a message when the device leaves the range set in the Geofence 3 4 Love Rewards Parents can send their kids a Love Reward in the form of a digital heart to reward them for good behavior or just to let them know you re thinking about them Tap the Love rewards icon on the interface ...

Страница 8: ... geofence alarm etc It will show what type of message was sent the date and time of the message The Alarm Settings button will give you the option to allow for these messages to be sent to you and watch Click on Enable to activate You are then able to choose Sound or vibration by sliding the bar to the right showing the green bar ...

Страница 9: ...eply by pressing the Power button for several seconds and then recording a voice message This will in turn then be sent to the parents phone and accessed via clicking on the speech bubble on the App indicated below Chapter 4 Settings Select Settings in the main front menu then you will have access to a number of different settings of the device Settings include Working mode Admin number Emergency ...

Страница 10: ...mother button 4 4 Setup whitelist You can nominate which phone numbers can phone the device by selecting the Whitelist button You are presented with 5 boxes where in you type the numbers you would like to have the ability to phone your child s PingMe So only up to a maximum of 5 people can then phone your child s PingMe 4 5 Setup Phonebook You can set up a Maximum of 10 contact numbers via the Pho...

Страница 11: ...one number etc 4 Change password The user can change the password of the device after the initial registration process Chapter 6 Troubleshooting Issue Resolution Device is not enabled on App Please check if 1 SIM card is not enabled 2 APN is not setup Device is offline on App Please check if 1 SIM card has no signal 2 GPRS is cancelled or not enabled 3 The SIM card does not have enough credit Posi...

Отзывы: