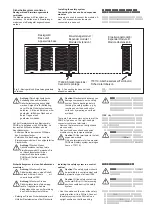
auf einer Normschiene. Führen Sie das
Sicherheitssystem gerade auf die
Normschiene, so dass die Erdungsfedern
am Sicherheitssystem auf die Norm-
schiene gedrückt werden.
• Um die EMV-Anforderungen einzuhalten,
muss die Normschiene mit dem Schalt-
schrankgehäuse niederohmig verbunden
sein.
Sicherheitssystem inbetriebnehmen
Inbetriebnahme vorbereiten:
Beachten Sie bei der Vorbereitung der
Inbetriebnahme:
Achtung!
Die steckbaren
Anschlussklemmen der Relaisaus-
gänge, die Netzspannung führen, nur
im
spannungslosen
Zustand ziehen
und stecken.
• Das Sicherheitssystem und die Eingangs-
kreise müssen immer aus einem Netzteil
versorgt werden. Das Netzteil muss den
Vorschriften für Kleinspannungen mit
sicherer Trennung (SELV, PELV) entspre-
chen.
• Für die Versorgungsanschlüsse 24 V und
0 V (Halbleiterausgänge) sowie A1 und A2
(Netzteil) sind jeweils 2 Anschluss-
klemmen vorhanden. Damit kann die
Versorgungsspannung auf mehrere
Anschlüsse geschleift werden. Der Strom
darf max. 9 A an jeder Klemme betragen.
• Verwenden Sie Leitungsmaterial aus
Kupferdraht mit einer Temperaturbe-
ständigkeit von 60/75 °C.
• Das Anzugsdrehmoment der Schrauben
auf den Anschlussklemmen finden Sie im
Kapitel "Technische Daten".
Betriebsbereitschaft herstellen:
Sicherheitssystem PNOZmulti zum ersten
Mal in Betrieb nehmen:
• Verdrahten Sie die Ein- und Ausgänge des
Basisgeräts und der Erweiterungsmodule
entsprechend des Schaltplans.
• Schieben Sie die Chipkarte mit der
Sicherheitssschaltung in den Chipkarten-
schacht des Basisgeräts.
• Legen Sie die Versorgungspannung an:
Klemmen
24 V
und
A1 (+)
: + 24 V DC
Klemmen
0 V
und
A2 (-)
: 0 V
Chipkarte wechseln, neue Sicherheits-
schaltung in das Sicherheitssystem
PNOZmulti übertragen:
Die Konfigurationsdaten, die zuvor in das
Sicherheitssystem PNOZmulti übertragen
wurden, müssen gelöscht werden.
• Schalten Sie die Versorgungsspannung
ab.
• Klemmen Sie alle Ausgangsklemmen ab.
• Brücken Sie OA0-I19 am Basisgerät.
• Legen Sie die Versorgungspannung an:
Klemmen
24 V
und
A1 (+)
: + 24 V DC
Klemmen
0 V
und
A2 (-)
: 0 V
• Warten Sie, bis die LED "DIAG" am
Basisgerät blinkt.
Der Speicher des Sicherheitssystems
PNOZmulti ist nun leer.
• Schalten Sie die Versorgungsspannung
ab.
• Entnehmen Sie die alte Chipkarte aus dem
Chipkartenschacht des Basisgeräts.
• Entfernen Sie die Brücke von OA0-I19 am
Basisgerät.
• Schließen Sie die Erweiterungsmodule
entsprechend des Schaltplans an das
Basisgerät an.
springs on the safety system are pressed
on to the DIN rail.
• To comply with EMC requirements, the
DIN rail must have a low impedance
connection to the control cabinet housing.
Commissioning the safety system
Preparing for commissioning:
Please note the following when preparing for
commissioning:
Caution!
The plug-in connection
terminals on the relay outputs carry
mains voltage and should only be
connected and disconnected when
the
voltage is switched off
.
• Power for the safety system and input
circuits must always be provided from a
single power supply. The power supply
must meet the regulations for extra low
voltages with safe separation (SELV,
PELV).
• Two connection terminals are available for
each of the supply connections 24 V and 0
V (semiconductor outputs), plus A1 and A2
(power supply). This means that the supply
voltage can be looped through several
connections. The current at each terminal
may not exceed 9 A.
• Use copper wire that will withstand
temperatures of 60/75 °C.
• The torque setting of the screws on the
connection terminals is specified in the
"Technical details" section.
Preparing the unit for operation:
Commissioning the PNOZmulti safety
system for the first time:
• Wire the inputs and outputs on the base
unit and expansion modules in accordance
with the circuit diagram.
• Insert the chip card containing the safety
circuit into the base unit’s chip card slot.
• Connect the supply voltage:
Terminals
24 V
and
A1 (+)
: + 24 VDC
Terminals
0 V
and
A2 (-)
: 0 V
Changing the chip card, downloading a
new safety circuit to the PNOZmulti safety
system:
The configuration data that was previously
downloaded to the PNOZmulti safety system
must be deleted.
• Switch off the supply voltage.
• Disconnect all the output terminals.
• Jumper OA0-I19 on the base unit.
• Connect the supply voltage:
Terminals
24 V
and
A1 (+)
: + 24 VDC
Terminals
0 V
and
A2 (-)
: 0 V
• Wait until the "DIAG" LED on the base unit
flashes.
The memory of the PNOZmulti safety system
is now clear.
• Switch off the supply voltage.
• Remove the old chip card from the chip
card slot on the base unit.
• Remove the jumper from OA0-I19 on the
base unit.
• Connect the expansion modules to the
base unit in accordance with the circuit
diagram.
• Wire the inputs and outputs on the base
・EMC指令を守るために、DINレールは制御
盤ハウジングに導電接続をしなければな
りません。
安全コントローラの運転
安全コントローラの運転
安全コントローラの運転
安全コントローラの運転
安全コントローラの運転
運転準備:
運転準備:
運転準備:
運転準備:
運転準備:
運転準備をする際には、以下に留意してく
ださい。
注意!
注意!
注意!
注意!
注意! リレー出力のプラグイン式
接続端子から主電源の電圧が流れま
す。電圧が切れた状態で
電圧が切れた状態で
電圧が切れた状態で
電圧が切れた状態で
電圧が切れた状態で接続した
り、はずしたりしてください。
・安全コントローラと入力回路用の電力は
必ず単一の電源から供給してください。
供給電源は、安全分離に関す低電圧指令
に従ってください(SELV,PELV)。
・24 Vと0 V(半導体出力)およびA1とA2
(電源用)のそれぞれ2つの供給電圧用接続
端子があります。つまり、供給電圧は複
数の接続を通してループさせることがで
きます。各端子の電流は9Aを超えること
はできません。
・配線には耐熱温度が60/75℃のものを使用
してください。
・接続端子のネジのトルク設定は、"技術
データ
にあります。
運転準備:
運転準備:
運転準備:
運転準備:
運転準備:
PNOZmulti
PNOZmulti
PNOZmulti
PNOZmulti
PNOZmulti 安全コントローラの初回起動:
安全コントローラの初回起動:
安全コントローラの初回起動:
安全コントローラの初回起動:
安全コントローラの初回起動:
・回路図に従って、ベースユニットと増設
モジュールの入出力を配線してくださ
い。
・安全回路を含むチップカードを、ベース
ユニットのチップカードスロットに挿入
してください。
・供給電圧を接続してください :
24 V
24 V
24 V
24 V
24 V および A1 (+)
A1 (+)
A1 (+)
A1 (+)
A1 (+)端子 : + 24 VDC
0 V
0 V
0 V
0 V
0 V および A2 (‑)
A2 (‑)
A2 (‑)
A2 (‑)
A2 (‑)端子 : 0 V
チップカードの交換、
チップカードの交換、
チップカードの交換、
チップカードの交換、
チップカードの交換、PNOZmulti
PNOZmulti
PNOZmulti
PNOZmulti
PNOZmulti 安全コン
安全コン
安全コン
安全コン
安全コン
トローラへの新規安全回路のダウンロー
トローラへの新規安全回路のダウンロー
トローラへの新規安全回路のダウンロー
トローラへの新規安全回路のダウンロー
トローラへの新規安全回路のダウンロー
ド:
ド:
ド:
ド:
ド:
以前にPNOZmulti 安全コントローラにダウ
ンロードされたコンフィグレーション デー
タは、必ず消去してください。
・供給電圧を切ります。
・すべての出力端子をはずします。
・ベースユニットのOA0とI19端子を接続し
ます。
・供給電圧を接続します:
24 V
24 V
24 V
24 V
24 V および A1 (+)
A1 (+)
A1 (+)
A1 (+)
A1 (+)端子 : + 24 VDC
0 V
0 V
0 V
0 V
0 V および A2 (‑)
A2 (‑)
A2 (‑)
A2 (‑)
A2 (‑)端子 : 0 V
・ベースユニットの "DIAG" LEDが点滅する
まで待機してください。
PNOZmulti 安全コントローラのメモリーは
消去されました。
・供給電圧を切ります。
・古いチップカードを、ベースユニットの
チップカードスロットから取り出しま
す。
・ベースユニットのOA0とI19の接続をはず
します。
・増設モジュールを、回路図に従ってベー
スユニットに接続します。
Содержание PNOZ mo1p
Страница 7: ...Notizen Notes Notes...


