1
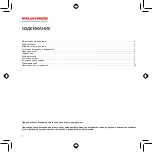
СОДЕРЖАНИЕ
Перед использованием внимательно прочитайте инструкцию.
Производитель постоянно работает над улучшением дизайна и характеристик своей продукции, поэтому некоторые
узлы и детали могут отличаться от образцов, приведенных в инструкции.
Меры предосторожности . . . . . . . . . . . . . . . . . . . . . . . . . . . . . . . . . . . . . . . . . . . . . . . . . . . . . . . . . . . . . . . . . . . . . . . . . . . . . . . . . . . . . . . . . . . . . . . . 3
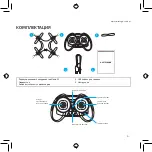
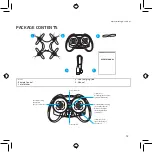
Комплектация . . . . . . . . . . . . . . . . . . . . . . . . . . . . . . . . . . . . . . . . . . . . . . . . . . . . . . . . . . . . . . . . . . . . . . . . . . . . . . . . . . . . . . . . . . . . . . . . . . . . . . . . . . . . 4
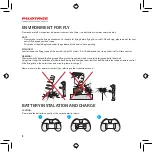
Выбор места для полетов . . . . . . . . . . . . . . . . . . . . . . . . . . . . . . . . . . . . . . . . . . . . . . . . . . . . . . . . . . . . . . . . . . . . . . . . . . . . . . . . . . . . . . . . . . . . . . . . 5
Установка батарейки в передатчик . . . . . . . . . . . . . . . . . . . . . . . . . . . . . . . . . . . . . . . . . . . . . . . . . . . . . . . . . . . . . . . . . . . . . . . . . . . . . . . . . . . . . . 5
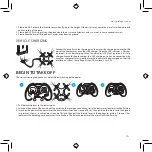
Перед полетом . . . . . . . . . . . . . . . . . . . . . . . . . . . . . . . . . . . . . . . . . . . . . . . . . . . . . . . . . . . . . . . . . . . . . . . . . . . . . . . . . . . . . . . . . . . . . . . . . . . . . . . . . . . 6
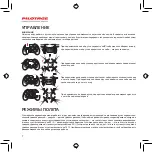
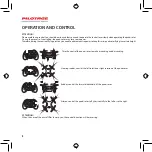
Управление . . . . . . . . . . . . . . . . . . . . . . . . . . . . . . . . . . . . . . . . . . . . . . . . . . . . . . . . . . . . . . . . . . . . . . . . . . . . . . . . . . . . . . . . . . . . . . . . . . . . . . . . . . . . . . 7
Режимы полета . . . . . . . . . . . . . . . . . . . . . . . . . . . . . . . . . . . . . . . . . . . . . . . . . . . . . . . . . . . . . . . . . . . . . . . . . . . . . . . . . . . . . . . . . . . . . . . . . . . . . . . . . . . 7
Функция кульбит . . . . . . . . . . . . . . . . . . . . . . . . . . . . . . . . . . . . . . . . . . . . . . . . . . . . . . . . . . . . . . . . . . . . . . . . . . . . . . . . . . . . . . . . . . . . . . . . . . . . . . . . . 8
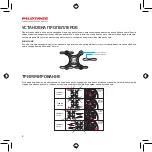
Установка пропеллеров . . . . . . . . . . . . . . . . . . . . . . . . . . . . . . . . . . . . . . . . . . . . . . . . . . . . . . . . . . . . . . . . . . . . . . . . . . . . . . . . . . . . . . . . . . . . . . . . . . 9
Триммирование . . . . . . . . . . . . . . . . . . . . . . . . . . . . . . . . . . . . . . . . . . . . . . . . . . . . . . . . . . . . . . . . . . . . . . . . . . . . . . . . . . . . . . . . . . . . . . . . . . . . . . . . . . 9
Неполадки и их устранение . . . . . . . . . . . . . . . . . . . . . . . . . . . . . . . . . . . . . . . . . . . . . . . . . . . . . . . . . . . . . . . . . . . . . . . . . . . . . . . . . . . . . . . . . . . . . . 10
Содержание NANO-X2
Страница 1: ...NANO X2...
Страница 2: ...1 3 4 5 5 6 7 7 8 9 9 10...
Страница 4: ...3 1 2 3 4 5 6 7 8 9 10 11 12 13 14 15 16 17 18 14...
Страница 5: ...4 www pilotage rc com 1 2 4 3 5 1 Nano X2 2 3 4 USB 5 USER S MANUAL...
Страница 6: ...5 14 25 1 2 3 1 1 2 3...
Страница 7: ...6 www pilotage rc com USB USB USB USB USB USB USB USB USB USB 5 0 5 V 1 2 1 5V 3 1 2 3 2 3 1 1 3 2 2 3...
Страница 8: ...7 30 50 70...
Страница 9: ...8 www pilotage rc com 3 360C 1...
Страница 10: ...9...
Страница 11: ...10 www pilotage rc com 1 2 3 1 2 USB...
Страница 21: ...20 www pilotage rc com NOTES...
Страница 22: ...21...
Страница 23: ...22 www pilotage rc com...
Страница 24: ...www pilotage rc com...


