1
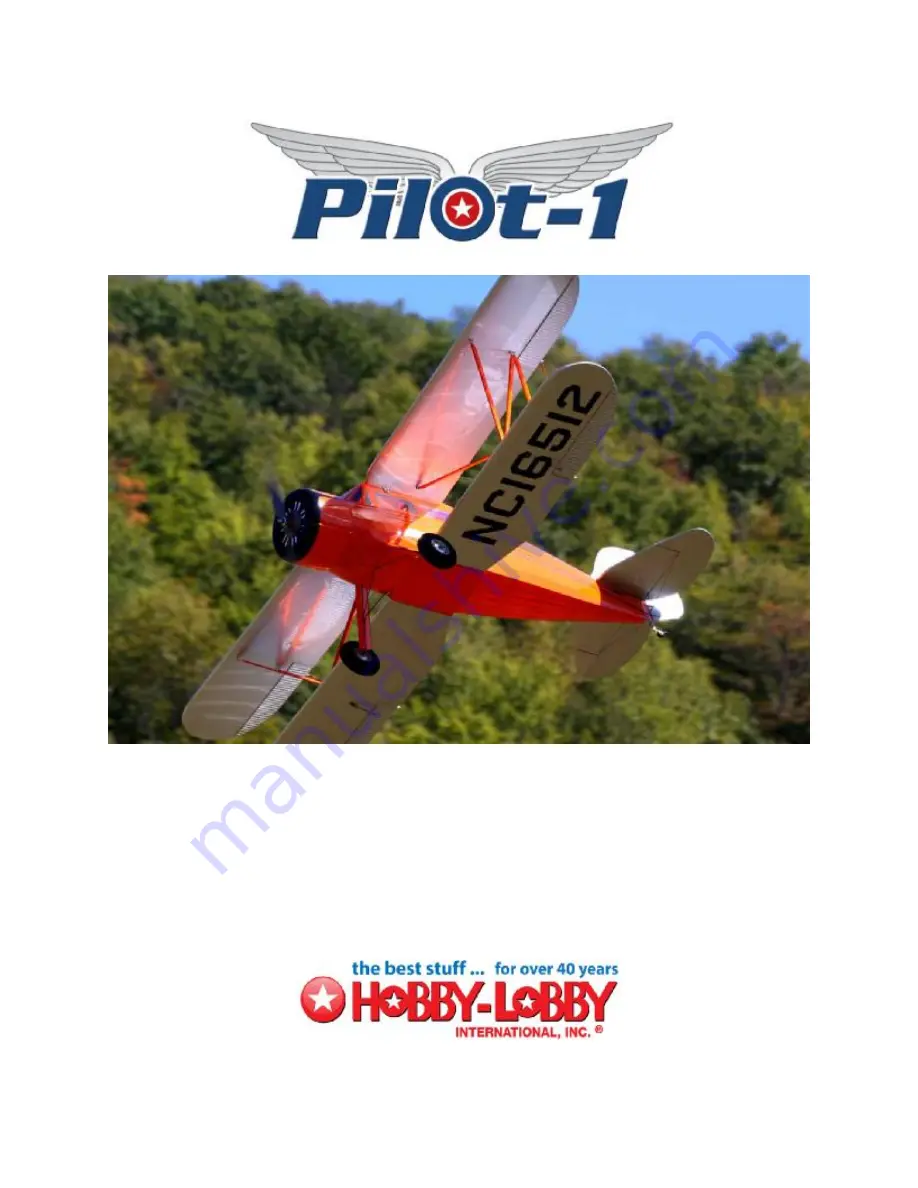
1/4 scale 1936 WACO YKS-6 “Custom Cabin” ARF
Wingspan:
100 in. (2540mm)
Length:
74 in. (1880mm)
Wing Area:
2496 in². (161dm²)
Flying Weight:
352 oz. (9.98kg)
Страница 1: ...1 1 4 scale 1936 WACO YKS 6 Custom Cabin ARF Wingspan 100 in 2540mm Length 74 in 1880mm Wing Area 2496 in 161dm Flying Weight 352 oz 9 98kg...
Страница 2: ...sions during WWII The best selling WACO was the Model 10 with over 1100 being produced from 1927 1930 During the years 1939 1942 WACO also built just over 600 Model UPF 7 s for the CAA and the Civilia...
Страница 3: ...uminum Wing Struts Horizontal Tail and Elevator Vertical Tail and Rudder Long Carbon Fiber Pushrods for Tail Pull pull cable for rudder and tailwheel Additional Items Required electric version 4 chann...
Страница 4: ...o Adjust as necessary if you are using a different servo 3 Drill the wood blocks with a 1 5mm drill 1 16 4 Mount aileron servo to blocks with servo screws Make sure the aileron is centered using a ser...
Страница 5: ...12 Insert CA hinges to their centers in each slot on aileron 13 Fold the CA hinge sharply upward This will keep them in place when inserting the hinges in the main wing panel 14 Install the aileron i...
Страница 6: ...washer touches the corrugations This is most easily accomplished with a Dremel 18 After marking the location of the washer use a Dremel to trim the corrugations 19 Work carefully to maintain a close...
Страница 7: ...the servo arms as shown in the photo 25 Locate the 2 long elevator pushrods 26 Install 2 HS 635 Hitec servos into outer mount locations with arms pointing toward center of fuselage See Photo A short P...
Страница 8: ...line as well as the end gaps prior to gluing 32 Epoxy horizontal tail into position on the fuselage making sure to center accurately 33 Prepare the vertical fin and rudder for installation Install CA...
Страница 9: ...in the fuselage 40 Install servo in center hole in fuselage 41 Un tape the cables at the rear of the fuselage and thread the pull pull cables through the clevises Just get the basic cable threading do...
Страница 10: ...as the 2 wooden fillers and the 2 nylon landing gear straps and screws 49 Insert the landing gear into the pockets on the fuselage making sure to avoid puncturing the covering with the rear landing g...
Страница 11: ...ed the wooden block will still protrude a small amount 54 Use a paper towel and rubbing alcohol to remove an epoxy that has squeezed out 55 Repeat process for the other side 56 Place the nylon landing...
Страница 12: ...by using a Dremel with a sanding drum Work carefully to not damage the finished fuselage 60 Once satisfied with the fillers cut 2 patches from the supplied orange covering to hide the installation 61...
Страница 13: ...rt balsa strips into the groove to finish the inside of the gear leg 65 Once satisfied with the position of the fillers CA them in place with thin CA 66 Cut lengths of orange covering to finish the in...
Страница 14: ...aller wire and complete the ironing process 68 Locate the scale wheels 69 Slip one wheel collar on the axel then the wheel and another wheel collar 70 Tighten wheel collars NOTE The nuts on the wheel...
Страница 15: ...on 73 Locate the 4 hitch pins The wing panels are held in place with these pins no screws of bolts are required 74 Press the hitch pin into position to hold the wing panel in place NOTE For convenienc...
Страница 16: ...Nylon fittings pre drilled 4 3x30mm screws shorten to 25mm 8 3x15mm screws 16 3x10mm screws 28 3mm nylock nuts 77 Install 2 nylon fittings with on 3x25mm screw and one 3mm nyloc nut Orient the nuts to...
Страница 17: ...Use a 3x10mm screw and a 3mm nylock nut 81 Hold the nut with a pair of needle nose pliers while you screw the Phillips head in place Repeat at the upper end 82 The N struts are 3 different lengths wi...
Страница 18: ...6 Install all hardware and snug each nut do not over tighten 87 Locate the hardware for the aileron interconnection 4 Nylon connectors 4 3mm nylock nuts 2 Pre painted inter connectors 88 Screw the nyl...
Страница 19: ...lder on electrical ends as well as the 3 3mm allen head screws and 3mm nylock nuts 93 You will be soldering the ring electrical connectors to the ends of the brace wires 94 Pre bend one of the solder...
Страница 20: ...n be used to attach it to the fuselage Pre drill the fitting before installing the screws 99 See photo for the location of the brace wires 100 Photo shows the general layout of tail parts 101 Bottom v...
Страница 21: ...he wooden AXI motor mounts 107 There is a light line burned on the 2 side pieces this line is 15mm from one edge of the plywood If you are using a 5330 series motor assemble the parts without modifica...
Страница 22: ...l mounted and the dummy radial engine with the center relieved for the electric motor Dummy motor has been detailed with some paint and self stick aluminum tape on the pushrods Propeller is an APC 21x...
Страница 23: ...cro and cable ties 122 Locate your radio receiver on the floor of the cabin with easy access 6 servo extensions on the 2 aileron channels of the receiver will make connecting the ailerons easier 123 M...
Страница 24: ...and slide the wings away from the side of the fuselage about 2 3 128 Slip the provided plywood wing jig into place one both the lower and upper root ribs 129 With the ply jig in place slide the wing...
Страница 25: ...The wings transport easily beside the fuselage for quick and pain free assembly at the flying field Aileron Low Rates 1 1 4 UP 3 8 DOWN Aileron High Rates 1 1 2 UP 7 16 DOWN Elevator Low Rates 1 UP 1...
Страница 26: ...3 4 DOWN Rudder Low Rates 1 in each direction Rudder High Rates 1 1 2 in each direction CG 6 back from the leading edge of the upper wing where it meets the fuselage NOTE This is about in line with t...
Страница 27: ...r radio manual 8 Balance propeller and make sure it is secure 9 Wait for a calm or light wind day for first flights Flying You will soon find out the Pilot 1 Cabin WACO YKS 6 is a real pleasure to fly...
Страница 28: ...y may not be launched from model aircraft Officially designated AMA Air Show Teams AST are authorized to use devices and practices as defined within the Air Show Advisory Committee Document 9 I will n...
Страница 29: ...io controlled model aircraft shall control it during the entire flight maintaining visual contact without enhancement other than by corrective lenses that are prescribed for the pilot No model aircraf...