background image

25

English

Content 

Important notes 

28

Safety instructions 

28

Warnings 

29

Some background knowledge  

30

Preparations for use 

31

Ascertaining the correct length 

31

Setting the correct length 

31

First time feedback system operations 

36

Application 

36

Further functions 

37

Power saving mode 

37

Charging the battery 

38

Technical data and general information 

16

Care and cleaning 

40

Contained in the delivery 

40

Classification 

40

Maintenance and technical safety checks 

40

Description of the technical safety controls 

41

Measurement technical controls 

41

Guarantee 

41

Disposal 

42

Technical data 

43

Dimensions 

44

Symbols 

45

Labels 

46

Содержание PIERENSTEP

Страница 1: ...PIERENSTEP Feedbacksystem F r Teilbelastung und Gangschulung For partial weight bearing and gait training...

Страница 2: ...L nge Wichtig ist die Einstellung der richtigen L nge an den Gehst t zen Wenn Sie gerade auf dem gesunden Bein stehen und den Arm h ngen lassen sollte das Griffst ck genau auf H he Ihres Handgelenks s...

Страница 3: ...die Gehst tzen 3 Punkt Gang Schritt 2 ben Sie diesen Krafteinsatz kon stant ber die gesamte Schritt dauer aus 3 Punkt Gang Schritt 3 Erst wenn das verletzte Bein kei nen Bodenkontakt mehr hat ent las...

Страница 4: ...Gebrauchsanweisung Deutsch...

Страница 5: ...ahme des Feedbacksystems 14 Anwendung 14 Weitere Funktionen 15 Stromsparmodus 15 Aufladen der Akkus 16 Technische Angaben und allgemeine Informationen17 Pflege und Reinigung 17 Lieferumfang 17 Klassif...

Страница 6: ...Sicherheitshinweise Zu Ihrer eigenen Sicherheit sollten Sie die nachfolgen den Hinweise sorgf ltig durchlesen und beachten Sollten die PIERENSTEP Gehst tzen besch digt sein so dass die Funktion oder d...

Страница 7: ...glich aufsetzen Die Gehst tzen d rfen nur zur Unterst tzung der Gehf higkeit verwendet und keinesfalls zweckent fremdet werden z B Aufstehhilfe als Werkzeug etc Aus Haftungsgr nden d rfen keine Ver nd...

Страница 8: ...r den Heilungsprozess f rder lich ist Zugleich muss er darauf achten korrekt zu gehen um den Heilungsprozess optimal zu unterst tzen Das alles ist gar nicht so einfach wie es auf den ersten Blick sch...

Страница 9: ...r auch leicht selbst ermitteln Stehen Sie dazu auf recht und gerade auf Ihrem gesunden Bein und las sen einen Arm entspannt h ngen St tzen Sie sich bei Bedarf mit der anderen Hand ab Stellen Sie die G...

Страница 10: ...10 Gebrauchsanweisung PIERENSTEP 1 L sen Sie die Feststellmutter 10 2 Dr cken Sie mit der einen Hand den Arretierungsknopf 9 ein...

Страница 11: ...and umfassen Sie den Gum mifu 12 Achtung Umfassen Sie dabei keines falls die Schutzabdeckung der Messeinheit 11 4 Drehen Sie das untere Rohr 7 ein kleines St ck nach rechts Der Arretierungsknopf 9 sol...

Страница 12: ...Schieben Sie das untere Gehst tzenrohr 7 nun auf die notwendige L nge Achtung Ziehen Sie dabei das untere Rohr nicht weiter als bis zur untersten Raststellung 10 8 heraus 6 Lassen Sie den Arretierungs...

Страница 13: ...die Feststellmutter 10 wieder fest 8 Stellen Sie die zweite Gehst tze auf die gleiche Weise auf dieselbe L nge ein Tipp Am einfachs ten geht das wenn Sie die freien Raststellungen 8 oberhalb des Arret...

Страница 14: ...Ihr PIERENSTEP Feedbacksystem zur Teilbelastungskontrolle einsatzbereit Jetzt d rfen die Gehst tzen wieder belastet werden Falls Sie keine akustische R ckmeldung von der Gehst tze erhalten und die ge...

Страница 15: ...Stromsparmodus Werden die Gehst tzen 2 Minuten lang nicht benutzt gehen sie in den Stromsparmodus ber Das wird von beiden Gehst tzen auch durch einen Doppelsignalton angezeigt Die gr ne LED 5 h rt au...

Страница 16: ...hr ausreichend f r den Betrieb der Geh st tzen ist Laden Sie immer beide Gehst tzen gleich zeitig Verwenden Sie nur die Ladeger te aus dem Lieferumfang Andere Ladeger te k nnten die Akkus besch digen...

Страница 17: ...rzu ist lediglich ein weiches fusselfreies Tuch unter ggf sparsamer Ver wendung milder Reinigungsmittel oder Isopropanol notwendig Keine Reinigungsmittel mit Schleifzus tzen verwenden Beim Reinigen ac...

Страница 18: ...sonen die aufgrund ihrer Ausbildung ihrer Kenntnisse und ihrer durch praktische T tigkeit gewon nenen Erfahrungen solche Kontrollen ordnungsgem durchf hren k nnen in der Funktionsweise des Ger tes ges...

Страница 19: ...hren keine Garantie bei Nichtbeachtung der Gebrauchsanweisung Bedienungsfehlern Unsachgem em Gebrauch oder Behandlung Fremdeingriff durch nicht autorisierte Personen in das Ger t zu Reparaturzwecken...

Страница 20: ...ahme Max 60 mA im aktiven Zustand ca 1 mA im Bereitschaftsmodus Massenspeicher 4 Megabyte Flash Memory Abmessung 150 x 1000 x 50 mm B x H x T Gewicht ca 1 2 kg pro Paar ohne Zubeh r Maximale Belastung...

Страница 21: ...21 Deutsch Ma e Oberteill nge a 225 mm St tzwinkel 15 Unterteill nge l Maximale Unterteill nge 970 mm Minimale Unterteill nge 740 mm a I...

Страница 22: ...der Nut zungszeit unentgeltlich bei einer kommunalen Sammelstelle zum Recyceln abgegeben werden muss Eine Entsorgung ber den Haus Restm ll ist nicht gestattet Dies ist ein aktiver Beitrag zum Umweltsc...

Страница 23: ...23 Deutsch Typenschilder...

Страница 24: ...24 User Instructions PIERENSTEP Operating Manual English...

Страница 25: ...stem operations 36 Application 36 Further functions 37 Power saving mode 37 Charging the battery 38 Technical data and general information 16 Care and cleaning 40 Contained in the delivery 40 Classifi...

Страница 26: ...length It is important to set the correct length on the crutches When standing straight on the healthy leg with the arms hanging down by the side both the handle piece and the wrist joint should be at...

Страница 27: ...nt gait Step 2 Continue to exert a constant downward pressure for the whole duration of the step 3 point gait Step 3 Discontinue downward pressure on the crutches only then when the injured leg is no...

Страница 28: ...or any other purpose Safety instructions For your own safety please read carefully and observe the following instructions If the PIERENSTEP crutches are damaged so that the function or safe use is com...

Страница 29: ...pose for example to help in the process of standing up as a tool etc For reasons of liability it is not permissible to modify the mechanics in any way Please do not hang articles on the crutches bags...

Страница 30: ...ed to walk properly in order to provide optimum support for the healing process This is not as easy as it appears at first glance How much weight is sufficient and how much is too much Subjective impr...

Страница 31: ...yourself easily establish the correct crutch length Stand up straight on the healthy leg and allow one arm to hang down loosely If necessary use the other hand for support Place the crutch adjacent to...

Страница 32: ...32 User Instructions PIERENSTEP 1 Loosen the adjusting nut 10 2 Depress with one hand the interlocking knob 9...

Страница 33: ...rubber foot 12 with the other hand Caution Be careful not to clasp the measuring component protective cladding 11 4 Turn the lower sliding sleeve 7 slightly to the right The interlocking knob should...

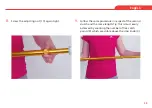
Страница 34: ...5 Now slide the lower crutch sliding sleeve 7 to the desired length Caution Do not push the lower sliding sleeve beyond the lowest catch point 10 8 6 7 Allow the interlocking knob 9 to engage to click...

Страница 35: ...justing nut 10 again tight 9 Follow the same procedure in respect of the second crutch and the same length Tip this is most easily achieved by counting the number of free catch points 8 which are visi...

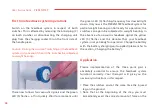
Страница 36: ...own Only now is the PIERENSTEP feedback system for partial weight bearing control ready for operation the crutches can again be subjected to weight bearing In the absence of an acoustic feedback signa...

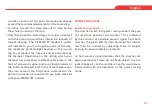
Страница 37: ...e form of an acoustic signal and or a vibration alarm in the crutch handle piece 2 In this respect please also take into account the information contained in the patient instruction manual which you h...

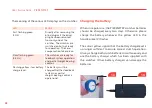
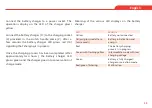
Страница 38: ...l Flashing yellow low battery charge level The battery must be charged Neither feedback system nor partial weight bearing control is operational Charging the battery When in regular use the PIERENSTEP...

Страница 39: ...process has been completed after approximately two hours the battery charger LED glows green and the charger goes into conservation of charge mode Meaning of the various LED displays on the battery c...

Страница 40: ...r manual Version 4 Classification The product PIERENSTEP has been designated as Class 1 in accordance with Appendix IX of the Medical Device Directive 93 42 EEC Maintenance and technical safety checks...

Страница 41: ...esting Low battery charge level buzzer and vibration alarm Radio communication with the PC Carrying out function controls in accordance with the operating instructions and service manual Measurement t...

Страница 42: ...product to the manufacturer dealer Lack of maintenance or technical safety controls Operational normal wear and tear which includes for example the rubber feet Use of non original spare parts and acc...

Страница 43: ...60 mA in active mode Approx 1 mA in stand by mode Mass storage 4 Megabyte Flash Memory Dimensions 150 x 1000 x 50 mm Width x Height x Depth Weight Approx 1 2 kg per pair without accessories Maximum l...

Страница 44: ...44 User Instructions PIERENSTEP Dimensions Upper part length a 225 mm Support angle 15 Lower part length l Maximum lower part length 970 mm Minimum lower part length 740 mm a I...

Страница 45: ...the product is to be submitted free of charge to the communal recycling collection center Disposal via the household waste system is not permitted In this way there is made an active contribution to...

Страница 46: ...46 User Instructions PIERENSTEP Labels...

Страница 47: ...47 English Notes...

Страница 48: ...Pierenkemper GmbH H rnsheimer Eck 19 35578 Wetzlar Tel 49 6441 67923 0 Fax 49 6441 67923 33 info pierenkemper eu www pierenkemper eu PIERENKEMPER GmbH GA Art Nr 451600 0276 Version 4 Stand 2010 10 29...

Страница 49: ......

Страница 50: ...Charging socket 5 LED gr n gelb LED green yellow 6 Oberes Rohr Upper sliding sleeve 7 Unteres Rohr Lower sliding sleeve 8 Raststellungen 1 bis 10 Catch point 1 to10 9 Arretierungsknopf Interlocking kn...

Отзывы: