background image

HM50

19

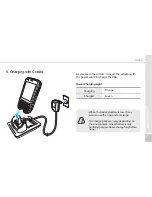
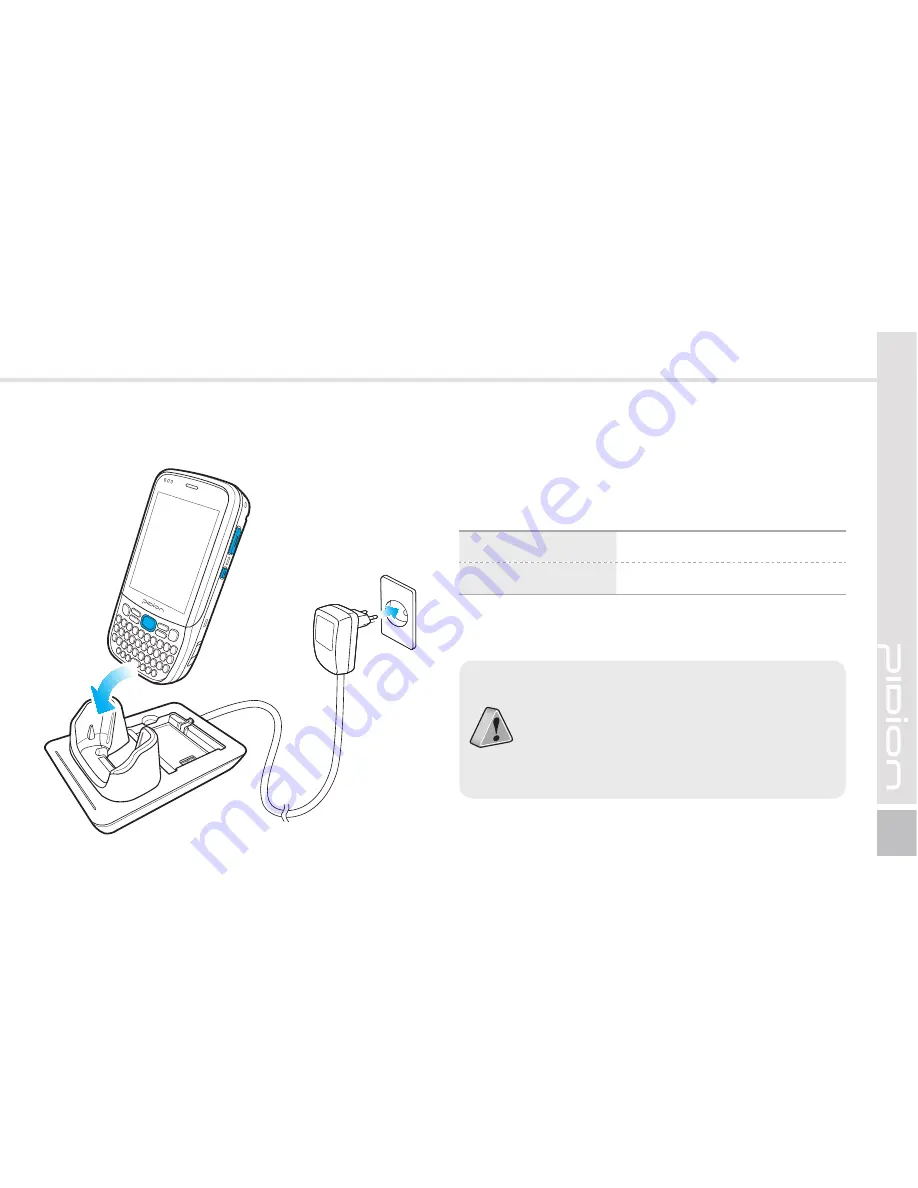
5. Charging with Cradle

As you see in the picture, connect the adapter with 
the power cable to charge the PDA.

Power Charging Light

Charging

Orange

Charged

Green


When the device’s battery is low, it may 

warn you with a ring and a message.


The charging time can vary depending on 

the environment. A new battery is only 

partially charged. Please charge fully before 

using.

Содержание HM50

Страница 1: ... please read and follow the user warnings In the manual the component s shape and color can be different from the actual model The information in the manual can vary depending on the software version and your mobile carrier USER MANUAL ...

Страница 2: ...as a household device at a residential area as well as any other areas NOTICE TOUSERS REGISTERED This user manual is copyright protected This user manual has been created by the bluebird Inc We have done our best not to create typos editing errors and leaving out any information Please understand if there are any inconveniences This product s program is legally protected Illegal copying transmitti...

Страница 3: ...ling on PC 24 Using ActiveSync 26 Connecting ActiveSync 29 UsingtheBar codeReader 30 Using the Barcodes 30 Scanning with Barcodes 30 Checking Barcodes 31 GettingtoknowyourHomeScr een 32 Looking at the Home screen 32 up photos as Home Screen Background 32 Adjusting Volume 33 Checking Battery Level 33 InputtingT ext 34 Selecting text input mode 34 Block recognizer 34 Letter recognizer 35 Transcriber...

Страница 4: ... voice message characters will be reset Notice Before Using Device This device is qualified of electromagnetic wave human safety standards For your own safety please use the authenticated devices only from the head company If not the case we cannot guarantee your safety Do not press the power button or the power adepter cord when the device is wet There is a danger of electrical shock Do not remod...

Страница 5: ...amage the listed item s information Please avoid impacts or vibrations When not using the device unplug the power cord and place it at a safe place where it will not drop Do not place your device at a dusty place Keep your power cord away from any heating devices Unplug the power cord when cleaning If there are any dusts or residue clean the power cords pins thoroughly When not using a battery for...

Страница 6: ...p object or an animal There is a risk of explosion Please use only the designated battery for the device If the original battery is not used the device s life may decrease and there is a risk of explosion In this case you cannot receive the free repair service When charging the battery you must use the supplied standard power adapter If the original adapter is not used the battery life may decreas...

Страница 7: ...olor and shape of the actual product Please contact the Customer Care Center if you wish to purchase any additional or optional products USB cable Main set 1 Checkingcomponents SCAN Stylus Pen Handstrap Desktop Cradle Battery Adaptor SpringWire About the Product ...

Страница 8: ...e Speaker Screen End Button Microphone Cradle I O Connector Barcode Scan Button Volume Up Volume Dowm Barcode Scan Button Send Button Battery Holder Battery Holder PTT Button Speaker Barcode Scan Stylus Pen Battery Camera Flash Handstrap Holder Barcode Scan Window Stylus Pen Holder ...

Страница 9: ...ll list SCAN SCAN Arrow Buttons Used to move left right up down SCAN Barcode Scan Button Scan the barcode Button Description SCAN End Button Ends the phone program You can finish a call by pressing this button during the call You can also exit an application program SCAN Numeric Alphabet Symbol Button The default is Numeric Used to enter numbers alphabets or symbol SCAN Backspace Button ...

Страница 10: ... is switched to the lowercase If you press this key twice the input mode is remained in the Uppercase like Caps Lock until you release it To release the Caps Lock you need to press the SHIFT key twice CAN Enter Button You can change the row you are typing in It functions the same as the computer enter button Button Description SCAN Power Button Turns on the device SCAN Tab Button SCAN SPACE Button...

Страница 11: ...ff status is maintained until you press the button again SCAN Fn Button This button s function is used as a combination It is used when the blue printed button is used 버 튼 설 명 SCAN SCAN Fn Button NUMERIC This button s function is used as a combination It is used when the blue printed button is used SCAN Numeric Alphabet symbol button The default is Numeric Used to enter numbers alphabets or symbol...

Страница 12: ...O CK M icro SD SIM D e s ig n e d M a n u fa c t u r e d b y O P E N L O C K LO CK M icro SD SIM D e s ig n e d M a n u f a c t u r e d b y O P E N L O C K LO CK M icro SD SIM D e s ig n e d M a n u f a c t u r e d b y O P EN D e s ig n e d M a n u fa c t u r e d b y O P E N L O C K LO CK M icro SD SIM D e s ig n e d M a n u fa c t u r e d b y O P E N L O C K LO CK M icro SD SIM D e s ig n e d M a...

Страница 13: ... c t u r e d b y O P E N L O C K LO CK M icro SD SIM D e s ig n e d M a n u f a c t u r e d b y O P E N L O C K LO CK M icro SD SIM D e s ig n e d M a n u f a c t u r e d b y O P EN D e s ig n e d M a n u fa c t u r e d b y O P E N L O C K LO CK M icro SD SIM D e s ig n e d M a n u fa c t u r e d b y O P E N L O C K LO CK M icro SD SIM D e s ig n e d M a n u f a c t u r e d b y O P E N L O C K LO ...

Страница 14: ...row direction 2 1 Insert the USIM Ⅰcard 2 2 Removing the USIM Ⅰcard 2 Insert Remo v etheUSIMcar d O P E N L O C K LOCK M icro SD SIM LOCK M icro SD O P E N L O C K SIM LOCK M icro SD LOCK M icro SD O P E N L O C K S I M O P E N L O C K LOCK M icro SD SIM LOCK M icro SD O P E N L O C K SIM LOCK M icro SD LOCK M icro SD O P E N L O C K S I M USIM ⅠCard Slot ...

Страница 15: ...the USIM II card on the holder then push down the holder 1 Push the USIM II card holder to OPEN direction then lift up 2 3 Insert the USIM Ⅱcard LOCK M icro SD LOCK M icro SD O P E N L O C K S I M S I M USIM ⅡCard Slot ...

Страница 16: ... Insert the MicroSD Card 3 Insert Remo v etheMicr oSDCar d O P E N L O C K LOCK M icro SD SIM LOCK M icro SD O P E N L O C K SIM LOCK M icro SD LOCK M icro SD O P E N L O C K S I M Push the top of the USIM II card and slide it out from the holder 2 3 Removing the USIM Ⅱcard ...

Страница 17: ... 15 3 Lock the storage card holder by pushing it down into place LOCK M icro SD LOCK M icro SD O P E N L O C K S I M 2 Insert the microSD card into the storage card holder with its gold contacts facing out ...

Страница 18: ...malfunction Please back up important data We are not responsible for the lost data If the memory card does not slide out do not remove by force After removing the card at the repair center exchange your device or get a refund 3 3 Precautions using the MicroSD Card With the USIM card and storage card compartment opened lift the storage card holder flap to open it 3 2 Removing the MicroSD card ...

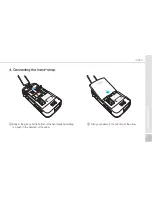
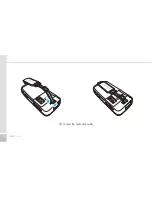
Страница 19: ...HM50 17 4 Connectingthehand str ap 1 Body in the groove at the bottom of the hand strap hand strap is a push in the direction of the arrow 2 Push your battery in the direction of the arrow ...

Страница 20: ...18 HM50 Manual 3 Connect the hand strap holder ...

Страница 21: ...e power cable to charge the PDA Power Charging Light Charging Orange Charged Green When the device s battery is low it may warn you with a ring and a message The charging time can vary depending on the environment A new battery is only partially charged Please charge fully before using ...

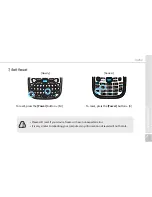
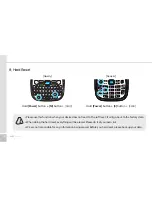
Страница 22: ... The Power button in on the front To turn your device on you must press the shortly After purchasing your device or hard reseting the booting process can take some time We apologize for the inconvenience SCAN SCAN Qwerty Numeric ...

Страница 23: ...press the Power button M Please soft reset if your device freezes or has an unexpected error It is very similar to rebooting your computer Any information not saved will not be lost SCAN Qwerty Numeric To reset press the Power button 4 ...

Страница 24: ... not react to the soft reset It will go back to the factory state When doing the hard reset everything will be erased Please do it at your own risk We are not responsible for any information being erased Before you hard reset please back up your data SCAN Qwerty Numeric SCAN Hold Power button 4 button SEND ...

Страница 25: ...ht bottom right top The supplied stylus pen is used to run programs or inputting on the touch screen Pressing Pressing means to open run and cancel any items Pulling Using the stylus pen you can select multiple items as much as needed it is similar to the mouse drag on the PC Holding Down If you want to see further details of the selected item hold down on the item and a popup will appear it is si...

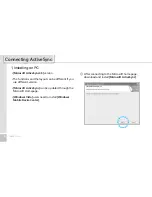
Страница 26: ...d and install Microsoft ActiveSync 1 InstallingonPC Microsoft ActiveSync 4 5 version The functions and the layout can be different if you use different version Microsoft ActiveSync can be updated through the Microsoft Homepage Windows Vista users need to install Windows Mobile Device Center ...

Страница 27: ... license terms press I accept the license terms On the Client information window input User name Specify where you want to install 3 Microsoft Active Sync can be installed when it is ready to install 4 Microsoft ActiveSync is installed ...

Страница 28: ...on Microsoft ActiveSync can be used when the device is plugged into a notebook or pc You can transfer files by syncing it You can also install uninstall new programs The USB cable is sold separately Please contact the service center for more details Code 12132 1 You can connect with the Cradle 2 UsingA ctiv eSync ...

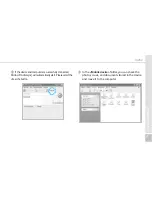
Страница 29: ...older you can check the photos music and documents stored in the device and move it to the computer 2 If the device and computer are successfully connected Microsoft Activesync will automatically start Please select the Search button ...

Страница 30: ...he battery while device on For this to be avoided do not remove the battery while the device on You must press the Power button or the Shut Down button with the stylus pen in order for the Windows Mobile to turn off correctly If in a case where you have removed the battery while the device is on hold the Reset button OK button to hard reset Please note if you hard reset all the data in the memory ...

Страница 31: ...ng USB devices to your PDA device If you use the function USB PC Connect your device s battery consumption will be high If you are not using the function USB PC Connect disconnect to save your battery consumption Your device and the surrounding devices can you used when connected with the USB Cable 3 ConnectingA ctiv eSync ...

Страница 32: ...ar codes Press the Barcode Scan button on the side or front of the device to start scanning barcodes In order to scan accurately you must scan with the correct angle 10cm away If you are using Barcodes with special programs please contact the manufacturing company Correct scanning Angle ...

Страница 33: ... will appear if you press the Create New button in Memo If you scan a barcode while Memo is open the barcode will be automatically saved in Memo If you scan when Memo is not opened it will not be saved To do this press the Menu button in Create New and Paste to save ...

Страница 34: ...mation Messages Operation Schedule Device Lock Status and etc on the Home screen with your user settings You can set the photos you can taken as a background image 1 Start Photos Video select My Photos 2 Press the bottom right Menu button on the screen 3 Select Set as Home Screen Wallpaper 4 After setting the transparency level select OK 1 L ookingatthehomescr een 2 upph oto sasH omeSc r eenBa c k...

Страница 35: ...olume After selecting the on the top right you can adjust your system ring tone volume Selecting Vibrate will make your phone muted and into the Vibrate Mode You can check your battery level by pressing the on the top right of your display 3 A djustingV olume 4 CheckingBatteryL e v el ...

Страница 36: ... the traditional writing area box split in the middle The left side is used to write letters and the right side is for number entry Symbols and common functions are located in other smaller boxes located in the right of the writing box area There are five different character input methods available ...

Страница 37: ...pen This option allows you to enter text using your own handwriting The screen is divided into three different areas A capital letter area small letter area and a number area Characters are entered by printing letters in each area The character is then analyzed and typed on the screen automatically 3 K e yboar d 4 L etterr ecogniz er ...

Страница 38: ...izer except instead of entering characters into a designated area you can enter entire words and sentences using your own handwriting Transcriber supports both printing and cursive writing styles and then automatically types the information on the screen 5 T r anscriber ...

Страница 39: ...ain press the Call button to redial Deletes mistake numbers You can use the saved speed dials to make a call To add edit delete a speed dial press the menu on the bottom right You can save a maximum of 98 speed dials You can the recent view received calls out going calls missed calls After inputting a phone number press this button to make the call 1 MakingaCall ...

Страница 40: ...bottom of the screen The outgoing information message can be different from the regular devices To block a call press the Ignore button on the bottom of the screen or the End button on the keyboard You can also block the call by shorting pressing the volume button 3 Blockingacall 2 ReceivingaCall ...

Страница 41: ...d 4 Hangingup The BIP 1500 Does not support conference calls call transferring optional call services The BIP 1500 Does not support Voice Call during Dial up The BIP 1500 supports only the regular optional call service Call waiting The SMS service from call waiting is not supported ...

Страница 42: ...50 Manual 1 Start Select Contacts 2 Type in a name on the Name Input to search a contact Contacts 1 Select the Create New button on the top left 2 Select the contact s category 1 Sear ching 2 A ddingaContact ...

Страница 43: ...d Message Sends a text message to the saved phone number Copy Contact Copies the selected contact Delete Deletes the selected contact If the BIP 1500 device has been reset there will not be a information message when retrieving deleting a contact list The BIP 1500 device may take some time showing the saved contacts when it has been reset or has been erased from the USIM card ...

Страница 44: ...n copy delete a selected contact Option You can do the setup of Alphabetical order and Show only name of contact Display standards You can set up the standards of the contacts for the names companies Filter You can filter the selected items Selecting Contacts You can multi select or select all 3 The contact will be saved when the attributes are imputed in order Press OK to save in Contacts 3 Menu ...

Страница 45: ...ous resolutions of 480x640 600x800 768x1024 1536x2048 Flash You can turn on off your flash Full Screen You can change your display to full screen Option You can change the name storing location file size Your photo will be taken when you press the OK button The photo video will be automatically saved in the album 1 T akingPhotos ...

Страница 46: ...to Video Start Photos and Video You can Enlarge Reduce or check the information of the saved Photo Video 2 ViewingPhotos If the battery is too low the camera will turn off or will not open If not in use more than a minute it will go into sleep mode If the device can shoot video the user manual will vary depending on the camera program ...

Страница 47: ...HM50 45 The selected Photo Video can be Enlarged Reduced Viewed with as a slideshow set as a background Wireless transfer Save Edit Properties Camera ...

Страница 48: ...or the communication of Bluetooth equipment Start Settings Bluetooth Turning on Bluetooth Set up as on off If not in use it will drain your battery Search surrounding Bluetooth devices and pair connect Way to set up your Bluetooth 1 Press Search for devices to search other Bluetooth devices 2 Select a Bluetooth device and press Next ...

Страница 49: ...ave chose appears you are finished connecting The pairing method is different for every Bluetooth devices Please read the manual for other Bluetooth devices Password Set up a password for your device every time you turn it on Start Settings Lock You must input your password twice After selecting Press ok if the device is not used for the following time set up a time The password must be 4 6 charac...

Страница 50: ...ual If the Check if the device is not used for the following time is set up the screen below will show when turning on your device After inputting your password press the Unlock button on the bottom of the screen ...

Страница 51: ...ou check each item the sound and notification will be setup with a sound Notifications You can set the Notifications sounds when the sound and notification is set up Start Settings Sound and Notifications Notifications You can set the phone wireless network notification Activesync and etc sounds by Ring Vibration SoundandNotifications Settings ...

Страница 52: ...ur photo 4 After selecting you photo press OK Background Display You can set up your photos as the home screen background Home Items You can set up items to be displayed on your home screen Start Settings Home Items When you check the item it will be shown on your home screen You can set the order of the items that are going to be shown by using the Move up Move down button ...

Страница 53: ...n when your device turns on UserInformation Start Settings Personal Phone Ring Vibration You can set as Ring Ring getting louder Ring only once vibrate Ring and vibrate Ring after Vibrate None Ring tones You can adjust the Ring tones Keypad The key pad sound can be adjusted to Long tone Short tone Off when keypad is selected Phone Phone You can adjust turn off the devices sounds Settings ...

Страница 54: ...isplay Light The shorter you adjust your display time the longer your battery will last You can turn the light back on again by press the buttons of the display DisplayLight Brightness Use the slider bar to adjust the brightness Start Settings System Display Light Brightness If you set the brightness of PDA close to Darker mode the battery of PDA will last longer ...

Страница 55: ...e port in which GPS devices will connect to ExternalGPS Program Select the port you want to use by receiving data from the program s external GPS Access If you select Automatic GPS management you can receive multiple program s GPS data simultaneously G Sensor You can set up the usage for the G Sensor Start Settings System G Sensor Settings ...

Страница 56: ...space of storage and programs Storage Card You can check the usage available space of the Micro SD memory card and the program store Memory UninstallingPr ogr ams The programs installed by the user or in default will be displayed Start Settings System Uninstall Program Select the program you want to uninstall on the list Press Uninstall and it will automatically be removed ...

Страница 57: ...art Settings System Display You can readjust the stylus pen points by pressing the Display Adjust button Display The memory status of running programs will be displayed Start Settings System Program Monitor Using the menu you can select the running programs and to stop it You can also stop all the programs running at once Pr ogr amMonitor Settings ...

Страница 58: ...IS In this case try to connect un checking the Advanced Network Function If the ActiveSync does not work properly try using the Advanced Network Function USB PCConnection Setting up the wireless internet with Wi Fi Start Settings System Wi Fi Through the wireless internet settings you can set up the Wi Fi that connects the surrounding AP access point Wi Fi ...

Страница 59: ...ireless Internet 1 Select the Admin Login button on the top right 2 Type in SUMMIT Capitalized in the password box and press OK button 3 Select the Profile buttons on the bottom 4 Select the Scan button on the top right Settings ...

Страница 60: ...onnect to will appear Connect to ex Platform_AP2 Please select a desired AP When the popup appears Press YES 6 Type password in the box of the AP you wish to connect and press OK buttons 7 Once you press Commit you will be connected to the internet ...

Страница 61: ...dset profile Camera 5 megapixel color camera w LED flash GPS Integrated GPS w A GPS Performance Characteristics CPU 1GHz OS Windows Embedded Handheld 6 5 Android Memory 256MB RAM optional 512MB 512MB ROM Interface RS 232C USB 2 0 Host Client via Snap on User Environment Characteristics Operating temp 20 to 60 Storage Temp 25 to 70 Humiditiy 95 non condensing Drop Spec 6 ft 1 8m drop per MIL STD 81...

Страница 62: ...ng terminals If it still doesn t work your battery life might be finished or it can be a broken battery The battery warranty is 6 menthes Q How do I get the repair service A You can send via a delivery service to the headquarters When sending the package make sure you pay for the shipping fee in advance When the repair is finished the headquarters will be covering the shipping fee Q My battery dra...

Страница 63: ...nly in principle If you bought the product from any party other than the authorized dealer you need to register the product before asking for after sales service Please enclose an evidence of purchasing or the receipt to the product for after sales service Please enclose the name telephone number address and symptom for prompt service You can ask for after sales service through the dealer or the C...

Страница 64: ...ts 3 Other cases Default due to nature fire damage due to sea wind flood damage etc Expendable parts have exhausted there life batteries antenna or other component parts 4 Regulations of treatment after charged service If the same default occurs on the part that had been repaired within a 2 months 60 days period it will be provided with free of charge repair service There will be no returning of g...

Страница 65: ...of inspection after the date of manufacture In case of accessories such as batteries only those that match the sales list managed by the service center will be eligible for customer service A repair or an exchange of batteries that does not match the sales list of the service center due to the carelessness of the customer will be fully charged Name of Product PDA Name of Model HM50 Date of Purchas...

Страница 66: ...ignated period from the date of receiving a notice of defect 4 Bluebird assumes no responsibility for repairing replacement or refund until it receives the defective product from the customer The replacement shall be equivalent to a new product in the aspect of performance 5 Warranty of Bluebird is valid in the countries where the Bluebird products are distributed by Bluebird Contract for addition...

Страница 67: ... satisfy your needs Customer Service Center Working hours Weekdays 9 30am 6 30pm Saturdays and Sundays Closed Phone Number 1588 1380 Address Customers service center SSang young IT twintower B 703 Sangdaewon dong 442 5 Joongwon gu Sungnam si Keonggi do Korea ...

Отзывы: