background image

10

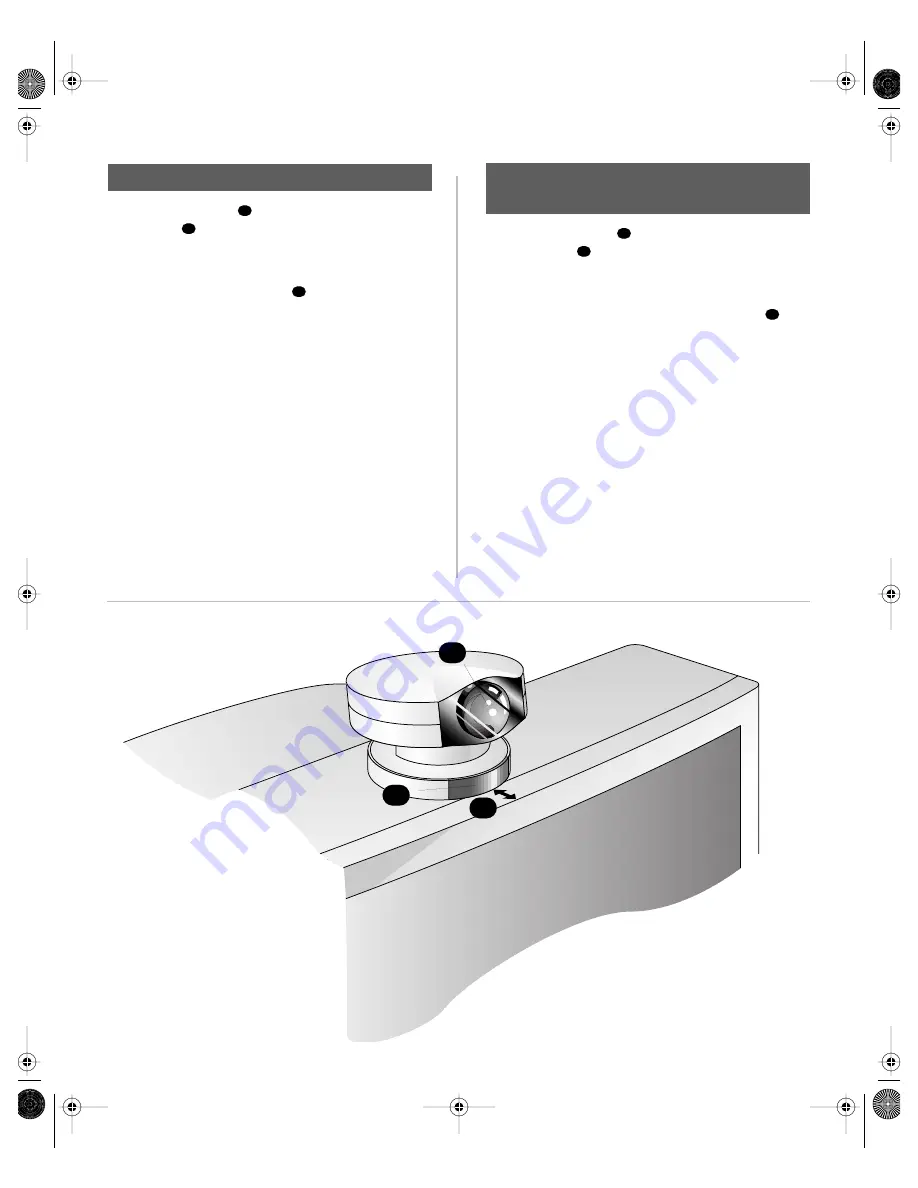
1. Line up the lens   with the infrared receiver 

window  .

2. Place the camera on the top center of the 

monitor with the front of the base within 2 
centimeters (.75 inches)   of the front of the 
monitor. Choose a level surface (±5 degrees).

3. Make guide marks with a pencil where you 

will attach the camera.

4. Remove the camera from the monitor. Peel off 

the backing from the adhesive.

5. Align the camera with the guide marks and 

firmly press it on top of the monitor.

Mounting PowerCam on a monitor

a

b

c

1. Alignez l’objectif   et le récepteur à 

infrarouge  .

2. Centrez la caméra au-dessus du moniteur. Le 

support de la caméra doit être placé à moins 
de 2 cm de la partie avant du moniteur  . 
Choisissez une surface plane (±5 degrés).

3. Marquez des repères à l’aide d’un crayon où 

vous allez fixer la caméra. 

4. Enlevez la caméra du moniteur. Enlevez la 

couche protectrice de l’attache adhésive.

5. Appuyez fermement sur la caméra au-dessus 

du moniteur tout en l’alignant avec 
les repères.

Installer la caméra PowerCam 

sur un moniteur

a

b

c

<2 cm

a

b

c

PowerCam  Page 10  Monday, March 8, 1999  11:24 AM

Содержание PowerCam 100

Страница 1: ...Installing the PowerCam 100 PowerCam Page 5 Monday March 8 1999 11 24 AM...

Страница 2: ...AL television TV broadcast receiver that is part of the Concorde 4500 system These receivers are governed by different regulations than computer monitors Warning Changes or modifications to this unit...

Страница 3: ...diff rentes de celles relatives aux moniteurs d ordinateur Attention les changements ou les modifications apport s cette unit qui n auront pas t express ment approuv s par le service responsable de l...

Страница 4: ...s Der Ausdruck Monitor bezieht sich in diesem Dokument auf den NTSC oder PAL Fernsehempf nger der zum System der Concorde 4500 geh rt F r diese Empfangsger te gelten andere gesetzliche Bestimmungen al...

Страница 5: ...iones que rigen el uso de este tipo de receptores son distintas a las que rigen el uso de monitores de ordenador Advertencia todo cambio o modificaci n efectuado a la unidad sin la aprobaci n expresa...

Страница 6: ...un ricevitore TV NTSC o PAL appartenento al sistema Concorde 4500 Tali ricevitori sono regolati da norme diverse rispetto a quelle dei monitor per computer Avvertenza cambiamenti o modifiche a questo...

Страница 7: ...800 0188 03 B PowerCam Page 1 Monday March 8 1999 11 24 AM...

Страница 8: ...ion des connecteurs ainsi qu une liste de sp cifications propos de la cam ra PowerCam 100 a b c d The PowerCam 100 consists of Pan tilt camera head Camera lens Infrared receiver window Camera base Thi...

Страница 9: ...rarrojos Base de la c mara Este folleto describe c mo Desembalar el hardware y la c mara Fijar el hardware de montaje a la c mara Instalar la c mara sobre un monitor o un tr pode Conectar el cable de...

Страница 10: ...ider Unpacking the PowerCam a b c d 1 Videz le sac contenant les pi ces et la pr sente brochure Vous disposez des l ments suivants plusieurs attaches en plastique une plaque de montage en plastique un...

Страница 11: ...off 2 Entfernen Sie die Trennpappe und die Schaumstoffteile und ziehen Sie die Kamera aus dem Karton 3 Nehmen Sie die Kamera aus dem Schutzbeh lter und stellen Sie sie vorsichtig auf eine saubere glat...

Страница 12: ...the notch until it clicks into place Attaching mounting hardware a b c Remarque Si vous comptez installer le LimeLight ne respectez pas les instructions de ce document mais celles du livret LimeLight...

Страница 13: ...do LimeLight contin e con el paso siguiente 1 Coloque la c mara con cuidado en posici n invertida encima de una superficie limpia y lisa 2 Alinee el soporte contra deformaciones con la c mara 3 Introd...

Страница 14: ...nt on a monitor see page 10 or a tripod see page 18 a b c 5 Alignez la plaque de montage avec le support de la cam ra L attache adh sive doit tre visible N enlevez pas la protection de l attache adh s...

Страница 15: ...l mina de montaje hacia abajo hasta que los pies circulares pasen a trav s de los orificios de la l mina 7 Deslice la l mina de montaje hacia el soporte contra deformaciones hasta que quede encajada A...

Страница 16: ...it on top of the monitor Mounting PowerCam on a monitor a b c 1 Alignez l objectif et le r cepteur infrarouge 2 Centrez la cam ra au dessus du moniteur Le support de la cam ra doit tre plac moins de 2...

Страница 17: ...cm de la parte frontal del monitor Escoja una superficie plana 5 grados 3 Marque con un l piz d nde se debe fijar la c mara 4 Retire la c mara del monitor y quite la protecci n del adhesivo 5 Coloque...

Страница 18: ...vided Connecting the camera cable a 8 b c 8 d Un c ble pour cam ra a t fourni avec votre syst me avec le symbole sur les deux serre c bles Le chariot WorldCart poss de son propre c ble Aucun c ble n e...

Страница 19: ...lado plano del conector central de la parte posterior de la c mara El icono del collar mira hacia arriba cuando est correctamente alineado 2 Enchufe el cable al conector de la parte posterior de la c...

Отзывы: