


Specifications subject to change. Copyright ® 2015 by Pico Digital Inc. All rights reserved. REV. 081715
VMX3-1
HD MPEG 2/4 QAM Set-Top Box
8
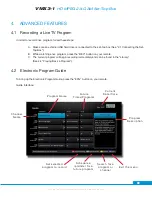
2. INSTALLATION
2.1 Connecting the Set-Top Box
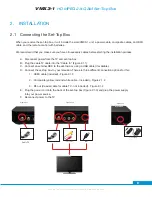
When you receive the set-top box, it will include the small VMX3-1 unit, a power cable, composite cables, an HDMI
cable, and the remote control with batteries.
We recommend that you make sure you have all necessary cables before starting the installation process.
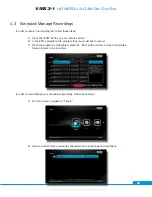
A. Disconnect power from the TV and set-top box.
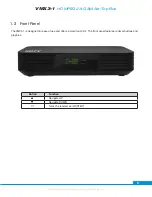
B. Plug the cable TV cable into the “Cable In.” (Figure 2.1.1)
C. Connect an external HDD to the set-top box using a USB cable (if available).
D. Connect the set-top box to your television. There are three different connection options for this:
1. HDMI cable (included) - Figure 2.1.2
2. Composite (yellow, red and white cable - included) - Figure 2.1.2
3. RF out (Coaxial cable for cable TV - not included) - Figure 2.1.2
E. Plug the power cord into the back of the set-top box (Figure 2.1.3) and plug the power supply
into your power source.
F. Reconnect power to the TV.
Figure 2.1.1
Figure 2.1.2
Figure 2.1.3
Cable TV
HDMI
Video/Audio
Power Adapter
Coaxial