PICO Neo3 Link Скачать руководство пользователя страница 55

107

108

KR

KR

컨트롤러 상태 표시등 설명

꺼짐 :

 연결 상태 또는 전원 꺼짐

파란색 :

 펌웨어 업데이트 진행 중

파란색 점멸 : 

연결 탐색 중

파란색 , 빨간색 교대로 점멸 : 

페어링 진행 중

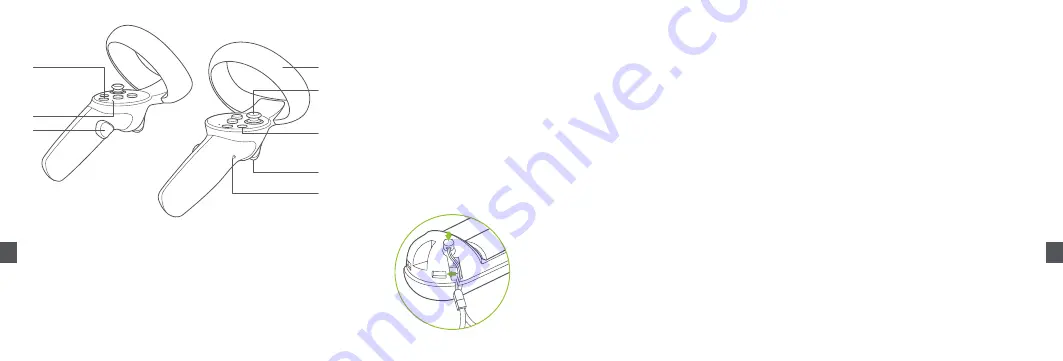
* 위 그림 안내에 따라 컨트롤러 랜야드를 장착하십시오 .


전원 켜기 : 짧게 누릅니다 .

전원 끄기 : 6 초 동안 길게 누릅니다 . 홈 화면

으로 돌아가기 : 짧게 누릅니다 .

화면 중앙 재정렬 : 1 초 동안 누릅니다 .

홈 버튼

누르기 가능

엄지스틱

이전 화면으로 돌아갑니다 . 특정 애플리케이션

에서는 다른 기능으로 설정할 수 있습니다 .

앱 / 뒤 버튼

상태 표시등 그립

잡기 / 쥐기 기능

버튼

사용 시 가리지 않게 유의하십시오 .

트래킹 링

확인

트리거 버튼

배터리 덮개

조작 안내

마스터 컨트롤러 포인터 전환

홈 화면에서 해당 컨트롤러의 트리거 버튼을 짧게 눌러 마스터 컨트롤러 포인터를 전환합니다 .

화면 중앙 재정렬

VR 헤드셋을 착용 후 정면을 바라본 다음 , 컨트롤러 또는 VR 헤드셋을 1 초 이상 길게 눌러 화면을 중앙에 재정렬하십시오 .

컨트롤러 연결 해제

상태 표시등이 빨간색이 되거나 컨트롤러가 진동할 때까지 홈 버튼을 길게 누릅니다 .

컨트롤러 전원 꺼짐

아래 상황에서는 절전을 위해 컨트롤러가 자동으로 꺼집니다 .

-VR 헤드셋이 최대 절전 모드 돌입 (VR 헤드셋을 벗은 후 일정 시간 지나면 실행 )

- 컨트롤러가 VR 헤드셋의 컨트롤러 관리 인터페이스에서 해제된 경우

-VR 헤드셋 전원이 꺼진 경우

새 컨트롤러 추가하기

새로운 컨트롤러를 추가 (VR 헤드셋은 좌측 컨트롤러 1 대 , 우측 컨트롤러 1 대만 연결 가능 ) 하거나 연결되지 않은 컨트롤러와 재연결하려면 “Settings( 설정 )” 

→“Controller( 컨트롤러 )” 이동 후 “add Controller( 컨트롤러 추가 )”를 누릅니다 .

컨트롤러에서 파란색과 빨간색 빛이 번갈아 가며 깜박거릴 때까지 홈 버튼과 컨트롤러의 트리거 버튼을 동시에 길게 누릅니다 .

이후 VR 헤드셋 화면에 나타나는 지침을 따르십시오 .

헤드 컨트롤 모드

컨트롤러가 연결되어 있지 않은 경우 , 머리를 움직여 조준선을 원하는 목표로로 향하게 하고 홈 , 확인 , 뒤로가기 버튼을 버튼을 누르는 방식으로 홈 화면과 인터랙션

할 수 있습니다 .

절전 모드 / 절전 모드 해제

1 번 옵션

( 근접 센서 ): VR 헤드셋을 벗으면 자동으로 대기 상태가 됩니다 . VR 헤드셋을 착용하면 자동으로 해제됩니다 .

2 번 옵션

( 전원 버튼 ): VR 헤드셋 전원 버튼을 누르면 수동으로 대기 모드 또는 대기 모드를 해제할 수 있습니다 .

하드웨어 초기화

VR 헤드셋 초기화

VR 헤드셋 이미지가 정지 상태거나 홈 버튼과 전원 버튼을 짧게 눌러도 VR 헤드셋이 응답이 없을 경우 , 전원 버튼을 10 초 이상 눌러 VR 헤드셋을 재부팅할 수 

있습니다 .

컨트롤러 초기화

VR 헤드셋의 가상 컨트롤러가 정지 상태거나 , 홈 버튼 , 컨트롤러의 모든 버튼이 응답이 없을 경우 , 배터리를 제거 후 다시 넣어 컨트롤러를 재시작할 수 있습니다 .

Содержание Neo3 Link

Страница 1: ...EN 01 User Guide DE 15 Benutzerhandbuch ES 29 Gu a del usuario FR 43 57 Manuel d utilisation IT Guida utente CN 71 JP 85 KR 99...

Страница 2: ...e fatigue It is recommended that you take a break every 30 minutes You may be able to relieve eye strain by watching distant objects If you feel any discomfort please stop using the product immediatel...

Страница 3: ...tery cover according to arrow direction with your palm Power on the Controller Power on the VR Headset First Start The Controller will start automatically after removing the insulating paper Others Sh...

Страница 4: ...the strap dial clockwise to tighten the VR Headset in a comfortable position Note You can use this product with prescription glasses IPD Adjustment To ensure image clarity it is necessary to line up t...

Страница 5: ...io Jack Pico Neo3 Link Details Strap Dial Return to home screen Short press Screen re centering Long press for one second HOME Button Removable Top Strap Removable Face Cushion APP BACK Button CONFIRM...

Страница 6: ...ler is unbound in the Controller Management Interface of the VR Headset When the VR Headset is powered off Add new Controller If you need to add a new Controller the VR Headset can only connect one le...

Страница 7: ...crease the space You can install or not according to your situation Install the Glasses Spacer on the Face Cushion Disassemble the Face Cushion Install the Face Cushion on the Headset Install Nose Pad...

Страница 8: ...the pin of new face cushion into the crevices along the edges as shown below Pull and remove face cushion by following the picture Pico VR App download Please search for Pico VR in Google Play or App...

Страница 9: ...gen Eventuell k nnen Sie die Augen entlasten indem Sie Ihren Blick auf weiter entfernte Objekte richten Wenn Sie sich unwohl f hlen beenden Sie sofort die Verwendung des Produkts Wenn die Beschwerden...

Страница 10: ...ie Batteriefachabdeckung mit der Handfl che in Pfeilrichtung Schnellanleitung Controller einschalten VR Headset einschalten Erste Bedienung Der Controller startet automatisch nachdem das Isolierpapier...

Страница 11: ...eigersinn um das VR Headset in einer f r Sie angenehmen Position zu befestigen Hinweis Sie k nnen dieses Produkt mit einer Korrektionsbrille verwenden IPD anpassen Um ein klares Bild zu gew hrleisten...

Страница 12: ...alten Hardware zur cksetzen Zehn Sekunden gedr ckt halten Kurz dr cken um Schlafmodus zu aktivieren deaktivieren POWER Taste Diese Schnittstelle ist kein Standard USB C DisplayPort ben tigt DisplayPor...

Страница 13: ...ung des VR Headsets getrennt wird Wenn das VR Headset ausgeschaltet ist Neuen Controller hinzuf gen Wenn Sie einen neuen Controller hinzuf gen m ssen das VR Headset kann nur einen linken und einen rec...

Страница 14: ...it wieder abnehmen B r i n g e n S i e d e n Brillenabstandshalter am Gesichtspolster an Nehmen Sie das Gesichtspolster ab Bringen Sie das Gesichtspolster am Headset an Nasenpad anbringen Wenn Sie das...

Страница 15: ...n Gesichtspolsters wie unten abgebildet in die Spalten entlang der Kanten Ziehen Sie das Gesichtspolster wie auf der Abbildung gezeigt ab Pico VR App herunterladen Bitte suchen Sie bei Google Play ode...

Страница 16: ...portantes Este producto se ha dise ado y creado para usarlo en una zona abierta y segura en interiores libre de peligros de tropiezos o deslizamientos Para evitar accidentes permanezca siempre conscie...

Страница 17: ...a palma de su mano seg n la direcci n de la flecha Gu a r pida Encienda el mando Encienda el casco Primer encendido el mando se encender inmediatamente despu s de quitar el papel aislante Otros Pulse...

Страница 18: ...y gire el dial en sentido horario para ajustar el casco de RV en una posici n c moda Nota Puede usar este producto con gafas graduadas Ajuste de IPD Para asegurarse la claridad en su imagen es necesa...

Страница 19: ...nk Correa con dial Volver a la pantalla de inicio pulsar brevemente Recentrar la pantalla mantener pulsado un segundo Bot n INICIO Extra ble Correa superior Almohadilla facial extra ble Bot n APP ATR...

Страница 20: ...quitarse el casco de RV Cuando el mando se desvincule de la interfaz de gesti n del mando en el casco de RV Cuando se apague el casco de RV A adir nuevo mando Si necesita a adir un mando nuevo el casc...

Страница 21: ...r el espacio Puede instalarlo o no seg n su situaci n Instalar el separador de gafas en el coj n facial Desmontar el coj n facial Instalar el coj n facial en el casco Instalar la almohadilla para la n...

Страница 22: ...n facial dentro de las ranuras a lo largo de los bordes como se muestra a continuaci n Tire y saque el coj n facial siguiendo la imagen Descarga de la aplicaci n de Pico VR por favor busque Pico VR en...

Страница 23: ...faire une pause toutes les 30 minutes Vous pouvez soulager la fatigue oculaire en regardant des objets loign s Si vous ressentez un quelconque inconfort veuillez cesser imm diatement d utiliser le pr...

Страница 24: ...la fl che avec votre paume Guide rapide Mettez sous tension la manette Mettez sous tension le casque VR Premier d marrage La manette d marrera automatiquement apr s avoir retir le papier isolant Autr...

Страница 25: ...a molette de la sangle dans le sens des aiguilles d une montre pour fixer le casque VR dans une position confortable Note Vous pouvez utiliser ce produit avec des lunettes de vue Ajustement IPD Pour a...

Страница 26: ...i long pendant dix secondes Appui court pour entrer ou sortir de veille Bouton ALIMENTATION Cette interface n est pas standard Display Port USB C un c ble PC VR DP personnalis est n cessaire pour la c...

Страница 27: ...st dissoci e dans l interface de gestion des manettes du casque VR Lorsque le casque VR est mis hors tension Ajouter une nouvelle manette Si vous devez ajouter une nouvelle manette le casque VR ne peu...

Страница 28: ...staller ou non en fonction de votre situation Installez l espacement pour lunettes sur le coussin facial D montez le coussin facial Installez le coussin facial sur le casque Installation de la plaquet...

Страница 29: ...coussin facial dans les fentes le long des bords comme indiqu ci dessous Tirez le coussin facial pour l enlever comme illustr T l chargement de l application Pico VR Recherchez Pico VR dans Google Pl...

Страница 30: ...ini o affaticamento degli occhi Si consiglia di fare una pausa ogni 30 minuti possibile ottenere sollievo concentrandosi su oggetti distanti In caso di fastidio interrompere immediatamente l uso del p...

Страница 31: ...comparto batterie seguendo la direzione della freccia col palmo della mano Guida rapida Accendere il controller Accendere il visore VR Primo avvio il controller si avvier automaticamente dopo la rimoz...

Страница 32: ...stringere il visore VR fino a raggiungere una posizione confortevole Nota possibile utilizzare questo prodotto insieme a occhiali da vista Regolazione della distanza interpupillare Per garantire la ni...

Страница 33: ...ieci secondi Premere brevemente per entrare o uscire dalla modalit standby Pulsante di ACCENSIONE Quest interfaccia non una porta DisplayPort USB C standard e necessita di un cavo DP VR per PC persona...

Страница 34: ...ndossato per un certo periodo di tempo Quando il controller non associato nell interfaccia di gestione del controller del visore VR Quando il visore VR spento Aggiungere un nuovo controller Se necessa...

Страница 35: ...o spazio i due L installazione facoltativa secondo necessit Installare il distanziatore per occhiali sul cuscino per il viso Smontare il cuscino per il viso Installare il cuscino per il viso sul visor...

Страница 36: ...nuovo cuscino per il viso nelle apposite fessure lungo i bordi come mostrato di seguito Tirare e rimuovere il cuscino per il viso facendo riferimento all immagine Download dell app Pico VR cerca Pico...

Страница 37: ...71 72 CN CN VR 2 AA 4 DP 2 USB C 2 0 MiniDP DP 2 2 12 12 30 T V Rheinland VR 1 2 2 2 3 2m 2m...

Страница 38: ...73 74 CN CN 1 5V AA HOME 2...

Страница 39: ...75 76 CN CN 58mm 63 5mm 69mm 63 5mm 58mm 69mm 58 63 5 69 mm...

Страница 40: ...77 78 CN CN Pico Neo3 Link HOME APP USB C 3 0 2 5 10 USB C DP PC VR DP PC DP 98 20 98 20...

Страница 41: ...79 80 CN CN 0 5 6 1 HOME APP HOME 1 HOME HOME HOME 10 HOME...

Страница 42: ...81 82 CN CN 160mm...

Страница 43: ...83 84 CN CN Pico VR PicoVR Pico VR Pico VR Pico VR VR...

Страница 44: ...85 86 JP JP VR 2 1 5V 4 2 AC USB C 2 0 MiniDP VR 2m 2m 12 13 VR VR 30 IPD 3 6DoF 6 VR VR 1 2m 2m 2 3 VR 2m 2m...

Страница 45: ...87 88 JP JP 1 5V 3 VR 2 1 2...

Страница 46: ...89 90 JP JP VR VR VR IPD IPD 58mm 63 5mm 69mm 3 58 63 5 69 mm...

Страница 47: ...91 92 JP JP Pico Neo3 Link 1 USB C 2 5 10 USB C PC PC VR DP 20 21 98 20 98 20 VR...

Страница 48: ...93 94 JP JP 6 1 VR VR 1 VR VR VR VR VR VR 1 VR VR 1 VR VR 2 VR VR VR VR VR 10 VR VR 3D...

Страница 49: ...95 96 JP JP VR VR 160mm...

Страница 50: ...97 98 JP JP Pico VR Google Play App Store Pico VR Android iOS...

Страница 51: ...99 100 KR KR 2m 2m 12 12 VR 30 IPD T V Rheinland Settings Display Eye Protection Mode VR 2 1 5V 4 DisplayPort 2 AC USB C 2 0 MiniDP DisplayPort 6 VR VR 1 2 3 2m 2m VR 2m 2m...

Страница 52: ...101 102 KR KR 1 5V VR 1 2...

Страница 53: ...103 104 KR KR VR A VR VR IPD IPD 58mm 63 5mm 69mm IPD 58 63 5 69 mm...

Страница 54: ...105 106 KR KR Pico Neo3 Link 1 USB C 2 5 10 USB C DisplayPort PC VR DP PC DisplayPort 20 98 20 98 20 VR...

Страница 55: ...107 108 KR KR 6 1 VR VR 1 VR VR VR VR VR 1 1 Settings Controller add Controller VR 1 VR VR 2 VR VR VR VR 10 VR VR...

Страница 56: ...109 110 KR KR VR 160mm VR...

Страница 57: ...111 112 KR KR Pico VR Google Play App Store Pico VR Android iOS...

Отзывы: