PhotoVu G1 Series 1740 Скачать руководство пользователя страница 3


- 3 - 

Getting Started 

We have created this Service & Repair Guide to assist you with the servicing of your PhotoVu. 
This guide is designed to help you disassemble the PhotoVu for repair. Once the internal parts 
are accessible, advanced computer troubleshooting skills will be required to diagnose and 
repair the issue. 

All PhotoVu models are covered with the exception of the PV1900, PV1040, PV1045, and 
PV1540. These models are not repairable. 

Additional help and technical information can be found at 

www.photovu.com/support

 and 

www.photovu.com/help

Determine Your Generation of PhotoVu Model 

There are three major generations of PhotoVu digital picture frames. In some cases, a model 
number might overlap several generations as in the PV2265. 

Generation One (G1) 

PhotoVu models in this generation include the 1740, 1740s, 1750, 1910, 1940, 1940s, 
1940dc, 1940sdc, 1945, 1950, 1960, 1965, and 1965w. G1 units have two major enclosure 
parts: a body housing the electronics and a two-part bracket that holds the LCD panel. 

Generation Two (G2) 

PhotoVu models in this generation include the 1965, 1965w, and 2265w. G2 units have a 
single enclosure that holds all the electronics and LCD panel. 

Generation Three (G3) 

PhotoVu models in this generation include the 2265w, 2265wds, 2270w, 2270wds, 2275w, 
and 2275wds. G3 units have an internal mounting plate for the electronics and LCD panel, a 
rear enclosure cover, and a faceplate that holds the matboard and picture frame. 

In the steps below, you will confirm your PhotoVu generation once you remove the picture 
frame and matboard. 

Removing the Picture Frame 

This step requires use of a #1 Phillips head screwdriver. 

G1/G2 Units


G1 and G2 units have picture frame mounting brackets. One side of the bracket screws into 
the picture frame and the other side into the PhotoVu’s rear body enclosure. Remove all 
screws and brackets from your PhotoVu. 


Содержание G1 Series 1740

Страница 1: ...PhotoVu Digital Picture Frame Service Repair Guide PhotoVu LLC 2450 Central Ave G1 Boulder CO 80301 USA www photovu com support Version 1 0...

Страница 2: ...el 3 Generation One G1 3 Generation Two G2 3 Generation Three G3 3 Removing the Picture Frame 3 Removing the Matboard 4 Removing the Faceplate 4 Removing the Rivets 5 Removing the LCD Panel 6 Troubles...

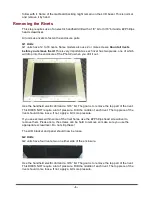
Страница 3: ...1940s 1940dc 1940sdc 1945 1950 1960 1965 and 1965w G1 units have two major enclosure parts a body housing the electronics and a two part bracket that holds the LCD panel Generation Two G2 PhotoVu mod...

Страница 4: ...osure Work your way around the matboard and slowly pry it up You are trying to release the matboard from the adhesive tape on the enclosure It might take several rounds You can also use the putty knif...

Страница 5: ...a 3 16 bit The goal is to remove the top part of the rivet This DOES NOT require a lot of pressure Drill the middle of each rivet The top piece of the rivet should come loose If not apply a bit more...

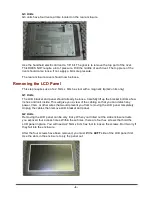
Страница 6: ...se Carefully lift up the bracket bottom a few inches and look inside This will give you a view of the cabling so that you can detach any power VGA or other wires that would prevent you from removing t...

Страница 7: ...ubsystems is made at the VGA cable When you separate this you can test each subsystem independently Once the failed subsystem is determined component analysis can be performed Advanced computer troubl...

Страница 8: ...er resellers o Power Supplies http www logicsupply com categories power_supplies ac_adapters http www mini box com AC DC power supplies o Hard Drive Any SATA 2 5in 9mm notebook hard drive o Wireless C...

Страница 9: ...tboard is unusable due to the removal process a number of PhotoVu matboard templates are available under the Support File Downloads Wizard Templates section of the web site Most retail frame shops use...

Отзывы: