


Page | 36
7
USB
C
ONNECTION
AquaPen comes with the USB cable that is required for charging of the Li-ion battery and can also be used for data transfer to the PC
after completion of measurements. To connect the USB cable with the AquaPen device Follow the picture instructions below. Please
note that a lock in system is used to secure the USB cable to the AquaPen and extreme caution has to be used when setting up this
connection to avoid damage to the cable pins.
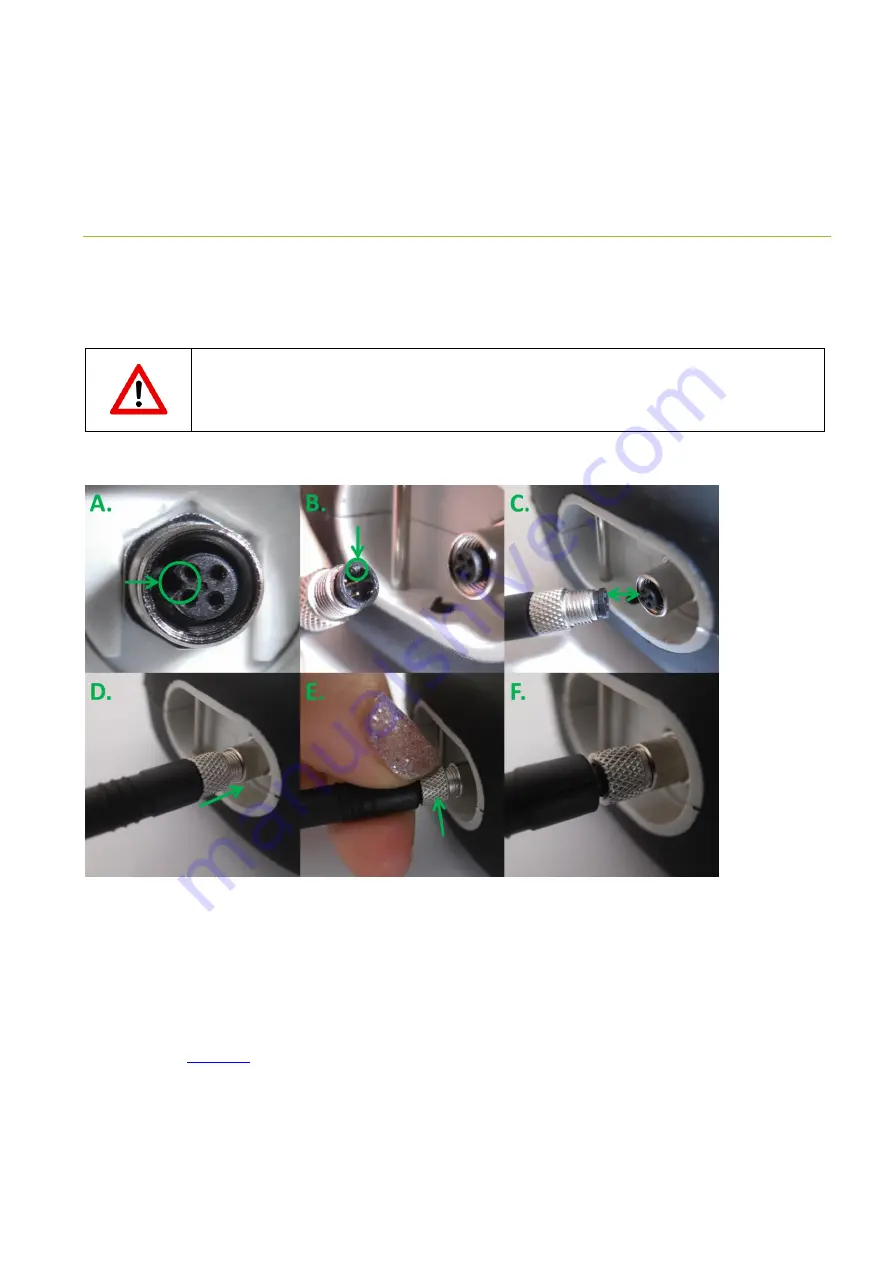
When connecting the USB cable take extra caution to prevent damage to the cable connector pins. Ensure correct
orientation of the cable as shown in the pictures below so the circled portion of the plug and the cable in photo
A and B are perfectly lined up prior to pushing them together. Once this connection is achieved the cable may be
secured in position by turning the metal cover of the cable and locking the cable in position.
To connect AquaPen with your computer please follow steps below in Fig. 11:
Fig. 11 How to connect AquaPen with PC.
A) connector on the AquaPen device. B) Portion of the USB cable with pins. C
–
E) Position the cable horizontally and line up the green
circled parts of the cable and the connector, plug in the inlet and screw the securing screw. F) Correct connection of the USB cable and
Pen device.
Once the cable is securely attached to the AquaPen the other end may be connected to the USB port on a PC. The AquaPen
switches ON
automatically after connecting the cable to the PC. For the USB connection to be successful the USB driver and the FluorPen software
need to be installed on the PC. Both may be found on the installation disk (USB driver folder) delivered with the device. Once the USB
driver is installed the Device Manager in Windows will list the USB serial port in the device tree. The USB driver may also be downloaded
from PSI websites
. Once the driver is installed correctly the connection between the AquaPen device and the computer is
initiated by selecting in the software on the computer
Setup > Device ID.
For more information about FluorPen software see chapter 9.
Содержание AquaPen-C AP 110-C
Страница 1: ......
Страница 9: ...Page 9 3 DEVICE DESCRIPTION Fig 1 Device description...
Страница 13: ...Page 13 Fig 3 AquaPen C AP110 C Fig 4 AquaPen P AP 110 P...
Страница 22: ...Page 22 Fig 8 NPQ Protocol...
Страница 24: ...Page 24 Fig 9 LC1 Protocol...
Страница 25: ...Page 25 Fig 10 LC2 Protocol...
Страница 29: ...Page 29...
Страница 30: ...Page 30...
Страница 31: ...Page 31...
Страница 32: ...Page 32...
Страница 33: ...Page 33...
Страница 34: ...Page 34...
Страница 35: ...Page 35...
Страница 47: ...Page 47 Fig 26 Data export...
Страница 51: ...Page 51 Fig 34 GPS coordinates...


