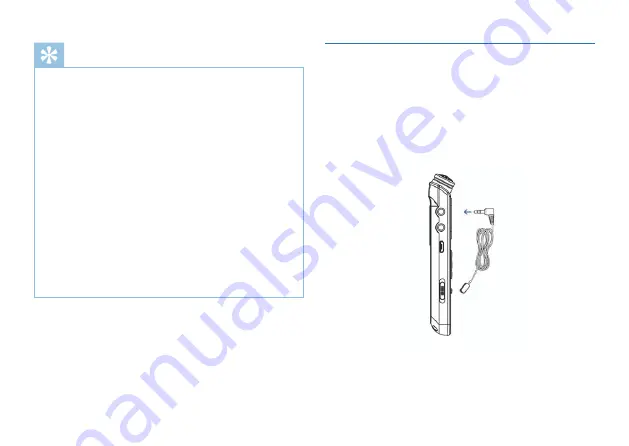
background image

10

11

使用外置麦克风录音

录音前,请先设置所需的声控录音功能和录音类型。注意:

在停止状态下,按停止键,可以在 A,B,C,D 和 MUSIC 五

个文件夹之间进行转换。录音文件可以在 A,B,C,D 这四

个文件夹中进行存储,每个文件夹能存储 99 个录音文件,

当一个录音文件夹存满 99 个后,系统会把随后录入的文件

自动存储在下一个文件夹中,如果,四个文件夹全部录满,

要再进行录音,请先删除一些不必要的文件再录。

请先测试录音,以确保录音笔设置正确。

每个目录最多可存储 99 个文件,总共可容纳 396 个文件

(99 文件 x 4 目录)。

当录音时间超过录音笔可用容量或达到最大  396  个文件数

量的上限时,录音停止。请删除部分录音或将其移至电脑。

录音时请勿断电,否则这会导致录音信息丢失和文件损坏。

如果需要长时间录音,请在录音前充电。

• 

• 

• 

• 

• 

• 

提示

当您使用外置麦克风录音时,请先将麦克风插入 Line in 插座,

并按照内置麦克风的录音程序进行录音。当您连接到外置麦克

风时,内置麦克风将自动关闭。使用外置麦克风录音时录音类

型自动转为“立体声录音”。注意外置麦克风的接口一定要是

双声道接口,如下图所示。

Содержание VTR6900

Страница 1: ...www philips com dictation 注册您的产品并获得技术支持 VTR6900 使用手册 VTR6900 ...

Страница 2: ...02 ...

Страница 3: ...09 2 重要须知 3 您的数码录音笔 4 开始使用 5 录音 6 语音模式 7 音乐模式 7 1 播放模式 6 3 删除文件 6 4 个性化设置 6 1 语音播放 6 2 播放模式 6 2 2 复读模式 6 4 1 咪头增益 7 1 1 循环模式 6 2 1 循环模式 6 2 3 复读次数 6 4 2 录音类型 7 1 2 音效模式 7 1 3 复读模式 6 4 3 录音指示灯设置 6 4 4 声控设置 6 4 5 监听设置 6 4 6 分段录音 6 2 4 复读间隔 6 2 5 播放速度 6 2 6 播放书签 4 1 开 关机 4 2 充电方法 4 3 按键锁定 HOLD 功能 4 4 连接电脑 ...

Страница 4: ... 无法启动录音笔 11 2 尺寸和重量 10 2 录音笔无法录音 11 3 系统要求 10 3 录音笔无法播放录音 11 4 录音 11 5 运行条件 17 17 18 7 1 4 复读模式 7 1 5 复读间隔 7 1 6 复读间隔 18 20 20 20 20 21 21 21 21 21 22 22 18 7 2 删除文件 9 1 背光时间 9 2 自动关机 9 3 语言选择 9 4 按键音 9 5 内存选择 9 6 磁盘信息 卡信息 9 7 格式化设备 9 8 固件版本 9 9 系统时间 9 10 定时录音 9 11 恢复出厂设置 7 3 歌词同步显示 ...

Страница 5: ...我们非 常高兴 您可在我们的官方网站上获得飞利浦公司的全方位技 术支持 如 使用手册 软件下载 保修信息等 www philips com 一键录音 仅仅拨上录音开关即可实现录音 拨下保存录音 数字降噪 能有效地对录音环境周围的噪声给予滤除 从而 可以清晰地记录有效的声音 此功能只建议在嘈杂的环境 中使用 以常见的 MP3 和 WAV 格式录音 使用高速 USB 2 0 快速存取录音和数据 声控录音功能 可作为大容量的 USB 存储设备 确保最大的兼容性 产品特点 ...

Страница 6: ... 本公司一概不予负责 特别 提醒用户小心操作 注意将资料另外备份 使用耳机时请遵守下列原则 调整至合适的音量 切勿长时间使用耳机 特别需要注意 切勿将音量调至耳朵所能承受的范围之外 切勿将音量调至盖过周边环境的声音 在危险情况下请小心或暂停使用耳机 在驾驶汽车 骑自行车 玩滑板时 切勿使用耳机 否则会 导致交通意外 且违反相关法律法规 此符号标志指明帮助您更加高效简便使用设备的信息 此符号标志指明处理或操作设备时必须遵守的各种注意事项 此符号标志警告可能发生的设备损坏和数据丢失 操作不当 可能导致损坏 此符号标志警告人身伤害危险 操作不当 可能导致人身伤害 或设备损坏 提示 注意 小心 警告 听力保护 所用符号标志 安全 ...

Страница 7: ...07 3 您的数码录音笔 1 Line in 接口 2 耳机接口 3 USB 接口 4 开机 关机 锁定键 5 左内置麦克风 6 录音 播放指示灯 7 播放 暂停 8 菜单键 9 右内置麦克风 10 显示屏 11 上一曲 快退 12 停止键 文件夹切换键 13 下一曲 快进 14 喇叭 15 录音键 16 音量加 减键 17 删除键 18 TF 卡槽 19 支架 供货范围 概览 ...

Страница 8: ...关机 在开机状态下 向下滑动开机键直到显示 ByeBye 关机 在此界面长按 MENU 键约 2 到 3 秒钟 机器返回主界面 在主界 面中包含有四个模块 下面四张图片分别代表 语音 音乐 调频和系统设置模块 然后机器进入录音文件停止播放界面 如下图所示 除了录音和播放过程中 在其他任何界面下 长按 MENU 键 约 2 到 3 秒可返回到主界面 如果录音笔无法正常工作 请确认机器是否已没电 当电量指示标志为 时 请及时充电 第一次使用机器时 请对该机器充电三小时以确保机器有电 工作 注意 注意 4 1 开 关机 提示 ...

Страница 9: ...要 3 小时左右 录音笔可作为大容量的 USB 存储设备 并可方便地对文件进行 存储 备份和移动 可使用 USB 数据线将录音笔与电脑相连 且无须安装软件 录音笔会自动显示为可移动设备 连接电脑 图标如下图所示 1 将开机键向上推至锁定位置 锁定录音笔上除了拨动录音键 的所有按键 然后屏幕上短暂显示 Hold 后 随即消失 如下图所示 2 要解除按键锁定 请将开机键向下推至中间位置 当录音笔与电脑连接时 对录音笔的手动操作将无效 4 2 充电方法 4 3 按键锁定 HOLD 功能 4 4 连接电脑 注意 在文件移入或移出录音笔时 请不要断开录音笔与电脑的 连接 当录音笔与电脑连接时 对录音笔的手动操作将无效 提示 ...

Страница 10: ...关机 电量不 足时 请及时充电 低电时提示的参考图标如下所示 注意 当您初次使用录音笔录音时 请注意本节中的内容说明 1 在语音模式停止状态下 按 停止 键 选择所需文件夹 2 把录音键拨到录音状态开始录音 录音 播放 指示灯 红灯常亮 录音过程中请将内置麦克风对准音源 3 按 播放 键暂停录音 录音 播放 指示灯红灯闪烁 显示屏显示 录音暂停 4 再次按下 播放 键 继续录音 5 录音过程中 短按 MENU 键设置书签 INDEX 一个录音文 件最多可以设置 10 个书签 6 把录音键拨到停止状态结束录音 并回到当前录音文件的停 止播放界面 ...

Страница 11: ...统会把随后录入的文件 自动存储在下一个文件夹中 如果 四个文件夹全部录满 要再进行录音 请先删除一些不必要的文件再录 请先测试录音 以确保录音笔设置正确 每个目录最多可存储 99 个文件 总共可容纳 396 个文件 99 文件 x 4 目录 当录音时间超过录音笔可用容量或达到最大 396 个文件数 量的上限时 录音停止 请删除部分录音或将其移至电脑 录音时请勿断电 否则这会导致录音信息丢失和文件损坏 如果需要长时间录音 请在录音前充电 提示 当您使用外置麦克风录音时 请先将麦克风插入 Line in 插座 并按照内置麦克风的录音程序进行录音 当您连接到外置麦克 风时 内置麦克风将自动关闭 使用外置麦克风录音时录音类 型自动转为 立体声录音 注意外置麦克风的接口一定要是 双声道接口 如下图所示 ...

Страница 12: ...录音 播放 指示灯绿灯常亮 4 使用 键或 键调节音量 5 按 停止 键结束播放 在停止播放状态下 长按 MENU 键约 2 秒返回到主界面 6 播放过程中 按播放键暂停播放 录音 播放 指示灯 绿灯闪烁 再次按下播放键 将继续先前位置的播放 7 播放时长按 或 键 可快退或快进当前正在播 放的文件 选择要播放的录音文件后 短按播放键播放 在播放过程中 短按菜单键 弹出如下播放菜单列表 循环模式 复读模式 复读次数 复读间隔 参考界面如下 语音文件播放界面说明 6 1 语音播放 6 2 播放模式 在停止状态下 按停止键 可以在 A B C D 和 MUSIC 五 个文件夹之间进行转换 注意 当耳机插入插孔内 录音笔扬声器将停止工作 提示 ...

Страница 13: ...前曲文件 随机播放 随机播放当前选中目录的文件 在播放菜单列表中选择 复读模式 菜单 再按菜单键将进入 复读模式 A B 复读的具体操作请参考 音乐播放 部分的 A B 复读操作部份 详细请参考音乐模块复读次数部分 详细请参考音乐模块复读间隔部分 在播放菜单列表中选择 播放速度 菜单 按菜单键进入播放 速度调节界面 屏幕显示一个播放速度数值 按 或 键改变播放速度的数值 参考界面如下图所示 在播放语音文件过程中 长按 MENU 键进入书签菜单 如下左图 所示 再选择 转到书签 或 删除书签 短按菜单键将进 入具体书签界面 如下右图所示 6 2 1 循环模式 6 2 2 复读模式 6 2 3 复读次数 6 2 4 复读间隔 6 2 5 播放速度 6 2 6 播放书签 ...

Страница 14: ... 你可根据个人喜好进行以下相应设定 在语音播放停止界面下 短按菜单键 将会弹出功能菜单列表 功能包括 咪头增益 录音类型 录音指示灯 声控设置 监 听设置 分段录音 相关参考图片如下图所示 在功能菜单中 选择 咪头增益 菜单 再按菜单键进入咪头 增益菜单 在咪头增益菜单中有三种增益可供选择 高 中 低 选择不同的咪头增益可以达到不同的录音效果 在功能菜单中 选择 录音类型 菜单 再按菜单键进入录音 类型菜单 在录音类型菜单中有四种录音类型可供选择 降 噪录音 PCM 录音 立体声录音 长时间录音 如果选择的 是 PCM 录音类型 则在 PCM 录音达到 1 小时后 机器自动保存 录音文件 然后重新进行下一个录音 相关参考图片如下 6 4 1 咪头增益 6 4 2 录音类型 ...

Страница 15: ...并自动进入下一个文件录音 分段录音功能参 考界面如下图所示 声控录音功能一旦被启用 录音过程中 当机器检测到有声音时 录音笔会自动开始录音 当未检测到声音时 录音笔在 3 秒后 将自动暂停录音 再次检测到声音时 录音笔又会自动开始录音 声控设置参考界面图片如下 降噪录音 WAV 格式 高音质 比特率为 384kbps PCM 录音 WAV 格式 高音质 比特率为 3072kbps 立体声录音 MP3 格式 高音质 比特率为 128kbps 长时间录音 MP3 格式 普通音质 比特率为 8kbps 6 4 3 录音指示灯设置 6 4 5 监听设置 6 4 6 分段录音 6 4 4 声控设置 PCM 录音时 文件不能保存在 mirco SD 卡里 只能保存在 内置内存里 注意 ...

Страница 16: ...按播放键播放 播放过程中短按菜单键 弹出如下播放菜单列表 循环模式 音效模式 复读模式 复读次数 复读间隔 播放速度 参考 界面如下图所示 音乐文件只能放在 MUSIC 文件夹里面进行播放 注意 音乐播放界面说明 7 1 播放模式 当选中其中一个菜单时 相应的区域将会变成白色 如上图选 中 循环模式 菜单 再按菜单键 将会进入到循环模式选择 菜单 你可以选择你需要的循环模式 参考界面如下图所示 目录播放 顺序播放选中目录的文件 全部播放完一遍当前目 录的文件后自动停止播放 目录循环 循环播放选中目录的文件 单曲循环 一直循环播放选中的一曲文件 随机播放 随机播放当前选中目录的文件 7 1 1 循环模式 ...

Страница 17: ...读 设置复读起点 在播放状态下 短按 菜单 键进入播放菜单 然后短按 键或 键选择 复读模式 选项 再按 菜单 键返回到播放状态 但此时 LCD 屏中 A B 的 A 在闪烁 等待确定复读起点 A 短按 确定复读起点 A 设置复读终点 设置复读起点 A 后 此时 LCD 屏中 A B 的 B 在闪烁 再短按 键 设置复读终点 B 此时 LCD 显示 在音效模式中 你可以使用 或 选择相应模式 再按 菜单键确认 7 1 2 音效模式 7 1 3 复读模式 7 1 4 复读次数 7 1 5 复读间隔 A B 当复读图标固定 A B 开始 AB 点间的反复播放 到达设定的次数后 闪烁图标 A B 中的 A 等待确定 起点 A 这时播放返回正常播放 如不再需要设定复读 可 通过以下方式退出复读模式 取消复读 短按 播放 键 将之前设置 AB 复读取消 并暂 停播放 短按 停止 键 将之前设置 AB...

Страница 18: ... 在右边界面 使用 和 选择 是 确认删除 否 保持文件 按菜单键执行命令 在音乐播放停止界面下 长按删除键 将会弹出功能菜单列表 功能包括 删除文件 删除全部 退出 下面为执行删除操作 的相关参考图片 产品支持 lrc 歌词文件 实现歌词与歌曲同步播放 7 1 6 播放速度 7 2 删除文件 7 3 歌词同步显示 歌词文件的名称与歌曲文件的名称需保持一致 如果当前歌曲有歌词文件匹配 则在屏幕左上方的音乐模式 图标下将出现歌词标志 如下所示 若没有歌词匹配 则没有该标志 如下所示 若有歌词匹配 长按 菜单 键进入歌词界面 接着会出现 歌词显示界面 若需退出时短按 菜单 键返回歌曲模式 注意 ...

Страница 19: ...单删除当前保存的某一电台 或选择删除所有电台菜单删除 所有保存的电台 机器最多只能保存 40 个电台 当保存的电台 数量多于 1 个后 短按 播放 暂停 键依次以递增的方式切 换所保存的电台 短按 停止 键依次以递减的方式切换所保 存的电台 如果你选择电台录音菜单 系统将会执行电台录音 功能 电台录音的录音类型固定为 立体声录音 电台录音 参考界面如下图所示 在调频模式下 短按 或 键选择频点 短按菜单键 将会弹出如下子菜单 包括 自动搜台 保存电台 电台录音 删除电台 删除全部 当自动搜台菜单被选择时 系统将会自动搜索电台 当一个电 台被检测到时 这个电台将会被自动保存在列表中 自动搜索 完电台后将显示下图 ...

Страница 20: ...格式化设备 固件版本 系统时间 定时录音 恢复 出厂设置 背光时间有四种时长可供选择 15 秒 30 秒 45 秒和恒亮 如果在设定的时间内没对机器做任何操作 背光将会自动灭 如果选择恒亮 背光将会恒亮 背光设置参考图片如下 如果在设定的时间内没对机器做任何操作 系统将会自动关机 如果时长设为 0 将不会自动关机 自动关机设置参考界面如下 在语言选择菜单中 你可以选择一种语言作为系统语言 语言 选择参考界面如下 在按键音设置菜单中 你可以选择打开或关闭按键音 关闭按 键音后 在任何按键操作 按键音都不会起作用 参考图片如下 9 1 背光时间 9 2 自动关机 9 3 语言选择 9 4 按键音 ...

Страница 21: ...此界面下 你可以设置系统的当前时间和系统时间显示格式 按停止键可以退出当前界面回到上一级菜单 例如 选择时间格式 时间格式 菜单 将会显示如下参考界面 此界面下有两种时间显示格式可供选择即 12 小时制和 24 小时 制 系统默认的是 24 小时制 例如 选择 设置日期 菜单 将会显示如下参考界面 使用此功能 你可以随时查看存储器的空间总容量和剩余空间 参考图片如下 使用此功能 你可以格式化本机器内存或 TF Micro SD 卡 参 考图片如下 9 5 内存选择 9 8 固件版本 9 9 系统时间 9 6 磁盘信息 卡信息 9 7 格式化设备 ...

Страница 22: ...先预设一个时间 当系统时间到达预设时间时 系 统将会自动录音 在功能菜单中 选择 定时录音 菜单 再 按菜单键进入定时录音设置菜单 参考界面如下图所示 使用此功能 你可以恢复到原出厂时的设置 参考图片如下 第一个功能是定时录音时间设置功能 定时录音时间设置参考 界面如下图所示 在此界面下 你可以选择 定时日期 和 定时时间 当系 统时间到达设定时间时 系统将自动开始录音 录音时间长度设置功能 第二个功能就是设定录音时长 你可以设置 30 分钟 60 分钟 120 分钟或者没限定录音时长来设置定时录音时长 时间长度 设置参考界面如下 9 10 定时录音 9 11 恢复出厂设置 ...

Страница 23: ...音 10 3 录音笔无法播放录音 10 常见问题 此处列举了常见问题的解答 可帮助解决录音笔出现的简 单问题 如果故障仍无法排除 请咨询经销商或访问我们的官 方网站 www philips com support 电池电量已耗尽请及时充电 或者滑动录音键不在停止录音的 位置 超出录音笔允许的最大文件数量或录音笔存储空间已满 请删 除部分录音或将其移至外部存储设备 录音笔可能处于锁定模式 HOLD 将 锁定 开关推至 Off 位置 电池电量已耗尽 请充电 ...

Страница 24: ...h 闪存 移动存储器 PC 是 11 1 存储器 宽 高 深 33 4 110 4 13 6 mm 重量 含电池 68 5g 降噪录音 NOISE CUT REC 比特率为 384kbps 格式为 WAV PCM 录音 PCM 比特率为 3072kbps 格式为 WAV 立体声录音 HQ 比特率为 128kbps 格式为 MP3 长时录音 SLP 比特率为 8kbps 格式为 MP3 温度 5 45 C 空气湿度 10 90 不凝结 操作系统 Windows 7 Vista XP 2000 Mac OS X Linux 接口 USB 接口 11 2 尺寸和重量 11 4 录音 11 5 运行条件 11 3 系统要求 ...

Страница 25: ...ice Tracer digital recorder 5 Recording 6 Voice Mode 6 1 Voice Playback 6 2 Playing Modes 6 2 1 Repeat Modes 6 2 2 A B Replay 6 2 3 Replay times 6 2 4 Replay gap 6 2 5 Play speed 6 2 6 Bookmark 7 1 1 Repeat 7 1 2 Equalizer 7 1 3 A B Replay 7 1 4 Replay times 7 1 5 Replay gap 7 1 6 Play speed 6 3 Delete Files 6 4 Record Settings 4 Start to Use 4 1 Power On Off 4 2 Recharge 4 3 Keypad Lock HOLD Func...

Страница 26: ...ht 11 3 System requirement 11 4 Recording 11 5 Operating conditions 10 1 Cannot switch on the device 10 2 Cannot record with the device 10 3 The device cannot play recorded audio 9 1 Backlight Time 9 2 Auto off 9 3 Language 9 4 Key tone 9 5 Memory select 9 6 Memory Micro SD information 9 7 Format device 9 8 Firmware version 9 9 System time 9 10 Record timer 9 11 Record timer ...

Страница 27: ...nformation etc www philips com One touch Recording Just slide the recording switch upward to start recording turn off to save file Digital Noise Reduction Effectively filter the ambient noise in the recording environment to enable crystal clear recording This feature should only be used in noisy environment Record in common MP3 and WAV format USB 2 0 high speed data access Voice activated recordin...

Страница 28: ... Do not turn up the volume so high that you can t hear what s around you When in dangerous environment please carefully use the earphones or stop using Do not use the earphones when driving cycling and skateboarding to avoid traffic accident and violating laws and regulations Observe the following guidelines when using your headphones Attention Before using the device please read this User s Manua...

Страница 29: ...5 Left built in Microphone 6 Record Play Indicator 7 Play Pause 8 Menu Selection Buttons 9 Right built in Microphone 10 Display 11 Previous Track Fast Backward 12 Stop Button File Folder Switch Button 13 Next Track Fast Forward 14 Speaker 15 Record Button 16 Volume up down Buttons 17 Delete button 18 TF card slot 19 The fold out stand ...

Страница 30: ... is displayed please charge the device promptly Note Note Note Power on Slide down and hold POWER button for 2 seconds the device starts automatically and then displays PHILIPS as shown below Then the device displays the play stop interface Press MENU button for 2 to 3 seconds to return to the main interface The main interface includes four modes The following four pictures show the modes respecti...

Страница 31: ...n be fully recharged in around 3 hours The device can be used as a USB mass storage to conveniently store back up and move files Link the device to a computer with a USB cable The voice recorder can automatically be recognized as a mass storage device without the need to install any software 1 Slide the POWER button to the lock position to lock all the buttons on the device except the slide switch...

Страница 32: ... to resume recording 5 When recording short press MENU button to set the index mark At maximum 10 index marks can be set in one recording file 6 Slide the recording switch to STOP to end recording the device returns to the play stop interface of current recorded file Recording Interface Reference Illustration of Recording Interface When the low battery icon occurs it means the battery is nearly em...

Страница 33: ...d MUSIC The recorded file can be stored in any of the A B C D folder each folder can store up to 99 audio files If one folder is full with 99 files the system automatically stores the subsequent files in the next folder In the case that all four folders are full please delete some unwanted files to enable recording Make a test recording to make sure that the Voice Tracer settings are correct Each ...

Страница 34: ...ndicator green light starts flashing press PLAY again to continue playing 7 When playing press or for a few seconds to fast forward or backward 6 Voice Mode Voice Playback Interface Specification On the main interface you can select the voice mode with or buttons and then shortly press the menu button to enter Please refer to the Voice Stop interface below After the audio file is selected press th...

Страница 35: ...back For operations of Replay Times please refer to Replay Times section in Music playback For operations of Replay interval please refer to Replay gap section in Music playback Sequence Play tracks sequentially in selected folder After playing all the tracks in the current folder the playing stops automatically Repeat Folder Repeat tracks on a playlist Repeat one repeat continuously the current t...

Страница 36: ...settings according to your preference On the play stop interface shortly press the MENU button to pop up Functions Menu the functions include MIC gain Record type Record lamp Voice Activation Control Listen In Auto divide See the below related reference pictures 6 3 Delete Files 6 4 Record Settings play speed See the below related reference pictures When playing the audio files long press MENU but...

Страница 37: ...next recording See the below related reference pictures 3 Record lamp From the Functions Menu select Record lamp then press MENU button to enter Record lamp Menu If recording indicator select Off Record lamp won t work anymore See the following picture NOISE CUT REC WAV format high sound quality bit rate 384kbps PCM REC WAV format high sound quality bit rate 3072kbps HQ REC MP3 format high sound q...

Страница 38: ...omatically into a new file every 30 or 60 minutes and resume recoding automatically The auto divide feature recording interface is as follows 5 The Listen In function After activating the Listen In function you can connect an earphone to listen if there s any sound output See the Listen in function setting interface picture as follows ...

Страница 39: ...ress PLAY to play When playing shortly press the MENU button the below menu pops up with modes of Repeat Equalizer A B Replay Replay times Replay gap and Play speed See the interface as follows 7 1 Playing Mode After selecting a menu the selected area turns White As illustrated Repeat is selected then press MENU button to enter the Repeat Selection Menu You can choose the preferred repeat as follo...

Страница 40: ... the selected track Random Play randomly tracks in selected folder In the Equalizer Mode you can choose mode with and buttons press MENU button to confirm you need to confirm the start point A shortly press to make confirmation Set the finish mark After setting mark A the B in A B on LCD display is blinking shortly press to set the finish mark The A B is displayed on the LCD As the replay marks ar...

Страница 41: ...eed See the below related reference pictures 7 1 5 Replay gap 7 1 6 Play speed On the play stop interface long press the delete button the below menu pops up with modes Delete file Delete All and Exit See the below interface picture On the left interface press or to choose delete file or delete all on the right interface press or to choose Yes to confirm deletion and choose No to keep the files Pr...

Страница 42: ...yrics file the music mode icon in the top of the screen will appear as follows if no lyrics match then no sign will be displayed as shown below If the lyrics match long press the menu button to enter the lyrics interface lyrics display will appear To exit short press MENU button to return to the Music Mode Note 1 2 ...

Страница 43: ...M record the system starts recording the radio the record type of radio recording is fixed to HQ REC see the interface picture below In the Radio Mode press or button to choose radio frequency press MENU button to display the following menu including Auto search Save Channel FM record Delete Delete All After Auto Search is selected the system automatically searches radio channels When a radio chan...

Страница 44: ...y If you select Constant the backlight is to be always on See the below picture of Backlight Time setting If there s no operation on the device for a set time the system automatically shuts down If the time is set at 0 the system will not automatically shut down See the below auto off picture From the Language menu you can choose a language as system language See the following interface picture Fr...

Страница 45: ...micro sd memory by using this function See the below picture You can check the device s firmware version by using this function See the System time interface as follows On this interface you can set the current system time and display format Press STOP return to the previous level submenu For example select Time format to show the following menu 9 5 Memory select 9 6 Memory Micro SD information 9 ...

Страница 46: ...em time turns to the pre set time the device automatically starts recording On the functions menu choose the Record timer then press the MENU button to enter Record timer setting See the below reference picture The first function is to set the time to start recording For setting please refer to the below picture On this interface you can choose set date and set time As system time turns to the pre...

Страница 47: ...47 You can restore to default settings by using this function See the below picture 9 11 Reset ...

Страница 48: ...te www philips com support The battery is empty please recharge promptly The maximum file number is exceeded or the device s memory is full Please delete some recordings or move them to other storage devices 1 The device may be in lock mode HOLD Slide the HOLD switch to OFF position 2 The battery is empty please recharge 10 1 Cannot switch on the device 10 2 Cannot record with the device 10 3 The ...

Страница 49: ... REC bit rate 3072kbps format WAV HQ REC bit rate 128kbps format MP3 SLP REC bit rate 8kbps format MP3 Temperature 5 45 C Humidity 10 90 no condensation This product was brought to the market by Speech Processing Solutions GmbH or one of its affiliates further referred to in this document as SPS which is the manufacturer of the product SPS is the warrantor in relation to the product with which thi...

Страница 50: ...VTR6900 ...

Страница 51: ... 2014 Speech Processing Solutions GmbH 版权所有文档版本1 0 2014 05 10 ...

Отзывы: