

EN
1VMN23433
/ E9B05BD
EN
Produced for ASDA Stores Ltd., LEEDS LS11 5AD
Quick Setup Guide
ADB2737BD
Congratulations on your purchase of a DVD Recorder with Video Cassette Recorder. This Quick Setup Guide takes you through the first-time setup with
simple instructions so you can enjoy exceptional audio and video quality as soon as possible. Please refer to the Owner’s manual for detailed instructions. If
you have read your instructions and still need assistance, call helpline at
0845-300-7775
. Unless stated, all procedures described use the remote control.
Playable discs
Recordable discs
* There may be a disc which cannot be used or played back.
Using the Scart jack
Using the S-VIDEO OUT jack and the AUDIO OUT jacks (only for DVD)
Basic recording on DVD
1
Press [STANDBY-ON] to turn on the unit.
2
Press [DVD
].
3
Press [OPEN / CLOSE / EJECT
O
] to open the disc
tray.
4
Place a recordable disc on the disc tray with its
label facing up. Be sure to align the disc with the
disc tray guide.
5
Press [OPEN / CLOSE / EJECT
O
] to close the disc
tray.
It may take a while to recognize a disc type after a disc is
inserted into the unit.
6
Select the recording speed using [REC SPEED].
7
Select the desired channel to record using
[PROG.
U
/
D
] or [the Number buttons].
8
Press [REC / OTR] (DVD) to start recording.
To pause the recording, press
[PAUSE
p
]
. Press
[REC / OTR]
(DVD) or
[PAUSE
p
]
to restart the recording.
9
Press [STOP
S
] to stop the recording.
This operation may take a few moments to complete.
Basic recording on video tape
1
Turn on the unit and insert a recordable tape.
Make sure that the TV input is set on the unit.
2
Press [VCR
].
3
Select the recording speed using [REC SPEED].
• The desired recording speed is selected in SP (standard play)
or LP (long play) mode by pressing
[REC SPEED]
.
4
Select the desired channel to record using
[PROG.
U
/
D
] or [the Number buttons].
5
Press [REC / OTR] (VCR) to start recording.
To temporarily stop recording or to resume it, press
[PAUSE
p
]
. After the unit has been in pause mode for 5
minutes, it will stop automatically to protect the tape and the
video head from damage.
6
Press [STOP
S
] when the recording is completed.
Playing back discs / video tapes
Playing back a DVD-RW / DVD-R / DVD+RW /
DVD+R disc
1
Press [STANDBY-ON] to turn on the unit.
2
Press [DVD
].
3
Press [OPEN / CLOSE / EJECT
O
] to open the
disc tray.
4
Place the disc on the disc tray with its label facing
up. Be sure to align the disc with the disc tray
guide.
5
Press [OPEN / CLOSE / EJECT
O
] to close the
disc tray.
It may take a while to recognize a disc type after a disc is
inserted into the unit.
6
Press [TOP MENU] to display the Title list.
You can switch between the “Original” and “Playlist” in the
VR mode using
[MENU / LIST]
.
7
Select the desired title using
[Cursor
U
/
D
/
L
/
P
], then press [ENTER].
Popup window will appear.
8
Select “Play” using [Cursor
U
/
D
], then press
[ENTER].
Playback will start.
9
Press [STOP
S
] to stop playback.
To eject the disc, press
[OPEN / CLOSE / EJECT
O
]
to
open the disc tray, then remove the disc. Press
[OPEN / CLOSE / EJECT
O
]
to close the disc tray before
turning off the unit.
Playing back a DVD-V / CD / Video CD
1
Follow steps 1 to 5 in “Playing back a DVD-RW /
DVD-R / DVD+RW / DVD+R disc”.
2
Press [PLAY
P
] to start playback.
Playback will start.
If you are playing back a DVD-Video or a Video CD, a menu
may appear.
See pages 41 - 42 on the Owner’s Manual for details.
3
Press [STOP
S
] to stop playback.
Playing back an MP3 / JPEG
For MP3 or JPEG files, you can select the track from the File List.
See pages 38 - 41 on the Owner’s Manual for details.
Playing back a video tape
1
Press [STANDBY-ON] to turn on the unit.
2
Press [VCR
].
3
Insert a prerecorded tape, then press [PLAY
P
] to
begin playback.
4
During playback, press [PAUSE
p
].
Playback will be paused and sound will be muted.
5
Press [PLAY
P
] to resume playback.
6
Press [STOP
S
] to stop playback.
7
Press [OPEN / CLOSE / EJECT
O
] to eject the
tape.
Note
• When a tape without record tab is inserted, the unit will start playback
automatically.
• Tracking will be automatically adjusted upon playback. To adjust the
tracking manually, press
[PROG.
U
/
D
]
.
STANDBY-ON
DVD
OPEN/CLOSE
/EJECT
OPEN/CLOSE
/EJECT
REC SPEED
Disc tray guide
PROG.
REC/OTR
STOP
VCR
REC SPEED
PROG.
REC/OTR
STOP
STANDBY-ON
DVD
OPEN/CLOSE
/EJECT
OPEN/CLOSE
/EJECT
TOP MENU
ENTER
STOP
ENTER
Disc tray guide
PLAY
STOP
STANDBY-ON
VCR
PLAY
PAUSE
PLAY
STOP
OPEN/CLOSE
/EJECT
Recordable and Playable discs
Disc
Logo
Disc
Logo
Disc type
Disc format
Functions
DVD-Video
DVD-RW
(Video/VR mode)
Video mode
Playing back, Limited
recording, Limited editing
VR mode
Playing back, Recording,
Original / Playlist editing
DVD-R
(Video mode)
DVD+RW*
Video mode
Playing back, Limited
recording, Limited editing
DVD+R*
CD-DA
(AUDIO CD)
This unit can play back DVD discs labelled with the
following region codes only:
VCD
(VIDEO CD)
CD-RW
(CD-DA FORMAT,
MP3, JPEG files)
CD-R
(CD-DA FORMAT,
MP3, JPEG files)
Kodak Picture CD
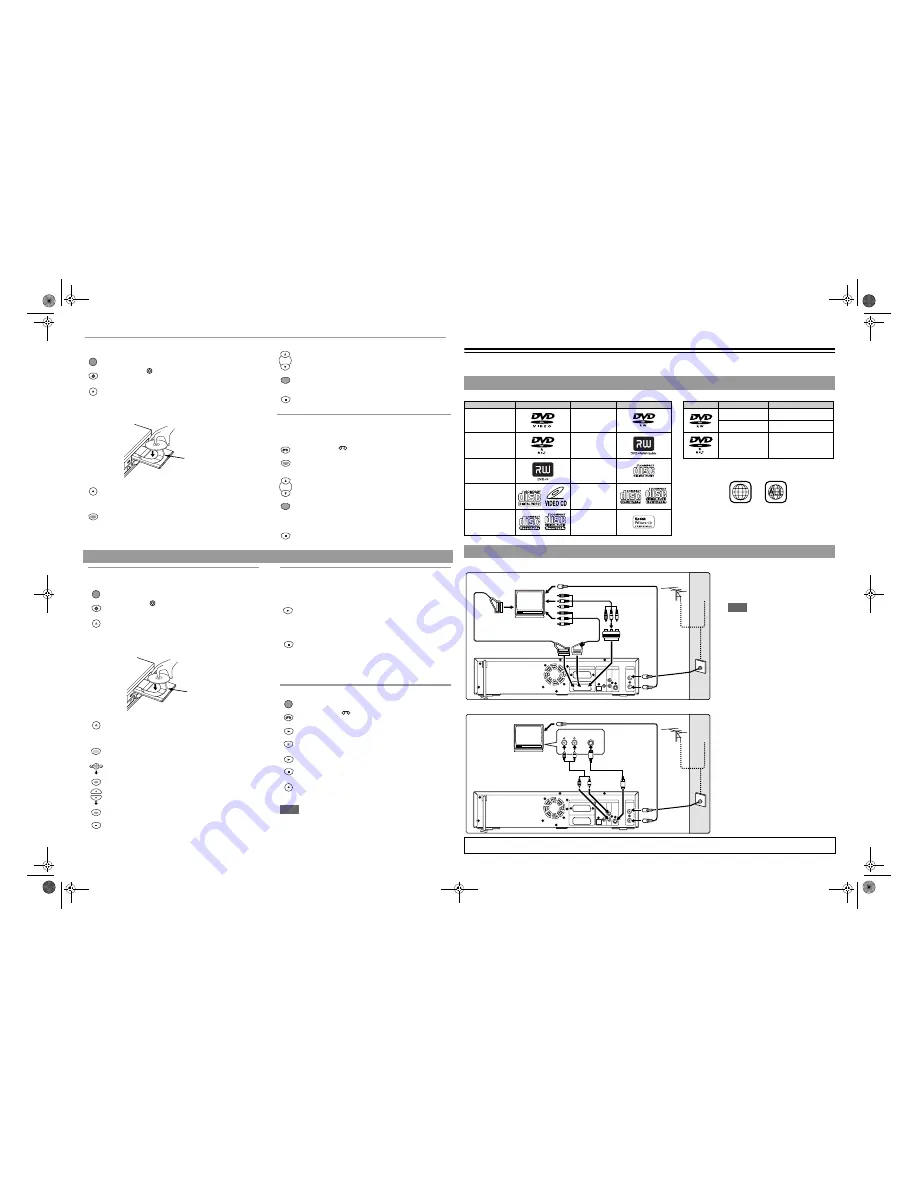
Connecting to a TV
Connect AV1 (TV) Scart jack of this unit
to the Scart jack of your TV.
Use the supplied Scart cable.
Note
• If your TV does not have a Scart jack, use
a commercially available Scart adaptor or
Scart / RCA cable to connect.
Use only AV1(TV) or AV2(DECODER)
jack for the VCR output signals of this
unit.
If your TV has an S-Video input jack, use
S-Video and Audio cables to connect.
1
Connect S-VIDEO OUT jack of
this unit to the S-Video input
jack of your TV. Use a
commercially available S-Video
cable.
2
Connect the AUDIO OUT jacks of
this unit to the analogue Audio
input jacks of your TV. Use a
commercially available Audio
cable.
Note for a TV with no S-Video input jacks or Scart jack:
• This unit has no RF modulator, so this type of TV cannot be used.
2
DIGITAL
AUDIO OUT
COAXIAL
OPTICAL
DVD/VCR
AV2(DECODER)
AUDIO
OUT
OUT
IN
L
R
S-VIDEO
OUT
AV1(TV)
DVD
ANTENNA
Cable
Signal
Antenna
or
RF cable
(not
supplied)
Scart cable (supplied)
To Aerial jack
Audio/Video cable
(not supplied)
Scart/RCA cable
(not supplied)
Scart adaptor
(not supplied)
RF cable
(supplied)
TV
DIGITAL
AUDIO OUT
COAXIAL
OPTICAL
DVD/VCR
AV2(DECODER)
AUDIO
OUT
OUT
IN
L
R
S-VIDEO
OUT
AV1(TV)
DVD
ANTENNA
AUDIO IN S-VIDEO IN
Antenna
or
RF cable
(not
supplied)
RF cable
(supplied)
To Aerial jack
S-Video cable
(not supplied)
Audio cable
(not supplied)
Cable
Signal
TV
E9B05BD_QSG_EN.fm Page 1 Wednesday, November 29, 2006 5:05 PM


