background image

6  Hookups Without a Cable Box

CH3 CH4

RF OUT

ANT.IN

AUDIO

VIDEO

IN

OUT

IN

OUT

R

L

OR

CH3 CH4

RF OUT

ANT.IN

AUDIO

VIDEO

IN

OUT

IN

OUT

R

L

75

ANT /

CABLE

OR

75

ANT /

CABLE

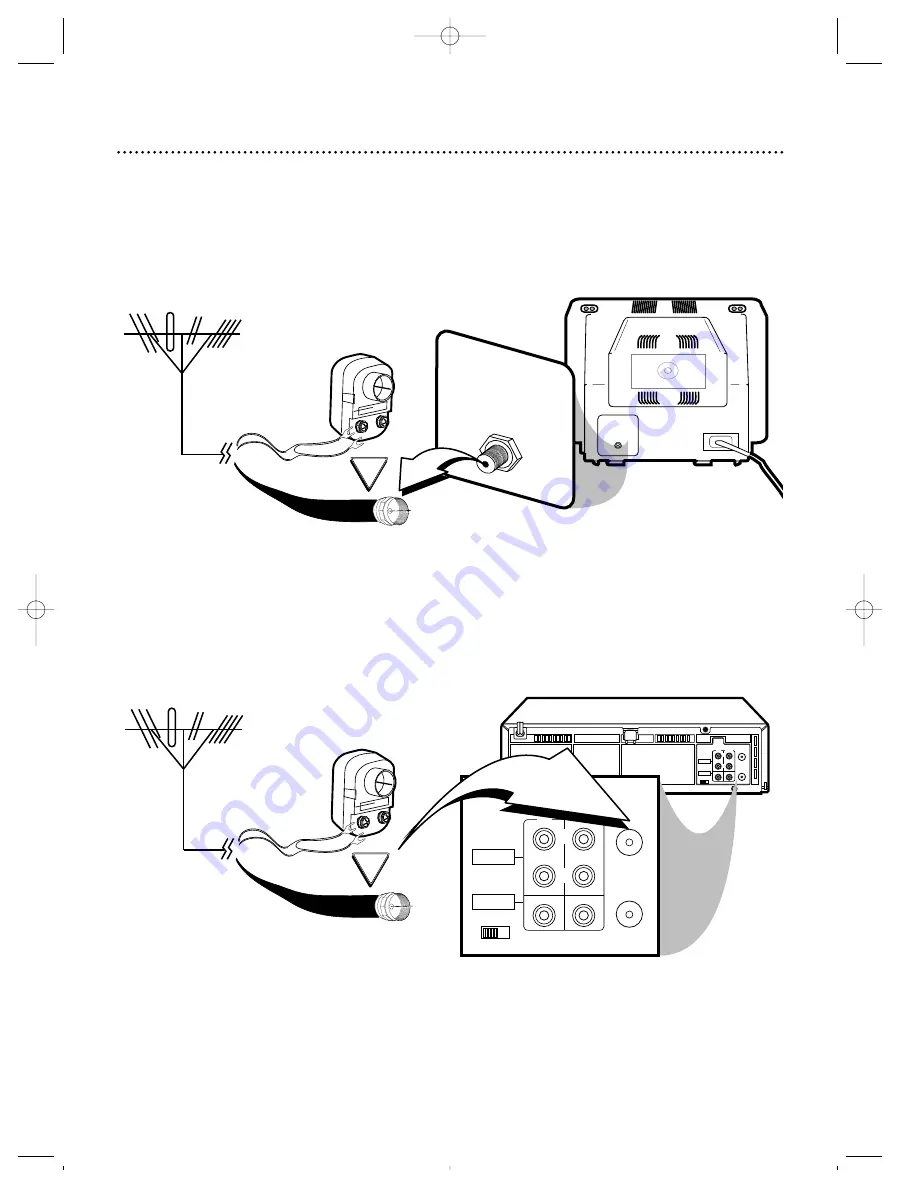
The basic VCR/TV connection – antenna/cable to VCR to TV – is shown below. If you have a Cable Box or
a Direct Broadcast System, please refer to pages 8 - 9. After you hook up the VCR, please go to page 10
to turn on the VCR. (The VRZ264 is illustrated here. The VRZ244 has single AUDIO IN/OUT Jacks.)

ANTENNA IN

Jack

(on back of TV)

Cable

(75 ohm)

Antenna

Indoor/Outdoor

(300 ohm)

1

Disconnect the antenna or cable from your TV.

2

Connect the antenna or cable to the ANT(enna) IN Jack on the back of the
VCR.

Cable

(75 ohm)

Antenna

Indoor/Outdoor

(300 ohm)

VRZ264  4/8/99 7:28 PM  Page 6

Содержание VRZ244

Страница 1: ...J 5 J W2 6X Xf hf H hW 5 W W 7 V T hf J he7 H W 7 4 U O 5h J 5 7 H W W YeS he W2 HhW Y J 5 W X Y H 0Yf K O g W H W H J W f W Ke S 5 gO 5 7 O W 6K O 6 H fW2 H J 5 W2 KV YW X 5g7 5 W H W S Y V Hg H 7 5 7 W f 5 H J O Y 5 f H 5 W Y W2 5 hf J H W V YeW H hfW 5 W 2 Y O 5hf W H W Hhf 7 O 5 hfJ 5 H he W Y J 5hfW Y W Hhe W H O W 5 heW W2 W H h W 5 W W Y heW Y 7 W 5h O W Hg W2 W2 7 5 gW H W H f O 5 O J 5f W...

Страница 2: ...EDUCE THE RISK OF ELECTRIC SHOCK DO NOT REMOVE COVER OR BACK NO USER SERVICEABLE PARTS INSIDE REFER SERVICING TO QUALIFIED SERVICE PERSONNEL W2 6Xh f7 Lh fW X J X h J X h W 1 7 Xh 7 1 h W L 6X h e 1h J Lg W 1h e W2 J Xh J L f W 1g 7 L h W 7 X g 7 X f 7 L f J 1 g W L Xg J X eJ Xe W L g W 1 J X f7 X W 1 eW 1f W 6Kh e7 Xe J 1 7 O f W L h W2 6 Xh X 7 L W 1h W X g K 1 W g O J Kf J W L e W2 7 6X e 7 1 e...

Страница 3: ...y the warranty if damage occurs Note to the Cable TV System Installer This reminder is provided to call the Cable TV system installer s attention to Article 820 40 of the National Electrical Code which provides guidelines for proper grounding in particular specifying that the cable ground shall be connected to the grounding system of the build ing as close to the point of cable entry as possible O...

Страница 4: ...Operate a Cable Box DBS 27 Basic Operations Playing 28 Recording 29 Recording One Touch Recording 30 Recording One Channel Watching Another 31 Setting Up the VCR Plus Programming System 32 33 Timer Recording With the VCR Plus Programming System 34 35 Quick Programming 36 39 Timer Recording Speed Setting 40 Rerecording Tape Duplication 41 Playing Index Search 42 Multi Channel Television Sound Syste...

Страница 5: ...ny light adhesive stick on notes from the video cassette before putting the cassette in the VCR Removable labels can jam the VCR Periodic maintenance is required to maintain your VCR s perfor mance Your VCR has an automatic head cleaner but the video heads eventually will require cleaning or replacement Cleaning or replacement of the video heads should be performed only by an authorized service ce...

Страница 6: ...or a Direct Broadcast System please refer to pages 8 9 After you hook up the VCR please go to page 10 to turn on the VCR The VRZ264 is illustrated here The VRZ244 has single AUDIO IN OUT Jacks ANTENNA IN Jack on back of TV Cable 75 ohm Antenna Indoor Outdoor 300 ohm 1 Disconnect the antenna or cable from your TV 2 Connect the antenna or cable to the ANT enna IN Jack on the back of the VCR Cable 75...

Страница 7: ... VCR and to the ANTENNA IN Jack on the TV You may use either a snap on type or screw on type of coaxial cable whichever you prefer A snap on type is sup plied 5 Set the CH3 CH4 switch on the back of the VCR to CH3 or CH4 whichever channel is not used or least used in your area To operate your VCR with your TV set the TV to the same channel For example when playing a tape if the CH3 CH4 switch is s...

Страница 8: ...ew record at the Cable Box DBS 1 2 There are two ways to connect your Cable Box DBS to the VCR With this connection You may view any channel You must select channels at the Cable Box DBS Channels cannot be changed at the VCR You may not view a channel other than the one you are recording You may not set up channels at the VCR You can only program a timer recording for one channel at a time Set the...

Страница 9: ...e VCR light will appear on the display panel use the CH annel 8 9 buttons to select the channel you want to record at the VCR Start the recording 2 Press the VCR TV button once to put the VCR in TV position The VCR light will disappear 3 Set the TV to the Cable Box DBS output channel 03 or 04 4 Select the channel you want to watch at the Cable Box DBS 1 2 With this connection You may watch one cha...

Страница 10: ...When channels are set up AUTO CH SET COMPLETED will appear on screen briefly 6Wait for the VCR to set up channels SELECT 9 A ENGLISH ESPAÑOL FRANÇAIS MAKE SELECTION OR PUSH OK TO CONTINUE CONNECT ANTENNA OR CABLE TO VCR THEN PUSH OK KEY OR FOR PLAY ONLY PUSH STOP Auto or may appear on the display panel until the clock is set After you connect the anten na cable signal to the VCR and con nect the V...

Страница 11: ... the STOP 9 button to select AUTO CH PRO GRAMMING then press the OK button AUTO CH SET PROCEEDING PLEASE WAIT and a scale that shows the progress of channel setup will appear on screen The VCR will memorize all the channels you receive If the channel you select has no broadcast the screen will be solid blue The two Line Input modes will always be stored in the VCR s mem ory at channel 00 To select...

Страница 12: ...ss the EXIT STATUS button Programming of the last channel you added or deleted will appear on screen 1 Press the VCR button then press the MENU button SELECT 9 CHOOSE OK A CABLE ANTENNA CABLE AUTO CH PROGRAMMING ADD DELETE CH TO END PUSH EXIT SELECT 9 124 DELETED 125 DELETED 01 DELETED 02 ADDED 03 ADDED TO ADD DELETE PUSH OK TO END PUSH EXIT SELECT 9 CHOOSE OK A VCR SET UP TUNER SET UP INITIAL SET...

Страница 13: ...To set the clock manually follow the steps on this page To use Time Zone Selection go to page 15 To use Manual PBS Channel selection go to page 16 To use Automatic PBS Channel Selection go to page 17 Manual Clock Setting 1 Press the VCR button then press the MENU button 3 Press the PLAY 8 or STOP 9 button to select CLOCK then press the OK button 2 Press the PLAY 8 or STOP 9 button to select INITIA...

Страница 14: ...to OFF you may only set D S T to ON or OFF For more informa tion please see page 18 4 Press the PLAY 8 or STOP 9 button repeatedly to set the TIME Every time you press the PLAY 8 or STOP 9 button the time changes in one minute increments If you press and hold the PLAY 8 or STOP 9 button the time changes in 30 minute increments When the time is correct press the OK button TIME 10 45 AM DATE 01 01 9...

Страница 15: ...different time zone Select the time zone of your PBS channel at step 5 Press the EXIT STATUS button repeatedly to make the time appear on the display panel when the VCR power is on Helpful Hints 3 Press the PLAY 8 or STOP 9 button to select CLOCK then press the OK button If AUTO CLOCK is set to OFF TIME ZONE will not be available in the menu If this happens press the OK button to select AUTO CLOCK...

Страница 16: ... button to select INITIAL SET UP then press the OK button TIME AM DATE 01 01 98 AUTO CLOCK ON PBS CH AUTO D S T AUTO TIME ZONE AUTO TO SET PUSH 9 THEN OK TO END PUSH EXIT 7 An on screen message will ask you to turn off the VCR and AM will appear on the display panel Press the POWER button to turn off the VCR Auto will flash in the display panel until the clock is set Leave the VCR power off until ...

Страница 17: ...e VCR button then press the MENU button 2 Press the PLAY 8 or STOP 9 button to select INITIAL SET UP then press the OK button TIME AM DATE 01 01 98 AUTO CLOCK ON PBS CH AUTO D S T AUTO TIME ZONE AUTO TO SET PUSH 9 THEN OK TO END PUSH EXIT 7 An on screen message will ask you to turn off the VCR and AM will appear on the display panel Press the POWER button to turn off the VCR Auto will flash in the...

Страница 18: ...NGUAGE ENGLISH VCR PLUS CH TO END PUSH EXIT 1 Press the VCR button then press the MENU button 2 Press the PLAY 8 or STOP 9 button to select INITIAL SET UP then press the OK button TIME 10 45 AM DATE 01 01 98 THURSDAY AUTO CLOCK ON PBS CH AUTO D S T AUTO TIME ZONE AUTO TO SET PUSH 9 THEN OK TO END PUSH EXIT 7 An on screen message will ask you to turn off the VCR Press the POWER button to turn off t...

Страница 19: ... repeatedly so that the English menu appears 5 Press the EXIT STATUS button Helpful Hint 1 Press the VCR button then press the MENU button 2 Press the PLAY 8 or STOP 9 button to select INITIAL SET UP then press the OK button SELECT 9 CHOOSE OK A VCR SET UP TUNER SET UP INITIAL SET UP TO END PUSH EXIT SELECT 9 CHOOSE OK A CLOCK LANGUAGE ENGLISH VCR PLUS CH TO END PUSH EXIT 4 Press the OK button rep...

Страница 20: ...ns POWER Button After pressing the CBL DBS VCR or TV button press to turn on or off the Cable Box DBS VCR or TV EJECT Button Press to eject the tape CH annel 8 9 Buttons After pressing the CBL DBS TV or VCR button press to scan through the channels of the Cable Box DBS TV or VCR Fast Forward OK Button When tape playback is stopped press to advance the tape at high speed During tape playback press ...

Страница 21: ... plays or to exit the TV menu SPEED Button Press to select the recording speed SP or SLP Details are on pages 37 and 50 Helpful Hint SKIP SEARCH Button Press during tape playback to fast forward 30 seconds of a tape This feature will only work with tape segments recorded in SP or SLP speed STILL SLOW Button While recording press to tem porarily stop the recording Press a second time to resume norm...

Страница 22: ...hen the clock is set the real time counter and the current channel number During tape playback press the EXIT STATUS button repeatedly to see the real time counter or the current time Line Input Mode Light When L appears here the VCR is in Line Input mode When L F appears you have selected A V IN FRONT Your audio and video cables should be connected to the AUDIO VIDEO jacks on the front of the VCR...

Страница 23: ... stays on screen Details are on page 48 Front VIDEO AUDIO In Jacks Connect cables coming from the VIDEO and AUDIO OUT Jacks of another VCR or a camcorder here Details are on page 41 The VRZ244 has one AUDIO In jack OK Button Press to change the setting of an on screen menu item MENU EXIT Button Press to access the main VCR menu Or press to exit on screen menus STILL PAUSE Button During tape playba...

Страница 24: ... ANTENNA IN Jack on your TV or to the IN Jack on your Cable Box DBS if applicable Details are on pages 6 9 AC Power Cord Connect to a wall outlet 120 V to supply power to the VCR AUDIO OUT Jacks Connect cables going to the AUDIO IN jacks of a camcorder another VCR or an audio source here Details are on pages 41 and 44 The VRZ244 has a single AUDIO OUT Jack The VRZ264 pic tured has Right and Left A...

Страница 25: ...utton or the STOP 9 but ton to stop playback some of the contents of the status display will appear for five seconds ON SCREEN MODE COUNTER The real time counter will appear on screen at all times Whenever you press the PLAY 8 button or the STOP 9 but ton to stop playback some of the contents of the status display will appear for five seconds After five seconds only the counter will remain on the ...

Страница 26: ...d remem ber the two digit number beside it 3 While you press and hold the TV button use two Number buttons to enter the two digit code for your TV For example if you have a Zenith TV press Number buttons 1 5 Then still holding the TV button press the STOP 9 but ton Your TV may turn on or off automatically 2Find the code for your TV 4 Repeat step 1 If the remote control works your TV you re finishe...

Страница 27: ...17 CABLEVIEW 15 16 17 21 25 CITIZEN 15 16 17 21 25 CURTIS 02 08 DIAMOND 01 17 EASTERN 19 GC BRAND 15 16 17 21 25 GEMINI 15 GENERAL INSTRUMENTS 01 04 06 11 12 15 HAMLIN 10 18 19 23 JASCO 15 JERROLD 01 04 06 11 12 15 NOVAVISION 02 08 OAK 07 20 PANASONIC 13 14 PULSAR 15 16 17 21 25 RCA 13 14 REGAL 10 18 19 23 REGENCY 19 REMBRANDT 01 16 17 SAMSUNG 05 16 24 SCIENTIFIC ATLANTA 02 08 SIGMA 07 20 SL MARX ...

Страница 28: ...power will come on The VCR will place itself in VCR position automatically the VCR light will appear on the display panel of the VCR If the VCR light does not appear press the VCR TV button once If the tape s record tab has been removed playback will start automatically 3 If playback does not start automatically press the PLAY 8 button The 3 light will appear on the VCR display panel 4 Press the S...

Страница 29: ...panel of the VCR go to step 5 If the VCR light does not appear press the VCR TV button once 5 Press the SPEED button until the desired tape speed appears on screen The VCR will only record in SP or SLP Details about tape speed are on pages 37 and 50 6 Use the CH annel 8 9 buttons or the Number buttons to select the channel to be recorded 7 Press the REC ord OTR button to start recording The light ...

Страница 30: ... to start an immediate timed recording 30 minutes to nine hours long of the channel you are watching Before you begin make sure Channels are set up Details are on pages 11 12 The desired recording speed SP or SLP has been selected with the SPEED button Details are on pages 37 and 50 There is a tape in the VCR Make sure the tape s record tab is intact see page 5 and the tape is long enough to recor...

Страница 31: ...s your TV press the TV button then use the CH annel 8 9 buttons to select the channel you want to watch The channel selected with the TV controls will appear on screen while the channel you previously selected to record is being recorded The light will appear on the display panel 6 Press the VCR button 7 Press the VCR TV button to put the VCR in VCR posi tion The VCR light will appear on the displ...

Страница 32: ...the VCR with your local channel infor mation To fill in the boxes you will need 1 a cable channel list if applicable you can request one from your cable company and 2 a chart that lists VCR Plus channel numbers which you can find in your TV guide or the TV listings of your local newspaper NOTE If you are using a Cable Box DBS the Cable TV channel must be 03 or 04 the Cable Box DBS output channel f...

Страница 33: ...LAY 8 or STOP 9 button repeatedly or press the Number buttons to select a VCR PLUS channel number The arrow will appear beside the VCR PLUS channel Press the OK button 8 Press the EXIT STATUS button 2Examine the lists on page 32 SET VCR PLUS CH VCR PLUS CABLE TV 99 01 02 03 04 SELECT 9 OR ENTER VCR CH NO THEN PUSH OK TO END PUSH EXIT 7 While the space for the CABLE TV channel is flashing press the...

Страница 34: ...mbers Details are on pages 32 33 Complete each step within 60 seconds of completing the previous step If you don t you may start again at step 1 1 Press the VCR button 2 Press the TIMER button 4 Use the Number buttons to enter the PlusCode program ming number of the program you wish to record This number is different for every program and it can be four to eight digits long 3 Press the PLAY 8 or S...

Страница 35: ...ith another timer recording To cancel the overlapping timer record ing follow the steps on page 39 If you want to check your timer recordings follow the steps on page 39 Helpful Hints 6 If you want to record the program one time only go to step 7 You may also press the Number 8 DAILY or 9 WEEK LY button repeatedly to select a ONE TIME PROGRAM If you want to record the program daily press the Numbe...

Страница 36: ...eding Complete each step within 60 seconds of the previous step 1 Press the VCR button then press the TIMER button 2 Press the PLAY 8 or STOP 9 button to select QUICK PROGRAMMING then press the OK button 3 Press the CH annel 8 9 buttons to enter the channel you want to record If you are using a standard antenna or cable to VCR to TV hookup as shown on pages 6 7 enter the channel of the TV program ...

Страница 37: ...XIT ONE TIME PROGRAM PROGRAM 1 CHANNEL 12 START 08 00 PM STOP 10 00 PM REC SPEED SLP DATE SET DAILY 8 OR WEEKLY 9 TO END PUSH EXIT ONE TIME PROGRAM PROGRAM 1 CHANNEL 12 START 08 00 PM STOP 10 00 PM REC SPEED SLP DATE SET DAILY 8 OR WEEKLY 9 TO END PUSH EXIT Tape Speed Maximum Record Playback Time T160 T120 T60 SP 2 hrs 2 hrs 1 hr Standard Play 40 mins LP 5 hrs 4 hrs 2 hrs Long Play 20 mins SLP 8 h...

Страница 38: ... WEEKLY 9 TO END PUSH EXIT 7 Press the Number 3 DATE or Number 6 DATE button to set the recording date Every time you press a button the date changes in one day increments If you press and hold a but ton the date changes quickly The day of the week will appear automatically You cannot program the VCR to record more than one year in advance ONE TIME PROGRAM PROGRAM 1 CHANNEL 12 START 08 00 PM STOP ...

Страница 39: ...ut ton to return to the previous screen SELECT 9 CHOOSE OK A VCR PLUS QUICK PROGRAMMING PROGRAM REVIEW TO END PUSH EXIT PR CH START STOP DATE 1 12 08 00P 10 00 D07 31 2 36 10 00A 10 45 08 01 3 24 11 30P 01 00 08 10 4 45 03 00P 03 15 W10 15 5 6 7 8 NEXT END EXIT ONE TIME PROGRAM PROGRAM 1 CHANNEL 12 START 08 00 PM STOP 10 00 PM REC SPEED SLP DATE 07 31 98 FRIDAY TO ERASE PROGRAM CLEAR NEXT PREV END...

Страница 40: ...STOP 9 button to select TIMER REC SPEED then press the OK button so that AUTO appears beside TIMER REC SPEED To turn off this feature press the OK button so that MANUAL appears beside TIMER REC SPEED 4 Press the EXIT STATUS button SELECT 9 CHOOSE OK A VCR SET UP TUNER SET UP INITIAL SET UP TO END PUSH EXIT Approximately 110 minutes Approximately 30 minutes Follow the steps below to set TIMER REC S...

Страница 41: ... make the connections shown then follow steps 1 6 You may use the AUDIO and VIDEO In jacks on the front of VCR 2 instead if you pre fer 1 VCR 1 will play your tape Insert a prerecorded tape in VCR 1 If the tape does not have a record tab playback begins If this happens press the STOP EJECT button on VCR 1 once 2 VCR 2 will record your tape Insert a blank tape in VCR 2 Make sure the VCR power is on...

Страница 42: ... rewind the tape When the index code is reached tape playback will begin automatically NOTE You may press an INDEX button repeatedly to skip over multiple recordings For example if you want to fast forward past four recordings press the INDEX button four times INDEX 4 will appear in the bottom right corner of the screen The index codes will count down on screen as the search progresses ON SCREEN M...

Страница 43: ...rding If a TV program is broadcast in stereo you can program your VCR to receive and record the program in Hi Fi stereo You must program the VCR and make the appropriate stereo hookups Follow the steps on page 44 To playback this type of program follow the steps on page 45 Receiving a Stereo Broadcast When a TV program is being broadcast in stereo STEREO will appear in the status display You still...

Страница 44: ...have a Stereo and a Monitor TV use a video cable to connect the VCR s VIDEO OUT Jack to the TV s VIDEO IN Jack Use audio cables to connect the VCR s AUDIO OUT Jacks to the Stereo s AUDIO IN Jacks OR if you have a single speaker TV use an RF coaxial cable to connect the VCR s RF OUT Jack to the TV s ANTENNA IN Jack If you want to connect the VCR to a Stereo TV follow these steps 1 Connect the anten...

Страница 45: ...e is recorded in Hi Fi stereo follow the steps below to play the tape in Hi Fi stereo 1 Press the VCR button then press the MENU button 2 Press the PLAY 8 or STOP 9 button to select VCR SET UP then press the OK button 3 Press the PLAY 8 or STOP 9 button to select AUDIO OUT then press the OK button so that HIFI appears beside AUDIO OUT SELECT 9 CHOOSE OK A ON SCREEN MODE ON TIMER REC SPEED MANUAL V...

Страница 46: ...to ON 1 Press the VCR button then press the MENU button 2 Press the PLAY 8 or STOP 9 button to select VCR SET UP then press the OK button 3 Press the PLAY 8 or STOP 9 button to select VIDEO STABILIZER then press the OK button so that ON appears beside VIDEO STABILIZER SELECT 9 CHOOSE OK A ON SCREEN MODE ON TIMER REC SPEED MANUAL VIDEO STABILIZER OFF PICTURE NORMAL AUDIO OUT HIFI STEREO SAP STEREO ...

Страница 47: ...ATUS button SELECT 9 CHOOSE OK A ON SCREEN MODE ON TIMER REC SPEED MANUAL VIDEO STABILIZER OFF PICTURE NORMAL AUDIO OUT HIFI STEREO SAP STEREO TO END PUSH EXIT SELECT 9 CHOOSE OK ON SCREEN MODE ON TIMER REC SPEED MANUAL VIDEO STABILIZER OFF A PICTURE INCREDIBLE AUDIO OUT HIFI STEREO SAP STEREO TO END PUSH EXIT SELECT 9 CHOOSE OK A VCR SET UP TUNER SET UP INITIAL SET UP TO END PUSH EXIT 1 Press the...

Страница 48: ... and hold the SLOW BACK button during Slow Motion playback the tape will play in reverse in slow motion Forward and Reverse Searching 1 During tape playback press and release the OK button or the Rewind button A fast forward or reverse picture search will begin 1 Press and hold the PLAY button until the 3 light flash es on the display panel Now when a tape has finished playing the VCR will rewind ...

Страница 49: ...you eject a tape with the VCR power turned off Counter Reset The real time counter will automatically be reset to 0 00 00 as you insert a cassette To reset the real time counter to 0 00 00 at anytime press the CLEAR button on the remote control Automatic Tracking Adjustment The VCR continually adjusts tracking to give you the best possible picture quality With some recordings however you may get a...

Страница 50: ...ours whichever you specify Remote Control the small electronic unit that came with your VCR allows you to operate your VCR from a distance The remote control may also operate some fea tures of your TV Cable Box or DBS RF coaxial cable the cable supplied with your VCR Use it to connect your VCR to your TV or Cable Box DBS if applicable The supplied cable is a snap on type However you may also use a...

Страница 51: ... Power Consumption 20 W For VRZ244 22 W For VRZ264 Operating Temperature 41 F 5 C to 104 F 40 C Relative Humidity 10 to 80 Weight 7 3 lbs 3 3 kg Dimensions 14 3 16 W x 3 3 4 H x 10 3 4 D 360 mm x 94 mm x 274 mm Tuner Broadcast Channels VHF 2 13 UHF 14 69 Cable TV Channels VHF 2 13 Midband A 1 Superband J W Hyperband A 5 A 1 Special Channel 5A Ultraband 37 94 100 125 NOTE Designs and specifications...

Страница 52: ...he VCR Make sure the tape has a record tab Details are on page 5 Make sure the VCR power is off Make sure the clock is set Details are on pages 13 17 The VCR may not perform or continue a timer recording if a power interruption of more than 10 min utes occurs even if the power comes back on If timer recordings are lost should appear on the display panel But even if you do not see this indication a...

Страница 53: ...ion Details are on pages 21 and 22 Check the connections between the VCR TV antenna cable and Cable Box DBS if applicable Details are on pages 6 9 Line Input mode is selected If you accidentally enter Line Input mode L 1 or L F will appear on the display panel use the CH annel 8 9 buttons or the Number buttons to select another channel Multi Channel Television Sound System VRZ264 only You can only...

Страница 54: ...ries where the product is officially distributed by Philips Consumer Electronics Company In countries where Philips Consumer Electronics Company does not dis tribute the product the local Philips service organiza tion will attempt to provide service although there may be a delay if the appropriate spare parts and technical manual s are not readily available MAKE SURE YOU KEEP Please keep your sale...

Страница 55: ...tic 17 manual 16 picture enhancer 47 play button 20 23 28 playback 28 options 48 pluscode programming number 34 power button 20 23 program review 39 quick programming 36 39 real time counter 25 49 rear panel 24 rec ord otr button 20 23 29 30 record tab 5 recording basic 29 one channel watching another 31 remote control buttons 20 21 sensor 22 using 5 repeat playback 48 rerecording 41 reverse searc...

Страница 56: ...vice Solutions Group at the address below Philips Service Solutions Group P O Box 967 Greeneville TN 37744 0967 Or call 1 800 851 8885 P O W E R C B L D S S V C R T V E J E C T V C R T V M E N U Q U IC K P R O G R A M M IN G E X IT S T A T U S T I M E R S L O W B A C K D B S D A IL Y W E E K L Y S T A R T S T O P D A T E S L O W F O R W A R D S K IP S E A R C H S T IL L S L O W O K 1 2 3 4 5 6 7 8...

Отзывы: