background image

Once your purchase is registered, you’re eligible to receive all the privileges of owning this prod-
uct. So complete and return the Warranty Registration Card enclosed with your purchase at
once. And take advantage of these important benefits.

MAC5097

Return your Warranty Registration Card today to

ensure you receive all the benefits you’re entitled to.

Warranty
Verification

Registering your product within
10 days confirms your right to 
maximum protection under the
terms and conditions of your 
warranty.

Owner
Confirmation

Your completed Warranty
Registration Card serves as
verification of ownership in the
event of product theft or loss.

Model
Registration

Returning your Warranty
Registration Card right away 
guarantees you’ll receive all
the information and special
offers which you qualify for 
as the owner of your model.

Congratulations on your purchase, and
welcome to the “family!”

Dear product owner:

Thank you for your confidence in this product. You’ve selected one
of the best-built, best-backed products available today. And we’ll do
everything in our power to keep you happy with your purchase for
many years to come. 
As a member of the SV2000 “family,” you’re entitled to protection
by one of the most comprehensive warranties and outstanding ser-
vice networks in the industry.
What’s more, your purchase guarantees you’ll receive all the infor-
mation and special offers for which you qualify, plus easy access to
accessories from our convenient home shopping network.
And most importantly, you can count on our uncompromising com-
mitment to your total satisfaction.
All of this is our way of saying welcome - and thanks for investing in
an SV2000 product.

P.S.  Remember, to get the most from your product,

you must return your Warranty Registration
Card within 10 days. So please mail it to us
right now!

R

E

G

I S

T R

A T I O N

N

E

E

D

E

D

W

IT

HI

N

10

D

A

Y

S

Hurry!

Know these

safety

symbols

This “bolt of lightning”

indicates uninsulated

material within your unit may

cause an electrical shock. For

the safety of everyone in your

household, please do not

remove product covering.

The “exclamation point”

calls attention to features

for which you should

read the enclosed literature

closely to prevent operating

and maintenance problems.

WARNING: TO PREVENT

FIRE OR SHOCK HAZARD,

DO NOT EXPOSE THIS

EQUIPMENT TO RAIN OR

MOISTURE.
CAUTION:

To prevent

electric shock, match wide

blade of plug to wide slot, and

fully insert.
ATTENTION: Pour éviter

les chocs électriques, intro-

duire la lame la plus large de

la fiche dans la borne corre-

spondante de la prise et

pousser jusqu’au fond.

C A U T I O N

RISK OF ELECTRIC SHOCK

DO NOT OPEN

CAUTION: TO REDUCE THE RISK OF ELECTRIC SHOCK, DO NOT

REMOVE COVER (OR BACK). NO USER-SERVICEABLE PARTS

INSIDE. REFER SERVICING TO QUALIFIED SERVICE PERSONNEL.

t

s

For Customer Use

Below, enter your product’s model number and serial number, which are located on the rear of the cabinet.
Keep this information for future reference.

Model No.

______________________________________ Serial No. ____________________________

SVZ162 LAYOUT  4/7/99 6:41 PM  Page 2

Содержание SV2000 SVZ162

Страница 1: ...Owner s Manual Video Cassette Recorder MODEL SVZ162 SVZ162 LAYOUT 4 7 99 6 41 PM Page 1 ...

Страница 2: ...es from our convenient home shopping network And most importantly you can count on our uncompromising com mitment to your total satisfaction All of this is our way of saying welcome and thanks for investing in an SV2000 product P S Remember to get the most from your product you must return your Warranty Registration Card within 10 days So please mail it to us right now R E G I S T R A T I O N N E ...

Страница 3: ...e mark The use of tapes that have not been inspected for use in two four six and eight hour VCRs may result in poor picture quality and excessive deposits on the video heads which may not be covered by the warranty if damage occurs Note to the Cable TV System Installer This reminder is provided to call the Cable TV system installer s attention to Article 820 40 of the National Electrical Code whic...

Страница 4: ...ar Panel 22 Basic Operations Playing 23 Recording 24 Recording One Touch Recording 25 Timer Recording 26 29 Auto Return 30 Auto Satellite Link Using a Satellite Tuner 31 Recording One Channel Watching Another 32 Rerecording Tape Duplication 33 Playing Repeat Play 34 Special Effects Playback 35 Rental Play 36 Real Time Counter Memory 37 Index Search 38 Time Search 39 Quick Find 40 Automatic Playbac...

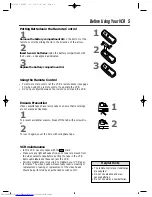
Страница 5: ...e direction of the arrow 2 Insert two AA batteries inside the battery compartment with their and ends aligned as indicated 3 Replace the battery compartment lid Using the Remote Control Point the remote control at the VCR s remote sensor see page 21 when using the remote control to operate the VCR Do not put objects between the remote control and the VCR Video cassette tapes have record tabs to en...

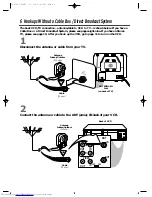
Страница 6: ...ve a Cable Box or a Direct Broadcast System please see pages eight nine If you have a Stereo TV please see page 10 After you hook up the VCR go to page 11 to turn on the VCR ANTENNA IN Jack on back of TV Cable 75 ohm Back of VCR Antenna Indoor Outdoor 300 ohm 1 Disconnect the antenna or cable from your TV 2 Connect the antenna or cable to the ANT enna IN Jack of your VCR Cable 75 ohm Antenna Indoo...

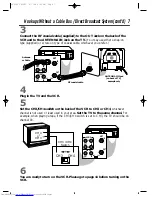
Страница 7: ...the TV You may use either a snap on type supplied or screw on type of coaxial cable whichever you prefer 5 Set the CH3 CH4 switch on the back of the VCR to CH3 or CH4 whichever channel is not used or least used in your area Set the TV to the same channel For example when playing a tape if the CH3 CH4 switch is set to CH3 the TV should be on channel 03 Hookups Without a Cable Box Direct Broadcast S...

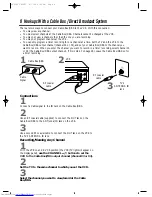
Страница 8: ...ep 7 on page 28 Leave the Cable Box DBS on for a timer recording R L VIDEO IN OUT IN OUT AUDIO CH3 CH4 OUT IN ANT OUT IN 75V ANT CABLE TV s ANTENNA IN Jack Cable Box DBS VCR Recording Viewing Any Channel Connections 1 With the VCR on and in VCR position the VCR TV light will appear on the display panel use the CHANNEL o p buttons to set the VCR to the Cable Box DBS output channel channel 03 or 04 ...

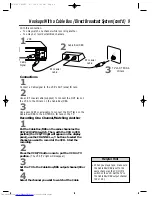
Страница 9: ...e to put the VCR in TV position The VCR TV light will disappear 3 Set the TV to the Cable Box DBS output channel 03 or 04 4 Select the channel you want to watch at the Cable TV s ANTENNA IN Jack Cable Box DBS VCR When you play a tape make sure the Cable Box DBS is set to the same channel as the CH3 CH4 switch on the VCR Set the TV to the Cable Box DBS output channel 03 or 04 Helpful Hint 1 Connect...

Страница 10: ... the AUDIO IN Jacks on your TV 4 Turn on your TV making sure it is in Line Input mode Please refer to your TV owner s manual for details A stereo audio cable not supplied is used here to deliver audio to the TV s left and right channels The TV must be in Line Input mode Please refer to your TV owner s manual Helpful Hints R L VIDEO IN OUT IN OUT AUDIO CH3 CH4 OUT IN ANT antenna or cable to ANT enn...

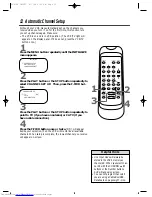
Страница 11: ...f you still do not see any on screen displays follow the steps under Automatic Channel Setup on page 12 and Language Selection on page 16 Helpful Hint LANGUAGE SELECT ENGLISH ON ESPAÑOL 5 Press the MENU button the F FWD button or the REWIND button to begin automatic channel setup TUNER SET UP will flash on screen The VCR will memorize all available channels so when you use the CHANNEL o p buttons ...

Страница 12: ...y to select CHANNEL SET UP Then press the F FWD but ton 3 Press the PLAY button or the STOP button repeatedly to point to TV if you have an antenna or CATV if you have a cable connection 4 Press the F FWD button once or twice ON will appear beside your selection then the VCR will memorize all available channels When setup is complete the lowest channel you receive will appear on screen Line Input ...

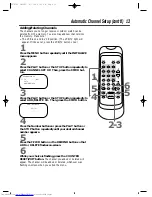
Страница 13: ...dded or deleted will appear The channel will be added or deleted whichever was flashing on screen when you exited the menu ADD DELETE CH 0 2 TV 2 3 CHANNEL SET UP TV ON CATV ADD DELETE CH Adding Deleting Channels The channels you no longer receive or seldom watch can be deleted from the memory You also may add new channels into the memory Make sure The VCR is on and in VCR position The VCR TV ligh...

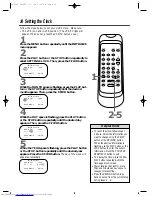
Страница 14: ...on 5 While the YEAR space is flashing press the PLAY button or the STOP button repeatedly until the desired year appears Press the F FWD button The day of the week will appear automatically To reset the clock follow steps 1 2 above Select the information you want to change using the F FWD button or the REWIND button When the desired information is flashing use the PLAY button or the STOP button to...

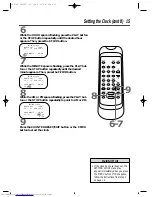
Страница 15: ... appears Then press the F FWD button 9 Press the COUNTER RESET EXIT button or the F FWD button to start the clock SETTING CLOCK MONTH DAY YEAR 0 3 0 1 SUN 1 9 9 8 HOUR MINUTE AM PM 0 5 4 0 SETTING CLOCK MONTH DAY YEAR 0 3 0 1 SUN 1 9 9 8 HOUR MINUTE AM PM 0 5 4 0 PM AM PM 6 7 If the clock has never been set the SETTING CLOCK menu may appear immediately when you press the MENU button If this happen...

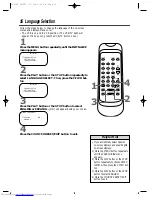
Страница 16: ...HANNEL SET UP SETTING CLOCK LANGUAGE SELECT LANGUAGE SELECT ENGLISH ON ESPAÑOL 1 Press the MENU button repeatedly until the INITIALIZE menu appears VCR TV POWER EJECT 1 2 3 4 5 6 7 8 9 0 100 CHANNEL INDEX SLOW SPEED QUICK FIND TIME EXIT COUNTER DISPLAY MENU RESET MEMORY REWIND PLAY F FWD RECORD PAUSE STILL STOP SEARCH 1 2 3 If you accidentally select Spanish on screen displays and need English on ...

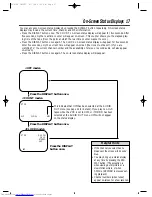
Страница 17: ...y of stereo or second audio will also appear on screen Press the DISPLAY button once again The on screen status display will disappear OFF mode COUNT mode STOP SLP 0 12 34 HIFI CLOCK mode STOP 5 40 PM CH 02 STEREO SAP SLP Press the DISPLAY button once If the channel you select has no broadcast the screen will be solid blue You may bring up a status display at any time by pressing the DIS PLAY butt...

Страница 18: ...on screen Details are on page 35 Press to erase a timer recording Details are on page 29 Press to go back one step when setting the clock or a timer recording Press to add or delete channel numbers Details are on page 13 RECORD Button Press to start a recording Details are on page 24 DISPLAY Button Press repeatedly to view the on screen status displays Details are on page 17 Number Buttons Use to ...

Страница 19: ... VCR s channels after the channels have been set up Details are on page 12 During slow motion playback press to adjust the tracking Details are on page 41 COUNTER RESET EXIT Button Press to set the real time counter to zero Details are on page 37 Press to remove menus VCR TV Button Use to select the signal that your TV receives VCR Position Use to watch a tape to watch a program while recording it...

Страница 20: ... in VCR position REC ord Light This light appears during a recording It flashes when a recording is paused CST IN Light This light appears when a tape is in the VCR POWER Light This light indicates that the power is on TIMER Light This light glows when you turn off the power to set a timer recording It also glows during a One Touch Recording It flashes when you turn off the power to set a timer re...

Страница 21: ...the channel you are watching Details are on page 25 CHANNEL o p Buttons Press to scan up or down through the VCR s channels TRACKING Function During normal tape playback or slow motion tape playback press the CHAN NEL o p buttons to adjust the track ing Details are on page 41 PLAY Button Press to play a tape Also press to release Slow Search or Still mode and to return to normal playback Details a...

Страница 22: ...e same chan nel Details are on page seven OUT Jack Use the supplied RF coax ial cable to connect this jack to the Antenna In Jack on your TV or Cable Box DBS Details are on pages six nine VIDEO OUT Jack Connect a cable going to the video in jack of a camcorder another VCR or an audio visual source laser disc player video disc player etc here Details are on pages 10 AC Power Cord Connect to a stand...

Страница 23: ...f the VCR is set to 2 Insert a tape in the VCR The POWER and CST IN lights will appear If the tape s record tab has been removed the VCR TV light will appear and playback will begin automatically 3 If playback does not start automatically press the VCR TV button to put the VCR in VCR position the VCR TV light will appear Then press the PLAY button Turn on the TV Insert a tape 3 1 2 If the tape you...

Страница 24: ... one minute remaining During the last minute of paused recording the mark will flash If any menu is activated on the TV screen the RECORD button on the remote control does not function Press the COUNTER RESET EXIT button to remove the menu Then press the RECORD button Helpful Hints 4 Press the SPEED button until the desired tape speed appears on screen The tape speed will disappear after about fiv...

Страница 25: ...the STOP but ton on the remote control To cancel the OTR but continue recording press the REC ord OTR button on the VCR repeat edly until REC appears in the upper left corner of the screen Press the REC ord OTR button on the VCR repeat edly OTR 0 30 To change the recording length while an OTR is in progress press the REC ord OTR button on the VCR repeatedly until the desired length appears on scre...

Страница 26: ...he TIMER PROGRAM MING menu appears Program numbers that do not have a timer recording stored will flash TIMER PROGRAMMING PROG 1 2 3 4 5 6 7 DATE START TIME END TIME CHANNEL REC SPEED 2 Press the PLAY button or the STOP button repeatedly to select a program number Then press the F FWD button If you select a program number that already has a timer recording stored information about that program wil...

Страница 27: ...PLAY button or the STOP button repeatedly until the desired month appears Then press the F FWD button Next press the PLAY button or the STOP button repeat edly until the desired day appears Then press the F FWD button The day of the week will appear automatically You can not pro gram the VCR to record more than one year in advance Timer Recording cont d 27 6 Repeat the procedure in step 5 to set t...

Страница 28: ...e selected tape speed will flash beside REC SPEED 9 Press the COUNTER RESET EXIT button 10 Press the POWER button to turn off the VCR The TIMER light will appear The TIMER light will flash if there is not a tape in the VCR If a timer recording will take place several hours or days from now you may use the VCR until time for the timer recording Just make sure you turn off the VCR about five minutes...

Страница 29: ...the timer recording 4 Press the COUNTER RESET EXIT button to exit Timer Recording cont d 29 Correcting a Timer Recording If you need to correct a timer recording after you have finished setting the program follow these steps Make sure the VCR is on and is in VCR position The VCR TV light will appear If it does not press the VCR TV button once 1 Press the MENU button so that the TIMER PROGRAM MING ...

Страница 30: ...ll rewind the tape to the beginning of the record ed programs VCR SET UP SATELLITE LINK AUTO REPEAT RENTAL AUTO RETURN AUDIO OUT TV STEREO ON SAP VCR SET UP SATELLITE LINK AUTO REPEAT RENTAL AUTO RETURN AUDIO OUT TV STEREO ON SAP VCR SET UP SATELLITE LINK AUTO REPEAT RENTAL AUTO RETURN AUTO AUDIO OUT TV STEREO ON SAP If additional timer recordings are programmed to take place later the Auto Return...

Страница 31: ...hen you view a program connect the satellite tuner directly to the TV When you use this feature the first few seconds of a program may not be recorded If your satellite tuner has the syn chronized timer feature by the broadcasting time of a program refer to the tuner s owner s manual Helpful Hints 1 Set the program to be recorded on the satellite tuner See your satellite tuner owner s manual for d...

Страница 32: ... at the TV 4 To return to the channel being recorded use the TV remote control to select channel 3 or 4 whichever chan nel the CH3 CH4 switch on the back of the VCR is set to 5 Press the VCR TV button on the VCR remote control to put the VCR in VCR position The VCR TV light will appear The channel being recorded will appear on screen 6 To stop recording press the STOP button If you use a Cable Box...

Страница 33: ...e SPEED but ton to select SP LP or SLP 6 Press the PLAY button on VCR 1 and the REC ord OTR button on VCR 2 at the same time 7 To stop recording press the STOP EJECT button on VCR 2 once then stop the tape on VCR 1 Unauthorized recording of copy righted television programs video tapes or other materials may infringe on the rights of copyright owners and violate copyright laws Audio and video cable...

Страница 34: ... ately AUTO REPEAT B will appear on screen briefly If you are fast forwarding or rewinding the tape you must first press the COUNTER RESET EXIT button to exit then press the PLAY button to begin tape playback The VCR will play the tape to the end rewind it then play it again TV programming will appear on screen while the tape is rewinding 1 3 2 VCR SET UP SATELLITE LINK AUTO REPEAT RENTAL AUTO RET...

Страница 35: ...LAY button Viewing a Still Picture 1 During tape playback press the SLOW button The tape will play in slow motion NOTE You can control the speed of slow motion playback by pressing the F FWD button faster or the REWIND button slower 2 To release Slow mode and return to normal playback press the PLAY button Viewing a Slow Motion Picture Slow and Still modes will automati cally switch to Stop mode a...

Страница 36: ...n the VCR 1 During tape playback press the MENU button repeatedly until the VCR SET UP menu appears 2 Press the PLAY button or the STOP button repeatedly to select RENTAL Then press the F FWD button The menu will disappear and RENTAL ON or RENTAL OFF will appear on screen for five seconds Each press of the F FWD button within five seconds will turn RENTAL to ON or OFF You may only set RENTAL to ON...

Страница 37: ...ero press the REWIND button or the F FWD button when playback is stopped When the tape reaches the point at which the real time counter was reset to zero the tape will stop Press the PLAY button to watch the tape 0 00 00 You may only set the real time counter memory at one location at a time If you set the real time counter to zero at a second loca tion the previous real time counter to zero setti...

Страница 38: ...LAY button or the STOP button repeatedly until the number of programs that you want to skip appears beneath INDEX SEARCH on screen Example 03 for three programs 4 While the number of programs is flashing press the REWIND button or the F FWD button The VCR begins rewinding or fast forwarding to the beginning of the desired program When the program is reached the VCR will start playback automaticall...

Страница 39: ...ach the desired length of time 4 Within 30 seconds press the REWIND button or the F FWD button The VCR begins rewinding or fast forwarding to the specified point The time counts down on screen beneath TIME SEARCH as the searching progresses When 0 00 appears beneath TIME SEARCH the VCR will start playback automatically TIME SEARCH You may also activate the Time Search by pressing the TIME SEARCH b...

Страница 40: ... repeatedly to select QUICK FIND then press the F FWD button The VCR will fast forward the tape to the beginning of the next recording The VCR will play the tape at high speed for 30 sec onds then go to the next recording To skip immediately to the beginning of the next recording on the tape press the QUICK FIND button on the remote control 3 To resume normal tape playback press the PLAY button 2 ...

Страница 41: ...ed a tape can only be ejected with the power on Be sure to insert a tape for the Timer Recording then turn off the VCR power Automatic Tracking Adjustment The VCR automatically adjusts tracking to give you the best possi ble picture quality With some recordings however you may get a better picture using the manual tracking controls see below Manual Tracking To adjust the tracking manually press th...

Страница 42: ...on screen display shown below will appear when you press the DISPLAY button on the remote control The indication SAP or STEREO that appears on this side of the status display tells you if the program you re watching is available in second audio or stereo Even though a program is available in second audio or stereo you still must program the VCR to receive or record the program Follow the direction...

Страница 43: ...io when second audio is not available the VCR will record normal audio Helpful Hints Make sure The VCR is on and is in VCR position The VCR TV light will appear If it does not press the VCR TV button once 1 Press the MENU button repeatedly until the VCR SET UP menu appears 2 Press the PLAY button or the STOP button repeatedly to select TV STEREO or SAP Press the F FWD button then ON will appear to...

Страница 44: ...ly to select MONO Press the COUNTER RESET EXIT button to exit HIFI will disappear from the status display If you play non Hi Fi tapes while the VCR is set to HIFI HIFI will not appear on the status display and the tape will play in monaural sound Please see additional notes on page 47 Helpful Hints 1 Press the MENU button repeatedly until the VCR SET UP menu appears 2 Press the PLAY button or the ...

Страница 45: ...or use the Number buttons to select another channel Mode a VCR operation OTR One Touch Recording programming a timed recording that starts immediately and records for 30 minutes to eight hours whichever you specify Remote Control the small electronic unit that came with your VCR allows you to operate your VCR from a distance RF coaxial cable The cable supplied with your VCR Use it to connect your ...

Страница 46: ...anism the cylinder will rotate for about five minutes This is normal The quick play mechanism switches the tape mechanism from Stop to Play in just one second A TV program cannot be recorded Check the connections between the VCR TV antenna cable and Cable Box DBS if applicable Details are on pages six 10 Make sure the tape has a record tab Details are on page five The VCR will not perform a timer ...

Страница 47: ... press the VCR TV button once Make sure channel 3 or 4 is properly adjusted Adjust the tracking Details are on page 41 TV programs cannot be watched normally Press the VCR TV button to put the VCR in TV position The VCR TV light will disappear Check the connections between the VCR TV antenna cable and Cable Box DBS if applicable Details are on pages six 10 The reception on all channels is poor You...

Страница 48: ...Consumption 18W Operating Temperature 41 F 5 C to 104 F 40 C Relative Humidity 10 to 80 Weight 5 73 lbs 2 6 kg Dimensions 14 3 16 W x 3 1 16 H x 9 3 16 D 360 mm x 92mm x 230mm Tuner Broadcast Channels VHF 2 13 UHF 14 69 Cable TV Channels 2 13 Midband A 1 Superband J W Hyperband A 5 A 1 Special Channel 5A Ultraband 37 94 100 125 NOTE Designs and specifications are subject to change without notice S...

Страница 49: ...uct is officially distributed by Philips Consumer Electronics Company In countries where Philips Consumer Electronics Company does not distribute the product the local Philips service organization will attempt to provide service although there may be a delay if the appropriate spare parts and technical manual s are not readily available MAKE SURE YOU KEEP Please keep your sales receipt or other do...

Страница 50: ...out jack 7 9 22 33 pause button 21 pause still button 19 24 35 play button 18 21 23 35 playing 23 power button 18 21 cord 7 22 light 20 quick find 40 quick find button 18 rear panel 22 rec ord light 20 rec otr button 21 record button 18 record tab 5 recording basic 24 one channel watching another 32 timer 26 29 remote control buttons 18 19 using 5 sensor 5 21 rental play 36 repeat play 34 rerecord...

Страница 51: ...SVZ162 LAYOUT 4 7 99 6 42 PM Page 51 ...

Страница 52: ... to be sure the items on this page are packed with your VCR These accessories are provided to help you use or set up your VCR If any of these items are not included or if you need to replace an item contact our Service Solutions Group at the address below Service Solutions Group P O Box 967 Greeneville TN 37744 0967 Or call 1 800 851 8885 SVZ162 LAYOUT 4 7 99 6 42 PM Page 52 ...

Отзывы: