background image

English

Preparation

 Using Center’s remote control

Battery usage: 

As a remote control with

synchronous display, Center’s remote control
consumes more power than normal remote
controls. When its batteries


are low or empty, the

icon     appears on the remote control’s display.
Replace the batteries with new alkaline batteries.

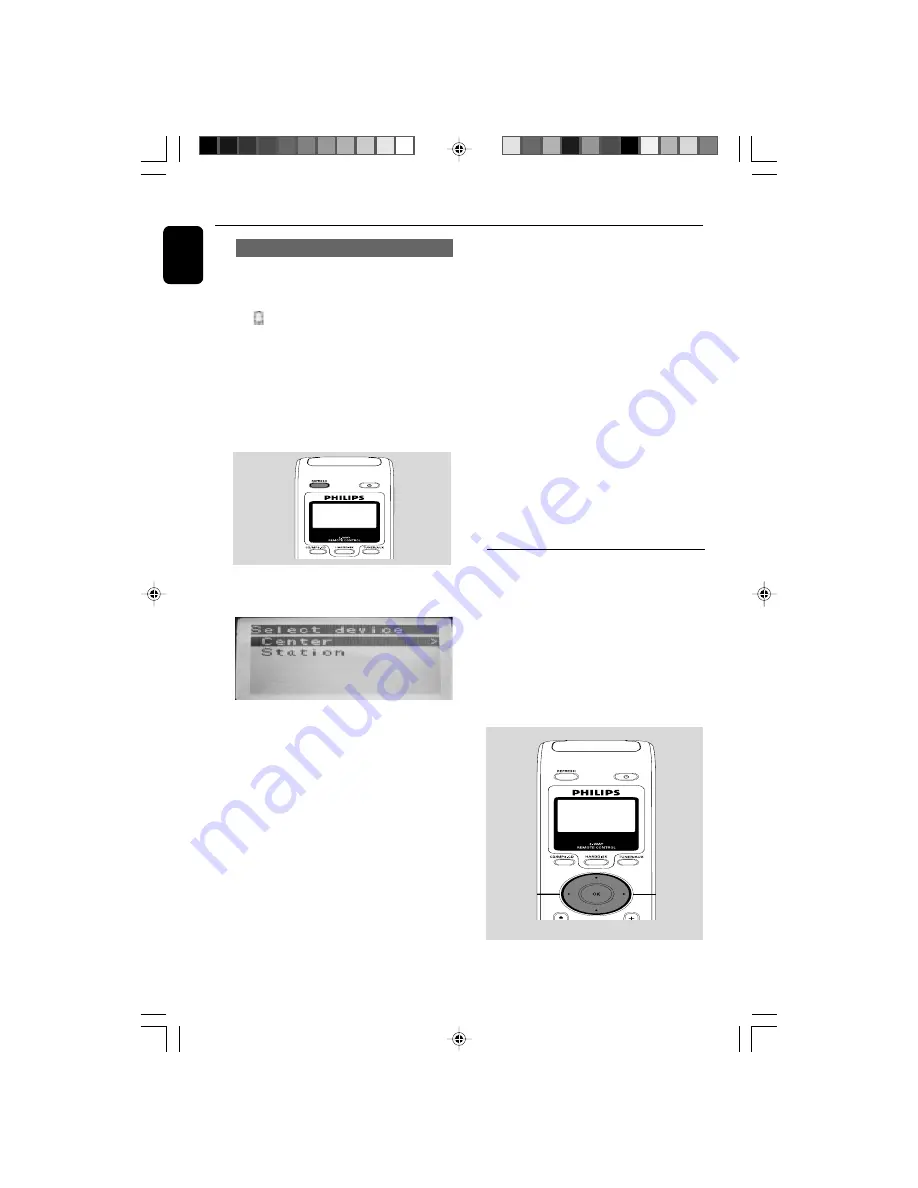
By default, Center’s remote control works with
Center only. 

To operate Station using

Center’s remote control,

1

Press and hold

 REFRESH 

until the selection

screen appears on the display of Center’s
remote control.

2

Press the navigation controls 

or

 4 

and 

2

 to select 

Station

On Center’s remote control:

➜ 

Display shows current status of Station

       after Station is connected

➜ 

You can use Center’s remote control to

operate Station now

Helpful hints:

–  To operate Center using the remote control
again, repeat the above steps 1-2 to select Center.
–  

Center’s remote control will return to its

default setting (works with Center only)
when you insert new batteries into it.

Using the display on the Center’s remote
control

You can synchronize the status of your Center or
Station onto the display of Center’s 2-way
remote control. With the synchronized display,
your operation of remote control becomes
quicker and easier.

Note:

– Avoid placing your Center or Station close to the
plasma TV.  It may resuit in improper display on
your Center’s remote control. 

Always keep WA

CS5

far enough from the 

plasma TV or turn off your

plasma TV.
– If you switch on your Center or Station using the

STANDBY-ON/ ECO POWER 

button on the

set,  press 

REFRESH 

on Center’s remote control

to synchronize the remote control’s display.
– The display supports 6 European languages:
English, French, Spanish, Dutch, Italian and German

Using the navigation controls

When selecting options on the set’s screen, you

often need to use the navigation controls 

/

 2

/

 3 

/

 4

.

1

Press  

/

 4

 to highlight an option.

2

Enter its submenu by pressing  

2

.

3

Press 

to return to the previous option list

screen.

4

Press 

OK 

or  

to confirm

WACS5_Eng/37

8/3/2005, 15:12

24

Содержание Streamium WACS5

Страница 1: ...Philips product more enjoyable If you have read your instructions and still need assistance you may access our online help at www usasupport philips com or call 1 888 PHILIPS 744 5477 while with your product and model serial number User manual Manuel d utilisation Manual del usuario Wireless Music Center Station WACS5_Eng 37 8 3 2005 15 12 1 ...

Страница 2: ...2 WACS5_Eng 37 8 3 2005 15 12 2 ...

Страница 3: ... 1 2 3 4 5 0 9 8 7 6 STOP MENU WACS5_Eng 37 8 3 2005 15 12 3 ...

Страница 4: ...4 1 2 4 5 6 3 WACS5_Eng 37 8 3 2005 15 12 4 ...

Страница 5: ...rotection by one of the most comprehensive warranties and outstanding serv ice networks in the industry What s more your purchase guaran tees you ll receive all the information and special offers for which you qualify plus easy access to accessories from our convenient home shopping network Most importantly you can count on our uncompromising commit ment to your total satisfaction All of this is o...

Страница 6: ...6 IMPORTANT SAFETY INSTRUCTIONS Class II equipment symbol This symbol indicates that the unit has a double insulation system Clean only with a piece of dry cloth materials WACS5_Eng 37 8 3 2005 15 12 6 ...

Страница 7: ...ference will not occur in a particular installation If this equipment does cause harmful interference to radio or television reception which can be determined by turning the equipment off and on the user is encouraged to try to correct the interference by one or more of the following measures Reorient or relocate the receiving antenna Increase the separation between the equipment and the receiver ...

Страница 8: ...is offer is valid for a period of three years after the date of purchase of this product GPL Package written offer This product contains Linux 2 4 27 vrsl that is made available under the GNU GPL license version 2 hereafter called the Program Philips Electronics Hong Kong Ltd hereby offers to deliver or make available upon request for a charge no more than the cost of physically performing source ...

Страница 9: ...as set out in the Radio Interference Regulations of the Canadian Department of Communications Français La norme NMB 003 du Canada Cet appareil numérique n émet pas de bruits radioélectriques dépassant les limites applicables aux appareils numériques de Classe B prescrites dans le Règlement sur le Brouillage Radioélectrique édicté par le Ministère des Communications du Canada WACS5_Eng 37 8 3 2005 ...

Страница 10: ...rching 27 28 Selecting a different album or track Finding a passage within a track during playback Selecting tracks of a particular artist Selecting tracks of a particular genre Different play modes REPEAT SHUFFLE 28 Creating Playlist custom collection of your favorite music 29 Deleting a playlist album or track 29 Building music library on Center 30 31 Ripping CDs Importing from PC Recording from...

Страница 11: ...n 4 minutes per song 10 songs per CD on average 128 kbps MP3 encoding and given the fact that operational software is part of the product s memory Actual free space is X GB or less due to the buffer partition for MP3 compression firmware music CD database and demo tracks stored Wi Fi or IEEE802 11 b g is the international leading industry standard for wireless broadband networking It transfers dig...

Страница 12: ...ditions to this exciting range to make your home entertainment experience even more enjoyable Please visit www philips com support and enter your product name WACS5 to view FAQ Frequently Asked Questions Latest user manuals and PC software manuals Firmware upgrade files for WACS5 Latest PC software downloads Interactive troubleshooting Since it is possible for you to upgrade your product we recomm...

Страница 13: ...leaning the Set Use a soft cloth slightly moistened with a mild detergent solution Do not use a solution containing alcohol spirits ammonia or abrasives Cleaning Discs When a disc becomes dirty clean it with a cleaning cloth Wipe the disc from the center out Do not use solvents such as benzene thinner commercially available cleaners or antistatic spray intended for analog records Safety informatio...

Страница 14: ... screen fast scrolls the option list 2 OK confirms selection OK HD CD starts or pauses playback CD selects or deselects tracks to be recorded on hard disk 5 STOP MENU stops playback or recording enters or exits setup menu 6 MUSIC FOLLOWS ME HD moves music playback between Center and Station 7 IR sensor for the infrared remote control Helpful hints Always point the remote control towards this senso...

Страница 15: ...y for working 4 STANDBY ON ECO POWER press briefly to switch Center on or to standby mode press and hold to switch Center to Eco Power mode or on 5 MUSIC FOLLOWS ME HD moves music playback between Center and Station or between Station and Station 6 IR sensor for the infrared remote control Helpful hints Always point the remote control towards this sensor WACS5_Eng 37 8 3 2005 15 12 15 ...

Страница 16: ...he set on and selects HD source TUNER AUX selects the audio input from an additional connected appliance In standby mode switches the set on and selects the audio input from an additional connected appliance 4 1 2 3 4 navigation controls left right up down to scroll through the option list 1 HD CD returns to previous option lists 3 4 HD CD skips searches tracks passage backward forward in playback...

Страница 17: ... option list MENU enters or exits setup menu 3 4 SCROLL scroll the display screen upward or downward REFRESH sychronize remote control s display with the set s display Station s remote control Same Artist Same Genre Smart EQ 9 0 1 4 7 6 5 2 3 8 1 y press briefly to switch the set to standby mode press and hold to switch the set to Eco Power mode or on 2 2 HD CD starts playback Å HD CD pauses playb...

Страница 18: ...lumination Menu enters or exits setup menu Controls 1 2 3 4 navigation controls left right up down to scroll through the option list 1 HD CD returns to previous option lists 3 4 HD CD skips searches tracks passage backward forward in playback screen fast scrolls the option list 2 OK confirms selection à á HD CD searches track passage backward forward in playback screen O P HD CD skips tracks backw...

Страница 19: ...English Installation OPTICAL OUT DIGITAL OUT Center AC power cord Station LINE OUT DC WACS5_Eng 37 8 3 2005 15 12 19 ...

Страница 20: ...n a flat and firm surface 2 First connect the Center to power supply and then connect the Station to power supply Center Station The screen lights up Auto installation connection starts You will enter HD Harddisk mode when the installation connection is finished 3 Relocate Center and Station as desired plug and stream Simply unplug your Center or Station and power them up in other rooms You will b...

Страница 21: ...isting HiFi audio system Using audio cables connect one one set of WACS5 s sound output terminals LINE OUT DIGITAL OUT or OPTICAL OUT to the corresponding input terminals in the connected device For better sound output use DIGITAL OUT or OPTICAL OUT if it is available on the connected device Helpful hints DIGITAL OUT and OPTICAL OUT are available on WAC5 only Rear connections Warning Never make or...

Страница 22: ...ct the other end of the audio cables to the OPTICAL IN terminal of the additional appliance B Connecting to your PC Connect the supplied Ethernet cable to Center s ETHERNET and your computer s Ethernet port For details see the manual Connect to your PC DIGITAL OUT 1 Insert the plug of digital audio cables not supplied to the DIGITAL OUT socket 2 Connect the other end of the audio cables to the DIG...

Страница 23: ...s remote control Remove the protective plastic tab before using the Station s remote control To replace the batteries 1 Press and hold 1 as indicated 2 Simultaneously pull the battery tray at 4 3 Remove the old battery and put a new CR2025 battery in place 4 Put back the battery tray CAUTION Remove batteries if they are exhausted or will not be used for a long time Do not use old and new or differ...

Страница 24: ...ault setting works with Center only when you insert new batteries into it Using the display on the Center s remote control You can synchronize the status of your Center or Station onto the display of Center s 2 way remote control With the synchronized display your operation of remote control becomes quicker and easier Note Avoid placing your Center or Station close to the plasmaTV It may resuit in...

Страница 25: ...tion for more than 5 minutes the set will switch to standby automatically to save power Basic functions Switching to standby on and selecting functions 1 When the set is on press STANDBY ON ECO POWER to switch it to standby or y on the remote control Display shows GoodBye Then Center The screen dims out Display shows Station Status screen and the number of stations found Station The PHILIPS screen...

Страница 26: ...Press 3 or 4 and 2 to select on or off You can also turn the backlight on or off by pressing DIM on the remote control Contrast Press 3 4 to reduce or enlarge the contrast Selecting languages 1 On the remote control press MENU to enter the MENU screen or on Center press and hold STOP MENU 2 Use the navigation controls 3 or 4 and 2 to select Settings 3 Use the navigation controls 3 or 4 and 2 to se...

Страница 27: ...lection sorted by music style All tracks tracks sorted by the tracks name in alphanumeric order Raw tracks tracks to be compressed MP3 conversion 3 Press the navigation controls 3 or 4 and 2 to select your option 4 Press 2 or OK to start playback if necessary Press OK on a highlighted artist genre or album to start playback from the beginning of the item orÉ Å on Center s remote control the Play k...

Страница 28: ...rent track in current album during playback In the playback screen briefly and repeatedly press the navigation controls 3 or 4 to select previous or next tracks or 4 or on Center s remote control O P on Station s remote control Using the fast skip 3 or 4 Use this function to find an option e g an album or a track in a long option list Press and hold the navigation controls 3 or 4 in the long optio...

Страница 29: ...ts You can also create your playlists on your computer via Philips Digital Media Manager DMM For details see DMM s help file Refer to the manual Connect to your PC to learn how to install DMM software 1 Use the navigation controls 1 2 3 4 to highlight the desired track album see Selecting and searching 2 Press MENU to enter the MENU screen 3 Use the navigation controls 3 or 4 and 2 to select Creat...

Страница 30: ...005 Gracenote This product and service may practice one or more of the following U S Patents 5 987 525 6 061 680 6 154 773 6 161 132 6 230 192 6 230 207 6 240 459 6 330 593 and other patents issued or pending Services supplied and or device manufactured under license for following Open Globe Inc United States Patent 6 304 523 Gracenote and CDDB are registered trademarks of Gracenote The Gracenote ...

Страница 31: ...racks After MP3 conversion is completed the ACTIVE indicator is off you can find and playback the ripped tracks in Albums 1 Select HD source 2 In Albums use the navigation controls 3 or 4 and 2 to enter the album of recorded tracks Only the completely ripped track can be found on Center s harddisk You will find the ripped CD tracks under Raw tracks if they are to be compressed MP3 conversion 6 To ...

Страница 32: ... then press MUSIC FOLLOWS ME 3 To deactivate MUSIC FOLLOWS ME press MUSIC FOLLOWS ME again or other functional keys e g SLEEP RDS NEWS or 1 2 3 4 MUSIC FOLLOWS ME will be automatically deactivated if you do not activate MUSIC FOLLOWS ME on the second unit within 5 minute On the second unit Center or Station where music will continue 4 Check you have selected HD CD or AUX source on the second unit ...

Страница 33: ...in you have to stop MUSIC BROADCAST on Center and then activate MUSIC BROADCAST again on Center 6 To stop MUSIC BROADCAST press STOP Ç on the Center Helpful hints MUSIC BROADCAST will also stop when you switched Center to Standby or Eco power the selected album or playlist has reached the end 5 Press MUSIC FOLLOWS ME within 5 minutes after MUSIC FOLLOWS ME is activated on the first unit Selected m...

Страница 34: ... 3 Press 3 or 4 and 2 to select the station you wish to delete 4 Press 3 or 4 and 2 to select Yes HD Viewing station status 1 Switch on WAC5 Center and select HD source 2 To select Station Status on Center a Press MENU b Use the navigation controls 3 or 4 and 2 to enter Station Mgnt menu c In Station Mgnt menu use the navigation controls 3 or 4 and 2 to select On the Center s display shows the lis...

Страница 35: ... MENU or STOP to enter the selection screen of Installation Mode and Select Server c Use the navigation controls 3 or 4 and 2 to select Installation Mode On Center Select HD mode and then enter Installation Mode by a Press MENU b Use the navigation controls 3 or 4 and 2 to enter Station Mgnt menu c In Station Mgnt menu use the navigation controls 3 or 4 and 2 to select Add New Station Searching fo...

Страница 36: ...ts are skipped This means that e g Word documents doc or MP3 files with extension dlf are ignored and will not be played DRM protected WMA files WMA files in Lossless orVBR format CD IMPORTANT Make sure that the file names of MP3 files end with mp3 For DRM protected WMA files use Windows Media Player 10 or later for CD burning conversion Visit www microsoft com for details about Windows Media Play...

Страница 37: ...yback of the album orÉÅ on Center s remote control the Play keyÉ on Station s remote control MP3 WMA Press OK on the highlighted album All tracks to start playback of all the tracks on the disc orÉ Å on Center s remote control the Play keyÉ on Station s remote control 5 To pause playback press OK orÉ Å on Center s remote control Å on the Station s remote control To resume playback press the button...

Страница 38: ...e bit rate of mp3 wma files 3 Press VIEW once or more to return to the playback screen SAME ARTIST SMART EQ SMART EQ Different play modes REPEAT SHUFFLE plays the current track continuously repeats all the tracks under current album repeats all the tracks under current album in random order tracks under current album are played in random order 1 During playback press once or more REPEAT or and SHU...

Страница 39: ...ides standardized protocols for a wide variety of home and small business devices It allows easy interoperability of all the devices supporting the the networking technologies UPnP server software is installed e g Philips Media Manager Musicmatch and the UPnP server function is enabled To connect a UPnP server Requirements for the UPnP server The UPnP device has been connected to the same network ...

Страница 40: ...sequence Sleep 15 30 45 60 90 120 Off Display shows the selected option briefly and returns to its previous status The icon Z Z appears 2 To view the time countdown to the standby mode press SLEEP again To deactivate the sleep timer press SLEEP until Sleep Off is displayed or Press STANDBY ON ECO POWER to switch the set to standby or y on the remote control SAME ARTIST SMART EQ AUX UPnP SLEEP To p...

Страница 41: ...trols 3 or 4 and 2 to select Add New Station Searching for Stations starts Reset If desired you can restore your Center or Station to their default setting including the network setting 1 Check the set is switched on See Basic functions Switching on to standby and selecting functions Switching to Eco power on 2 On the remote control press MENU to enter the MENU screen or on Center press and hold S...

Страница 42: ...English Specifications WACS5_Eng 37 8 3 2005 15 13 42 ...

Страница 43: ...our home Turn the devices in different directions to minimize interference Check your plasmaTV is turned off Check you have placed two IR operated devices Station in separate rooms wherever possible Wi Fi connection During the first time setup Station s display shows Searching for Center I get interference on my wireless WiFi link between center and station The WACS 5 operate in the 2 4GHz radio f...

Страница 44: ... of the set you wish to operate You switched on the set by using the control on the set instead of center s remote control Press REFRESH on center s remote control to synchronize its display Remove the protective plastic tab before using the Station s remote control Reduce the distance between the remote control and the set Insert the batteries with their polarities signs aligned as indicated Repl...

Страница 45: ...ing to product during shipping when improp erly packaged or cost associated with packaging Product lost in shipment and no signature verification of receipt can be provided A product used for commercial or institutional purposes including but not limited to rental purposes Products sold AS IS or RENEWED SHIP IN WARRANTY For Ship In warranty repair ship the product to a Philips autho rized service ...

Страница 46: ...e Gracenote Data the Gracenote Database and Gracenote Embedded Software Gracenote reserves all rights in the Gracenote Data Gracenote Database and Gracenote Embedded Software including all ownership rights You agree that Gracenote may enforce its rights under this Agreement against you directly in its own name The Embedded Software and each item of Gracenote Data are licensed to you AS IS Gracenot...

Отзывы: