background image

3    Installing your wall mount

In this chapter, the basic steps to get you 

started are described.

Warning

Carefully read the safety precautions 

in “Section 1 Important” before you 

install the wall mount.


3.1  Mounting the wall plate (drywall)


Warning

For safety reasons, this LCD mount 

must be secured to a wood stud. 


The stud must be capable of supporting 

the combined weight of the mount 


and display.

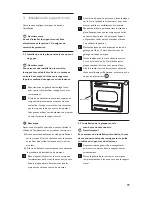
1

   See enclosed mounting template for 

diagram and guide of how to mount 

properly on the wall.

2

   Using a stud finder, locate and mark the 

stud for securing the mount (make sure 

your mark is in the center of the stud). 

You can use your own stud finder or the 

one included in the hardware kit.

Note


Once stud has been located you will need to 

verify with a hammer and a nail

  A)  Simply place the nail over your mark on 

the wall and tap in with hammer. If the 

nail encounters resistance and is secure 

in wall you have verified a stud location

  B)  If it just pushes through with no 

resistance you will need to start over  

and locate the stud.

3

   Using the enclosed mounting template, 

place the diagram against the wall and 

mark two locations (top and bottom) 

on the wall where the mount is to be 

Installed. Be sure to use the center of 


the stud.

4

   With the help of another person, place 

the mount against the wall and level it 

using the bubble guide.

5

   While another person holds the mount 

in place, mark two locations (top and 

bottom) on the wall where the mount is 

to be installed. Be sure to use the center 

of the stud. (these marks should line up 

with the ones made in step 3 above using 

the template).

6

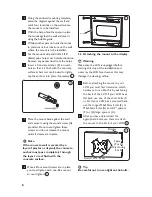
   Set the mount aside and drill a 1/8”  

(3 mm) pilot hole at each marked 

location.

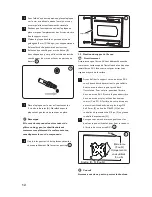
7

   Place the mount back against the wall  

and secure it using the wood screws (A)  

provided. Do not over-tighten these 

screws and do not release the mount 

until all screws are in place. 

8

   Once both wood screws are in place you 

must tighten each one. (note: be sure not 

to over tighten).  1

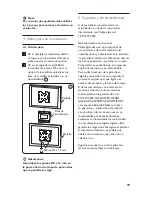
Wall Piece

1


3.2  Mounting the wall plate

       (concrete/brick installation) 

Warning

For safety reasons, the concrete wall 

must be capable of supporting the 

combined weight of the mount 


and display.

1

   See enclosed mounting template for 

diagram and guide of how to mount 

properly on the wall.

Содержание SQM4122

Страница 1: ...Register your product and get support at www philips com welcome SQM4122 27 EN Fixed wall mount 3 FR Support mural inclinable 9 ES Soporte de pared basculante 15 ...

Страница 2: ... 2 2 What you ll also need 4 3 Installing your wall mount 5 3 1 Mounting the wall plate drywall 5 3 2 Mounting the wall plate concrete brick installation 5 3 3 Attaching the mount to the display 6 4 Final installation and operation 7 4 1 Final installation 7 5 Guarantee and service 7 ...

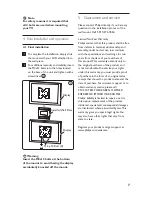
Страница 3: ...act a qualified installer The wall or mounting surface must be capable of supporting the combined weight of the mount and the display otherwise the structure must be reinforced Do not exceed the maximum load capacity of 77 lbs for this product Safety gear and proper tools must be used Failure to do so can result in property damage and or serious injury A minimum of two people are required for this...

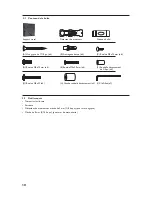
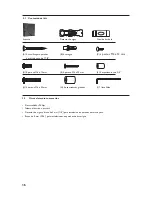
Страница 4: ... M4x12mm Bolt x6 D M6x12mm Bolt x4 E M4x30mm Bolt x4 F 3 4 Spacer x4 G M6x35 Bolt x4 H Large Spacer x4 I Allen Wrench x1 2 2 What you ll also need Phillips head screw driver Electric or portable drill Stud finder and 1 8 3 mm drill bit for drywall installation 5 16 8 mm masonry bit for concrete installation ...

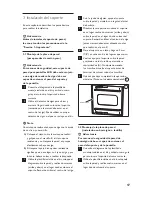
Страница 5: ...nd locate the stud 3 Using the enclosed mounting template place the diagram against the wall and mark two locations top and bottom on the wall where the mount is to be Installed Be sure to use the center of the stud 4 With the help of another person place the mount against the wall and level it using the bubble guide 5 While another person holds the mount in place mark two locations top and bottom...

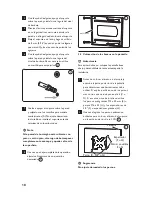
Страница 6: ...e If the concrete wall is covered by a layer of plaster or drywall the concrete anchor must pass completely through the layer to rest flush with the concrete surface 8 Once all four wood screws are in place you must tighten each one Be sure not to over tighten 3 Wall Piece 3 3 3 Attaching the mount to the display B Warning Make sure the LCD is unplugged before starting this step of the installatio...

Страница 7: ...warrants that this product shall be free from defects in material workmanship and assembly under normal use in accordance with the specications and warnings for two years from the date of your purchase of this product This warranty extends only to the original purchaser of the product and is not transferable To exercise your rights under this warranty you must provide proof of purchase in the form...

Страница 8: ...0 2 2 Outils requis 10 3 Installation du support mural 11 3 1 Installation de la plaque murale sur un mur de gypse 11 3 2 Installation de la plaque murale sur un mur de maçonnerie 11 3 3 Fixation du support à l écran 12 4 Installation finale et fonctionnement 13 4 1 Installation finale 13 5 Garantie et service 13 ...

Страница 9: ...oit pouvoir supporter le poids combiné du support et du téléviseur Si le poids total est trop important pour la surface choisie celle ci doit être renforcée Ne dépassez pas la capacité de charge maximum du support mural soit 34 93 kg 77 lb Veuillez utiliser du matériel de protection et les outils adéquats Tout manquement à ces consignes peut engendrer des dommages matériels ou des blessures graves...

Страница 10: ... C Boulon M4x12 mm x6 D Boulon M6x12 mm x4 E Boulon M4x30 mm x4 F Rondelle d espacement de 3 4 po x4 G Boulon M6x35 x4 H Grande rondelle d espacement x4 I Clé Allen x1 2 2 Outils requis Tournevis cruciforme Perceuse Détecteur de montants et mèche de 3 mm 1 8 de po pour mur de gypse Mèche de 8 mm 5 16 de po pour mur de maçonnerie ...

Страница 11: ...localisation du montant 3 Placez le gabarit fourni sur le mur et marquez l emplacement des 2 trous haut et bas où sera fixée la plaque murale Assurez vous que les marques sont bien au centre du montant 4 Avec l aide d une autre personne placez la plaque sur le mur et utilisez le niveau fourni pour vous assurer qu elle est parfaitement horizontale 5 Pendant que l autre personne tient la plaque en p...

Страница 12: ...à bois placées vissez les chacune solidement Ne les serrez pas trop 3 Plaque murale 3 3 3 Fixation du support à l écran B Avertissement Assurez vous que l écran ACL est débranché avant de commencer cette étape de l instal lation et ne déposez jamais l écran ACL face contre sol pour éviter tout risque de rayure de la surface 1 Avant de fixer le support sur votre écran ACL vous devez d abord détermi...

Страница 13: ... défauts de matériel et de main d œuvre dans des conditions normales d utilisation conformes aux spécifications et aux avertissements pour une période de deux ans à compter de la date d achat du produit Cette garantie s applique uniquement à l acquéreur initial du produit et n est pas cessible Pour exercer vos droits dans le cadre de cette garantie vous devez fournir le reçu de caisse original sur...

Страница 14: ...rios 16 3 Instalación del soporte 17 3 1 Montaje de la placa de pared para paredes de cartón yeso 17 3 2 Montaje de la placa de pared instalación en hormigón o ladrillo 17 3 3 Colocación de los brazos en la pantalla 18 4 Último paso de la instalación 19 4 1 Último paso 19 5 Garantía y servicio técnico 19 ...

Страница 15: ...ro tipo de superficie pónganse en contacto con un instalador profesional La pared o superficie debe ser capaz de sostener el peso del soporte y de la pantalla De lo contrario la estructura deberá ser reforzada No exceda los 35 kg de capacidad de carga máxima del producto Utilice equipos de seguridad y herramientas apropiadas De lo contrario podría ocasionar serios daños materiales o sufrir lesione...

Страница 16: ...D 4 pernos M6 x 12 mm E 4 pernos M4 x 30 mm F 4 espaciadores de 3 4 G 4 pernos M6 x 35 mm H 4 espaciadores grandes I 1 llave Allen 2 2 Otros elementos necesarios Destornillador Philips Taladro eléctrico o portátil Detector de vigas y broca de 3 mm 1 8 para instalación en paredes de cartón yeso Broca de 8 mm 5 16 para instalaciones en paredes de hormigón ...

Страница 17: ... búsqueda 3 Utilice la plantilla incluida en el kit coloque el diagrama sobre la pared y realice dos marcas arriba y abajo en el lugar donde colocará el soporte Recuerde utilizar el centro de la viga 4 Con la ayuda de alguien apoye el soporte sobre la pared y nivélelo con la guía del nivel de burbuja 5 Mientras la otra persona sostiene el soporte en su lugar realice dos marcas arriba y abajo sobre...

Страница 18: ...artón yeso el tarugo debe traspasar completamente esa capa y quedar al ras de la superficie 8 Una vez que haya completado la operación ajústelos Asegúrese de no ajustarlos demasiado 3 Pieza de pared 3 3 3 Colocación de los brazos en la pantalla B Advertencia Para evitar daños no coloque la pantalla boca abajo y desenchúfela durante esta etapa de la instalación 1 Antes de colocar el brazo en el mon...

Страница 19: ... conformidad con las especificaciones y advertencias este producto no presentará defectos de fabricación durante los 2 años posteriores a la fecha de compra Esta garantía se extiende sólo al comprador original del producto y es intransferible Para poder hacer uso de la garantía se exige la presentación de un comprobante de compra original en el que figuren el nombre del producto y la fecha de comp...

Страница 20: ... 2008 Koninklijke Philips Electronics All rights reserved ...

Отзывы: