background image

98BDL4150D

47

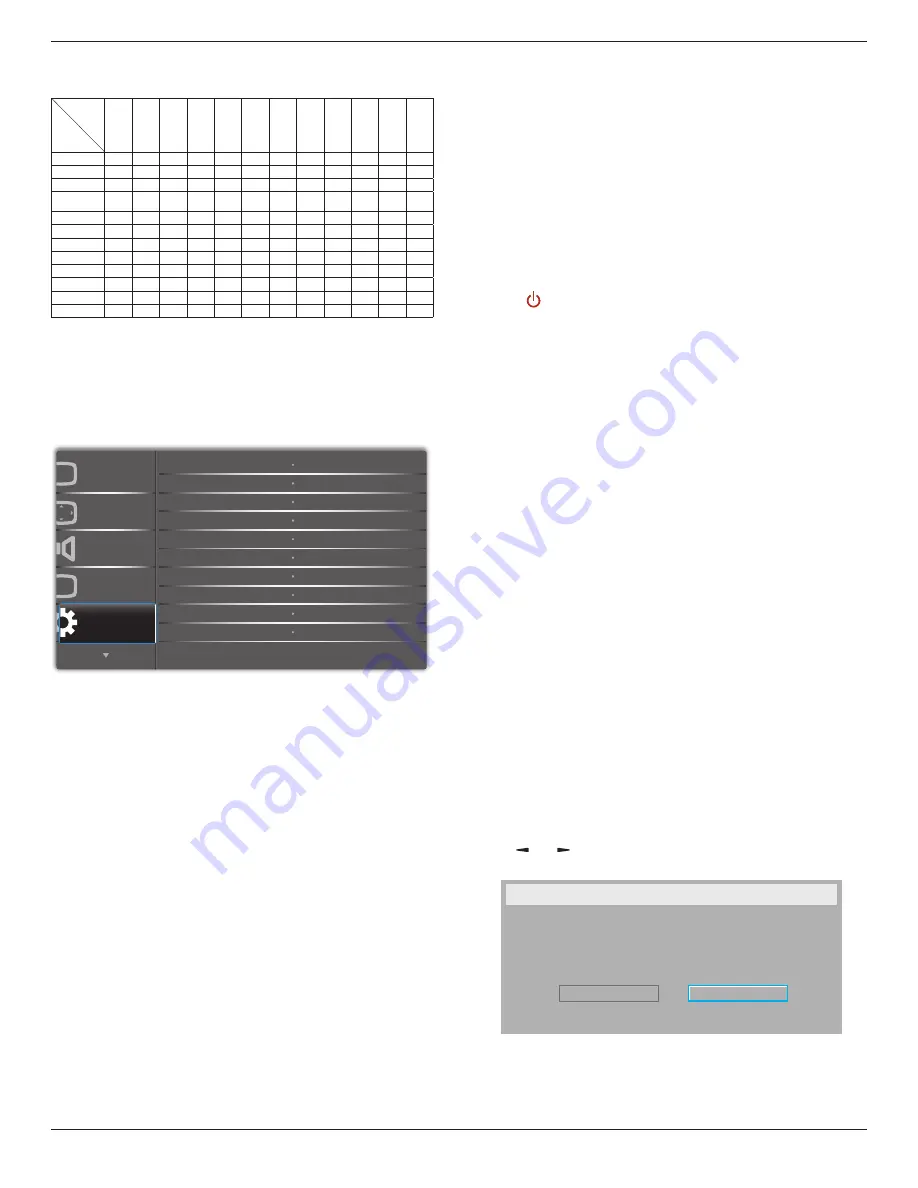
•  The PIP function is available only for certain signal source 

combinations as shown in the table below.

Main  

Sub 

DP

OPS

HDMI1

VG

A

HDMI2

HDMI3

COMP

VIDEO

USB

BR

O

WSER

Smar

tCMS

DV

I

DP

O

O

O

O

O

O

O

O

O

O

O

O

OPS

O

O

X

O

O

O

O

O

O

O

O

O

HDMI1

O

X

O

O

O

O

O

O

O

O

O

O

VGA

O

O

O

O

O

O

O

O

O

O

O

O

HDMI2

O

O

O

O

O

X

O

O

O

O

O

O

HDMI3

O

O

O

O

X

O

O

O

O

O

O

O

COMP

O

O

O

O

O

O

O

X

X

X

X

O

VIDEO

O

O

O

O

O

O

X

O

X

X

X

O

USB

O

O

O

O

O

O

X

X

O

X

X

O

BROWSER

O

O

O

O

O

O

X

X

X

O

X

O

SmartCMS

O

O

O

O

O

O

X

X

X

X

O

O

DVI

O

O

O

O

O

O

O

O

O

O

O

O

(

O

: PIP function available, 

X

: PIP function unavailable)

•  The availability of the PIP function will also depend on the resolution 

of the input signal being used.

6.2.5.  Configuration1 menu









 

 

 

  

  

  

 





 





 

 







Switch on state

Select the display status used for the next time you connect the power 

cord.
•  {

Power off

} - The display will remain off when the power cord is 

connected to a wall outlet.

•  {

Forced on

} - The display will turn on when the power cord is 

connected to a wall outlet.

•  {

Last status

} - The display will return to the previous power status 

(on/off/standby) when removing and replacing the power cord.

Auto adjust

Use this function to automatically optimize the display of VGA input 

image.
NOTE:   This item is functional for 

VGA

 input only.

Power save

Use this setting to reduce the power automatically.
•  {

RGB

} - Select {

On

} to let the display enter power saving mode 

when no signal is detected from the PC mode (RGB color space) 

inputs after 10 seconds.

•  {

Video

} - Select {

On

} to enter power saving mode when no signal 

is detected from the VIDEO mode (YUV color space) inputs after 

10 seconds.

Panel saving

Choose to enable the panel saving functions and thus reduce the risk of 

“image persistence” or “ghost-imaging”.
•  {

Cooling Fan

} - Choose to adjust the cooling fan’s speed of 

rotation. Select {

Auto

} to turn on/off the cooling fan according to 

the display’s temperature.
Choose from: {

Auto

} / {

Off

} / {

Low

} / {

Medium

} / {

High

}.

NOTES: 

•  The default {Auto} option will start running the cooling fan if 

the temperature of 

45°C (113°F)

 is reached, and stop running 

the cooling fan if the temperature of 

43°C (109°F)

.

•  A temperature-warning message will be shown on the screen if 

the temperature reaches 

58°C

 (

136°F

). All key functions except 

[

] key will then be disabled. 

•  Once the temperature reaches 

60°C

 (

140°F

), the display power 

will be shut down automatically. 

•  {

Brightness

} - Select {

On

} and the image brightness will be reduced 

to an appropriate level. The Brightness setting in the Picture menu 

will be unavailable when selected.

•  {

Pixel shift

} - Select the time interval ({

Auto

} / {

10

 ~ 

900

} Seconds 

/ {

Off

}) for the display to slightly expand the image size and shift 

the position of pixels in four directions (up, down, left, or right).  

Activating Pixel Shift will disable H Position, V Position and Zoom 

Mode in the Screen Menu.

Network control port

Select the network control port.
Choose from: {

RS232

} / {

Card OPS RS232

} / {

LAN ->RS232

}.

NOTE:   After connected to your OPS device, the option {

Card OPS 

RS232

} is functional.

Boot on source

Clear all the cookies, bookmarks, history list and text used for filling 

automatically.

Configuration1 reset

Choose to select source when boot up.
Input: select input source when bootup. 
Playlist: select playlist index for Media player, Browser, PDF player.
0: no play list. Same as switch source from OSD. 1~7: playlist number.  

Factory reset

Reset all settings in the OSD menus of {

Picture

}, {

Screen

}, {

Audio

}, {

PIP

}, 

{

Configuration1

}, {

Configuration2

}, and {

Advanced option

} to the 

factory preset values.
Press 

[ ]


or 

[ ]

 button to select {

Reset

}, and press 

[OK]

 button to 

do the reset.

Factory reset

Cancel

Reset

Содержание SignageSolutions 98BDL4150D

Страница 1: ...www philips com welcome 98BDL4150D V1 00 User Manual English ...

Страница 2: ...such as alcohol or ammonia based liquids to clean your display To avoid the risk of shock or permanent damage to the set do not expose the display to dust rain water or an excessively moist environment If your display becomes wet wipe it with dry cloth as soon as possible If a foreign substance or water gets in your display turn the power off immediately and disconnect the power cord Then remove t...

Страница 3: ...set out in the Council Directive on the Approximation of the Laws of the Member States relating to Electromagnetic Compatibility 2014 30 EU Low voltage Directive 2014 35 EU RoHS directive 2011 65 EU and Radio Equipment Directive 2014 53 EU This product has been tested and found to comply with the harmonized standards for InformationTechnology Equipment these harmonized standards published under Di...

Страница 4: ...並改善至無干擾時方得繼續使用 前項合法通信 指依電信法規定作業之無線電通信 低功率射頻電機須忍受合法通信或工業 科學及醫療用電波輻射性電機設備之干擾 USA Federal Communication Commission Interference Statement This device complies with Part 15 of the FCC Rules Operation is subject to the following two conditions 1 This device may not cause harmful interference and 2 this device must accept any interference received including interference that may cause undesired operatio...

Страница 5: ...nement indésirable Radiation Exposure Statement This equipment complies with ISED radiation exposure limits set forth for an uncontrolled environment This equipment should be installed and operated with minimum distance 20cm between the radiator your body Déclaration d exposition aux radiations Cet équipement est conforme aux limites d exposition aux rayonnements ISED établies pour un environnemen...

Страница 6: ...standards PN 93 T 42107 and PN 89 E 06251 Electric Magnetic and Electromagnetic Fields EMF 1 We manufacture and sell many products targeted at consumers which like any electronic apparatus in general have the ability to emit and receive electromagnetic signals 2 One of our leading Business Principles is to take all necessary health and safety measures for our products to comply with all applicable...

Страница 7: ... NEUTRAL N BROWN LIVE L GREEN YELLOW EARTH E 1 The GREEN YELLOW wire must be connected to the terminal in the plug which is marked with the letter E or by the Earth symbol or coloured GREEN or GREEN YELLOW 2 The BLUE wire must be connected to the terminal which is marked with the letter N or coloured BLACK 3 The BROWN wire must be connected to the terminal which marked with the letter L or coloure...

Страница 8: ...连接线 遥控器 X 本表格依据SJ T 11364 的规定编制 电路板组件包括印刷电路板及其构成的零部件 如电阻 电容 集成电路 连接器等 O 表示该有害物质在该部件所有均质材料中的含量均在 GB T 26572规定的限量要求以下 X 表示该有害物质至少在该部件的某一均质材料中的含量超出GB T 26572规定的限量要求 上表中打 的部件 应功能需要 部分有害物质含量超出GB T 26572规定的限量要求 但符合欧盟RoHS 法规要求 属于豁免部分 备注 上表仅做为范例 实际标示时应依照各产品的实际部件及所含有害物质进行标示 10 環保使用期限 此標識指期限 十年 電子電氣產品中含有的有害物質在正常使用的條件下不會發生外泄或突變 電子 電氣產品用戶使用該電子電氣產品不會對環境造成嚴重污染或對其人身 財產造成嚴重損害的期限 ...

Страница 9: ...指該項限用物質之百分比含量未超出百分比含量基準值 備考2 係指該項限用物質為排除項目 液晶面板 警語 使用過度恐傷害視力 注意事項 1 使用30分鐘請休息10分鐘 2 未滿2歲幼兒不看螢幕 2歲以上每天看螢幕不要超過1小時 警告使用者 此為甲類資訊技術設備 於居住環境中使用時 可能會造成射頻擾動 在此種情況下 使用者會被 要求採取某些適當的對策 Turkey RoHS Türkiye Cumhuriyeti EEEYönetmeliğine Uygundur Ukraine RoHS Обладнання відповідає вимогам Технічного регламенту щодо обмеження використання деяких небезпечних речовин в електричному та електронному обладнанні затвер...

Страница 10: ...spose of according to all Local State and Federal laws Restriction on Hazardous Substances statement India This product complies with the E Waste Management Rules 2016 CHAPTERV rule 16 sub rule 1 Whereas New Electrical and Electronic Equipment and their components or consumables or parts or spares do not contain Lead Mercury Cadmium Hexavalent Chromium polybrominated biphenyls and polybrominated d...

Страница 11: ...d of disposal of the used battery According to EU directive 2006 66 EC the battery can t be disposed improperly The battery shall be separated to collect by local service Após o uso as pilhas deverão ser entregues ao estabelecimento comercial ou e ou baterias rede de assistência técnica autorizada Information for EAC Month and year of manufacturing please refer information in Rating label Name and...

Страница 12: ...nge Picture Format 20 4 3 Overview 20 4 4 Media Player 22 4 5 Browser manual 25 4 6 PDF Player 27 4 7 CMND Play 30 4 8 Custom App 31 5 Setting 32 5 1 WI Fi Show up when plug in Wi Fi dongle 32 5 2 Ethernet 32 5 3 More Only show up when 4G module connected 32 5 4 Signage Display 32 5 5 Display 40 5 6 Apps 40 5 7 Security 40 5 8 Date time 40 5 9 Developer options 40 5 10 About 41 5 11 Supplementary ...

Страница 13: ...tation Always keep the carton in vertical direction Any other directions are not allowed No any other objects could be placed on the carton Don t impact the carton Move the carton by stacker Don t tip over the carton Move single carton with small pallet by stacker Carton Small Pallet Big Pallet ...

Страница 14: ...on 1 Remove the strap around the carton 2 Use blade to cut the tape on the top and open the carton 3 Take out the accessory box 4 Take out the top and front cushions carefully 5 Remove the plastic carton lockers and remove the top carton ...

Страница 15: ...ove the display out of the bottom carton Do not touch the screen of display Please use the handles to move the display Keep vertical direction when moving the display 90 90 Do not let the edge of display to touch the hard surface such as floor or table ...

Страница 16: ...nsor Cable Dipole Antenna x2 M2 Logo guider Logo Differences according to regions Display design and accessories may differ from those illustrated above NOTES For all other regions apply a power cord that conforms to the AC voltage of the power socket and has been approved by and complies with the safety regulations of the particular country Type H05W F 2G or 3G 0 75 or 1 mm2 should be used You mi...

Страница 17: ... having a length 15 mm longer than the thickness of the mounting bracket and tighten them securely 5 Unit without base weight 91 4 kg The equipment and its associated mounting means still remain secure during the test For use only with UL Listed Wall Mount Bracket with minimum weight load 91 4 kg 1 4 1 VESA Grid 98BDL4150D 800 H x 500 V mm Caution To prevent the display from falling For wall or ce...

Страница 18: ...ld and press the guider with your left hand Put the logo sticker with its adhesive side down into the logo hole with your right hand and press to make it stick tightly onto the front bezel 3 Remove the guider 1 5 2 How to remove the logo 1 Prepare a piece of paper with a cutting area of logo as a protector to prevent the front bezel from scratching 2 Using a knife carefully remove the logo sticker...

Страница 19: ...SD menu is on 7 button Move the highlight bar down to adjust the selected item while OSD menu is on 8 MENU button Return to previous menu while OSD menu is on or to activate the OSD menu when OSD menu is off 9 Remote control sensor and power status indicator Receives command signals from the remote control Indicates the operating status of the display without OPS Lights green when the display is t...

Страница 20: ...ol sensor will stop working if the jack IR IN is connected To remotely control your A V device via this display refer to page 19 for IR Pass Through connection 14 SPDIF OUT Digital audio output 15 AUDIO IN Audio input forVGA source 3 5mm stereo phone 16 AUDIO OUT Audio output to external AV device 17 SPEAKER SWITCH Internal speaker on off switch 18 SPEAKERS OUT Audio output to external speakers 19...

Страница 21: ... touch exposed battery acid as it can damage your skin NOTE If you do not intend to use the remote control for a long period remove the batteries 2 2 2 Handling the remote control Do not subject to strong shock Do not allow water or other liquid to splash the remote control If the remote control gets wet wipe it dry immediately Avoid exposure to heat and steam Other than to install the batteries d...

Страница 22: ...controlled Group ID number Main Menu go to previous level menu Source Menu Exit source menu Volume Menu Decrease AudioVolume Main Menu go to next level menu or set selected option Source Menu Go to selected source Volume Menu Increase AudioVolume 7 button Root Menu Go to IR daisy chain OSD in Primary Secondary mode Main Menu Confirm an entry or selection 8 ADJUST button Go to Auto Adjust OSD forVG...

Страница 23: ...control For example press 0 and 1 for display No 1 press 1 and 1 for display No 11 The numbers available are from 01 255 2 Not pressing any button within 10 seconds will exit the ID Mode 3 If an error pressing of buttons other than the digits occured wait 1 second after the red LED lights off and then lights up again then press the correct digits again 4 Press ENTER button to confirm The red LED b...

Страница 24: ...ile 4 When playing PDF video or music press button to pause playing 5 All media or pdf files should be put at the folder which is named philips with sub folder under the root directory of the specified storage internal USB SD Card All sub folders video photo music pdf are named by media types and shouldn t be changed videos root dir of storage philips video photos root dir of storage philips photo...

Страница 25: ... ENTER on Android source These buttons are only controlled by Scalar 2 For PDF file enter the page number by pressing number buttons and then press button to jump to the specific page 12 FORMAT button Change picture format The button is only controlled by Scalar 13 BACK button Return to the previous page or exit from the previous function 14 INFO button 1 Display information about current input si...

Страница 26: ...98BDL4150D 14 2 4 SD card Cover Use the SD card cover and screws to hide the Micro SD card ...

Страница 27: ...VCR VCD HDMI Out HDMI IN HDMI1 IN HDMI2 IN HDMI3 IN 3 2 Connecting a PC 3 2 1 UsingVGA input PC VGA IN VGA AUDIO IN VGA Out D Sub 15 pin Audio Out VGA IN AUDIO IN AUDIO OUT IR IN IR OUT SPDIF OUT 3 2 2 Using DVI input PC VGA AUDIO IN Audio Out VGA IN DP IN DP OUT AUDIO IN AUDIO OUT IR IN IR OUT SPDIF OUT DVI IN DVI Out DVI IN ...

Страница 28: ...HDMI input HDMI Out HDMI IN HDMI1 IN HDMI2 IN HDMI3 IN PC 3 2 4 Using DisplayPort input PC DisplayPort Out DisplayPort IN DP IN 3 3 Connecting Audio Equipment 3 3 1 Connecting external speakers EXT SPK TERMINAL External speakers ...

Страница 29: ... a Daisy chain Configuration You can interconnect multiple displays to create a daisy chain configuration for applications such as a menu board 3 4 1 Display control connection Connect the RS232 OUT connector of DISPLAY 1 to the RS232 IN connector of DISPLAY 2 DISPLAY 1 PC DISPLAY 2 RS 232C IN RS 232C RS 232C OUT RS 232C IN PC RJ 45 RS 232C OUT RS 232C IN DISPLAY 1 DISPLAY 2 RJ 45 ...

Страница 30: ... DP DP OUT DP IN 3 5 IR connection IR IN External IR Receiver IR IN IR OUT DISPLAY 1 DISPLAY 2 RS 232C OUT RS 232C IN DISPLAY 1 DISPLAY 2 NOTE 1 This display s remote control sensor will stop working if the IR IN is connected 2 IR loop through connection can support up to 9 displays 3 IR in daisy chain via RS232 connection can support up to 9 displays ...

Страница 31: ...98BDL4150D 19 3 6 IR Pass through Connection DVD VCR VCD DVD VCR VCD Remote Control IR OUT IR IN ...

Страница 32: ... When you return to android PD launcher the screen will show hint image the hint image only show 5 second as below The hint image will notify you can press source key to change source 2 Admin mode You can press Home 1888 to enter admin mode Please make sure you see the Home OSD menu after Home is pressed and then press 1888 in sequence Two continuous Home keys will not be a valid hotkey Admin mode...

Страница 33: ...98BDL4150D 21 3 Network page 6 Storage page 7 Help page Display QRcode page ...

Страница 34: ...playback File1 File7 of playlist automatically Clear all 4 4 2 Media Player introduction 1 Home page of Media Player this page has three items Play Compose and Settings Play select playlist to play Compose edit playlist Settings setting play properties 2 Select Play on home page first you should choose one playlist to play between FILE 1 and FILE 7 The pencil icon means the playlist is non empty 3...

Страница 35: ...lide bar it helps you to do the following select all select all storage files delete all delete all playlist files add remove update playlist from source sort sort playlist save abort save or abort playlist back return 7 If you choose Sort in the slide bar you can change the order of files one by one 8 Press info key after you choose desired file you will get the detail information 9 Press play ke...

Страница 36: ...ber 1 2 3 4 5 6 7 Ex mpplaylist1 txt mpplaylist2 txt Content Note if playlist file contains video and music when the pd plays music file the screen will be black Step 2 Copy mpplaylistX txt to philips folder of internal storage You may use FTP to do this File path storage emulated legacy philips Ex storage emulated legacy philips mpplaylist1 txt Step 3 Prepare media files to photo video and music ...

Страница 37: ...ose 1 7 Press any one will show a dialog 3 Enter url and press OK then data will save on List 4 Press Option then left side will pop up a list Import Import url list file Export Export url list file Delete all Delete all url record on right side Back left side list will be closed 4 1 Import Click import Choose storage Choose file contains urls ...

Страница 38: ...rt Choose storage Dialog shows path file will be saved and file s name Press save button then urls on list will be saved 5 Press OK then url records will be saved 6 On url list page if you select non empty item it will show a dialog to ask edit or play url If press Edit it will show edit url dialog if press Play it will show web page of item s url ...

Страница 39: ...tep 3 Start browser app it will auto import browser text file PS Once the playlist file text is imported if an user change playlist by remote controller this change will not be written to playlist text file 4 6 PDF Player 4 6 1 OSD menu interaction with pdf player 1 Boot on source Input If you select PDF player source PD will go to PDF player automatically after the boot complete Playlist 0 go to ...

Страница 40: ...f 5 You could edit or delete a non empty playlist just choose the desired playlist which is with pencil icon 6 Once you start to edit a playlist you will see below screen Source files in storage Playlist files in playlist There are 4 icons which map to the keys of remote controller Option key launch slide bar Play key play media file Info key show media info Ok key select unselect file 6 1 In the ...

Страница 41: ...ayer app it will auto import pdf player text file PS Once the playlist file text is imported if an user change playlist by remote controller this change will not be written to playlist text file Media Hotkey Play Playback file Pause Pause page Fast forward go to next page if the page is end of the file it will go to next file Rewind back to last page if the page is first of the file it will back t...

Страница 42: ...rsion There are two options Ver 2 andVer 3 Ver 2 use 2 0 2 2 agreement Ver 3 use 3 0 3 1 agreement 5 Content There are internal storage SD card USB storage 3 options for selecting WhenVer 2 Server Account PIN code will be gray and unavailable Internal storage SD card USB storage CONTENT Settings Server Account PIN Code Version Ver 2 CMND Play ...
Страница 43: ...ave Select the App click the Save will perform the function of storage Forget After press the Forget can remove previously stored information Cancel Don t do any change directly closed Windows If no customer installed apk the list will be blank No option for choose Save Forget key will be gray and unavailable If customer installed apk user can select customer installed apk in list Case 1 Not set u...

Страница 44: ...mask DNS address and Gateway Note IP address netmask DNS address and gateway address input limitation 1 Format number 0 9 decimal point 2 Mac Address Note Ethernet will be disable automatically if Wi Fi turn on and connect to network 5 3 More Only show up when 4G module connected Via Enable Disable to control Cellular networks On OFF Note 1 Only show up when 4G module connected 2 Only show up Teth...

Страница 45: ...ss Save key to save the bootanimzation zip from the SD card or USB to data local and set it as boot logo c Forget Press Forget key to delete data local bootanimation zip and not show boot logo d Cancel Close dialogue w o changes Scenario introduction Case 1 The user don t select customized boot logo PD does not find any bootanimation zip file under SD and USB The list will be blank Save and Forget...

Страница 46: ...ll show Error toast 3 EndTime Set up screenshot End time Note 1 If no End time the screen will show current time automatically 2 Start time cannot be newer than End time It will show error toast 4 Repeat Set screenshot repeat cycle User can choose screenshot time frame Multiple selection 5 Save to Set up screenshot save path default path internal storage Note In root of internal storage PD will cr...

Страница 47: ... other mail account and set up SMTP server Security type and port item Note Password input limitation 1 Length 6 20 characters 2 Format no limit Gmail safety setting If Gmail is not working when the settings are completed please test the Gmail account via a PC and the below link https www google com settings security lesssecureapps And confirm on Access for less secure apps the Turn on item is sel...

Страница 48: ...isplay Internal storage cannot be modified Only show path 4 Port Set up FTP port number Note Input limitation 1 Length Max 5 characters 2 Range 1025 65535 3 Format Number 0 9 4 Default 2121 5 Unavailable port 9988 15220 28123 28124 and SICP network port 3 Remote Control Via Enable Disable to Control Remote Control On Off User can input Server address If server does not registered it will ask user ...

Страница 49: ...ble Platform Web API 3 SICP network port Change SICP Network Port Note Input limitation 1 Length Max 5 characters 2 Range 1025 65535 3 Format Number 0 9 4 Default 5000 5 Unavailable port 9988 15220 28123 and 28124 5 4 5 SystemTools System tools 4 main functions 1 Clear Storage 2 Factory Reset 3 Import Export 4 Clone Media Files 5 External Storage 5 4 5 1 Clear Storage The purpose is to clear all d...

Страница 50: ...oidPDUrlListData db H Smartcms db 2 Will save to Philips folder in storage Export Signage Display Settings Will export database to Philips folder under USB or SD card 1 Export database 2 Export 3rd party apk to Philips app Note If no Philips folder exists in USB or SD card it will be created automatically List all available storage internal SD USB Import Signage Display Settings Import data from P...

Страница 51: ... 5 4 5 5 External Storage Enable SD card USB External Storage Lock Disable SD card USB External Storage Unlock Note Must re plug SD card USB External Storage after unlock the external storage 5 4 6 Misc 5 4 6 1Tiling tool To activate the tiling tool function by enter the serial number that buy from the dealer 5 4 6 2TeamViewer Support Enable DisableTeamViewer support 5 4 7 System update 1 Local up...

Страница 52: ... Small Normal Large Huge 5 6 Apps Display applications information Note 1 User options key on RCU to show setting option 5 7 Security 1 Credential storage Control panel of certificates 5 8 Date time Via Scalar OSD menu to control AutoTime On Off Note Add new NTP server to display current server IP 5 9 Developer options Android developer options For more information please visit https developer and...

Страница 53: ...s contained within an uncompressed zip file called bootanimation zip 2 Inside the bootanimation zip file The bootanimation zip as follow The image folder Contains PNG images named in incremental numbers The desc txt file 1 The image folder These contain PNG images named in numbers starting from something like 0000 png or 0001 png and proceeding with increments of 1 There has to be at least one fol...

Страница 54: ...ying them in one loop switching to contents of part1 folder and playing them continuously till the device boot complete 3 Zip file Select everything image folders and desc txt inside the Bootanimation folder and zip them into a new uncompressed zip archive using your favorite compression utility like 7zip or WinRAR and so on If using 7zip set compression level to Store If using WinRAR set Compress...

Страница 55: ...ne tool C apkfolder adb install r apk_name apk c Via Customized Intent 1 If you develop an apk which can download any android app then your apk can issue a customized intent 2 Giving the apk name and the path it was stored The system will help you to install by program Description Intent Parameters Sw Update php intent action UPDATE_APK filePath The absolute file path including the file name Keep ...

Страница 56: ...olor temperature Color control Gamma selection 50 50 70 50 Medium Native 2 2 Brightness Adjust the overall image brightness by changing the intensity of the LCD panel s backlight Contrast Adjust to sharpen the picture quality The black portions of the picture become richer in darkness and the white become brighter Sharpness Adjust to improve the image detail Black level Video black level is define...

Страница 57: ...sition cannot be adjusted when Pixel Shift is activated V position Press the button to move the image up or to move the image down NOTES V position adjustment is functional for VGA input only V position cannot be adjusted when Pixel Shift is activated Clock Adjust the width of the image NOTE This item is functional for VGA input only Clock phase Adjust to improve the focus clarity and stability of...

Страница 58: ...ttings in the Audio menu to factory preset values 6 2 4 PIP menu P P Audio PIP Screen Picture Configuration 1 PIP size PIP position PIP reset Sub mode PIP change Small Bottom Left Off Cancel Cancel Sub mode Select the PIP Picture in Picture mode Choose from Off PIP Quick swap PBP 2Win PBP 3Win PBP 3Win 1 PBP 3Win 2 PBP 4Win PBP 4Win 1 SICP Off PIP Quick swap Switch main on top or sub on top PBP 2W...

Страница 59: ...reduce the risk of image persistence or ghost imaging Cooling Fan Choose to adjust the cooling fan s speed of rotation Select Auto to turn on off the cooling fan according to the display s temperature Choose from Auto Off Low Medium High NOTES The default Auto option will start running the cooling fan if the temperature of 45 C 113 F is reached and stop running the cooling fan if the temperature o...

Страница 60: ...tion enables setting up Monitor ID of connected machine according to Tiling matrix settings Example Tiling matrix sets as 4 1 2 5 6 3 4 7 8 9 10 11 12 13 14 15 16 Auto ID The option are Start End The default is End Switch to Start option to set up IDs of machines backward from current one Once the setup is completed the option exits to End automatically To use this function serial connect all mach...

Страница 61: ...y OSD will be displayed for 3 seconds Or press OK button to display the Primary Secondary OSD when no other OSD 1 During the Primary OSD press or button to adjust the value of Control Monitor ID and press or button to adjust the value of Control Group ID Keyboard control Choose to enable or disable the display keyboard control buttons function Unlock Enable the keyboard function Lock All Lock all ...

Страница 62: ...ble this function OffTimer Set the display to turn itself off to standby mode within an amount of time specified The options are Off 1 24 hours from current time NOTE When the Off timer is activated the Schedule settings will be disabled Schedule This function allows you to program up to 7 seven different scheduled time intervals for the display to activate You can select The time for the display ...

Страница 63: ...atically Off Once a signal is connected it can only be selected manually If the selected input is no signal set the display to display the image automatically according to the search order of each option The options are All PC source only Video source only Failover All DP HDMI1 HDMI2 HDMI3 DVI VGA Component OPS PC source only DP DVI VGA Card OPS Video source only HDMI1 HDMI2 HDMI3 Component Failov...

Страница 64: ...MI1 HDMI2 HDMI3 Media Player BROWSER SmartCMS PDF Player Custom Card OPS Audio source Select the audio input source according to the audio signal source connected to the audio input and HDMI sockets on the display Choose from Analog Displayport Audio1 Audio2 Media PIP audio Select the audio source the PIP Picture in Picture mode Main Select audio from the main picture Sub 1 Select audio from the s...

Страница 65: ...n 1080P 60fps Max Bit Rats 135Mbps 4K2K 30fps H 265 H 265 MP4 mp4 MPEG transport stream ts MKV mkv V Max Resolution 4K2K 60fps Max Bit Rats 100Mbps GOOGLEVP8 VP8 MKV mkv WebM webm V Max Resolution 1080P 30fps Max Bit Rats 20Mbps Motion JPEG MJPEG AVI avi MP4 mp4 MKV mkv V Max Resolution 1920 1080 30fps Max Bit Rats 40Mbps Audio Decode Type Audio Codec Container Decode Encode Channel Remark MPEG Au...

Страница 66: ...ion 15360 x 8640 The limitation of max resolution depends on DRAM PNG PNG File Format PNG V Max Resolution 15360 x 8640 The limitation of max resolution depends on DRAM NOTES Sound or video may not work if the contents have a standard bit rate frame rate above the compatible Frame sec listed in the table above Video content with a Bit rate or Frame rate larger than the rate specified in the table ...

Страница 67: ...280x720 52 5 70 000 23 CVT 2 3MA 1280 x768 47 776 59 870 24 CVT 2 3MA 1280 x768 60 289 74 893 25 CVT 1280x800 49 7 59 810 26 CVT 1280x800 62 8 74 930 27 VESA 1280x960 60 60 000 28 VESA 1280x1024 63 981 60 020 29 SUN WS 1280x1024 71 691 67 189 30 VESA 1280x1024 79 976 75 025 31 VESA Standard AddDMT 1360x768 47 712 60 015 32 VESA Standard AddDMT 1366x768 47 712 59 790 33 VESA reduced blanking mode 1...

Страница 68: ...ndows Check your PC instruction book for information about connecting your PC to a display If a vertical and horizontal frequency select mode exists select 60Hz vertical and 31 5KHz horizontal In some cases abnormal signals such as stripes might appear on the screen when the PC power is turned off or if the PC is disconnected If so press the INPUT button to enter the video mode Also make sure that...

Страница 69: ...xel or picture element is composed of three sub pixels in the primary colors of red green and blue Many pixels together form an image When all sub pixels of a pixel are lit the three colored sub pixels together appear as a single white pixel When all are dark the three colored sub pixels together appear as a single black pixel Other combinations of lit and dark sub pixels appear as single pixels o...

Страница 70: ...ome liquid crystal display LCD panels This is known within the industry as Mura which is a Japanese term for unevenness It is used to describe an irregular pattern or area in which uneven screen uniformity appears under certain conditions Mura is a result of the deterioration of the liquid crystal alignment layer and is most commonly caused by long term operation under high ambient temperatures It...

Страница 71: ... lint free cloth If the surface becomes dirty soak a soft lint free cloth in a mild detergent solution Wring the cloth to remove excess liquid Wipe the surface of the display to remove dirt Then use a dry cloth of the same type to dry Do not scratch or hit the surface of the panel with fingers or hard objects of any kind Do not use volatile substances such as insert sprays solvents and thinners Ca...

Страница 72: ...incorrectly to underscan 3 If the image exceeds the screen size Scan Mode may need to be set to Underscan Use the Zoom mode or Custom zoom function in the Screen menu to fine tune display geometry and time frequency parameter Can hear sound but no picture Improperly connected source signal cable Make sure that both video inputs and sound inputs are correctly connected Can see picture but no sound ...

Страница 73: ...gle MENU will show again if it disappear 3 Default setting ID NO 0 GP NO 0 this setting can control all displays by IR The can change ID NO to control signal display by Monitor ID The UP DOWN can change GP NO to control multi display by Group ID The first display always be controlled by IR How is the RC working Daisy chain no RS232 connected and IR cable No need setting just to connect with IR cab...

Страница 74: ...m phone jack x 1 0 5V rms Normal 2 Channel L R RS232C 3 5mm phone jack x 3 RS232C in X2 RS232C out RJ 45 RJ 45 Jack x 1 8 pin 1000 baseT HDMI Input HDMI Jack x 3 Type A 19 pin Digital RGB TMDS Video Audio MAX Video 720p 1080p 3840 x 2160 60 Hz Audio 48 KHz 2 Channel L R Supports LPCM only VGA Input D SUB jack 15pin Digital RGB TMDS Video Analog RGB 0 7V p p 75Ω H CS V TTL 2 2kΩ MAX 1920 x 1080 60 ...

Страница 75: ...m Specifications Energy Efficiency Class B Visible Screen Size 247 7 cm 97 5 inches On Mode Power Consumption W 372 W Annual Energy Consumption kWh 544 kWh Standby Power Consumption W 0 50 W Off Mode Power Consumption W 0 50 W Display Resolution Pixels 3840 x 2160 Network Standby W 5 W Environmental Condition Item Specifications Temperature Operational 0 40 C Storage 20 60 C Humidity Operational 2...

Страница 76: ...s N V All rights reserved Philips and the Philips Shield Emblem are registered trademarks of Koninklijke Philips N V and are used under license from Koninklijke Philips N V Specifications are subject to change without notice ...

Отзывы: