13
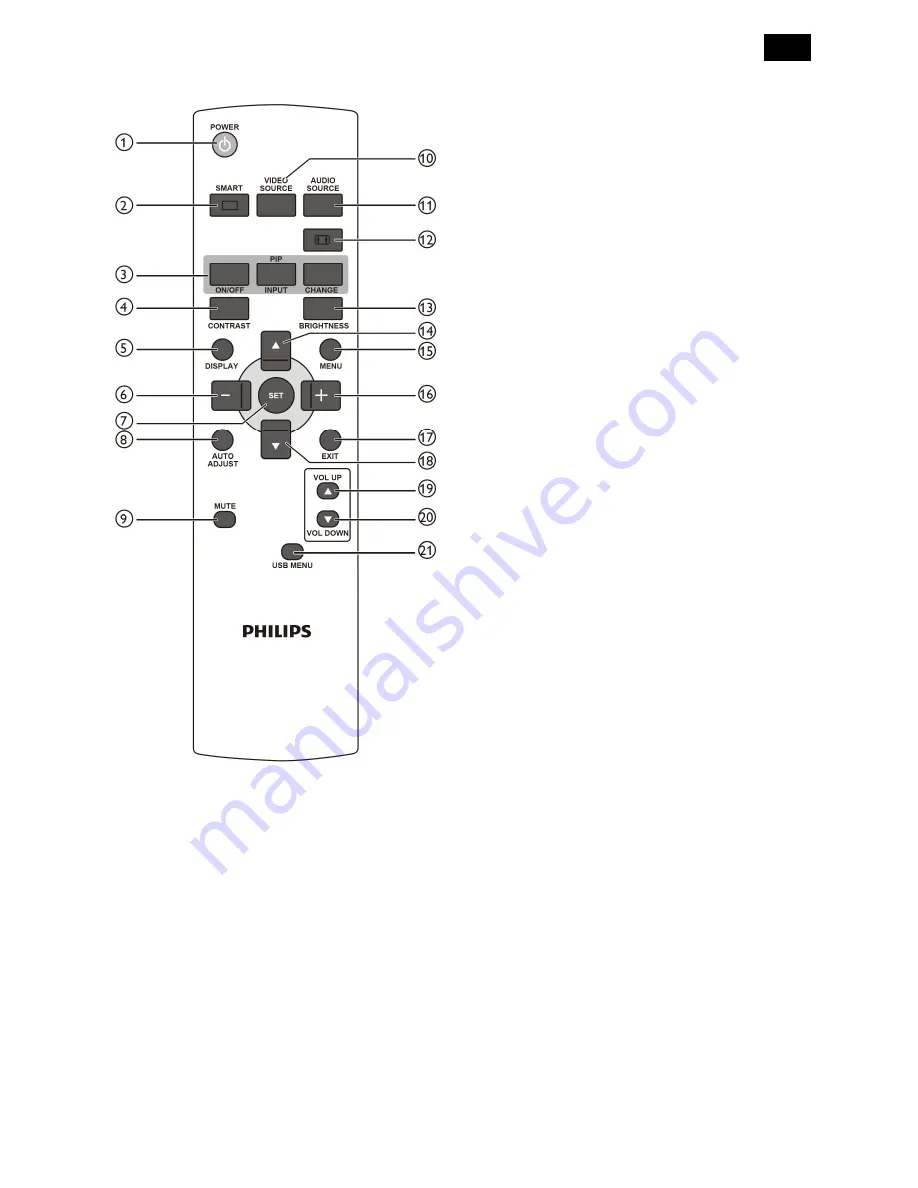
3.3 Remote Control
1. [POWER] Button
Press to switch on the display from standby mode.
Press again to turn it off and back into standby
mode.
2. [SMART] Button
Press to activate Smart Menu. Press [
▲
] or [
▼
]
button to select menu options. Press [SET] button
to confirm and exit selection.
Standard:
Used for normal images (factory
setting)
Highbright:
Used for moving image such as
video
sRGB:
Used for text based images(only for PC
mode)
Cinema:
Used for movies(only for Video mode)
3. [PIP] (Picture In Picture) Button
[ON/OFF]:
Turn PIP mode ON/OFF.
[INPUT]:
Select the input signal for the sub
picture.
[CHANGE]:
Toggle between the main picture and
sub picture.
4. [CONTRAST] Button:
Press to activate Contrast Menu. Press the [+] or
[-] button to adjust the value. Press [MENU]
button to confirm and exit.
5. [DISPLAY] Button
Press to turn on/off the information OSD displayed
on the upper right corner of the screen.
6. [-] Button
Press to move the selection left in OSD menu.
Press to decrease the value in OSD menu.
Press to move the sub picture left in PIP mode.
7. [SET] Button
Press to activate the setting inside the OSD menu.
8. [AUTO ADJUST] Button
Press to run the Auto Adjust function.
Note: This button is functional for VGA input only.
9. [MUTE] Button
Press to turn the mute function on/off.
10. [VIDEO SOURCE] Button
Press to toggle Video Source Menu. Press [
▲
] or
[
▼
] button to select one of the video sources
among
Displayport, DVI-D
,
VGA
,
HDMI
,
Component
,
Video, Card OPS,
or
USB
. Press
[SET] button to confirm and exit.
11. [AUDIO SOURCE] Button
Press to toggle Audio Source Menu. Press [
▲
] or
[
▼
] button to select one of the audio sources
among
Displayport, HDMI
,
AUDIO1
,
AUDIO2
,
USB
or
Card OPS
. Press [SET] button to confirm
and exit.
Содержание Signage Solutions E-Line Display BDL5551EL/00
Страница 2: ...2 Revision List Version Release Date Revision History A00 Feb 07 2013 Initial release Draft Version ...
Страница 33: ...33 Meridian 1 5 Block Diagram 5 1 Scaler Board ...
Страница 34: ...34 Power Board ...
Страница 65: ...65 7 2 POWER BOARD 715G5525P01000003S Remark Parts position can be searched by using FIND function in PDF ...
Страница 66: ...66 Remark Parts position can be searched by using FIND function in PDF ...
Страница 68: ...68 7 5 SUB BOARD 715G5623T01000005K Remark parts position can be searched by using FIND function in PDF ...
Страница 75: ...75 3 Remove all the screws as follow ...
Страница 76: ...76 76 4 Remove the main frame from the panel ...
Страница 81: ...81 3 Set the parameters as below figure ...
Страница 83: ...83 6 Click Commands batch to load the file isp_psi_ext txt ...
Страница 87: ...87 ...
Страница 89: ...89 ...
Страница 92: ...92 92 5 Click Auto to upgrade 6 Update processing ...
Страница 96: ...96 96 2 Tick the Analog DVI and click Loadfile to set the parameters 3 Select the EDID folder ...
Страница 115: ...115 ...
Страница 121: ...121 Service Kit Description Part No Picture ISP tool 715GT183 A DDC TOOL 715GT034 B ...
Страница 122: ...122 122 17 General Product Specification Please refer to the Product Specification the next page ...


