Mechanical Instructions
4.
4.3.9
LCD Panel
Important:
Be sure to work in a dust free environment during
the following activities. In addition, the use of (fabric) hand
gloves is advised.
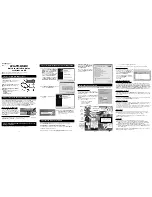
Figure 4-14 Plasma panel disassembly
1.
First remove front cover, back cover and shielding as
described earlier.
2.
Place the TV set face down on the foam bars. Place the
bars at each of the four the edges of the set, so they will
support the front frame and not only the glass plate!
3.
Remove the grounding screw [1] that secures the cabling.
4.
Do NOT forget
to unplug the LVDS connector [2] from the
SSB.
Important:
Be careful, as this is a very fragile
connector!
5.
Unplug the connectors from the backlight inverters [3].
6.
Remove the screws [4].
7.
Now gently lift the complete subframe from the LCD panel.
When defective, replace the whole unit.
4.4
Set Re-assembly
To re-assemble the whole set, execute all processes in reverse
order.
Notes:
•
While re-assembling, make sure that all cables are placed
and connected in their original position. See figure “Cable
dressing”.
•
Pay special attention not to damage the EMC foams at the
SSB shields. Make sure, that EMC foams are put correctly
on their places.
I_17540_001.ep
s
2
8
010
8
3
3
2
4
4
4
4
4
4
4
4
1
Содержание QCS1.0S
Страница 11: ...Mechanical Instructions EN 11 QCS1 0S LA 4 Figure 4 12 SSB I_17540_010 eps 280108 5 5 5 5 3 5 5 2 4 ...
Страница 18: ...Service Modes Error Codes and Fault Finding EN 18 QCS1 0S LA 5 Personal Notes E_06532_012 eps 131004 ...
Страница 37: ...Circuit Diagrams and PWB Layouts 37 QCS1 0S LA 7 Layout Scaler Board Top Side I_17540_034 eps 310108 ...
Страница 40: ...40 QCS1 0S LA 7 Circuit Diagrams and PWB Layouts Power Board P P POWER BOARD I_17540_041 eps 310108 ...
Страница 42: ...42 QCS1 0S LA 7 Circuit Diagrams and PWB Layouts Personal Notes E_06532_013 eps 131004 ...
Страница 51: ...Revision List EN 51 QCS1 0S LA 11 11 Revision List Manual xxxx xxx xxxx 0 First release ...