Philips PicoPix Micro 2 Скачать руководство пользователя страница 9

Operation 9

Prepare the remote control

CAUTION!

The improper use of batteries can lead 
to overheating, explosion, risk of fire and 
injury. Leaking batteries can possibly 
damage the remote control.
Never expose the remote control to 
direct sunlight.
Avoid deforming, dismantling or charging 
the batteries.
Avoid exposure to open fire and water.
Replace empty batteries immediately.
Remove the batteries from the remote 
control if not in use for long periods of 
time.

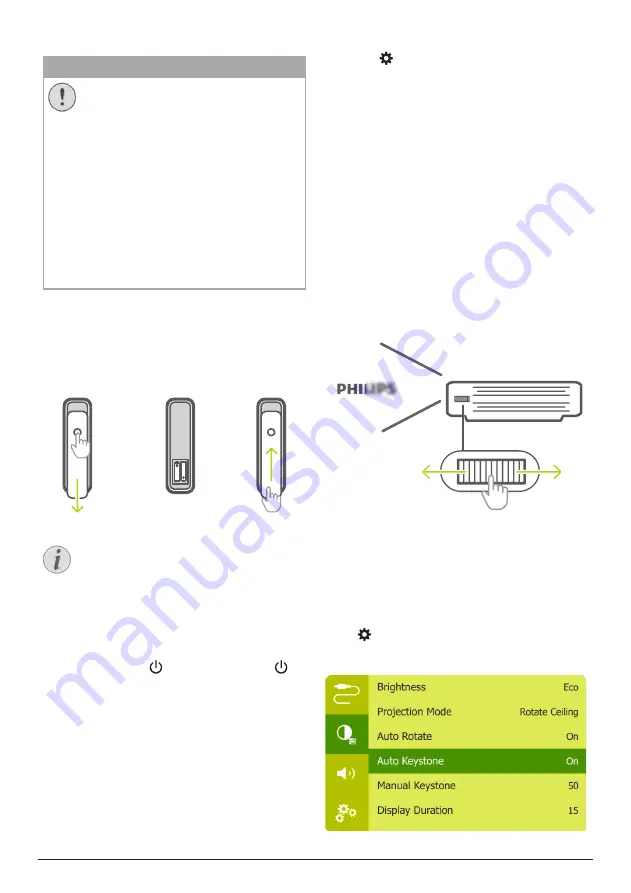
Press and hold the battery compartment 
cover, and simultaneously slide it open to 
access the battery compartment.

2  Insert the supplied batteries (type AAA) 

with correct polarity (+/- ) indicated.

3  Close the battery compartment.

Notice

When using the remote control, point the 
remote control at the IR sensor located 
on the back of the projector, and make 
sure there is no obstacle between the 
remote control and the IR sensor.

Power on and set up

Press and hold   on the projector (or   on 
the remote control) for 1 second to switch 
the projector on. 
• 

When the projector is switched on, the 
LED on the projector turns white if the 
projector is not being charged. 

• 

When charging, the LED on the 
projector turns red regardless of the 
projector switching on or off.

Set up the language

Press   on the remote control to access 
the settings menu, then navigate to select 
OSD 

Language,

 and press 

OK

.

2  Press the 

Navigation button

 to select a 

language. 

Change screen size

The projection screen size (or size of images) is  
determined by the distance between the lens 
of the projector and the projection surface.
• 

The projection distance needs to be 1.2 
times the width of your desired screen size. 

• 

The projection image size is to up to 80’’.

• 

The projection distance is 80 cm to 200 cm.

Image  sharpness adjustment

To adjust image focus, turn the focus 
adjustment knob on the side of the projector.

Image shape correction

Auto correction (vertical keystone)

The projector can automatically correct the 
image to be rectangular when you tilt the 
projector upwards or downwards.
To enable auto vertical keystone correction, 
press   on remote control to access the 
settings menu, then navigate to select 

Auto 

Keystone - On.


Содержание PicoPix Micro 2

Страница 1: ...User Manual Register your product and get support at www philips com support PPX340 PicoPix Micro 2 Portable projector ...

Страница 2: ...he remote control 9 Power on and set up 9 Using tripod 10 Placement options 10 5 Other features 11 Listen through external speakers or headphones 11 Charge a USB device 12 Use HDMI ARC function 12 Use easy link 12 6 Change settings 12 Language settings 12 Input source selection 12 Picture settings 13 Sound settings 13 Power control settings 13 Restore default settings 13 Other settings 13 7 Servic...

Страница 3: ...sily DANGER Danger of personal injury This symbol gives warning of danger of personal injury Physical injury or damage can result from improper handling CAUTION Damage to the product or loss of data This symbol gives warning of damage to the product and possible loss of data Damage can result from improper handling What s in the box a Quick Start Guide b PicoPix Micro 2 projector PPX340 c Tripod d...

Страница 4: ... cable Have your product checked by an authorised service centre Keep the product away from open flames e g candles The product has built in battery Do not dissemble and modify The built in battery should be replaced by qualified service staff only Do not try to replace the built in battery yourself Incorrect handling of the battery or using the wrong type of battery can cause damage to the produc...

Страница 5: ...rs sprays abrasives polishes alcohol Do not allow any moisture to reach the interior of the product DANGER Risk of eye irritation This product is equipped with a high power LED Light Emitting Diode which emits very bright light Do not look directly into the projector lens during operation This could cause eye irritation or damage 2 Overview Rear view HDMI DC USB c b a d e f g h i j k l a IR sensor...

Страница 6: ... projector switching on or off Front view a b a IR sensor b Projection lens Side view a a Focus adjustment knob Adjust image sharpness Remote control OK a d e b c f g h a Access the settings menu b Confirm a selection or entry c Mute or restore volume d Access the home menu e Volume control Increase or decrease volume f Return to a previous menu screen g Navigation buttons Navigate menu options h ...

Страница 7: ... HDMI DC USB 2 If the projection screen does not show images select HDMI input Press on the remote control to access the settings menu then navigate to select HDMI USB C connection for image projection Connect a USB C device e g a mobile phone tablet or laptop to the projector through USB C connection With this connection images are shown on the projection screen and audio is played on the project...

Страница 8: ...e of the power adapter US UK EU 2 Connect the power adapter to the socket on the projector and then to the wall outlet a b Operation by built in battery The projector can be also operated on built in battery for portability Charge the projector Charge the projector for 1 5 hours before first use Charge the projector when the low battery icon appears in the projection screen To charge the projector...

Страница 9: ...cond to switch the projector on When the projector is switched on the LED on the projector turns white if the projector is not being charged When charging the LED on the projector turns red regardless of the projector switching on or off Set up the language 1 Press on the remote control to access the settings menu then navigate to select OSD Language and press OK 2 Press the Navigation button to s...

Страница 10: ...ke sure the ceiling can support the weight of the projector and mounting kit For ceiling installation this product must be securely attached to the ceiling in accordance with the installation instructions An improper ceiling installation may result in accident injury or damage Front table 1 Place the projector on a table in front of the projection screen This is the most common way to position the...

Страница 11: ...tor With this connection audio from the projector is played through the external speakers or headphones DANGER Danger of hearing damage Before connecting the headphones turn down the volume on the projector Do not use the projector over a longer time at high volume especially when using headphones This could lead to hearing damage 1 Using a 3 5 mm audio cable connect the connector on the projector...

Страница 12: ...link compliant devices that are connected through HDMI The manufacturer does not guarantee 100 interoperability with all HDMI CEC devices 1 Make sure the projector is connected to an HDMI device which supports HDMI CEC function see HDMI connection for image projection page 7 2 To activate easy link function on this projector press on remote control to access the settings menu then navigate to sele...

Страница 13: ... format to fit the projection screen Sound settings Select a preset sound mode or customize sound to suit your video or music Navigate to select Sound Presets and press the Navigation button to select a sound mode then press OK Power control settings Go to the following menu options to control power consumption Brightness Select a screen brightness mode Display Duration Select a timer to automatic...

Страница 14: ...cleaning Use a soft lint free cloth Never use liquid or easily flammable cleansers sprays abrasives polishes alcohol etc Do not allow any moisture to reach the interior of the projector Do not spray the projector with any cleaning fluids Wipe over the surfaces gently Be careful that you do not scratch the surfaces Cleaning the lens Use a soft brush or lens cleaning paper for cleaning the lens of t...

Страница 15: ...ed to connect the projector to an HDMI device or USB C device so that the projection screen can show images see Connect page 7 Select the correct input source Press on the remote control to select an input source Check if the video output of the external device is turned on The projector is charged slowly When powered on the external power will be used first to run the projector and unused power w...

Страница 16: ... No sound when you connect your computer via HDMI cable Check that the sound is activated on the computer and set to output to the projector The projector does not react to remote control commands Check the batteries of the remote control The temperature of the projector s surface is warm For this projector it is normal to generate moderate heat during operation What to do if the projector does no...

Страница 17: ...tate yes Sound Internal stereo speaker 2 x 3 W Connection HDMI x1 with ARC and CEC USB C x1 video USB A 2 0 x1 charging DC 5V 1A Analog audio output 3 5mm x1 DC jack x1 power supply and charging Power source Power supply power adapter Input 100 240V 50 60Hz 1 5 A max Output DC 20 V 3 25 A 65 W Built in battery 12 000 mAh last up to 3 hours Product details Dimensions W D H 138 x 110 5 x 51 mm 5 43 ...

Страница 18: ...tion If this equipment does cause harmful interference to radio or television reception which can be determined by turning the equipment off and on the user is encouraged to try to correct the interference by one or more of the following measures Reorient or relocate the receiving antenna Increase the separation between the equipment and receiver Connect the equipment into an outlet on a circuit di...

Страница 19: ...e purchaser of this product or third parties for damages losses costs or expense s incurred by the purchaser or third parties as a result of accident misuse or abuse of this product or unauthorised modifications repairs or alterations to this product or failure to strictly comply with Screeneo Innovation SA operating and maintenance instructions Screeneo Innovation SA shall not be liable for any d...

Страница 20: ...ps and the Philips Shield Emblem are registered trademarks of Koninklijke Philips N V used under license Screeneo Innovation SA is the warrantor in relation to the product with which this booklet was packaged 2020 Screeneo Innovation SA All rights reserved PicoPix Micro 2 EN ...

Отзывы: