background image

1 Get 

started

Control buttons

a

Turn on/off the PhotoFrame

b

Toggle between slideshow mode, 

thumbnail mode, and main menu

c

/ / /

Select the previous/next/right/

left option

d

Play photos in slideshow mode, 

browse mode, or clock mode
Pause slideshow

Confi rm a selection

e

Enter/Exit photo menu

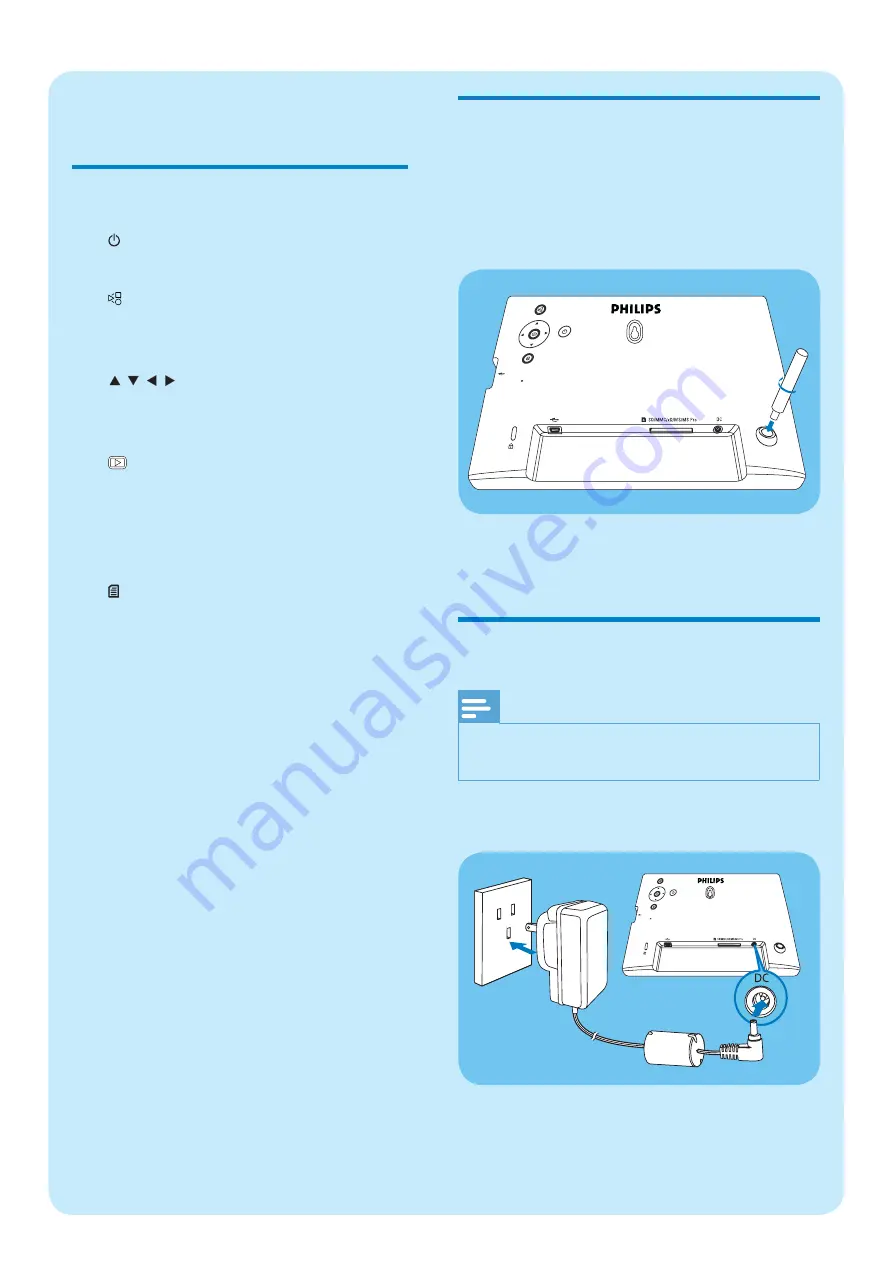
Install the stand

To place the PhotoFrame on a fl at surface, 
attach the supplied stand to the back of the 
PhotoFrame.

1

  Insert the stand into the PhotoFrame.

2

  Screw the stand into the stand hole 

fi rmly.

Connect power

Note

When you position the PhotoFrame, ensure that 

the power plug and outlet are easily accessible.

1

  Connect the power cord to the  

DC

socket of the PhotoFrame.

2

  Connect the power cord to a power 

supply socket.

a

b

Содержание PhotoFrame SPF1017/00

Страница 1: ...PhotoFrame 1 Get started Play Setup 2 3 SPF1017 EN Quick start guide ...

Страница 2: ...lso need Philips Digital PhotoFrame AC power socket AC DC power adaptor AC Memory card USB Stand Computer CD ROM Digital User Manual Auto Run software Quick Start Guide 1 2 3 Quick start guide Get started Play Setup Eng PhotoFrame ...

Страница 3: ...ction e Enter Exit photo menu Install the stand To place the PhotoFrame on a flat surface attach the supplied stand to the back of the PhotoFrame 1 Insert the stand into the PhotoFrame 2 Screw the stand into the stand hole firmly Connect power Note When you position the PhotoFrame ensure that the power plug and outlet are easily accessible 1 Connect the power cord to the DC socket of the PhotoFrame ...

Страница 4: ...llowing storage device which is connected to the PhotoFrame Secure Digital SD Secure Digital SDHC Multimedia Card MMC xD card xD Memory Stick MS Memory Stick Pro with adaptor USB memory drive However we do not guarantee the operations for all types of memory card media 1 For xD SD MMC MS MS Pro card insert it into the slot until you hear a CLICK For USB memory drive insert it into the slot firmly P...

Страница 5: ...rce and then press to confirm 3 Select a photo and then press to confirm Display collage photos 1 In the main menu select Setup and then press to confirm 2 Select Collage and then press to confirm 3 Select Random and then press to confirm To disable collage function select Off and then press to confirm ...

Страница 6: ...ess to confirm Select a photo background 1 In the main menu select Setup and then press to confirm 2 Select Background and then press to confirm 3 Select an option and then press to confirm If you select a background color the PhotoFrame displays a photo with a background color If you select Auto Fit the PhotoFrame extends a photo to fill the screen with picture distortion ...

Страница 7: ...ll the screen without black bars or aspect ratio distortion Set time and date 1 In the main menu select Clock and then press to confirm 2 Select Time and Date and then press to confirm Select 12 24 hr 12HR 24HR and then press to confirm 3 Select Time Date and then press to confirm 4 Press to set time date and then press to confirm ...

Страница 8: ...Show clock in slideshow 1 In the Time and Date menu select Slideshow Clock and then press to confirm 2 Select Yes and then press to confirm You can have clock shown in slideshow ...

Страница 9: ... back to control the PhotoFrame Will the LCD be damaged if I keep showing the same photo for a long time No The PhotoFrame can display the same photo continuously for 72 hours without any damage to the LCD screen Why does my PhotoFrame not show some of my photos The PhotoFrame supports only JPEG photos Ensure that these JPEG photos are not damaged Frequently asked questions ...

Страница 10: ...ps Electronics N V 2009 All rights reserved Specifications are subject to change without notice Trademarks are the property of Koninklijke Philips Electronics N V or their respective owners QSG_V2 0 3ULQWHG LQ KLQD ...

Отзывы: