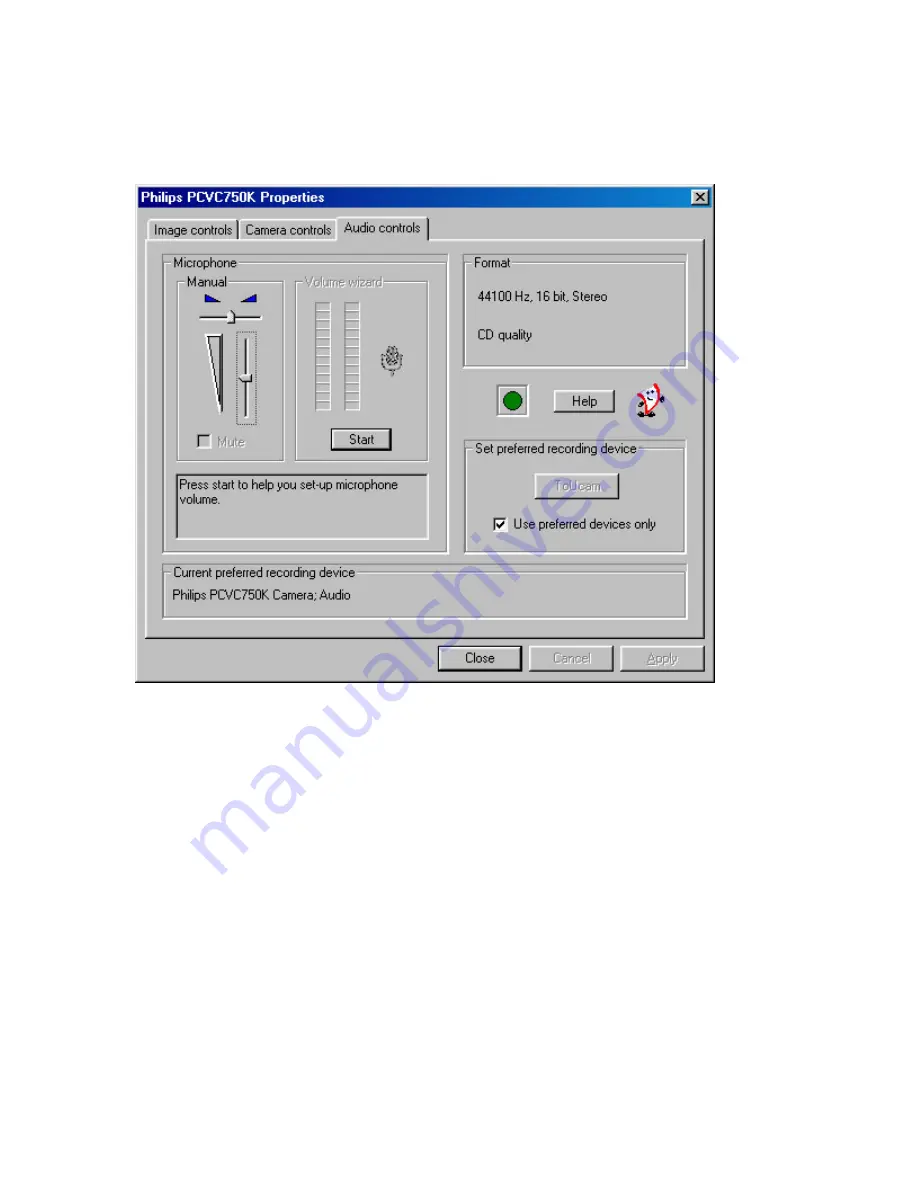
background image

5.3 Audio Controls 


The third tab is marked 'Audio Controls'.  


Volume slider 


This slider provides manual control over the microphone volume. The 'Volume Wizard' helps you 
to select the correct sound level setting for the slider control.  
 

Balance slider 


Not implemented since the camera microphone itself produces a mono audio signal.  
 

Mute 


Shuts off the microphone completely. This option will be greyed out and cannot be used if it is not 
available.  
 

Volume Wizard (Automatic volume setting) 


By pressing the 'Volume Wizard' start button, an Automatic Gain Control cycle is started for the 
camera microphone to determine the optimum volume setting. Speak into the microphone until 
the Volume Wizard stops or until you press Cancel. 


Audio Format 


Audio format shows the parameters of the audio data. You can change these parameters in your 
application in the same way as the resolution setting, for example. 


15

Содержание PCVC750K Pro 3D

Страница 1: ...lications 17 7 Tips and Frequently Asked Questions FAQs 20 8 Technical specifications 22 9 Regulations Warnings Maintenance 24 10 Glossary 25 All brand names and trademarks acknowledged Copyright 2001 Philips Components BV Please visit www philips com pcstuff for new or updated information All data subject to change without notice 1 ...

Страница 2: ...tions on purchasing the Philips USB PC Camera This new digital camera is the most advanced means of recording high quality movies or still pictures quickly and easily on your PC or laptop computer After installation the new camera can be used for all sorts of applications such as Optical Character Recognition of short texts Convert text and numbers from hard copy into electronic documents and spre...

Страница 3: ... USB port marked with the USB logo when requested by the installation program 4 Start the central camera application VLounge using its icon on your desktop 5 Have fun 2 2 Contents of the box Check that the box contains the following items The Philips USB PC Camera The combined high base mouse pad in two parts the base plate and the parallel antennas Base to support the camera on including monitor ...

Страница 4: ...nt scanning purposes Mounting the parallel antennas Slide the base of the parallel antennas into the mouse pad supporting the high base Top left if you are right handed top right if you are left handed Mounting Removing the camera Mounting Hold the camera pointing 90 degrees sideways and push it down onto the support pin then twist it 90 degrees back so it faces you Removing in reverse order First...

Страница 5: ...For scanning rotate the camera 90 degrees forward with the lens pointing downward You may adjust its height by shortening or lengthening the parallel antennas unclip the cable if necessary 2 5 Use of the camera base and the perch Place the camera on top of the monitor or on a desk or suspend the camera from your laptop screen 5 ...

Страница 6: ...base can be removed by turning it through 90 degrees 1 and pulling it down out of the camera 2 The camera features a 1 4 UNC screw thread for tripod mounting 2 6 Use of the camera pouch You will also find a convenient carrying pouch in the packaging This is used as follows 1 Fold camera base by rotating it along its length 2 Run USB cable along camera then wind cable around the camera 3 Place came...

Страница 7: ...Using the pouch 7 ...

Страница 8: ...this does not happen double click the My Computer icon in the top left corner of the screen for Windows XP in the Start menu then double click the PCVC750K icon and double click Setup exe to start installation 4 Let the Philips installation program guide you through the setup procedure Mark the different components you want to install including the applications You can always re run this setup at ...

Страница 9: ... your computer You should now have Program Group called Philips PCVC750K Camera in the Windows Start menu A camera settings icon on the taskbar VProperty A VLounge icon on the Windows QuickLaunch menu on the taskbar Not on Windows 2000 and XP A VLounge icon on the desktop Installed applications as selected by the user during the installation procedure 8 Plug in any USB devices that were disconnect...

Страница 10: ...ations some of these buttons will be greyed out and will not activate when the cursor moves over them indicating that the application is not available Please re run the Philips Setup installation program from the CD ROM to install any missing applications The other buttons and the menus offer access to other useful camera options Where to get help on the applications For detailed information about...

Страница 11: ...n to see the effect of changed settings on your screen NOTE Windows XP may hide inactive icons Hidden icons can be displayed by clicking the Unhide button on the taskbar 5 1 Image Controls The first property tab is marked Image Controls Performance This text box is used to inform the user about camera settings problems or special circumstances Important messages will show a flashing icon The same ...

Страница 12: ... to your USB port and the amount of data they transport The buttons for invalid frame rates will be greyed out automatically and cannot be selected To enable higher frame rates choose a smaller video image format in your application Applications will usually offer resolution switching image format setting under menu items within the applications themselves Image Controls Here you will find the sli...

Страница 13: ...utomatic white balance control to enable Manual control The current colour setting will remain frozen and will not be influenced by the camera s internal controls Put the white balance setting in Manual mode when you have a colourful scene and stable lighting conditions Indoor FL Outdoor These settings compensate for the specific colour spectrum of these types of lighting However these compensatio...

Страница 14: ...hen click on the Restore button under Factory The default values apply to both the Image controls tab and the Camera controls tab Performance icon The Performance text box on the Image Controls tab is used to inform the user about camera settings problems or special circumstances Important messages will show a flashing icon The same icon also appears in the Camera Controls tab to indicate that an ...

Страница 15: ... microphone completely This option will be greyed out and cannot be used if it is not available Volume Wizard Automatic volume setting By pressing the Volume Wizard start button an Automatic Gain Control cycle is started for the camera microphone to determine the optimum volume setting Speak into the microphone until the Volume Wizard stops or until you press Cancel Audio Format Audio format shows...

Страница 16: ...recording device in its multimedia settings Applications can use this setting for selecting a user preferred audio source Use preferred devices only Use this option to enforce or stop using the preferred device only For most camera applications it is preferable to check this option 5 4 Capture Source Some applications may offer you a fourth tab called Capture Source Usually this setting has only o...

Страница 17: ...o capture still images with your camera but without the advanced capabilities of the TWAIN software described below e g no voice control feature Please select the Philips ToUcam Camera as your TWAIN source device for acquiring still images with your camera 6 1 Capturing images from within applications In TWAIN compatible applications you will see the Philips USB PC Camera listed as an available TW...

Страница 18: ...the only video source connected to your computer However if more than one video source is connected to your system this is where you switch between them The Camera Controls button will bring up the other camera setting tabs as described under Camera Settings Image formats Here you can select the size of the still image to be captured To the right of the still image format the streaming image forma...

Страница 19: ...at adjustable regular intervals The Capture button in the View Finder changes to an Auto Start button to indicate this selection and the Voice Control option will become unavailable Leave Incremental File Save unchecked if you want to overwrite the previous image when capturing a new one If you do check this box the picture data is saved under the selected filename but extended with one or more di...

Страница 20: ...E If the installation program asks you to place a different CD ROM in the CD ROM drive for instance the installation CD ROM or the Windows CD ROM always wait until the busy cursor icon usually an hour glass icon has disappeared from your screen and the busy LED on your CD ROM drive extinguishes before pressing the eject button on the CD ROM drive This will prevent a blue Windows Error message appe...

Страница 21: ...ew the list of If the USB PC Camera has been installed correctly Camera Video phone site A V Device hese ill disappear from the list and can 1 Access this menu by right clicking My Computer in the top left hand corner of t desktop for Windows XP in the Start menu and clicking Properties Alternatively click on Start Settings Control Panel then double click on S to access the menu for Windows Start ...

Страница 22: ... 352 x 288 Up to 30 SIF 320 x 240 Up to 60 QCIF 176 x 144 Up to 60 QSIF 160 x 120 Up to 60 Data format I420 IYUV Camera adjustment parameters Frame rate contrast brightness gamma saturation colour on off mirror image backlight compensation white balance exposure control Interfacing USB cable 2 95 m Minimum system requirements Processor Pentium II 233 MHz RAM 32 MB OS Windows 98 Windows 2000 or hig...

Страница 23: ... 11 025 22 05 44 1 kHz Weight 400 g Dimensions camera 84 x 67 x 47 mm L x W x H Ambient temperature Operating 0 to 45 C Storage 25 to 70 C Power supply NOTE Should you wish to connect this camera to a USB hub instead of your computer s root hub you will need to use a powered hub capable of delivering the operating power specified below Power Supplied via the USB cable Power compliance General USB ...

Страница 24: ...ient or relocate the receiving antenna Increase the separation between the equipment and receiver Connect the equipment to an outlet on a circuit different from that to which the receiver is connected Consult the dealer or an experienced radio TV technician for help Any unauthorized modification to this equipment could result in the revocation of the authorization to operate the equipment 9 2 Warn...

Страница 25: ...before writing to disk Codec COding DECoding This refers to a compression format for creating sound and video streams on the computer Compression Term used to describe a process of compacting or squeezing video and sound information into a smaller than normal size For example 2 to 1 compression would indicate that 2 pixels would now only occupy the space of 1 pixel DirectX The latest standard deve...

Страница 26: ...manually by running setup exe from the CD ROM drive Pixel The smallest square or round element in an image These are the building blocks that are only one colour in their individual state but combine with others to form complete images Plug Play An operating system principle for connecting hardware to your computer The idea is to recognize the new hardware automatically and to load the appropriate...

Страница 27: ... TWAIN driver for the TWAIN source USB Universal Serial Bus used for connecting external devices to the PC without having to restart your PC Video for Windows Developed by Microsoft this is a standard for displaying video on the Windows desktop Windows has this built in This standard has now been superseded by DirectShow which is part of DirectX Video stream A collection of images that combine to ...

Отзывы: