background image

I

NSTALLING 

Y

OUR 

D

RIVE

2

11


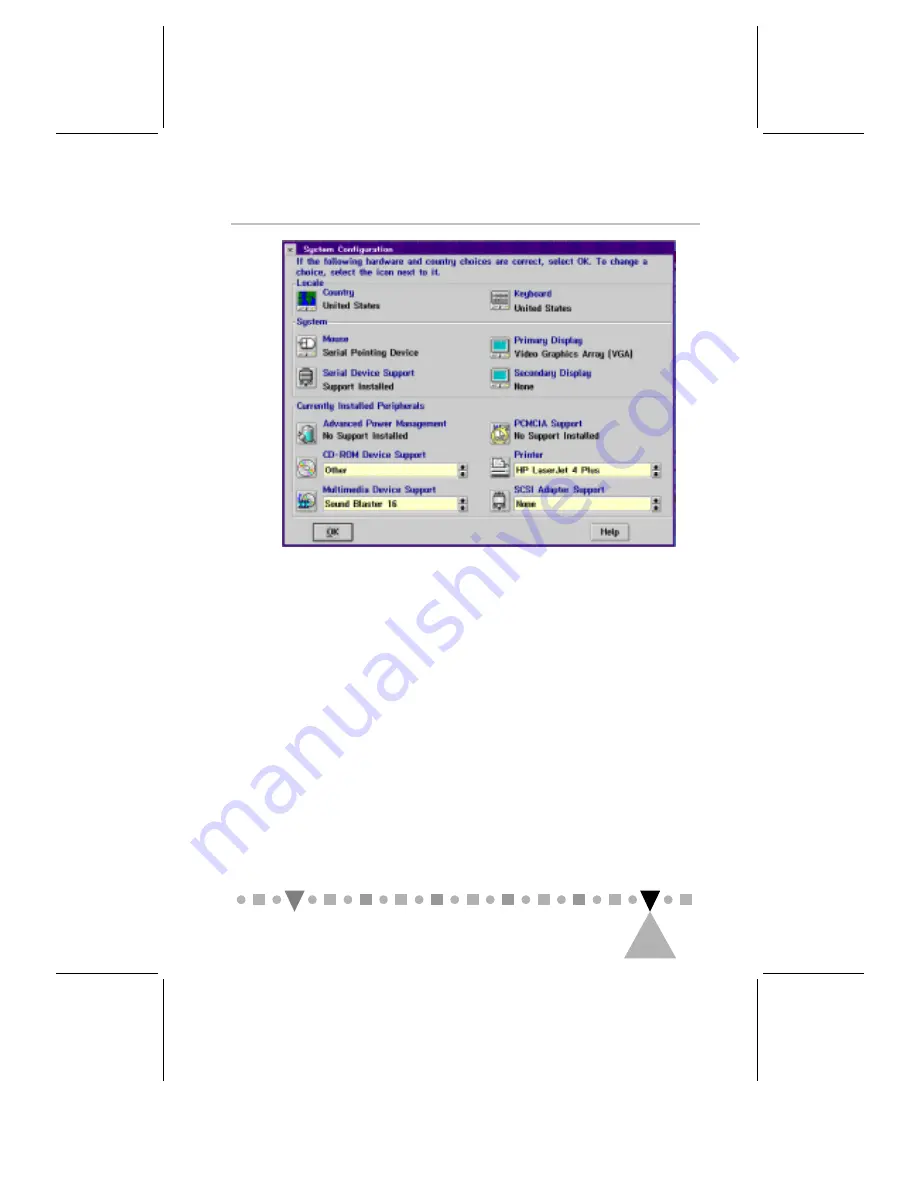
Figure 2-6    The “System Configuration” Dialog Box

2. Click the CD icon, select 

" '

 from the 

!"

& %% 

 list box and click the 

"(

button.

Follow the screen instructions until the

installation is completed.

3. Reboot your PC.

4. Double click the 

")* # $

 icon on the desktop to

display the following window:

Содержание PCA103CD

Страница 1: ...PHILIPS CD ROM Drive User s Manual PCA103CD PCA123CD ...

Страница 2: ... Your System Recognize the Drive 5 2 2 1 If You Are a DOS or Windows 3 x User 5 2 2 2 If You Are a Windows 95 User 6 2 2 3 If You Are an OS 2 Warp User 9 Chapter 3 USING YOUR CD ROM DRIVE 13 3 1 Drive Applications 13 3 2 Manually Controlling the Drive 13 Appendix A A MASTER OR A SLAVE DEVICE 15 A 1 IDE Connections 15 A 2 Setting Master and Slave Jumpers 18 Appendix B SPECIFICATIONS 19 ...

Страница 3: ...d user only unless otherwise stated and the copying should be solely for the purpose of backup In the event the product this manual supports is not free from defects the purchaser s sole remedy shall be repair or replacement within the warranty period By acceptance of this product you hereby assume all liability consequent to your use or misuse of it Philips Electronics N V assumes no liability fo...

Страница 4: ...ii and product names are trademarks and registered trademarks of their respective owners Printed in Taiwan ...

Страница 5: ...nt does cause harmful interference to radio or television reception which can be determined by turning the equipment off and on the user is encouraged to try to correct the interference by one or more of the following measures 1 Reorient or relocate the receiving antenna 2 Increase the separation between the equipment and receiver 3 Connect the equipment into an outlet on a circuit different from ...

Страница 6: ...ulatory Statement Canada This digital apparatus does not exceed Class B limits for radio noise emissions from digital apparatus set out in the Radio Interference Regulations of the Canadian Department of Communications Le présent appareil numérique n émet pas de bruits radio électriques dépassant les limites applicables aux appareils numériques de la classe B prescrites dans le Réglement sur le br...

Страница 7: ...eilylle Varning Om apparaten används pä annat sätt än i denna bruksanvisning specificerats kan användaren utsättas för osynlig lasersträlning som överskrider gränsen för laserkläss 1 According to EN 60825 sub clause 6 regarding actions to be taken against dangerous radiation including copies of all warning labels and information about the laser components and radiation data such as wavelength outp...

Страница 8: ...his product should never be placed near or over a radiator or heat register or in a built in installation unless proper ventilation is provided 5 This product should be operated from the type of power indicated on the marking label If you are not sure of the type of power available consult your dealer or local power company 6 Never push objects of any kind into this product through cabinet slots a...

Страница 9: ... dit produkt nooit in de buurt van een radiator of een kachel plaatsen u mag hem alleen inbouwen als er voor voldoende ventilatie is gezorgd 5 U mag dit apparaat alleen aansluiten op een voeding van het type dat op het label staat vermeld Neem contact op met uw leverancier of het plaatselijk elektriciteitsbedrijf voor meer informatie 6 Steek nooit voorwerpen of iets anders in dit produkt via de ve...

Страница 10: ...un accumulateur de chaleur ou encore dans une installation intégrée à moins qu une ventilation adéquate soit assurée 5 Ce produit ne doit fonctionner qu avec le type d alimentation indiqué sur l étiquette de repérage Veuillez consulter votre revendeur ou la société de distribution électrique locale pour connaître le type d alimentation disponible dans votre région 6 Veillez à ne jamais enfoncer d ...

Страница 11: ...fnungen nicht blockiert oder verdeckt werden Zusätzlich sollten Sie dieses Produkt niemals in der Nähe einer Heizquelle stellen oder in eine Anlage integrieren außer wenn ausreichende Lüftung gewährleistet ist 5 Dieses Produkt sollte mit der auf dem Etikett angegebenen Netzspannung betrieben werden Fragen Sie Ihren Händler oder Ihr lokales Stromversorgungsunternehmen welche Netzspannung verfügbar ...

Страница 12: ...devono essere bloccate né coperte Inoltre questo prodotto non dovrebbe essere mai posto vicino o sopra termosifoni o altre fonti di calore e neppure incorporato in altri contenitori a meno che non si provveda ad una opportuna ventilazione 5 Questo prodotto dovrebbe esser fatto funzionare con l alimentazione elettrica indicata sull etichetta Consultare il proprio rivenditore o la società elettrica ...

Страница 13: ...se sobrecaliente estas ranuras y aperturas no deben ser bloqueadas o tapadas Además este producto no se deberá colocar cerca de o encima de un radiador o una calefacción o en una instalación incorporada a no ser que venga con una ventilación apropiada 5 Este producto tendrá que funcionar con el tipo de alimentación que se indica en la marca de fábrica Recurra a su distribuidor local o compañía elé...

Страница 14: ...to efficiently and effectively get all that information into your computer 1 1 Features This CD ROM drive has the following key features IDE ATAPI interface Access time at 170 ms for PCA103CD and 150 ms for PCA123CD Data transfer rate at 1 500 KB sec for PCA103CD and 1800 KB sec for PCA123CD Built in 256 KB buffer Special design to ensure maximum readability of low quality CDs Motorized tray for l...

Страница 15: ...nterface to set up the drive without the need for an additional CD ROM interface card 1 2 Package Contents Your complete CD ROM package contains the following items CD ROM drive Audio cable IDE cable software diskette Four screws This user s manual 1 3 System Requirements IBM PC or compatible with 80286 CPU or higher a 80386 or higher is recommended 3 5 floppy drive One empty 5 25 horizontally ori...

Страница 16: ...1 3 Please read this manual thoroughly before installing or using your new CD ROM drive ...

Страница 17: ...t IDE controller See Appendix A for a brief introduction to IDE connections 2 1 Installing the CD ROM Drive Here s how to install your CD ROM drive 1 Turn off your PC and remove its casing 2 Adjust the Master Slave jumpers on the back of the CD ROM drive as necessary The factory default of the slave mode normally should not be changed See Appendix A 3 Remove the 5 25 drive s drive guard as instruc...

Страница 18: ...e CD ROM drive Digital Audio 39 40 1 2 HOST Interface Power 5V G G 12V Analog C S M S L A ABCDE ABCDE Audio Cable IDE Cabel Power Cabel Red Red Figure 2 2 Back Panel Connections Note Figure 2 2 shows the back panel of PCA123CD PCA103CD looks slightly different It has four additional jumpers to the right of the Power connector and has only one audio analog ...

Страница 19: ...nd card that has an IDE port you can either connect the CD ROM drive to your PC or to the sound card You must then disable the unused secondary IDE port See Appendix A for what a secondary IDE port is and refer to your sound card PC or IDE controller manual for the instructions on disabling the unused secondary IDE port 7 If you have a sound card with a 4 pin CD ROM audio connector use the supplie...

Страница 20: ...System Recognize the Drive For your system to recognize the new CD ROM drive you need an appropriate driver to act as the system s eye opener In normal cases either Windows 95 or OS 2 Warp should have no problem recognizing the drive with the OS s built in standard IDE CD ROM driver To use the drive in DOS and Windows 3 1 however you need to install the supplied device driver 2 2 1 If You Are a DO...

Страница 21: ... typing A INSTALL or B INSTALL will not properly install the driver 5 Change the destination directory if necessary and press 6 Change the name of the directory containing the file if necessary and press 7 Reboot your computer If everything is okay you can start using your CD ROM drive right away Otherwise make sure that your CD ROM drive has been correctly set as a master device or a slave device...

Страница 22: ...ktop and check whether the CD ROM icon appears as in the following window Figure 2 3 My Computer Peripherals 4 Double click the folder in the same window The folder contents are displayed Figure 2 4 The Control Panel Folder Contents 5 Double click the icon The folder appears ...

Страница 23: ... new CD ROM drive Otherwise proceed with Steps 7 and 8 7 Install the supplied device driver under DOS by following the instructions given in Section 2 2 1 8 Restart Windows 95 and repeat Step 3 This time the CD ROM icon should appear in s peripheral icon display but not in the Device Manager s listing for reasons beyond this manual s purposes Note If you need to but cannot access the CD ROM drive ...

Страница 24: ...sted in Section 2 2 1 before performing the upgrade Remember without the CD ROM driver Windows 3 1 has no way to recognize your CD ROM drive If you were installing Windows 95 from scratch the standard IDE CD ROM driver contained in the Windows 95 installation package might not be working properly with your IDE controller Try the diskette version 2 2 3 If You Are an OS 2 Warp User Perform the follo...

Страница 25: ...em Configuration Dialog Box 2 Click the CD icon select from the list box and click the button Follow the screen instructions until the installation is completed 3 Reboot your PC 4 Double click the icon on the desktop to display the following window ...

Страница 26: ...ollowing list of available drives Figure 2 8 The Drives Icon View Window 6 If it is listed you can stop here OS 2 Warp has successfully recognized your new CD ROM drive Otherwise proceed with the remaining steps 7 Close the window and double click the icon in the window see Figure 2 7 The following window appears Figure 2 9 The Command Prompts Icon View Window ...

Страница 27: ... Close the file after saving it and reboot your PC 12 Repeat Steps 4 and 5 This time the CD ROM icon should appear as an available drive in the window Why couldn t I install OS 2 Warp with its CD disc Is my CD ROM defective No Your CD ROM probably had nothing to do with that problem Instead the standard IDE CD ROM driver contained in Diskette 1 of the OS 2 Warp installation package might not be ...

Страница 28: ...PHILIPS CD ROM DRIVE USER S MANUAL 2 14 working properly with your IDE controller Try the diskette version This page is intentionally left blank ...

Страница 29: ...C s CPU The other way is as a CD player You can use your CD ROM drive to listen to music CDs 3 2 Manually Controlling the Drive Most of the time you will use application software to control the CD ROM drive However there are times manually controlling the drive can be more direct and even necessary Figure 3 1 shows the drive s front panel components for manually controlling the drive 1 2 3 4 6 7 5...

Страница 30: ...ady for access flashes during seek operation 5 Emergency eject Opens the disc tray when the power is off or when both the Stop Eject button and the software control fail Insert a hard bladed tool e g a screw driver into the groove and pry the disc tray open Note Use the emergency eject groove only when absolutely necessary The procedure may damage the disc tray In addition turn off the power of yo...

Страница 31: ...th two 40 pin connectors stemming from a connector seat on the mother board each of the connectors may or may not have been connected to a peripheral device Such a cable is called an IDE cable and the connector seat an IDE port The functionality of the cable and port is determined by an IDE controller either built in on your motherboard or in the form of an add on card This whole set of things act...

Страница 32: ...PHILIPS CD ROM DRIVE USER S MANUAL 16 A 16 ...

Страница 33: ...ith a peripheral device for example your sound card is taken as a secondary port Red Red Secondary Port Primary Port Figure A 2 Enhanced IDE Controller Card Note Your PC system can have only one port of each kind at any time If you add an enhanced IDE controller to the system you must remove or disable the PC s original port s Similarly if a bonus port is present you must disable either this port ...

Страница 34: ...PHILIPS CD ROM DRIVE USER S MANUAL 16 A 18 port As a result if you have more than one IDE device their assignments may look similar to the following ...

Страница 35: ...ce port and either as a master or a slave at your own choice Here master and slave do not imply any operating precedence they are just the sub IDs of the devices that your computer needs to know about Note 1 Currently a CD ROM drive cannot be used as a boot drive Therefore you cannot configure the CD ROM drive as the primary master 2 If you are using OS 2 Warp and another device has already been c...

Страница 36: ... Your CD ROM drive is shipped with the jumper capped In spite of this note from Figure A 3 that capping the jumper is optional for the slave mode To set your CD ROM drive as a master device simply remove the cap from the jumper and place it over the jumper Note 1 The MA and SL jumpers cannot be both capped at the same time 2 A system halt will occur if the MA or SL jumper is set in conflict with t...

Страница 37: ...A MASTER OR A SLAVE DEVICE 17 A 21 ...

Страница 38: ...Performance Data transfer rate 1 500 KB sec 10X 1 800 KB sec 12X Access time 170 ms typical 1 3 stroke 10X 150 ms typical 1 3 stroke 12X Buffer size 256 KB Audio Features Sampling frequency 44 1 KHz Output ports 3 5 mm stereo headphone jack 4 pin stereo line out connector 2 pin stereo digital audio output connector for PCA123CD only Reliability MTBF 50 000 POH 25 duty cycle at room temperature Env...

Страница 39: ...2 x 196 5 mm W x H x D typical Weight 0 85 Kg Front panel Stop Eject button Audio Play Skip button Emergency disc eject hole Rotary volume control knob Disc Ready Data Seek LED indicator Headphone jack Rear Panel Power supply connector IDE interface connector Master Slave configuration jumpers Audio line output Digital audio output PCA123CD only Testing jumper ...

Отзывы: