background image

17

English

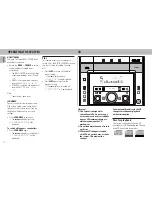
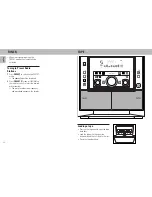
Loading the CD Changer

1

Press 

3 CDC

 to select CD mode.

2

Press 

OPEN•CLOSE

.

The CD carousel slides out.

3

Load a CD with the printed side up in
the right tray.

• You can load another disc in the left

tray.

• To load the third disc, press the 

DISC

CHANGE

 button.

The CD carousel will rotate until the
empty tray is ready for loading.

4

Press 

OPEN•CLOSE

 to close the CD

carousel.

The total number of tracks and the
playing time of the last selected disc
appear on the display.

Note:
– To ensure good system performance,

wait until the CD changer completely
reads the disc(s) before proceeding.

CD Direct Play

You can play a CD directly by pressing the

DISC 1

DISC 2

 or 

DISC 3

 button. The CD

player will stop at the end of playback of
the selected disc.

– A lit button indicates that a disc is

loaded in the disc tray.

Playing a CD

1

Press 

PLAY

É

 to start playback.

The disc tray, track number and
elapsed playing time of the current
track appear on the display.

• To interrupt playback, press

Å

.

The playing time flashes.

• To resume playback, press 

PLAY

É

again.

2

To stop playback, press 

STOP

.

Note:
– All the available discs will play once,

then stop.

Disc Change

You can change the outer two discs while
the third inner disc is stopped or is playing.

1

Press 

DISC CHANGE

.

The CD carousel slides out.

2

Replace the discs in the left and right
disc trays.

• If you press 

DISC CHANGE

 again

during playback, the CD will stop
playing.

The CD carousel will rotate until the
inner tray is rotated out and is ready
for loading.

3

Press 

OPEN•CLOSE

 to close the CD

compartment.

CD

Selecting a desired track

Selecting a desired track when
playback is stopped
1

Press 


 or 


T


(or 

í

 / 

ë

 on

the remote control) until the desired
track appears on the display.

2

Press 

PLAY

É

 to start playback.

The selected track number and
elapsed playing time appear on the
display.

Selecting a desired track during
playback

• Press


 or 


T


(less than 0.5

seconds) until the desired track appears
on the display.

The selected track number and
elapsed playing time appear on the
display.

• If you press 


 (less than 0.5

seconds) it will skip to the beginning of
the current track and play the track
again.

Searching for a particular
passage during playback

• Press and hold 

SEARCH 


 or

T


(or 

à


á


on the remote

control) until the desired passage is
located.

The volume will be reduced.

• Play returns to normal when 

SEARCH


 or 


T


 is released.

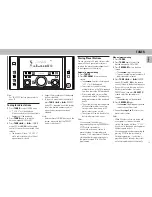
Programming Tracks

Programming tracks of a loaded CD is
possible when playback is stopped. The
display will indicate the total tracks stored
in the program. Up to 40 tracks can be
stored in the memory in any order. When
40 tracks are stored and you attempt to
store another track, the display will show

FULL

”.

1

Load the desired discs in the disc trays.

2

Press 

PROGRAM

 to start programming.

The


PROGRAM

 flag starts flashing.

It will cancel any previously selected
repeat mode.

3

Press the 

3 CDC

 button to select the

disc.

4

Press 


 or 


T


 (or 

í

 / 

ë

 on

the remote control) to select the desired
track.

5

Press 

PROGRAM

 to store the track.

• Repeat steps 

3

 to 

5

 to store other discs

and tracks.

6

Press 

STOP

 once to end programming.

The total number of tracks
programmed and total playing time
appear on the display.

Notes:
– If the total playing time is more than

99:59


or if one of the programmed

tracks has a number greater than 30,
then “

--:--

” appears on the display

instead of the total playing time.

Содержание MZ7/37

Страница 1: ...1 Mini Hi Fi System Toll Free Help Line Ligne d assistance en service libre Linea de ayuda telefónica sin cargo 800 531 0039 ...

Страница 2: ...r as the owner of your model t This bolt of lightning indicates uninsulated material within your unit may cause an electrical shock For the safety of everyone in your household please do not remove product covering s The exclamation point calls attention to features for which you should read the enclosed literature closely to prevent operating and maintenance problems WARNING TO PREVENT FIRE OR SH...

Страница 3: ... all the information and special offers for which you qualify plus easy access to accessories from our convenient home shopping network And most importantly you can count on our uncompromising commitment to your total satisfaction All of this is our way of saying welcome and thanks for investing in a Philips product Sincerely Robert Minkhorst President and Chief Executive Officer P S Remember to g...

Страница 4: ...arato AVISO RIESGO DE CHOQUE ELÉCTRICO NO ABRIR Atención Para reducir el riesgo de choque elécrico no quite la tapa o el panel posterior En su interior no hay piezas que el usuario pueda reparar Para servicio dirijase a personal calificado WARNING To reduce the risk of fire or electric shock do not expose this appliance to rain or moisture CAUTION Use of controls or adjustments or performance of p...

Страница 5: ...5 English Français Español INDEX English 5 Français 28 Español 54 CLASS 1 LASER PRODUCT ...

Страница 6: ...tion means of an appliance is not defeated CAUTION To prevent electric shock match the wide blade of this plug to the wide slot and fully insert Do not use this polarized plug with an extension cord receptacle or other outlet unless the blades can be fully inserted to prevent blade exposure 12 Power Cord Protection Power supply cords should be routed so that they are not likely to be walked on or ...

Страница 7: ...able ground shall be connected to the grounding system of the building as close to the point of cable entry as practical Ground Clamp Electric Service Equipment Antenna Discharge Unit NEC Section 810 20 Grounding Conductors NEC Section 810 21 Ground Clamps Antenna Lead in Wire Power Service Grounding Electrode System NEC Art 250 Part H Example of Antenna Grounding as per NEC National Electrical Co...

Страница 8: ... may be a delay if the appropriate spare parts and technical manual s are not readily available MAKE SUREYOU KEEP Please keep your sales receipt or other document showing proof of purchase Attach it to this owner s manual and keep both nearby Also keep the original box and packing material in case you need to return your product BEFORE REQUESTING SERVICE Please check your owner s manual before req...

Страница 9: ...l with the voltage of your local power supply If not please consult your dealer The typeplate is located at the rear of your system When the system is switched on do not move it around Place the system on a solid base e g a cabinet Place the system in a location with adequate ventilation to prevent internal heat build up in your system The system incorporates a built in safety feature that prevent...

Страница 10: ...ions AM ANTENNA AC MAINS A B H C FRONT AUX CDR IN G SUB WOOFER OUT D LINE OUT AUDIO OUT L R L R L R L R HIGH POWER SUBWOOFER SUBWOOFER LEVEL CONTROL STANDBY ON CUT OFF FREQUENCY 60Hz 150Hz MIN MAX E F AUDIO IN DIGITAL OUT FM ANTENNA 300Ω ...

Страница 11: ...aker wires across rooms You can place as many remote speakers as you like provided they operate at the same radio frequency Connect the wireless radio frequency transmitter to the LINE OUT terminals Place the active speakers at your preferred location Be sure to follow the instructions supplied with the active speakers Note Availability of a wireless transmitter and its peripherals is subjected to...

Страница 12: ...3 4 5 2 7 6 8 9 0 2 2 AUX CDR TAPE 1 2 TUNER CD 2 1 3 PROGRAM REPEAT SHUFFLE DISPLAY SLEEP TIMER INC SURR LOUD NESS FLAT BASS L R TREBLE BALANCE SIDE PAUSE MUTE Å CD DIRECT VOLUME á à ë í É Ç 3 4 4 4 4 4 7 2 DIM RDS PLAY DIGITAL CONTROL SEARCH TUNE NEWS TA PRESET A B BACK 60Hz 250Hz 500Hz 1KHz 2KHz 4KHz 8KHz SOUND VOLUME PRESET AM LW TRACK REPEAT MW FM STEREO PROGRAM TIMER SHUFFLE SURROUND INCREDI...

Страница 13: ...when playing in Tape 2 mode to change side PRESET to switch on or off the PRESET mode CONTROLS STOP Ç for CD to stop CD playback or to clear a program for TUNER to stop programming for TAPE to stop playback or recording DEMO on the system only to start or stop demonstration mode 5 DISPLAY SCREEN to view the current setting of the system 6 CD CAROUSEL TRAY 7 DISC 1 DISC 2 DISC 3 to select a CD tray...

Страница 14: ...cted to the wall socket the demonstration will remain off until it is switched on again To start the demonstration mode Press and hold STOP on the system only for five seconds when the system is in standby mode The demonstration will begin CONTROLS OPERATING THE SYSTEM BACK REC CD SYN PROG A REV FLAT PRESET STOP LOUDNESS INCREDIBLE SURROUND TREBLE BASS DOLBY B NR CLOCK TIMER 3 CDC TAPE CDR AUX TUN...

Страница 15: ...ct 4 different modes for display brightness Press DIM to select the desired screen display brightness DIM 1 DIM 2 DIM 3 or DIM OFF The DIM display lights up DIM 1 DIM 2 DIM 3 or DIM OFF will be displayed depending on the mode selected Volume Adjustment Adjust VOLUME to increase or decrease the sound level For Personal Listening Connect the headphones plug to the n socket at the front of the system...

Страница 16: ...e FLAT display lights up FLAT ON will be displayed Press FLAT again to restore the previous setting The FLAT display is switched off FLAT OFF will be displayed Warning 1 This system is designed for conventional CDs Do not use any accessories such as disc stabilizer rings or CD treatment sheets etc which may damage the CD mechanism 2 Do not load more than one disc into each tray 3 When the CD chang...

Страница 17: ...k Selecting a desired track when playback is stopped 1 Press S or T or í ë on the remote control until the desired track appears on the display 2 Press PLAYÉ to start playback The selected track number and elapsed playing time appear on the display Selecting a desired track during playback Press S or T less than 0 5 seconds until the desired track appears on the display The selected track number a...

Страница 18: ...and PROGRAM flags will be displayed 2 Press STOP to stop program playback Shuffle only on remote control In shuffle mode the system plays all the available discs and their tracks in random order Shuffle may be used also when tracks are programmed To shuffle all the discs and tracks 1 Press SHUFFLE SHUFFLE will be displayed The SHUFFLE flag the disc and the track selected at random appear on the di...

Страница 19: ...played The system will search for every available station in the FM waveband first then search the AM waveband All available radio stations will be stored automatically The frequency and preset number will be displayed briefly The system will stop searching when all the available radio stations are stored or when the memory for 40 preset radio stations is used The system will remain tuned to the l...

Страница 20: ...EEP DIM REC FRONT HSD DIM PLAY DIGITAL CONTROL SEARCH TUNE PRESET A B Loading a tape Press on the tape deck to open the tape deck door Load the tape with the open side downward and the full spool to the left Close the tape deck door When in programming mode the PRESET mode will automatically be activated Tuning to Preset Radio Stations 1 Press PRESET to switch on the PRESET mode The PRESET flag wi...

Страница 21: ...side A and B The BACK or FRONT flag appears on the display depending on the side selected 3b For Tape Deck 2 only Press A REV to select the different type of playback mode see auto reverse playback 4 Press STOP to end playback Note To change side before playback begins use the SIDE button on the remote control During playback Press and hold S or T or à á on the remote control until the desired pas...

Страница 22: ...HANGER T A NEWS SLEEP DIM REC FRONT HSD DIM PLAY DIGITAL CONTROL SEARCH TUNE PRESET A B CDR AUX RECORDING Notes There are two external modes i the normal AUX DVD mode ii the CDRW mode where the LINE OUT of this mini system is muted You will not be able to record or listen to the sound from the LINE OUT You are advised not to listen to and record from the same source simultaneously All the sound co...

Страница 23: ...bing tapes from tape deck 1 to tape deck 2 1 Press TAPE to select tape deck 2 2 Load the prerecorded tape into tape deck 1 and a blank tape into tape deck 2 Make sure the tape in tape deck 1 has its full spool to the left 3 For Tape Deck 2 only Press SIDE on the remote control to select the recording side 4 Press DUBBING NORMAL FAST once for normal speed dubbing or twice within 2 seconds for high ...

Страница 24: ...TAPE 2 mode automatically at a preset time It can serve as an alarm to wake you up Before setting the timer make sure the clock is set correctly The timer will always be switched on once it is set The volume of the timer will start to increase from the minimum level until the volume level before the set is switched to standby mode 1 Press and hold CLOCK TIMER for more than 2 seconds to select time...

Страница 25: ...onds or TIMER on the remote control 2 Press CLOCK TIMER again to store the start time The timer is now switched on The TIMER flag appears on the display Maintenance Cleaning the Cabinet Use a soft cloth slightly moistened with a mild detergent solution Do not use a solution containing alcohol spirits ammonia or abrasives Cleaning Discs When a disc becomes dirty clean it with a cleaning cloth Wipe ...

Страница 26: ...e range 87 5 108 MHz AM wave range 530 1700 kHz Number of presets 40 Antenna FM 300 Ω dipole wire AM Loop antenna TAPE DECK Frequency response Chrome tape type II 60 15 000 Hz 5 dB Normal tape type I 60 15 000 Hz 5 dB Signal to noise ratio Chrome tape type II 50 dBA Normal tape type I 47 dBA Wow and flutter 0 4 DIN SPEAKERS System shielded 3 way 1 G bass port Impedance 6 Ω Woofer 1 x 6 5 Tweeter 1...

Страница 27: ... tape deck maintenance Magnetic build up in the record playback head Use demagnetizing tape General System does not react when any button is pressed Electrostatic discharge Press STANDBY ON to switch the system off Remove the AC power plug from the wall outlet then reconnect the power plug and switch on the system again No or poor sound Volume is not turned up Adjust VOLUME The headphones are conn...

Отзывы: