Service Modes, Error Codes, and Fault Finding
5.
5.
8
.6
Display option code
Caution:
In case you have replaced the SSB, always check the
display option code in SAM, even if you have picture. With a
wrong display option code it is possible that you have picture,
but that in certain conditions you have unwanted side-effects.
5.
8
.7
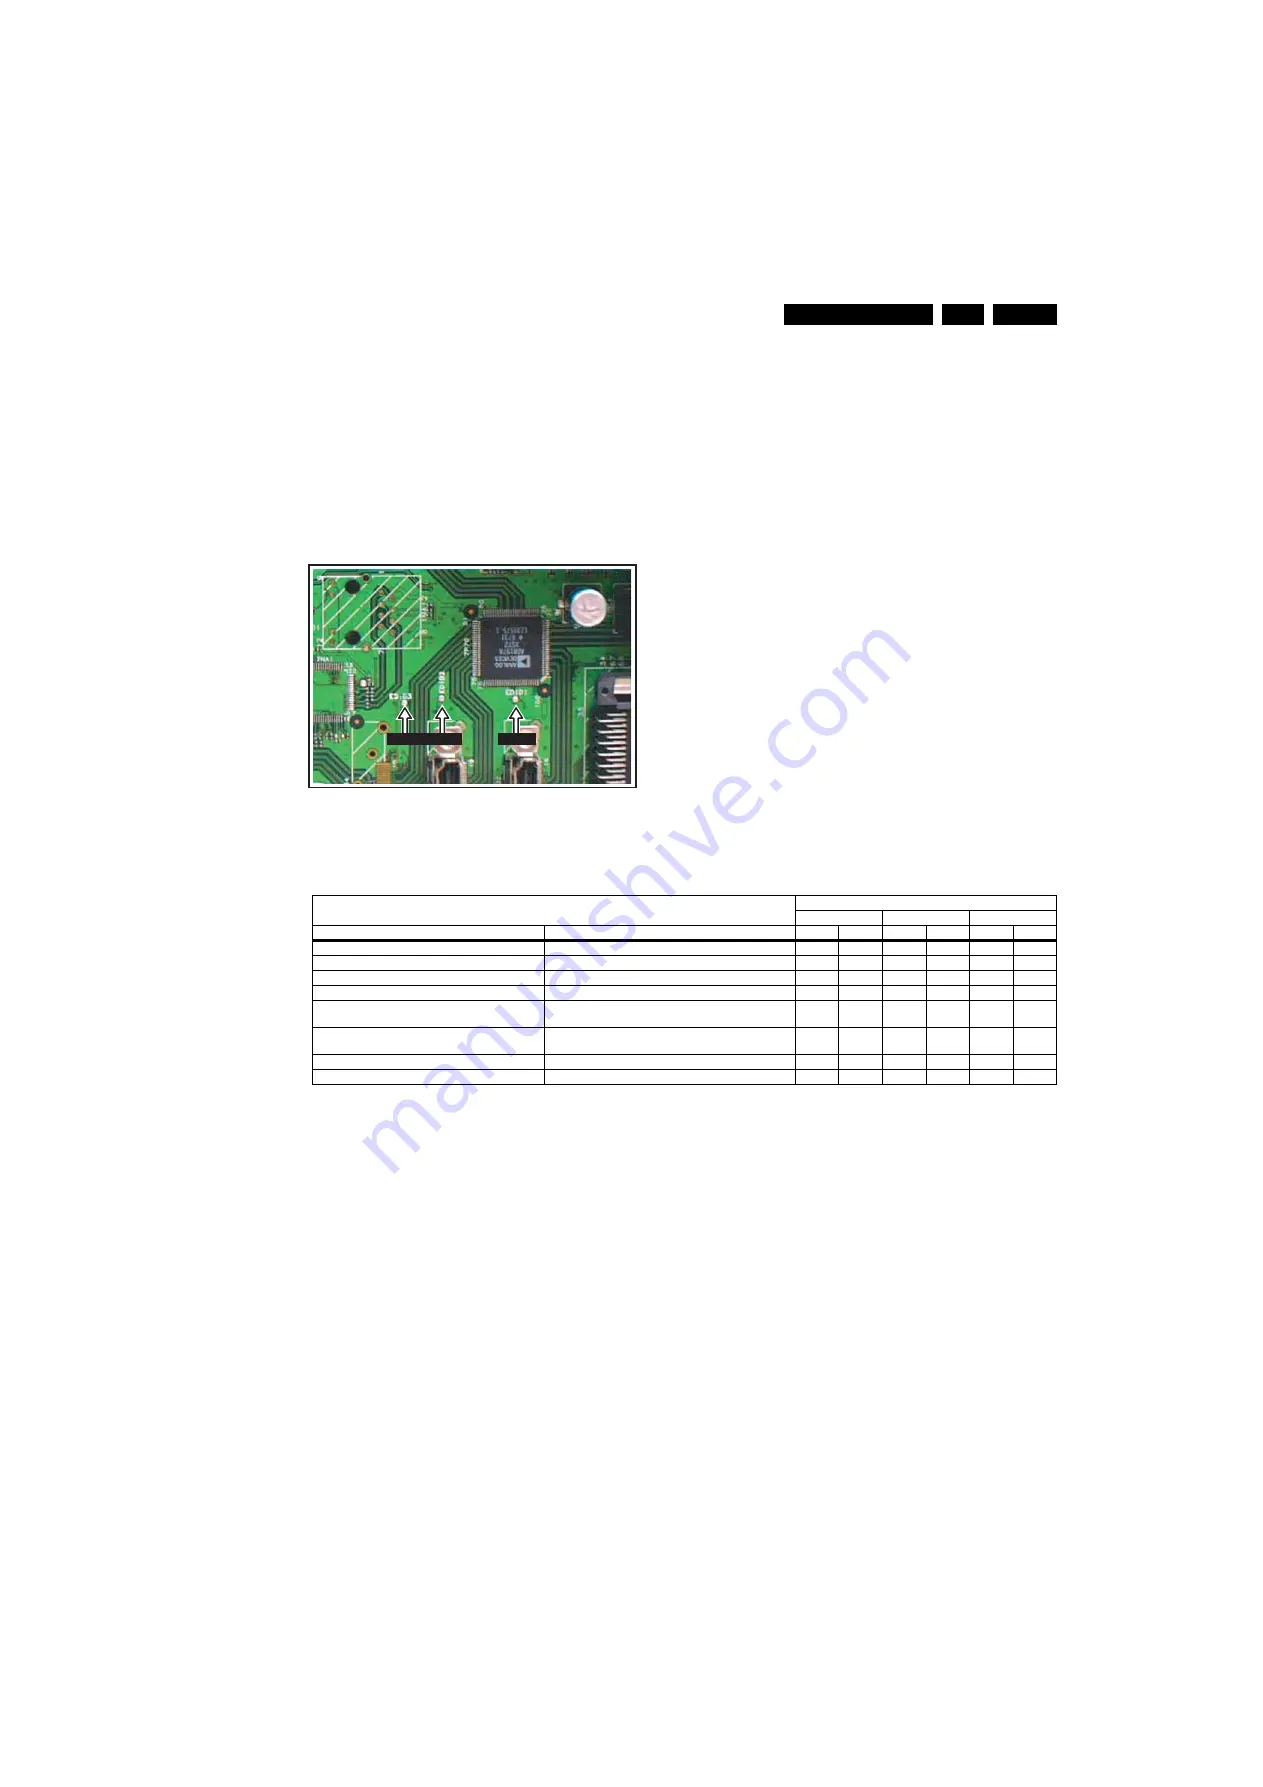
Upgrade EDID NVM
To upgrade the EDID NVM you must short circuit pin 7 of the
EDID NVM to ground. Therefore some test points (EDID1,
EDID2 and EDID3) are foreseen next to the HDMI connectors
(figure “EDID-NVM pins”). See ComPair for further instructions.
Figure 5-13 EDID-NVM pins
5.9
Software Upgrading
5.9.1
Introduction
The set software and security keys are stored in a NAND-
Flash, which is connected to the PNX85xx via the PCI bus.
It is possible
for the user
to upgrade the
main
software via the
USB port. This allows replacement of a software image in a
stand alone set, without the need of an E-JTAG debugger. A
description on how to upgrade the main software can be found
in the DFU.
Important:
When the NAND-Flash must be replaced, a new
SSB must be ordered, due to the presence of the security
keys!!! (copy protection keys, MAC address, ...).
Perform the following actions after SSB replacement:
1.
Set the correct option codes (see sticker inside the TV).
2.
Update the TV software (see the DFU for instructions).
3.
Perform the alignments as described in chapter 8 (section
“Reset of Repaired SSB”).
4.
Check in CSM if the HDMI keys are valid.
5.9.2
Main Software Upgrade
The software image resides in the NAND-Flash, and is
formatted in the following way (refer to figure “NAND-flash
content”):
Table 5-3 NAND flash content
•
The above overview of the NAND Flash shows the content
of the different partitions. It also shows which part of the
one-zip file erases and programs which part of the NAND
Flash.
•
Remark: the above does not mean that you can reprogram
your HDMI keys with the “UpgradeAll.upg” file from the one
zip file. This can only be done in a secure environment (e.g.
the factory).
•
The “UpgradeAll.upg” file is only used in the factory.
•
The “FlashUtils.upg” file is only used by service centra
which are allowed to do component level repair on the
SSB.
Automatic Software Upgrade
In “normal” conditions, so when there is no major problem with
the TV, the main software and the default software upgrade
application can be upgraded with the “AUTORUN.UPG” (FUS
part of the one-zip file: e.g. 3104 337 03801 _FUS _Q582E_
0.37.0.0_commercial.zip). This can also be done by the
consumers themselves, but they will have to get their software
from the commercial Philips website or via the Software Update
Assistant in the user menu (see DFU). The “autorun.upg” file
must be placed in the root of your USB stick.
How to upgrade:
1.
Copy “AUTORUN.UPG” to the root of your USB stick.
2.
Insert USB stick in the side I/O while the set is in ON
MODE. The set will restart and the upgrading will start
automatically. As soon as the programming is finished, you
will get the message that you can remove your USB stick
and restart the set.
Manual Software Upgrade
In case that the software upgrade application does not start
automatically, you can also start it manually.
How to start the software upgrade application manually:
1.
Disconnect the TV from the Mains/AC Power.
2.
Press the “OK” button on a Philips DVD RC-6 remote
control (it is also possible to use the TV remote in “DVD”
mode). Keep the “OK” button pressed while reconnecting
the TV to the Mains/AC Power.
3.
The software upgrade application will start.
Attention!
In case that you have started the download application
manually
, the “autorun.upg” will maybe not be recognized.
What to do in this case:
1.
Create a directory “UPGRADES” on your USB stick.
H_17650_0
8
9.ep
s
16010
8
EDID
3
EDID 2
EDID 1
NAND Flash content
One ZIP
Fuse UPG
Upgrade all UPG
Flash Utils UPG
Partition
Content
Erase
Program Erase
Program Erase
Program
JFFS2 partition 1 (application read write data)
Channel table, EPG data,...
X
X
X
JFFS2 partition 0 (Application read only once data)
HDMI keys, back up display file, …
X
X
JFFS2 partition 0 (Application read only upgradable data) wizard pictures, display file, cabinet file, upgrade assistant, …
X
X
X
SQUASHFS partition
Main software (Mips), Linux structure (root file system)
X
X
X
X
BFFS partition 2 (DVD OK)
Default software upgrade application TriMedia software boot
batch file 2
X
X
X
X
BFFS partition 1 (DVD cursor down)
Back up software upgrade application boot batch file 1
Linux kernel JETT : needed for ComPair
X
X
X
X
BFFS partition 0
Jaguar Boot loader boot batch file 0
X
X
Block 0
μ
BTM partition table
X
Содержание ME8
Страница 11: ...Mechanical Instructions EN 11 Q522 1E LA 4 Figure 4 4 Cable dressing 47 I_17750_057 eps 060608 ...
Страница 37: ...Service Modes Error Codes and Fault Finding EN 37 Q522 1E LA 5 Personal Notes E_06532_012 eps 131004 ...
Страница 38: ...Service Modes Error Codes and Fault Finding EN 38 Q522 1E LA 5 ...


