background image

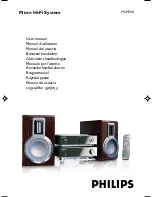
MCM700

Micro Hi-Fi System

User manual
Manuel d'utilisation
Manual del usuario
Benutzerhandücher
Gebruikershandleidingen
Manuale per l'utente
Användarhandböckerna
Brugermanual
Käyttöoppaita
Manual do usuário


pg001-025_MCM700_12-Eng

2007.3.14, 10:39

1

Содержание MCM700/12

Страница 1: ...M700 Micro Hi Fi System User manual Manuel d utilisation Manual del usuario Benutzerhandücher Gebruikershandleidingen Manuale per l utente Användarhandböckerna Brugermanual Käyttöoppaita Manual do usuário ...

Страница 2: ...d red Do not connect either wire to the earth terminal in the plug marked E or e or coloured green or green and yellow Before replacing the plug cover make certain that the cord grip is clamped over the sheath of the lead not simply over the two wires Copyright in the U K Recording and playback of material may require consent See Copyright Act 1956 and The Performer s Protection Acts 1958 to 1972 ...

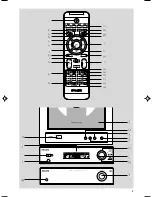
Страница 3: ...3 MICRO SY STEM MCM700 TUNER POWER AMPLIFIER MCM700 6 3 5 7 9 8 2 1 4 º 1 9 0 8 5 ª ...

Страница 4: ...ider gränsen för laserklass 1 Observera Stömbrytaren är sekundärt kopplad och bryter inte strömmen från nätet Den inbyggda nätdelen är därför ansluten till elnätet så länge stickproppen sitter i vägguttaget SF Luokan 1 laserlaite Varoitus Laitteen käyttäminen muulla kuin tässä käyttöohjeessa mainitulla tavalla saattaa altistaa käyttäjän turvallisuusluokan 1 ylittävälle näkymättömälle lasersäteilyl...

Страница 5: ...ish Français Português Español Deutsch Nederlands Italiano Svenska Dansk Suomi Index English 6 Français 26 Español 46 Deutsch 46 Nederlands 86 Italiano 106 Svenska 126 Dansk 146 Suomi 166 Português 186 E 206 ...

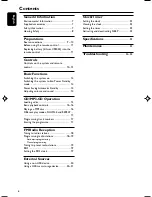
Страница 6: ...ting volume and sound 14 CD MP3 CD Operation Loading a disc 15 Basic playback controls 15 16 Playing an MP3 disc 16 Different play modes SHUFFLE and REPEAT 17 Programming track numbers 17 Erasing the programme 17 FM Radio Reception Tuning to radio stations 18 Programming radio stations 18 19 Automatic programming Manual programming Tuning to preset radio stations 19 RDS 19 Setting the RDS clock 19...

Страница 7: ...icated on the typeplate of your system is identical with the voltage of your local power supply If not please consult your dealer Place the system on a flat hard and stable surface Place the system in a location with adequate ventilation to prevent internal heat build up in your system Allow at least 10 cm 4 inches clearance from the rear and the top of the unit and 5 cm 2 inches from each side Th...

Страница 8: ...re To establish a safe volume level Set your volume control at a low setting Slowly increase the sound until you can hear it comfortably and clearly without distortion Listen for reasonable periods of time Prolonged exposure to sound even at normally safe levels can also cause hearing loss Be sure to use your equipment reasonably and take appropriate breaks Be sure to observe the following guideli...

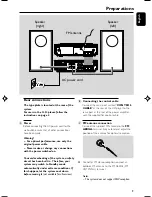
Страница 9: ...tch to Standby mode automatically under extreme conditions If this happens let the system cool down before reusing it not available for all versions B Connecting the control cable Connect the serial port marked CONTROL CABLE at the rear of the CD player to the same port at the rear of the power amplifier with the supplied flat control cable C FM antenna connection Connect the supplied FM antenna t...

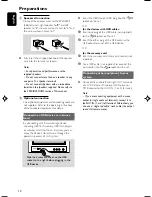
Страница 10: ...s or memory cards to the Hi Fi system you can enjoy the device s stored music through the powerful speakers of Hi Fi system Insert the USB device s USB plug into the socket on the set OR for the devices with USB cables 1 Insert one plug of the USB cable not supplied to the socket on the set 2 Insert the other plug of the USB cable to the USB output terminal of the USB device OR for the memory card...

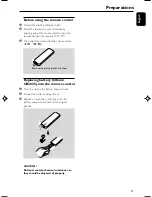
Страница 11: ...ct the desired function for example ÉÅ à á Remove the plastic protective sheet Replacing battery lithium CR2025 into the remote control 1 Press the slot on the battery compartment 2 Pull out the battery compartment 3 Replace a new battery and fully insert the battery compartment back to the original position 1 2 3 CR2025 CAUTION Batteries contain chemical substances so they should be disposed of p...

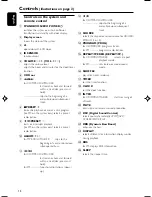
Страница 12: ...USB skips to the beginning of a current previous subsequent album 5 6 for CD MP3 CD WMA USB fast searches back and forward within a track disc press and hold for FM tunes to radio stations down up for CD MP3 CD WMA USB skips to the beginning of a current previous subsequent track SOURCE selects the respective sound source for CD USB FM AUX 1 or 2 PROGRAM PROG for CD MP3 USB programs tracks for FM ...

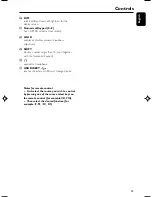
Страница 13: ...udness adjustment ª SHIFT inputs a number larger than 10 used together with the Numerical Keypad º n connects a headphone USB DIRECT jack for the external USB mass storage device Notes for remote control First select the source you wish to control by pressing one of the source select keys on the remote control for example CD FM Then select the desired function for example ÉÅ à á ...

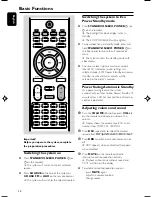
Страница 14: ...vel of 12 interactive sound settings last selected mode ECO Power Standby or normal standby source and tuner presets will be retained in the player s memory Power Saving Automatic Standby As a power saving feature the system automatically switches to Eco Power Standby 15 minutes after a CD has reached the end and no control is operated Adjusting volume and sound 1 Turn the VOLUME knob or press VOL...

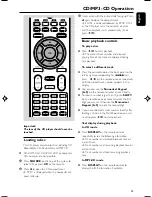
Страница 15: ...u want and then use the Numerical Keypad 0 9 to input the second digit If you have selected a track number shortly after loading a disc or in the PAUSE position you will need to press ÉÅ to start playback Text display during playback In CD mode Press DISPLAY on the remote control repeatedly to see the following information Track number and elapsed playback time of current track Track number and re...

Страница 16: ...rack in the whole disc one by one INTRO appears on the display The playback will start from the first track of the current disc To stop scanning Press INTRO on the remote again until INTRO disappears Playing an MP3 disc 1 Load an MP3 disc The disc reading time may exceed 10 seconds due to the large number of songs compiled into one disc 2 Press ALBUM on the remote to select a desired album 3 Press...

Страница 17: ...y Programming track numbers Program in the STOP position to select and store your disc tracks in the desired sequence If you like store any track more than once Up to 20 tracks can be stored in the memory 1 Press the control knob on the front panel of the system upward corresponding to PROGRAM or press PROG on the remote to enter the programming mode A track number flashes 2 Press the control knob...

Страница 18: ... radio stations will be overridden 1 Press PRESET on the top of the system or on the remote to select the preset number where programming should start Note If no preset number is selected default is preset 1 and all your presets will be overridden 2 Press and hold the control knob on the front panel upward corresponding to PROGRAM or PROG on the remote for more than 2 seconds to activate programmi...

Страница 19: ...uency Setting the RDS clock Some RDS radio station may be transmitting a real clock time at an interval of every minute It is possible to set the clock by using a time signal which is broadcast together with the RDS signal 1 Tune to a RDS station 2 The system will read the RDS time and set the clock automatically Note Some RDS radio station may be transmitting a real time clock at a minute interva...

Страница 20: ...Disc Drive show up on your computer after you plugged the mass storage device into your computer most likely it is MSD compliant and it will work with this micro system b If your Mass storage device required a battery power source Please make sure you have a fresh battery in it or charge the USB device first and then plug it into the micro system again Supported Music type a This device only suppo...

Страница 21: ... Notes If you have not organized MP3 WMA files into any albums on your disc an album 01 will be automatically assigned for all those files Make sure that the file names of MP3 files end with mp3 and the file names ofWMA files end with wma For DRM protectedWMA files useWindows Media Player 10 or later for conversion Visit www microsoft com for details aboutWindows Media Player andWM DRM Windows Med...

Страница 22: ...ssed within 30 seconds the system will exit timer setting mode automatically 1 Press and hold TIMER on the remote control until the time flashes on the display SET TIMER is displayed briefly Then the hour digits flash on the display screen 2 Turn VOLUME clockwise or anticlockwise or press VOL on the remote to set the hours 3 Press TIMER to confirm The minute digits flash on the display screen 4 Tu...

Страница 23: ...tput power 2 x 80 W RMS Signal to noise ratio 70 dBA Frequency response 20 Hz 20 KHz 3 dB Input sensitivity AUX 0 5V max 2 V Impedance loudspeakers 4 Ω Impedance headphones 32 Ω Output power headphones 50 mW CD PLAYER Frequency range 20 Hz 20 kHz Signal to noise ratio 70 dBA TUNER FM wave range 87 5 108 MHz Sensitivity at 75 Ω FM 20dBf Selectivity 25 dB Total harmonic distortion 1 Frequency respon...

Страница 24: ... at the lens has cleared Replace or clean the disc see Maintenance Use a finalised CD RW or correct format disc Increase the distance between the Micro HiFi System and yourTV orVCR Hang up one end of theT shape antenna and keep the other end at horizontal angle to it Remove and reconnect the AC power plug and switch on the system again Adjust the volume Disconnect the headphones Check that the spe...

Страница 25: ...es on the USB device are not displayed DEVICE NOT SUPPORTED scrolls on the display Check if the number of folders exceeds 99 or the number of titles exceeds 400 Remove the USB mass storage device or select another source Problem Solution ...

Страница 26: ...English Français Português Español Deutsch Nederlands Italiano Svenska Dansk Suomi Polski Printed in China MCM700 PDCC JS JW 0711 Meet Philips at the Internet http www philips com ...

Отзывы: