background image

11

3

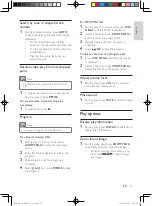
  Insert one lithium CR2025 battery with 

correct polarity (+/-) as indicated.

4

  Close the battery compartment.

Note

Before you press any function button on the 


remote control, first select the correct source 

with the remote control.

Turn on
1

  Press  .

The unit switches to the last selected 


»

source.

Switch to standby mode

1

  Press   again.

Find the correct viewing 

channel
1

  Press   to turn on the unit.

2

  Press 

SOURCE

 repeatedly to select the 

disc source.

3

  Turn on the TV and switch to the correct 

video-in channel in one of the following 

ways:

Go to the lowest channel on your 

• 

TV, then press the Channel Down 

button until you see the blue screen.

Press the source button repeatedly 

• 

on the remote control of your TV. 

Tip

The video-in channel is between the lowest 


and highest channels and may be called 

FRONT, A/V IN, VIDEO etc. See the TV user 

manual on how to select the correct input on 

the TV.

4  Get started

Caution

Use of controls or adjustments or 


performance of procedures other than herein 

may result in hazardous radiation exposure or 

other unsafe operation.

Always follow the instructions in this chapter in 

sequence.

If you contact Philips, you will be asked for the 

model and serial number of this apparatus. The 

model number and serial number are on the 

bottom of the apparatus. Write the numbers 

here: 

Model No. __________________________

Serial No. ___________________________

Activate demonstration mode

You can see an overview of all features.

1

  In standby mode, press   on the main 

unit to activate the demonstration mode.

A demonstration of major available 


»

features starts.

To deactivate the demonstration mode:

1

  Press   on the main unit again.

Prepare the remote control

Caution

Risk of explosion! Keep batteries away from 


heat, sunshine or fire. Never discard batteries 

in fire.

For first-time use: 

1

  Remove the protective tab to activate the 

remote control battery.

2

  Open the battery compartment.

English

EN

MCD110_94_UM_EN_V1.0.indd   11

10/28/2009   1:40:03 PM

Содержание MCD110

Страница 1: ...MCD110 Register your product and get support at www philips com welcome EN User manual MCD110_94_UM_EN_V1 0 indd 1 10 28 2009 1 39 53 PM ...

Страница 2: ...t s in the box 7 Overview of the main unit 7 Overview of the remote control 7 3 Connect 9 ConnectTV 9 Connect power 10 4 Get started 11 Activate demonstration mode 11 Prepare the remote control 11 Turn on 11 Find the correct viewing channel 11 Select the correctTV system 12 Change system menu language 12 Turn on Progressive Scan 12 5 Play 13 Play a disc 13 Play from USB 14 Play MP3 WMA picture fil...

Страница 3: ...oisture does not operate normally or has been dropped n Battery usage CAUTION To prevent battery leakage which may result in bodily injury property damage or damage to the unit Install all batteries correctly and as marked on the unit Do not mix batteries old and new or carbon and alkaline etc Remove batteries when the unit is not used for a long time 1 Important Safety This bolt of lightning indi...

Страница 4: ...he double D symbol are trademarks of Dolby Laboratories o Apparatus shall not be exposed to dripping or splashing p Do not place any sources of danger on the apparatus e g liquid filled objects lighted candles q This product may contain lead and mercury Disposal of these materials may be regulated due to environmental considerations For disposal or recycling information please contact your local a...

Страница 5: ...ices enjoy audio from discs or USB devices view pictures from discs or USB devices The unit supports these media disc formats You can play DVD discs with the following region codes DVD region code Countries India Recordable ReWritable The USB IF Logos are trademarks of Universal Serial Bus Implementers Forum Inc This apparatus includes this label Note The type plate is located on the bottom of the...

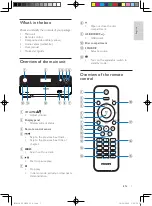
Страница 6: ...in unit Remote control Composite video cable yellow Audio cables red white User manual Quick start guide Overview of the main unit a VOLUME Adjust volume b Display panel Display current status c Remote control sensor d Skip to the previous next track Skip to the previous next title or chapter e Search within a track f Start or pause play g Stop play In demo mode activate or deactivate demonstratio...

Страница 7: ...CE Select a source c MUTE Mute or restore volume d SLOW ANGLE For menus navigate up down Rotate or invert pictures SLOW For video select a slow play mode ANGLE Select a DVD camera angle e For menus navigate left right Move an enlarged image left right Rotate or invert pictures Search within a track f OK Start or pause play Confirm a selection g SYSTEM MENU Access or exit the system setup menu h St...

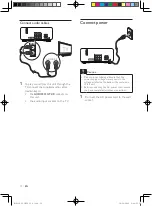
Страница 8: ... the TV Option 3 Connect through composite video 1 Connect the supplied composite video cable to the VIDEO OUT socket on this unit the video input socket on the TV 3 Connect Connect TV Connect video cables With this connection you can watch video from the unit on the TV screen You can select the best video connection that your TV supports Option 1 connect through component video for a standard TV ...

Страница 9: ...re connecting the AC power cord ensure you have completed all other connections 1 Connect the AC power cord to the wall socket Connect audio cables 1 To play sound from this unit through the TV connect the supplied audio cables red white to the AUDIO OUT L R sockets on this unit the audio input sockets on the TV EN MCD110_94_UM_EN_V1 0 indd 10 10 28 2009 1 40 02 PM ...

Страница 10: ...e TV 4 Get started Caution Use of controls or adjustments or performance of procedures other than herein may result in hazardous radiation exposure or other unsafe operation Always follow the instructions in this chapter in sequence If you contact Philips you will be asked for the model and serial number of this apparatus The model number and serial number are on the bottom of the apparatus Write ...

Страница 11: ...Press to select Video Setup in the menu then press 7 Select Component Video then press 8 Select P Scan then press OK The progressive setup is complete Select the correct TV system Change this setting if the video does not appear correctly By default this setting matches the most common setting forTVs in your country 1 Press SYSTEM MENU 2 Select Video Setup 3 Select TV System and then press 4 Selec...

Страница 12: ...lect a subtitle language on DVDs During play press SUBTITLE Note For some DVDs the language can only be changed from the disc menu Press DISC MENU to access the menu 5 Play Note With some disc file types play may differ Play a disc Caution Never look at the laser beam inside the unit Risk of product damage Never play discs with accessories such as disc stabilizer rings or disc treatment sheets Nev...

Страница 13: ...ect repeat shuffle play options 1 During play press MODE repeatedly to select a repeat option or the shuffle play mode To resume normal play press MODE repeatedly until OFF is displayed Search forward backward 1 During play press repeatedly to select a search speed To resume play at normal speed press Play from USB Note Ensure that the USB device contains playable music pictures or video 1 Insert ...

Страница 14: ...hen the image is zoomed in you can press to pan through the image Search by time or chapter track number 1 During video audio play press GOTO until a time field or chapter track field is displayed For the time field enter the play position in hours minutes and seconds For the chapter track field enter the chapter track Play starts automatically at your selected point Resume video play from last st...

Страница 15: ...se Slow motion play 1 During video play press SLOW repeatedly to select a slow play option The sound is muted To resume play at normal speed press OK Change the audio channel Note This feature is only available for VCD play 1 During play press AUDIO repeatedly to select an audio channel available on the disc Mono Left Mono Right Stereo Select a camera angle Note This feature is only available for ...

Страница 16: ... 4 3 screen TV wide screen display with black bars on the top and bottom of the screen 4 3 Letter Box LB 4 3 Pan Scan PS 16 9 Wide Screen 6 Adjust settings 1 Press SYSTEM MENU 2 Select a setup page 3 Select an option and then press 4 Select a setting and then press OK To return to the previous menu press To exit the menu press SYSTEM MENU General setup On the General Setup page you can set the fol...

Страница 17: ...display ratio 16 9 Picture Settings Select a predefined set of picture color settings or customize your personal setting Standard original color setting Bright vibrant color setting Soft warm color setting Personal customize the color setting Adjust the level of brightness contrast sharpness tint and color saturation Component Video Set the video output according to the video connection If the com...

Страница 18: ...C DLF M3U PLS WAV Non English Album Title name Discs recorded in Joliet format MP3 Pro and MP3 with ID3 tag 7 Product information Note Product information is subject to change without prior notice Specifications Disc Laser Type Semiconductor Disc Diameter 12cm 8cm Video Decoding MPEG 1 MPEG 2 Video DAC 12Bits Signal System PAL NTSC Video Format 4 3 16 9 Video S N 48dB Audio DAC 24Bits 96kHz Total ...

Страница 19: ...Check the video connection Turn on the TV to the correct Video In channel Progressive scan is activated but the TV does not support progressive scan USB playability information Compatible USB devices USB flash memory USB 2 0 or USB1 1 USB flash players USB 2 0 or USB1 1 memory cards requires an additional card reader to work with this apparatus Supported formats USB or memory file format FAT12 FAT...

Страница 20: ...display format The aspect ratio if fixed on the loaded DVD disc The aspect ratio may not be changed for some TV systems No sound or poor sound Adjust the volume Check that the audio cables red white are connected correctly Remote control does not work Before you press any function button first select the correct source with the remote control instead of the main unit Reduce the distance between th...

Страница 21: ... 2009 Koninklijke Philips Electronics N V All rights reserved MCD110_94_UM_V1 0 MCD110_94_UM_EN_V1 0 indd 28 10 28 2009 1 40 09 PM ...

Отзывы: