background image

PCS 104 684

3-7

INSTRUCTIONS FOR USE

Tape Operation/Recor

ding

Micr

ophone Mixing

Connect 

microphone 

(not 

supplied) 

to 

the

system 

allo

wing 

you 

to 

sing 

along 

with 

the 

m

usic

source

.

1

Connect a microphone to the MIC


jack.

l

Before 

connecting 

the 

microphone

, press 

MIC/

ECHO 

to set the microphone volume to the

minim

um 

lev

el 

to 

prev

ent 

ho

wling 

sound 

(ref

er

to 

“MIC 

Volume and Echo

” page 17).

2

Select 

VCD

 and press 

2

Å

to star

t playback.

3

Adjust the volume lev

el of the source with

V

OLUME

 control.

4

Press 

MIC/ECHO 

to 

adjust 

the 

MIC 

and

ECHO lev

el to the desired mixing level.

Karaok

e

MIC

5

Star

t singing or talking through the microphone

.

Notes: –

Keep the micr

ophone away fr

om the speak

ers to

pr

event 

ho

wling.

Micr

ophone 

mixing 

only 

available 

in 

CD/VCD

mode

.

Note: –

Dur

ing 

recor

ding,

 it 

is 

not 

possible 

to 

chang

e

tape direction or listen to another source

.

Recor

ding 

timer

To record a r

adio station from a specif

ied time

,

you will need to use a preset radio station and to set a star

t (ON) and f

inish (OFF) time

.

1

Load a recordab

le tape into the tape deck.

If desired,

 select tape rever

se mode option.

2

Follo

w the 

TIMER SETTING

” procedure as

descr

ibed on 

pa

ge 21

 to store the star

ting and

finishing time for recording.

  Select 

REC TU

” a

s

the 

wak

up 

source 

for 

timer 

recording.

Note: –

If the system is switched on at the preset time

,

the recor

ding will not be made

.

Clock/Timer

Vie

clock

The 

clock 

(if 

it 

is 

set) 

will 

be 

sho

wn 

in 

Standb

y

mode

.

To view the clock in an

y sour

ce mode

(VCD 

or 

TUNER 

for 

example)

l

Press 

CLOCK

.

The clock will be display

ed for a f

ew seconds.

If the clock has not been set, "

24 HOUR

" or

"

12 HOUR

" will star

t flashing.

Clock 

setting

The 

clock 

can 

be 

set 

in 

either 

12- 

or 

24-hour

mode

, for 

example 

"

AM 

12:00

" or "

00:00

".

1

Press 

CLOCK

 to 

select 

clock 

mode

.

2

Press 

PROGRAM

 to select clock setting mode

.

"

24 HOUR

" or "

12 HOUR

" will star

t flashing.

3

Press  

S

 or 

T

 to select 12- and 24- hour

mode

.

4

Press 

PROGRAM

 to 

conf

irm 

the 

selection.

The 

hour 

indication 

will 

star

t flashing.

5

Press  

S

 or 

T

 to set the hour

s.

6

Press 

PROGRAM

 to 

conf

irm 

the 

selection.

The minutes indication will star

t flashing.

7

Press  

S

 or 

T

 to set the minutes.

8

Press 

PROGRAM

 to 

store 

the 

setting

The clock will star

t w

or

king.

l

To exit without stor

ing the setting,

 press 

Ç

 on

the system.

Notes: –

The 

cloc

setting 

will 

be 

er

ased 

when 

the 

po

wer

cor

d is disconnected or if a po

wer failur

e occurred.

Dur

ing c

lock setting,

 if no button is pressed

within 

seconds

, the 

system 

will 

exit 

cloc

setting

mode 

automatically

.

CLOCK

TIMER ON/OFF

SET

OPEN/ CLOSE

STEREO/ VOCAL

O

S

D/D

IM

iR

 SENSOR

SHUFFLE

 REV.

MODE

BAND

RECORD

PROGRAM

MIC

REPEAT

•DEMO

STOP

•CLEAR

SEARCH

•TUNING

VOLUME

ST

ANDBY ON

MC

-55 

VIDEO 

CD 

MICR

SY

STEM

DIGITAL 

SOUND

CONTROL

4  

PRESET 

DIRECTION

PLAY

•PAUSE

1

2

3

VCD

TUNER 


TAPE    

Timer 

setting

The 

system 

can 

switch 

on 

to 

VCD

, TUNER 

or

TAPE mode automaticall

y at a preset time

,

ser

ving as an alar

m to wake y

ou up

.

IMPOR

TANT!

Before setting the timer

, ensure that the

clock is set correctly

.

The 

timer 

will 

not 

star

t at 

the 

pr

eset

time if the system is switched on in one of the source mode (VCD,

 TUNER,

 for

example). –

The 

timer 

can 

only 

be 

activ

ated 

fr

om

Standb

mode

.

1

Press and hold 

TIMER ON/OFF (SET)

 for

more 

than 

seconds 

to 

select 

timer 

setting

mode

.

TIMER


will 

appear 

on 

the 

displa

y.

l

Press  

S

 or 

T

 repeatedly to view the

previous setting.

2

Press 

PROGRAM

 to change the previous

setting 

or 

star

t a 

new 

setting.

"

TUNER

", "

TAPE

", "

CD

" or "

REC TU

" will star

t

flashing.

3

Press  

S

 or 

T

 to select the desired source

.

4

Press 

PROGRAM

 to 

conf

irm 

the 

selection.

l

If "

TUNER

" or "

REC TU

" is selected, press

TUNER

 to 

select 

the 

cur

rent 

radio 

station 

or

press  

S

 or 

T

 to select a desired preset

radio 

station.

"

VOL

" and 

the 

volume 

lev

el 

will 

star

t flashing.

5

Press  

S

 or 

T

 to 

set 

the 

volume 

lev

el.

6

Press 

PROGRAM

 to 

conf

irm 

the 

setting.

ON


and the hour indication will star

t flashing.

7

Set the time to star

t playback.

Press 

S

 or 

 to set timer star

t hour

s and

press 

PROGRAM 

to 

store 

the 

setting 

and

repeat the same procedure to set the minutes.

OFF


and the hour indication will star

t flashing.

8

Set the time to stop playback follo

wing the

abov

e procedure

.

"

TIMER OK

" will 

be 

displa

br

iefly 

and 

the

timer 

is 

no

set.

9

Switch the system to standby mode

.

l

When 

reached 

the 

preset 

timer

, the 

selected

source will pla

y if the timer has been activated.

Содержание MC-55

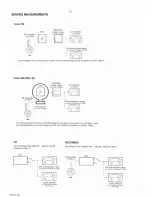
Страница 1: ... 104 676 Printed in The Netherlands Copyright reserved Subject to modification Micro System TABLE OF CONTENTS chapter Handling chip components and safety 1 1 MC 55 21M Technical Specification Service Tools 2 1 Service Measurement 2 2 Connections Controls 3 1 Instructions for use 3 2 to 3 8 Block Diagram 4 1 to 4 2 Wiring Diagram 5 1 circuit diagram 6 1 FRONT BOARD layout diagram 6 2 circuit diagra...

Страница 2: ... essere collegato allo stesso potenziale che quello della massa delápparecchio tramite un braccialetto a resistenza Assicurarsi che i componenti e anche gli utensili con quali si lavora siano anche a questo potenziale Safety regulations require that the set be restored to its original condition and that parts which are identical with those specified be used Safety components are marked by the symb...

Страница 3: ...44 13999 AVAILABLE ESD PROTECTION EQUIPMENT AMPLIFIER Output power 2 x 12 W RMS 500 W PMPO Signal to noise ratio 60 dBA IEC Frequency response 80 15000 Hz 3 dB Microphone input sensitivity 3 5 mV Output impedance 8 W 1 8 W 1 kHz 10 THD DISC PLAYER Number of programmable tracks 20 Frequency response 20 20000 Hz Signal to noise ratio 60 dBA Channel separation 40 dB Total harmonic distortion 0 6 MPEG...

Страница 4: ......

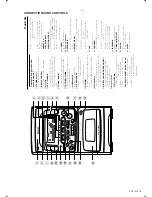
Страница 5: ...elect the desired sound effect POP CLASSIC ROCK JAZZ or FLAT to switch on off BASS mode Mode Selection STOP CLEAR 9 for CD VCD MP3 CD to stop playback or to clear a programme for Tuner to stop programming for Tape to stop playback or recording SEARCH TUNING S T à á for MP3 CD only to select previous next album or track for CD VCD to search backward forward or to skip to the previous next track dur...

Страница 6: ......

Страница 7: ...r of songs compiled into one disc CD VCD MP3 CD Playing a normal disc 1 Press 2Å to start playback The track number and elapsed playing time of the current track appear on the display l To interrupt playback press 2Å The playing time will start flashing l To resume playback press 2Å again 2 To stop playback press 9 Selecting a desired track passage To select a desired track l Press S or T repeated...

Страница 8: ...unction is set on will disable all the Repeat play modes If the Repeat function is enable and the Stop button is pressed will disable all the Repeat play modes In programme mode you can only select Repeat 1 or Repeat All function CD VCD MP3 CD VIDED CD VCD TUNER TAPE OSD REPEAT PROGRAM RECORD NTSC PAL PBC RETURN GOTO A B RESUME VOLUME SLOW FRAME VIEW DSC Å Ñ É Å SLEEP STOP 1 2 3 VOCAL 4 5 6 MIC EC...

Страница 9: ...t be switched off 1 Press VIEW on the remote control On TV screen 9 pictures will be displayed To view the previous next page press S or T The first 20 seconds of each track will be played 2 To exit review mode press digits 0 9 10 to playback the desired track or 2Å to play the current selected track Return l Press RETURN on the remote control to return to the previous VCD disc MENU level It is fu...

Страница 10: ...layback 1 Press TAPE to select Tape mode 2 Press Å1 or 2Å to select the direction for playback PLAY with playback direction indicator will appear on the display l To interrupt playback press the last selected Å1 or 2Å button PAUSE will be displayed l To resume playback press Å1 or 2Å again 3 To stop playback press 9 Auto Reverse l Press REV MODE TAPE repeatedly to select the different playback mod...

Страница 11: ...utes indication will start flashing 7 Press S or T to set the minutes 8 Press PROGRAM to store the setting The clock will start working l To exit without storing the setting press Ç on the system Notes The clock setting will be erased when the power cord is disconnected or if a power failure occurred During clock setting if no button is pressed within 5 seconds the system will exit clock setting m...

Страница 12: ...ation at the lens has cleared Replace or clean the disc see Maintenance Use a readable disc or correct recorded format MP3 CD No picture on TV screen Connect the cable betwen the system and TV No colour on TV Change the system to the respective PAL or NTSC setting RADIO RECEPTION Radio reception is poor If the signal is too weak adjust the antenna or connect an external antenna for better receptio...

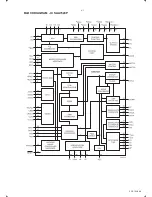
Страница 13: ...PCS 104 686 4 1 BLOCK DIAGRAM IC SAA7324P ...

Страница 14: ...BLOCK DIAGRAM 4 2 PCS 104 687 ...

Страница 15: ...WIRING DIAGRAM 5 1 5 1 PCS 104 688 ...

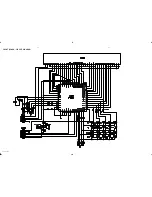
Страница 16: ...FRONT BOARD CIRCUIT DIAGRAM 6 1 6 1 PCS 104 689 ...

Страница 17: ...FRONT BOARD LAYOUT DIAGRAM 6 2 6 2 PCS 104 690 ...

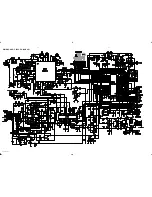
Страница 18: ...MAIN BOARD CIRCUIT DIAGRAM 7 1 7 1 PCS 104 691 ...

Страница 19: ...MAIN BOARD LAYOUT DIAGRAM 7 2 7 2 PCS 104 692 Component Side Copper Side ...

Страница 20: ...POWER SUPPLY BOARD CIRCUIT DIAGRAM 8 1 8 1 PCS 104 693 ...

Страница 21: ...POWER SUPPLY BOARD CIRCUIT DIAGRAM 8 2 8 2 PCS 104 694 ...

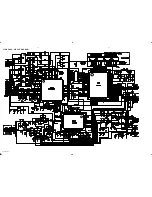
Страница 22: ...VCD BOARD CIRCUIT DIAGRAM 9 1 9 1 PCS 104 695 ...

Страница 23: ...VCD BOARD LAYOUT DIAGRAM 9 2 9 2 PCS 104 696 Top View Bottom View ...

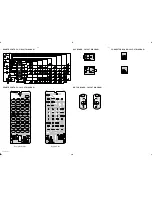
Страница 24: ...REMOTE CONTROL CIRCUIT DIAGRAM REMOTE CONTROL LAYOUT DIAGRAM 10 1 10 1 PCS 104 697 Component Side Copper Side MIC BOARD LAYOUT DIAGRAM MOTOR BOARD LAYOUT DIAGRAM CONNECTOR BOARD LAYOUT DIAGRAM ...

Страница 25: ...7 4822 462 10964 Rubber Foot 31 4822 492 11457 Compress Spring Eject Cam 8 9965 000 07202 Open Keys 32 4822 402 10795 Latching Cam 9 4822 492 11458 Cass Tape Spring 34 9965 000 07218 Logic Tape Deck CRL44 25 10 9965 000 07203 Decoration Key Cover 39 9965 000 07219 Top Cover 11 9965 000 07204 FTD Display Lens 40 9965 000 07220 CD VCD Window 12 9965 000 07205 CD VCD Door 42 9965 000 07221 CD Deck TC...

Страница 26: ...NICAL PARTSLIST TAPE DECK 1 9965 000 07438 HD Holder Assy 32 9965 000 07439 Bobbin Assy 34 9965 000 07440 Motor Assy 36 9965 000 07441 Belt SR 37 9965 000 07442 Belt FR 40 7 9965 000 07443 Box SW Note Only these parts meioned in the list are normal service part ...

Страница 27: ...07235 AM IF Coil T106 9965 000 07235 AM IF Coil Q301 4822 130 10974 Trans 2SB1240Q X101 9965 000 07229 Crystal 75 kHz Q302 4822 130 41198 Trans 2SC945P Q303 4822 130 10974 Trans 2SB1240Q X301 9965 000 07230 Crystal 12 072 MHz Q304 4822 130 41198 Trans 2SC945P Q305 9965 000 07248 Trans 8050D DIODES Q306 4822 130 63423 Trans 8550C D101 4822 130 30621 Diode 1N4148 Q307 9965 000 07248 Trans 8050D D102...

Страница 28: ...5 000 07258 Zener 3 9V 0 5W ZD503 4822 130 10971 Diode UZ9 1W SW406 4822 276 13893 Push Switch EVQJAE05R SW407 4822 276 13893 Push Switch EVQJAE05R IC TRANSISTORS SW408 4822 276 13893 Push Switch EVQJAE05R SW409 4822 276 13893 Push Switch EVQJAE05R IC501 9352 641 80557 IC SAA7324H M2B SW410 4822 276 13893 Push Switch EVQJAE05R IC502 9965 000 07259 IC TDA7073 N4 IC503 9965 000 07259 IC TDA7073 N4 S...

Страница 29: ... D917 4822 130 31438 Diode 1N4001G D918 4822 130 31438 Diode 1N4001G Z901 4822 130 10971 Diode UZ9 1W IC TRANSISTORS IC901 4822 209 70084 IC NJM7812A IC902 4822 209 83824 IC NJM7805FA Q901 4822 130 10974 Trans 2SB1240Q Q902 4822 130 41198 Trans 2SC945P Q903 4822 130 41198 Trans 2SC945P Q904 4822 130 10974 Trans 2SB1240Q Q905 4822 130 41198 Trans 2SC945P Q906 4822 130 10803 Trans KTD2058Y MISCELLAN...

Отзывы: