background image

GENERAL INFORMATION ON RECORDING

• Recording is permissible insofar as copyright or other

rights of third parties are not infringed.

• This deck is not suited for recording on CHROME (IEC 

II

)

or METAL (IEC 

IV

) type cassettes. For recording, use

only NORMAL type cassettes (IEC type 

I

) on which the

tabs have not yet been broken.

• The best recording level is set automatically. Altering

the VOLUME, INCREDIBLE SURROUND, DBB or
INTERACTIVE SOUND controls will not affect the
recording in progress.

• At the very beginning and end of the tape, no recording

will take place during the 7 seconds when the leader
tape passes the recorder heads.

• To protect a tape from accidental erasure, have the tape

in front of you and break out the left tab. Recording on
this side is no longer possible. If, however, you wish to
record over this side again, cover the tabs with a piece
of adhesive tape.

Synchro Start CD recording

1

Select CD source.

2

Insert a CD and if desired, programme track numbers.

3

Press STOP•OPEN to open the cassette door.

4

Insert a suitable tape into the cassette deck and close
the cassette door.

5

Press RECORD to start recording.
– Playing of the CD programme starts automatically

from the beginning of the CD/programme after 7
seconds. It is not necessary to start the CD player
separately.

To select and record a particular passage within a
track:

• Press and hold down on PREV 

¡1

or NEXT 

2™

(on the

remote control 

5

or 

6

).

• When you recognize the passage you want, release

PREV 

¡1

or NEXT 

2™

.

• To interrupt CD playback press PLAY•PAUSE 

2;

(on the

remote control SIDE/ 

;

).

• Recording will begin from this exact point in the track

when you press RECORD.

6

For brief interruptions during recording, press PAUSE. To
resume recording, press PAUSE again.

7

To stop recording, press STOP•OPEN.

Recording from the Radio

1

Tune to the desired radio station (see Tuning to radio
stations).

2

Press STOP•OPEN to open the cassette door.

3

Insert a suitable tape into the cassette deck and close
the cassette door.

4

Press RECORD to start recording.

5

For brief interruptions, press PAUSE. To resume
recording, press PAUSE again.

6

To stop recording, press STOP•OPEN.

Recording from AUX

1

Select AUX source.

2

If necessary, prepare the additional appliance for
recording.

3

Press RECORD to start recording.

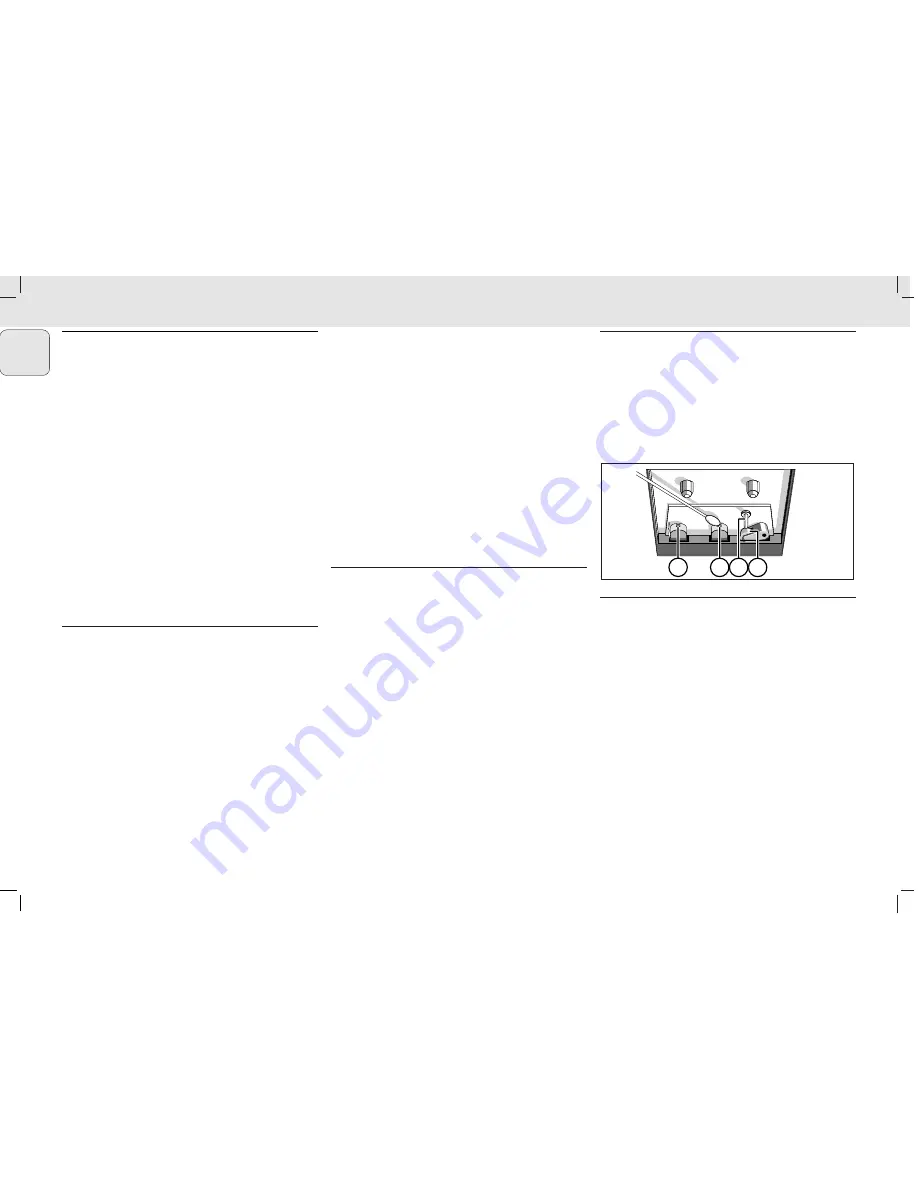
Tape deck maintenance

To ensure quality recording and playback of the tape deck,
clean parts  

A

,  

B

and  

C

shown in the diagram

below, after approx. 50 hours of operation, or on average
once a month. Use a cotton bud slightly moistened with
alcohol or a special head cleaning fluid to clean the deck.

1

Open the cassette door by pressing STOP•OPEN.

2

Press PLAY 

2

and clean the rubber pressure roller

C

.

3

Press PAUSE and clean the magnetic heads 

A

, and

also the capstan 

B

.

4

After cleaning, press STOP•OPEN.

Note: Cleaning of the heads can also be done by playing a

cleaning cassette through once.

A

A B C

12

MC 118 / 22  page 12

English

Содержание MC 118

Страница 1: ... DSC INTERACTIVE SOU ND STANDB Y ON TIMER ON OFF PROGRAM SELECT VOLUME INCR EDIB LE SURR OUN D DBB DSC INTERACTIVE SOU ND STANDB Y ON TIMER ON OFF PROGRAM SELECT RECO RD PLAY STO P OPEN PAU SE PLAY STO P OPEN PAU SE RDS CLOCK SHUFFLE REPEAT BA ND IR SENS OR RDS CLOCK SHUFFLE REPEAT BA ND IR SENS OR INCREDIBLE SURROUND INCREDIBLE SURROUND CD TA PE TU NE R TIM ER AU X SL EE P DB B DS C INC SU RR MU ...

Страница 2: ...blue neutral N brown live L As these colours may not correspond with the colour markings identifying the terminals in your plug proceed as follows Connect the blue wire to the terminal marked N or coloured black Connect the brown wire to the terminal marked L or coloured red Do not connect either wire to the earth terminal in the plug marked E or e or coloured green or green and yellow Before repl...

Страница 3: ...ER ON OFF PROGRAM SELECT RECO RD PLAY STO P OPEN PAU SE PLAY STO P OPEN PAU SE RDS CLOCK SHUFFLE REPEAT BA ND IR SENS OR INCREDIBLE SURROUND 1 3 4 2 7 9 6 5 8 0 AM aerial FM aerial 75Ω speaker 8Ω RIGHT RIGHT LEFT AUXin L R 3 CONTROLS AND CONNECTIONS CD TAPE TUNER TIMER AUX SLEEP DBB DSC INC SURR MUTE REPEAT PROGRAM SHUFFLE 2 9 K J 5 6 SIDE NEW S TA VOLUME ...

Страница 4: ...t PAUSE interrupts recording or playback SHUFFLE plays CD tracks in random order Back panel AM AERIAL connect the supplied AM frame aerial here FM AERIAL 75 Ω connect the supplied aerial wire or an antenna wall connection here SPEAKERS 8 Ω connect the supplied speakers here p 3 5 mm stereo headphone socket AC MAINS after all other connections have been made connect the mains lead to the wall socke...

Страница 5: ...a long time Batteries contain chemical substances so they should be disposed of properly Speaker connections The speaker terminals are click fit connectors Use them as shown below Connect the unmarked wire to the red terminal and the marked black wire to the black terminal When headphones are inserted into the headphone socket the speakers are disconnected Mains 1 Check if the mains voltage as sho...

Страница 6: ...ws if activated Note The effect of INCREDIBLE SURROUND may vary with different types of music 5 Press MUTE on the remote control to interrupt sound reproduction instantly Playback will be continued without sound and the display shows MUTE To reactivate sound reproduction you can press MUTE again adjust the volume controls CLOCK Setting the clock There are two possible methods for setting the clock...

Страница 7: ...ed During playback to select and activate your desired sleep time press SLEEP on the remote control once or more Display shows SLEEP and one of the sleep time options in sequence 60 45 30 15 SLEEP OFF 60 if you have selected a time Once SLEEP is activated SLEEP ON scrolls across the display at repeated intervals To deactivate press SLEEP on the remote control once or more until SLEEP OFF is shown ...

Страница 8: ... entire CD programme continuously in random order REPEAT ALL repeats the entire CD programme REPEAT plays the current track continously 1 To select your play mode press the SHUFFLE or REPEAT button before or during playback until the display shows the desired function 2 Press PLAY PAUSE 2 on the remote control 2 to start playback if in the STOP position If you have selected SHUFFLE playback starts...

Страница 9: ...lways keep the CD compartment closed to avoid dust on the lens To take a CD out of its box press the centre spindle while lifting the CD Always pick up the CD by the edge and return the CD to its box after use to avoid scratching and dust To clean the CD wipe in a straight line from the centre towards the edge using a soft lint free cloth Do not use cleaning agents as they may damage the disc Neve...

Страница 10: ...sired preset station is displayed Changing tuning grid some versions only In North and South America the frequency step between adjacent channels in the AM and FM band are 10 KHz and 100 KHz respectively In the rest of the world this step is 9 KHz and 50 KHz Usually the frequency step has been pre set in the factory for your area if not 1 Select TUNER source 2 Press SHUFFLE on the set for at least...

Страница 11: ...ews option NEWS ON TA ON or OFF is displayed briefly NEWS is displayed if you have activated the news or TA option Changing listening source will not disarm the function Notes To avoid unwanted recordings the NEWS announcement does not work while recording a cassette When you receive RDS news or traffic announcements during CD playback playback will pause and you will be able to hear the news TA P...

Страница 12: ...ck Press and hold down on PREV 1 or NEXT 2 on the remote control 5 or 6 When you recognize the passage you want release PREV 1 or NEXT 2 To interrupt CD playback press PLAY PAUSE 2 on the remote control SIDE Recording will begin from this exact point in the track when you press RECORD 6 For brief interruptions during recording press PAUSE To resume recording press PAUSE again 7 To stop recording p...

Страница 13: ...s active Switch off SHUFFLE PROGRAM Poor cassette sound Dust and dirt on the heads etc Clean deck parts see Maintenance quality Use of incompatible cassette types Only use NORMAL IEC I for recording METAL or CHROME Recording does not Cassette tab s may be broken Apply a piece of adhesive tape over the missing work tab space Remote control does Batteries exhausted Insert fresh batteries not functio...

Отзывы: