background image

SLEEP

POWER

AV

STATUS/EXIT

CC

TV/VCR-CLOCK

TV

VCR

ACC

VCR

INCREDIBLE

A/CH

UP

SMART

SOUND

SMART

PICTURE

MENU

SURF

VOL

CH

MUTE

MULTI

MEDIA

STEREO

RECORD

1

SMART SOUND  OFF

SMART SOUND  ON

OR

A

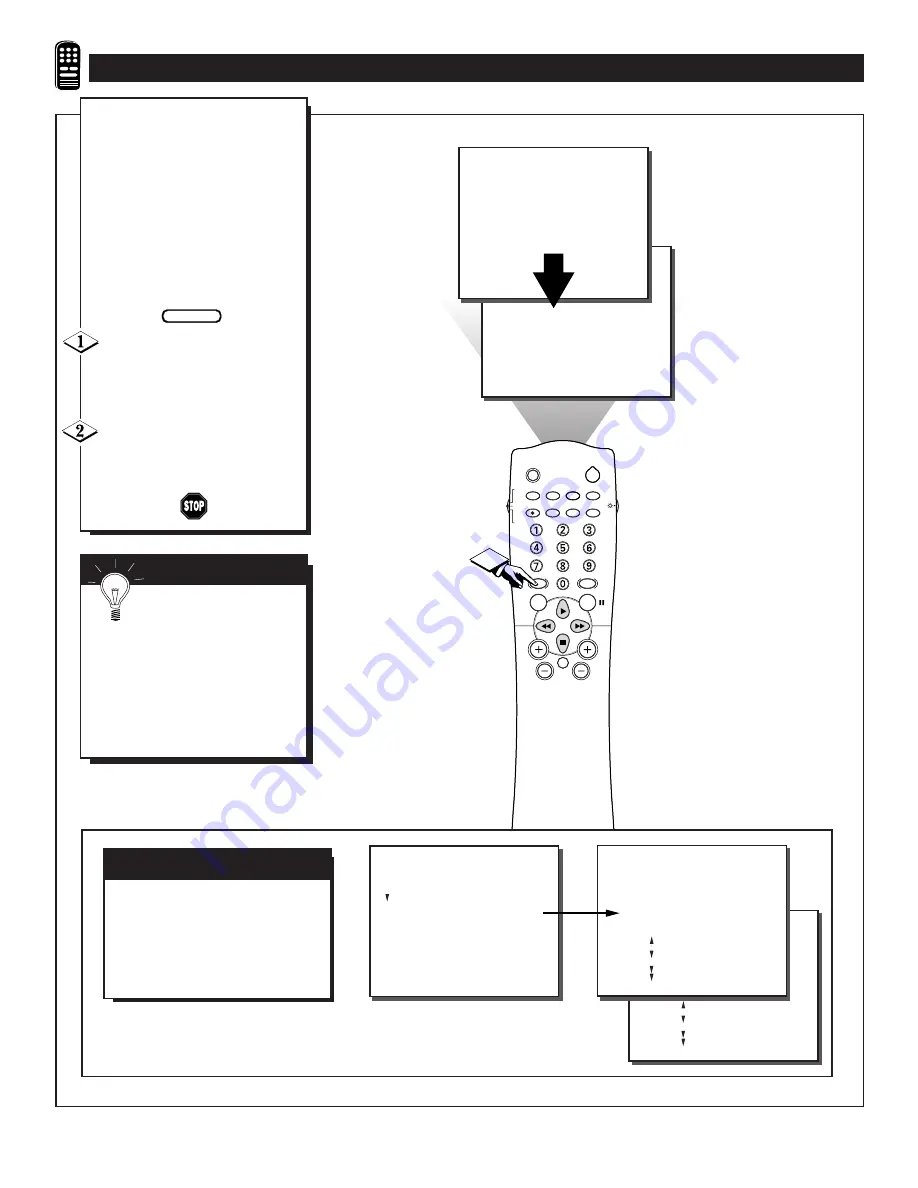
re you tired of the sound of
commercials following you into

the next room or all through the
house? Smart Sound allows you to
preset a desired volume level that
the TV sound will not go above.
This makes for an even, more con-
sistent sound by reducing the peaks
and valleys that can occur during
program changes or commercial
breaks.   

Press the SMART SOUND but-

ton on the remote control. The cur-

rent Smart Sound setting will appear
in the middle of the screen.

Press the SMART PICTURE

button repeatedly to turn the fea-

ture ON or OFF.

U

SING THE

S

MART

S

OUND

C

ONTROL

BEGIN

S

MART

H

ELP

Remember, Smart Sound

works only with the pro-

grams coming through the
ANTENNA/CABLE input on the
rear of the TV (RF audio). It will
not control the sound levels for
the External AV1, AV2, SVID-R
or MM1, MM2, and MM3 con-
nections.

SOUND

.

SOUND

TREBLE

BASS

BALANCE

AVL

STEREO

OFF

..

...

.

.

..

.

.

SOUND

.

SOUND

PICTURE

SOUND

FEATURES

INSTALL

TREBLE

BASS

BALANCE

AVL

STEREO

.

.

.

TREBLE

BASS

BALANCE

AVL

STEREO

ON

..

...

.

.

.

.

..

.

.

Note: SMART SOUND is the same
feature as AVL 
within the SOUND
on-screen menu controls. When
SMART SOUND is changed, the
AVL control will also change (and
vice versa).

AVL C

ONTROL

Содержание MAGNAVOX S3658

Страница 1: ...DFU TS3258 TS3658 ...

Страница 2: ...your unit may cause an electrical shock For the safety of everyone in your household please do not remove product covering sThe exclamation point calls attention to features for which you should read the enclosed lit erature closely to prevent operating and maintenance problems WARNING TO PREVENT FIRE OR SHOCK HAZARD DO NOT EXPOSE THIS EQUIPMENT TO RAIN OR MOISTURE CAUTION To prevent electric shoc...

Страница 3: ...t where they exit from the appliance 12 Cleaning The appliance should be cleaned only as recommended by the manufacturer 13 Power Lines An outdoor antenna should be located away from power lines 14 Outdoor Antenna Grounding If an outside antenna is connected to the receiver be sure the antenna system is grounded so as to pro vide some protection against voltage surges and built up static charges S...

Страница 4: ... 20 Using the TV s Audio Video Input Jacks 21 22 TABLE OF CONTENTS Copyright 1997 Philips Consumer Electronics Company All rights reserved Remote Control Operation Using the Smart Picture Control 23 Using the Smart Sound Control AVL 24 Using the Surf and Alternate Channel Buttons 25 Setting the Remote to Operate Accessory Devices 26 27 Setting the TV Remote to Operate Accessory Devices Search Meth...

Страница 5: ...L 8V R L VIDEO OUT VAR AUDIO OUT SUR AUDIO OUT 75V UHF VHF ANT CABLE REAR SURROUND EXT SPEAKERS VCR AUX IN VIDEO AUDIO R L R L 8V R L VIDEO OUT VAR AUDIO OUT SUR AUDIO OUT 2 Acombination outdoor or indoor antenna receives normal broadcast channels 2 13 VHF and 14 69 UHF Your con nection to such an antenna is easy since there is only one antenna plug 75Ω ohm on the back of your TV and that s where ...

Страница 6: ...the right to display an adjustment bar in front of the BRIGHTNESS control Use the CURSOR LEFT or RIGHT buttons to adjust the BRIGHTNESS level of the pic ture After adjusting the BRIGHT NESS control press the CURSOR DOWN button to select another Picture adjustment COLOR PIC TURE SHARPNESS TINT or COLOR TEMP Use the CURSOR LEFT or CURSOR RIGHT buttons to adjust the selected control HOW TO ADJUST THE...

Страница 7: ...T button and the menu will shift to the left to display the TIMER controls Press the CURSOR RIGHT button again to shift the dis play left and highlight the TIME control Press the CURSOR RIGHT button again to highlight the time indicator area Press the NUMBERED buttons to enter the correct time Use the CURSOR UP or CURSOR DOWN buttons to set AM or PM SETTING THE TV S CLOCK SMART HELP Remember be su...

Страница 8: ...to turn itself on at the same time everyday Press the MENU button on the remote to show the on screen menu PICTURE will be highlighted Press the CURSOR DOWN button twice to select the FEA TURES menu Press the CURSOR RIGHT button and the menu will shift to the left to display the TIMER controls Press the CURSOR RIGHT button again to shift the dis play left then CURSOR DOWN to highlight the ACTIVATE...

Страница 9: ...ATE control is turned ON Press the MENU button on the remote to show the on screen menu PICTURE will be highlighted Press the CURSOR DOWN button twice to select the FEA TURES menu Press the CURSOR RIGHT button and the menu will shift to the left to display the TIMER controls Press the CURSOR RIGHT button again to shift the dis play left then CURSOR DOWN to highlight the CHANNEL con trol Press the ...

Страница 10: ...TIVATE control is turned ON Press the MENU button on the remote to show the on screen menu PICTURE will be highlighted Press the CURSOR DOWN button twice to select the FEA TURES menu Press the CURSOR RIGHT button and the menu will shift to the left to display the TIMER controls Press the CURSOR RIGHT button again to shift the dis play left then CURSOR DOWN to highlight the START TIME control Press...

Страница 11: ...nently display the time in the upper right corner of the screen Press the MENU button on the remote to show the on screen menu PICTURE will be highlighted Press the CURSOR DOWN button twice to select the FEA TURES menu Press the CURSOR RIGHT button and the menu will shift to the left to display the TIMER controls Press the CURSOR RIGHT button again to shift the dis play left then CURSOR DOWN to hi...

Страница 12: ...e been viewed Smart Lock allows parents to block out or censor any channels they think children should not watch A channel blocked by the Smart Lock control cannot be viewed until a correct access code is used to unlock the channel for viewing First let s set your Smart Lock access code Press the MENU button on the remote to show the on screen menu PICTURE will be highlighted Press the CURSOR DOWN...

Страница 13: ...previous page you are now ready to select up to 5 channels or inputs to block out or censor Press the MENU button on the remote to show the on screen menu PICTURE will be highlighted Press the CURSOR DOWN button twice to select the FEA TURES menu Press the CURSOR RIGHT button and the menu will shift to the left then CURSOR DOWN to highlight the SMART LOCK control Press the CURSOR RIGHT button agai...

Страница 14: ...option area Press the CURSOR UP or CURSOR DOWN buttons to turn the NR feature ON or OFF TURNING ON THE NOISE REDUCTION PICTURE CONTROL BEGIN SLEEP POWER AV STATUS EXIT CC TV VCR CLOCK TV VCR ACC VCR INCREDIBLE A CH UP SMART SOUND SMART PICTURE MENU SURF VOL CH MUTE MULTI MEDIA STEREO RECORD 5 1 3 2 FEATURES TIMER SmartLock NR CONTRAST CLOSED CAP OFF FEATURES TIMER SmartLock NR CONTRAST CLOSED CAP ...

Страница 15: ...MODE or TEXT MODE options area Press the CURSOR UP or CURSOR DOWN buttons to select the CLOSED CAPTION option you want CAPTION MODE CC1 CC2 CC3 CC4 CC MUTE or OFF dialogue and descriptions for the action on the captioned TV program shows on screen TEXT MODE TXT1 TXT2 TXT3 TXT4 or OFF often used for channel guide sched ules or bulletin board information for CC programs USING THE CLOSED CAPTION CONT...

Страница 16: ...ve you all that trouble by automatical ly turning itself off Press the SLEEP button on the remote control and the SLEEP timer on screen display will appear in the lower center of the display Press the SLEEP button repeatedly to pick the amount of time 15 minutes to 2 hours ahead before the TV will turn itself off An on screen count down will appear during the last minute before the TV shuts itself...

Страница 17: ...programs Press the MENU button on the remote to show the on screen menu PICTURE will be high lighted Press the CURSOR DOWN button to select the SOUND menu Press the CURSOR RIGHT button and the menu will shift to the right to display an adjustment bar in front of the TRE BLE control Use the CURSOR LEFT or RIGHT buttons to adjust the TREBLE high frequency level of the television s sound After adjust...

Страница 18: ...part of the stereo broadcast system Sent as a third audio channel SAP can be heard apart from the current TV program sound TV stations are free to use SAP for any number of purposes but many experts believe it will be used for foreign language translations of TV shows or for weather and news bulletins If a SAP signal is not present with a selected program the SAP option cannot be selected Also if ...

Страница 19: ...CR ACC VCR INCREDIBLE A CH UP SMART SOUND SMART PICTURE MENU SURF VOL CH MUTE MULTI MEDIA STEREO RECORD 1 SPATIAL INCR STEREO The Incredible Stereo feature adds greater depth and dimen sion to both monaural MONO and stereo TV sound With the con trol turned ON the TV s speakers can add even wider sound separa tion to normal broadcasts Press the INCREDIBLE STEREO button on the remote to turn the Inc...

Страница 20: ...er or sound system Set the audio system s vol ume to normal listening level Turn the TV and audio system ON You can now adjust the sound level coming from the audio sys tem with the VOLUME or buttons on the TV or remote To hear the TV sound from only the audio system speakers Press the MENU button on the remote to show the on screen menu PICTURE will be high lighted Press the CURSOR DOWN button to...

Страница 21: ...TV ON Use the A V button on the remote to select the AV 1 chan nel With the VCR ON and a prere corded tape inserted press the PLAY button to view the tape on the television AUDIO IN RED WHITE VCR EQUIPPED WITH VIDEO AND AUDIO OUTPUT JACKS SMART HELP Remember after it is con nected an easy way to select the VCR mode is to press the TV VCR button on the remote Channel 3 and 4 can also be selected th...

Страница 22: ...c Player ON Press the AV button on the remote to tune to the SVID R channel You are now ready to view the tape or disc on the TV AUDIO IN RED WHITE VIDEO IN YELLOW HOW TO USE THE AUDIO VIDEO INPUT JACKS BEGIN S VIDEO CABLE NOT SUPPLIED DSS DVD Video Game etc EQUIPPED WITH S VIDEO AND AUDIO OUTPUT JACKS BACK OF ACCESSORY S VIDEO INPUT BACK OF TV NOTE Repeatedly pressing the AV button on the remote ...

Страница 23: ...preset at the factory to auto matically adjust the TV s Brightness Color Picture Sharpness Tint and Color Temperature levels Press the SMART PICTURE button on the remote control The current Smart Picture setting will appear in the middle of the screen Press the SMART PICTURE button repeatedly to select either PERSONAL MOVIES SPORTS WEAK SIGNAL or MULTI MEDIA picture settings Note The PERSONAL sett...

Страница 24: ...remote control The cur rent Smart Sound setting will appear in the middle of the screen Press the SMART PICTURE button repeatedly to turn the fea ture ON or OFF USING THE SMART SOUND CONTROL BEGIN SMART HELP Remember Smart Sound works only with the pro grams coming through the ANTENNA CABLE input on the rear of the TV RF audio It will not control the sound levels for the External AV1 AV2 SVID R or...

Страница 25: ... remote The on screen display will read THE SURF LIST IS EMPTY Press to add Press the CURSOR RIGHT button to add the present channel to the SURF list Press the CURSOR LEFT button to delete the present channel from the SURF list Repeat steps 1 through 3 to add additional channels up to 10 to the SURF list USING THE TV S CHANNEL SURF CONTROL A CH BUTTON Your remote also has an A CH Alternate Channel...

Страница 26: ...e following section is necessary Place the TV VCR ACC Mode Switch in the proper posi tion Point the remote control at the device and press the POWER button Does the remote turn the device ON If YES stop and try other func tion buttons on the remote If they also work the device then the remote is ready and no fur ther steps are needed If NO continue Cable Converter SMART HELP Remember if more than ...

Страница 27: ...he VCR RECORD button on the remote control and release Press the SMART SOUND button on the remote within 30 seconds then release Enter the THREE DIGIT REMOTE CODE NUMBER for your desired device The remote is now ready to send commands to the unit Point the remote at the Device Press the POWER button on the remote to turn the unit ON Cable Converter SMART HELP Remember if this doesn t work the firs...

Страница 28: ...are attempting to program to turn it ON Place the TV VCR ACC Mode Switch in the proper posi tion Press the VCR RECORD and the SMART SOUND buttons simultaneously and hold them down The device will begin to change channels after the remote identi fies the correct code When the channels start to change release the VCR RECORD and SMART SOUND buttons The remote should be ready to operate the device Cab...

Страница 29: ...de 297 320 321 Okano 346 Olympus 035 226 Optimus 037 048 058 104 162 432 454 Optonica 062 Orion 004 295 348 352 479 Panasonic 035 077 162 225 226 378 454 Penney 035 037 038 040 042 065 105 Pentax 042 065 105 Philco 035 Philips 035 062 081 110 403 Pilot 037 Pioneer 058 067 Portland 020 Profax 322 Profitronic 240 Protec 072 Pulsar 039 051 Quarter 046 Quartz 046 Quasar 035 077 162 454 RCA 042 060 065...

Страница 30: ...twork System 749 Jerrold 627 Magnavox 722 724 Memorex 724 Panasonic 701 Philips 722 724 Primestar 627 RCA 566 Sony 639 Toshiba 790 Uniden 724 REMOTE Satellite CODE NO AST 351 Akai 515 Alba 352 515 613 Aldea 288 Amstrad 080 252 345 461 509 689 Ankaro 220 288 369 Anitron 183 Armstrong 243 Astra 108 Avalon 396 Axis 369 BT 515 668 Beko 189 Best 369 Boca 243 513 Bush 067 Cambridge 344 515 Channel Maste...

Страница 31: ...s Press again to place in the TV position VCR indicator light will go off to view one program while recording another program NUMBER BUTTON Press buttons for direct VCR channel selections PAUSE BUTTON Press to temporarily stop the tape during a playback or recording Press again to release Pause FAST FORWARD BUTTON Press to rapidly advance the tape For some VCR s you may need to press the STOP butt...

Страница 32: ...eries Replace with AA Heavy Duty Zinc Chloride or Alkaline batteries if necessary Clean the remote and the remote sensor window on the TV Check the TV power cord Unplug the TV wait 10 seconds then reinsert plug into outlet and push POWER button again Check to be sure TV outlet is not on a wall switch Check the VOLUME buttons Check the MUTE button on the remote control Check the SPEAKER on screen c...

Страница 33: ...han nel provided for in the Multichannel Television Sound MTS broad cast standard The most frequently proposed use for SAP is the simultaneous bilingual broadcast of TV program material Status Allows the user to quickly confirm what channel number is currently being viewed Status can also be used to clear the Television of on screen displays or information rather than waiting for the displays to t...

Страница 34: ...RENEWED 90 DAY LIMITED WARRANTY ...

Отзывы: