DATA / VIDEO MODE DISPLAY
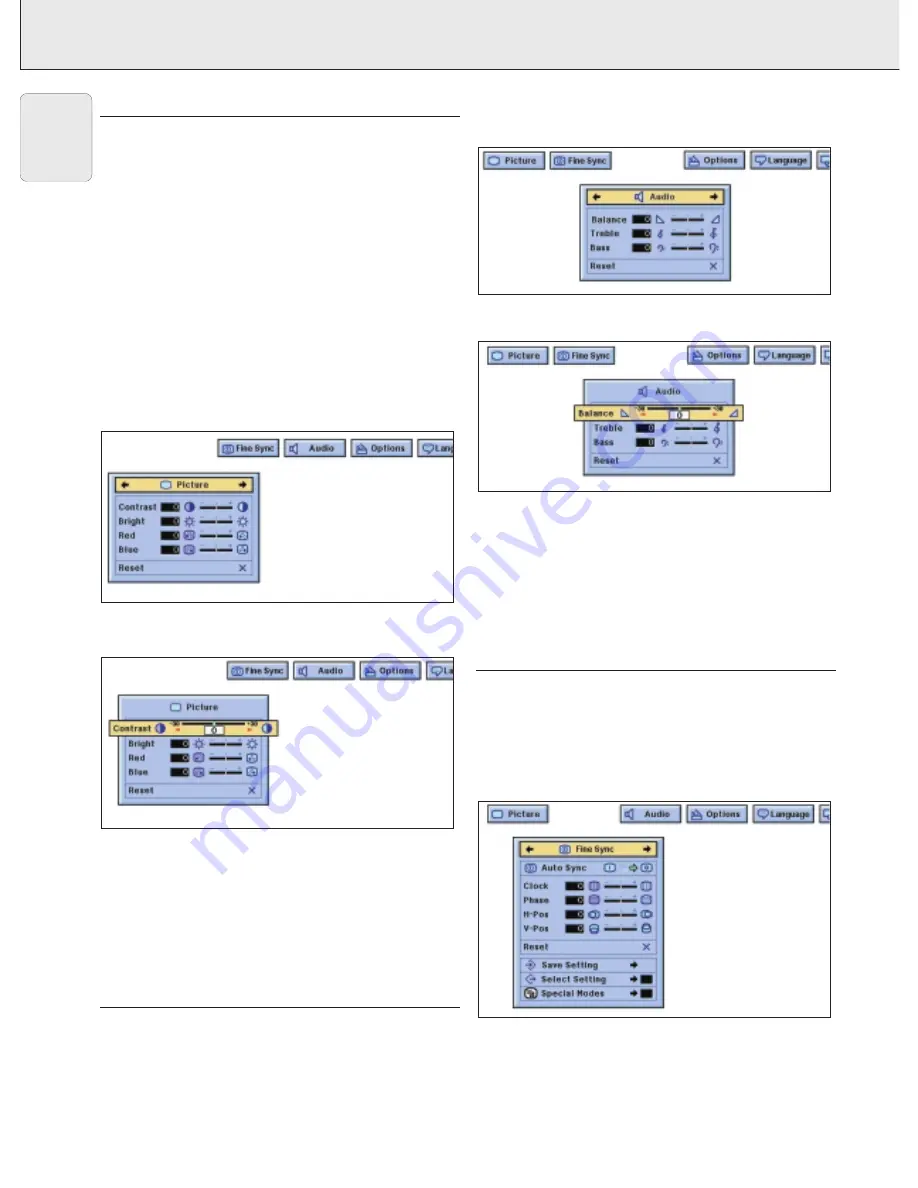
Picture display adjustments
For video signal input, the following adjustments can be made:
–
Contrast
- adjusts the overall contrast intensity;
–
Bright
- adjusts the picture brightness;
–
Color
- adjusts the colour saturation of the projected image;
–
Tint
- for more purplish/greenish skin tones (NTSC only);
–
Sharpness
- adjusts the overall picture sharpness;
–
Red
- for weaker/stronger red images;
–
Blue
- for weaker/stronger blue images;
–
Reset
- all image adjustment items are returned to the
factory preset settings.
Note:
“Color”, “Tint” and “Sharpness” do not appear for
Computer/RGB input in Data mode.
1.
Press Menu.
– Menu bar and “Picture” menu screen appear. GUI operation
guide is also displayed.
2.
Press
3
/
4
to select a specific adjustment item.
3.
Press
1
/
2
to move the mark of the selected adjustment
item to the desired setting.
4.
To exit from the GUI, press Menu.
Notes:
– To reset all adjustment items, select “Reset” on the
“Picture” menu screen and press OK.
– The adjustments can be stored separately in the “Data 1”,
“Data 2” and “Video” modes.
– For Component input in Data mode, “Sharpness” is
adjustable only when a DVD player is connected.
AUDIO CONTROL
This projector’s audio is factory preset to standard settings.
However, you can adjust it to suit your own preferences by
adjusting the following audio settings.
–
Balance
– adjusts audio level of left and right speaker;
–
Treble
– adjusts the high tones;
–
Bass
– adjusts the bass tones;
–
Reset
– All audio adjustment items are returned to the
factory preset settings.
1.
Press Menu. Menu bar and “Picture” menu screen appear.
GUI operation guide is also displayed.
2.
Press
1
/
2
to select “Audio”.
3.
Press
3
/
4
to select a specific adjustment item.
4.
Press
1
/
2
to move the mark of the selected adjustment
item to the desired setting.
5.
To exit from the GUI, press Menu.
Notes:
– To reset all adjustment items, select “Reset” on the “Audio”
menu screen and press OK.
– The volume can also be adjusted with the “–” Volume “+”
buttons on the projector.
PERSONAL PREFERENCES
This projector allows you to store up to seven adjustment
settings for use with various computers. Once these settings
are stored, they can be easily selected each time you connect
the computer to the projector.
Saving/changing the adjustment setting
1.
Press Menu.
2.
Press
1
/
2
to select “Fine Sync”.
18
8. OPERATION
Picture control/Audio control/Personal preferences
English


