


6
7
EN
EN
switch audio output from the Soundbar
speaker or TV speaker.
p
(Play/Pause)
Start, pause or resume play in USB mode
and Bluetooth mode (only for AVRCP-
supported Bluetooth devices).
Press and hold to stop play in USB mode.
q
USB
Switch to USB mode.
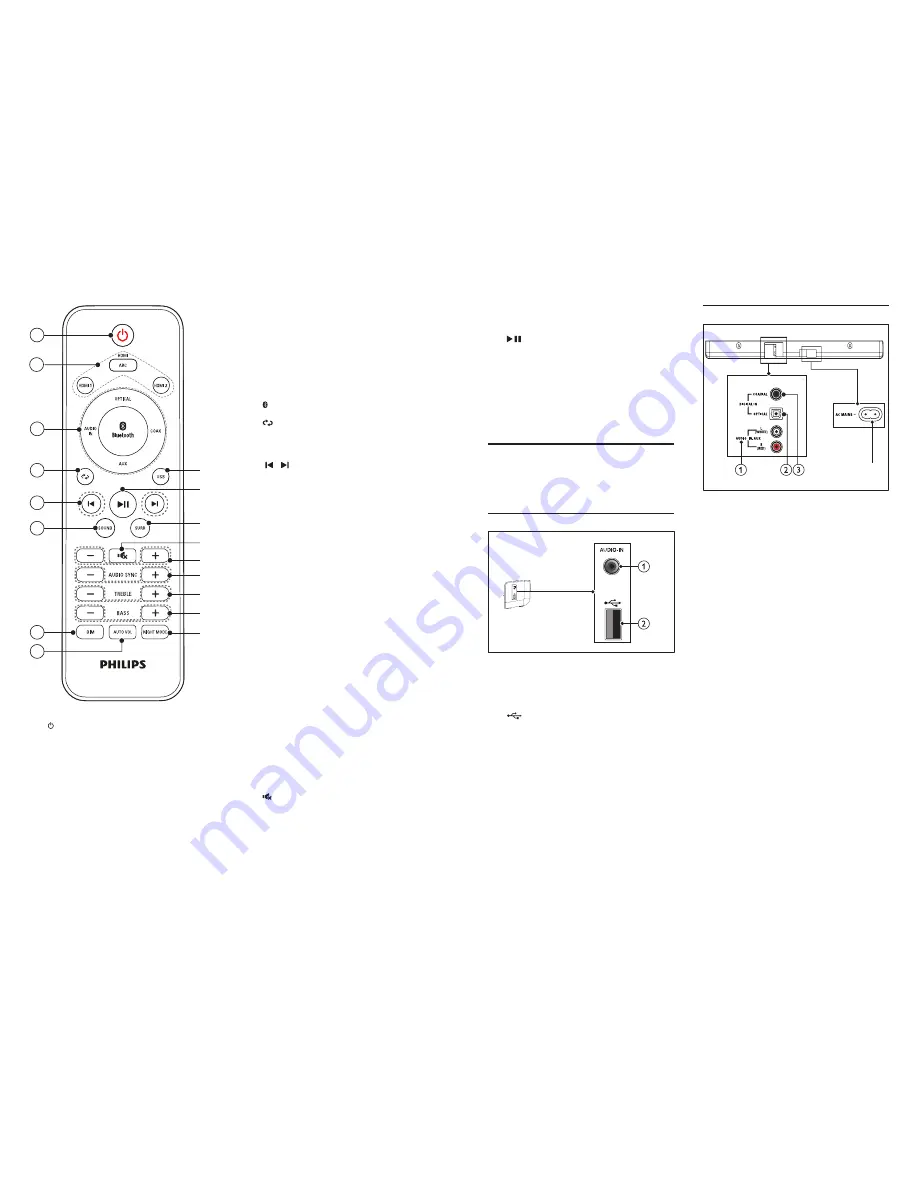
Connectors
This section includes an overview of the
connectors available on your SoundBar.
Side connectors
a
AUDIO IN
Audio input from an MP3 player (3.5mm
jack).
b
(USB)
Audio input from a USB storage device.
Rear connectors
a
AUDIO IN-AUX
Connect to an analog audio output on the
TV or an analog device.
b
DIGITAL IN-OPTICAL
Connect to an optical audio output on the
TV or a digital device.
c
DIGITAL IN-COAXIAL
Connect to a coaxial audio output on the
TV or a digital device.
d
AC MAINS~
Connect to the power supply.
d
a
(Standby-On)
•
Switch the SoundBar on or to standby.
•
When EasyLink is enabled, press
and hold for at least three seconds
to switch all connected HDMI CEC
compliant devices to standby.
b
HDMI selection
HDMI ARC
/
HDMI 1
/
HDMI 2
:
The
function of those buttons is not available
on this model.
c
Source buttons
6
7
8
1
3
4
5
i
j
k
l
m
n
o
p
q
2
OPTICAL
: Switch your audio source to
the optical connection.
AUDIO IN
: Switch your audio source to
the AUDIO-IN connection (3.5mm jack).
AUX
: Switch your audio source to the
AUX connection.
COAX
: Switch your audio source to the
AUX connection.
Bluetooth
: Switch to Bluetooth mode.
d
(Repeat)
Select or turn off repeat/shuffle mode in
USB mode.
e
/ (Previous/Next)
Skip to the previous or next track in USB
mode and Bluetooth mode (only for
AVRCP-supported Bluetooth devices).
f
SOUND
The function of this button is not
available on this model.
g
DIM
Set the brightness of SoundBar display
panel.
h
AUTO VOL
Turn auto volume on or off.
i
NIGHT MODE
Turn night mode on or off.
j
BASS +/-
Increase or decrease bass.
k
/-
Increase or decrease treble.
l
AUDIO SYNC +/-
The function of this button is not
available on this model.
m
+/- (Volume)
Increase or decrease volume.
n
(Mute)
Mute or restore volume.
o
SURR
Select surround or stereo sound.
In HDMI in mode (connected via
HDMI
IN 1
or
HDMI IN 2
), press and hold to


