background image

38

EN

• 

Satellite speakers: 4 x 2.5" sp 

2 x 2.5" radiators

• 

Power consumption: 60 W

• 

Standby power consumption: 0.5 W 

• 

Dimensions (WxHxD): 

1060 x 83.1 x 194.8 mm

• 

Weight: 4.9 KG

• 

Operating temperature and humidity: 

0°C to 40°C, 5% to 90% Humidity for all 

climates

• 

Storage temperature and humidity: -40 °C 

to 70 °C, 5% to 95%

Subwoofer

• 

Power supply: 

• 

Europe/China: 220-240 V~, 50 Hz

•  Latin America/Asia Pacific: 110-127 

V/220-240 V~, 50-60 Hz 

• 

Russia/India: 220-240 V~, 50 Hz 

• 

Impedance: 3 ohm

• 

Speaker drivers: 1 x 6.5" woofer

• 

Power consumption: 50 W

• 

Standby power consumption: 0.5 W 

• 

Dimensions (WxHxD): 

195 x 298 x 410 mm

• 

Weight: 7.2 KG

Remote control batteries

• 

2  x AAA-R03-1.5 V 

Laser

• 

Laser Type (Diode): InGaN/AIGaN (BD), 

AIGaInP (DVD/CD)

• 

Wave length: 405 +7 nm/-7 nm (BD),  

655 +10 nm/-10 nm (DVD), 

790 +10 nm/-20 nm (CD)

• 

Output power (Max. ratings): 

20 mW (BD), 6 mW (DVD), 7 mW (CD)

9 Troubleshooting

Warning


Risk of electric shock. Never remove the casing of the 

product.

To keep the warranty valid, never try to repair 

the product yourself. 

If you have problems using this product, check 

the following points before you request service. 

If you still have a problem, get support at 

www.philips.com/support. 

Main unit

The buttons on the home theater do not 

work.

• 

Disconnect the home theater from the 

power supply for a few minutes, then 

reconnect.

Picture

No picture.

• 

Make sure that the TV is switched to the 

correct source for the home theater.

No picture on a TV connected through HDMI.

• 

Make sure that you use a High Speed 

HDMI cable to connect the home theater 

and TV. Some Standard HDMI cables do 

not display properly for some images, 3D 

video, or Deep Color.

• 

Make sure that the HDMI cable is not 

faulty. If it is faulty, replace it with a new 

cable.

• 

Press   (

Home

) and then 

731

 on the 

remote control to restore the default 

picture resolution.

• 

Change the HDMI video setting, or wait 

for 10 seconds for auto recovery (see 

'Picture and video settings' on page 30).

Содержание HTB5150KD

Страница 1: ...www philips com welcome User manual Always there to help you Register your product and get support at Question Contact Philips HTB5150KD ...

Страница 2: ......

Страница 3: ...ideo and picture options 19 Radio 20 MP3 player 21 iPod or iPhone 21 Smartphone control 22 Browse SmartTV 23 Skype 25 Internet radio 25 Browse PC through DLNA 26 Karaoke 28 Choose sound 28 6 Change settings 30 Language settings 30 Picture and video settings 30 Audio settings 30 Parental control settings 31 Display settings 31 Energy saving settings 31 Speaker settings 31 Restore default settings 3...

Страница 4: ...a topic The legends used to display the Contents are as follows Press OK to expand the subtopics Press OK to collapse the subtopics or press Navigation buttons up down to select a topic To move between the left and right panel press Navigation buttons left right The right panel contains the content of the selected topic For additional help on the content scroll down the page to see Related topics ...

Страница 5: ...ountable products use only the supplied wall mount bracket Secure the wall mount to a wall that can support the combined weight of the product and the wall mount Koninklijke Philips Electronics N V bears no responsibility for improper wall mounting that results in accident injury or damage For speakers with stands use only the supplied stands Secure the stands to the speakers tightly Place the ass...

Страница 6: ...ing the product for an extended period of time Use only microfiber cloth to clean the product Care of the environment Your product is designed and manufactured with high quality materials and components which can be recycled and reused When this crossed out wheeled bin symbol is attached to a product it means that the product is covered by the European Directive 2002 96 EC Please inform yourself a...

Страница 7: ...system is not fully developed yet 3 Your home theater Congratulations on your purchase and welcome to Philips To fully benefit from the support that Philips offers e g notification of product software upgrade register your product at www philips com welcome Remote control This section includes an overview of the remote control a Standby On Switch the home theater on or to standby When EasyLink is ...

Страница 8: ...te menus In radio mode press left or right to start auto search In radio mode press up or down to tune the radio frequency During network and password setup press left to delete a character c Mute Mute or restore volume d Volume Increase or decrease volume a Stop Open Close Stop play Press and hold for three seconds to open or close the disc compartment b Play Start or resume play c Previous Next ...

Страница 9: ...press and hold to erase the current preset radio stations d SOURCE Select an audio or video source for the home theater e Increase or decrease volume f Open Close Open or close the disc compartment Connectors This section includes an overview of the connectors available on your home theater Rear left a AC MAINS Connect to the power supply b OPTICAL IN Connect to an optical audio output on the TV o...

Страница 10: ... Connect to a Philips dock for iPod or iPhone Model Philips DCK306x sold separately for some models a b c d e a USB Audio video or picture input from a USB storage device b MUSIC iLINK MIC MIC is available only in selected models Audio input from an MP3 player or a microphone Audio input from a microphone Available only in selected models Subwoofer connectors a LED When the power is on the LED tur...

Страница 11: ...on about the basic connections of your home theater and accessories see the quick start guide Note For identification and supply ratings see the type plate at the back or bottom of the product Before you make or change any connections make sure that all devices are disconnected from the power outlet Placement Place the subwoofer at least 1 meter 3 feet away from your home theater and ten centimete...

Страница 12: ...re that enables CEC compliant devices that are TV connected through HDMI to be controlled by a single remote control such as volume control for both the TV and the home theater see Set up EasyLink HDMI CEC control on page 12 3 If you cannot hear theTV audio through your home theater set up the audio manually see Set up the audio on page 13 Option 2 Connect to TV through standard HDMI Best quality ...

Страница 13: ...input For details see the TV user manual TV Connect digital devices through HDMI Connect a digital device such as a set top box games console or camcorder to your home theater through a single HDMI connection When you connect the devices in this way and play a file or game the video is automatically displayed on your TV and audio is automatically played on your home theater 1 Using a High Speed HD...

Страница 14: ...O OUT TV Option 3 Connect audio through analog audio cables Basic quality audio 1 Using an analog cable connect the AUX connectors on your home theater to the AUDIO OUT connectors on theTV or other device Set up EasyLink HDMI CEC control This home theater supports Philips EasyLink which uses the HDMI CEC Consumer Electronics Control protocol EasyLink compliant devices that are connected through HD...

Страница 15: ...onnector on your home theater see Set up the audio on page 13 Note To change the EasyLink control settings press Home select Setup EasyLink Set up the audio If you cannot hear the audio output of a connected device through your home theater speakers do the following Check that you have enabled EasyLink on all the devices see Set up EasyLink HDMI CEC control on page 12 and on yourTV set the audio o...

Страница 16: ...ork router with DHCP enabled 1 Using a network cable connect the LAN connector on your home theater to the network router 2 Press Home 3 Select Setup and then press OK LAN www 4 Select Network Network installation Wired Ethernet 5 Follow the onscreen instructions to complete the setup If connection fails select Retry and then press OK 6 Select Finish and then press OK to exit To view the network s...

Страница 17: ...tup appears when you turn on your home theater for the first time or if you do not complete the setup Switch theTV to the correct source for your home theater for example HDMI AV IN Access the home menu The home menu provides easy access to connected devices setup and other useful features in your home theater 1 Press Home The home menu is displayed 2 Press the Navigation buttons and OK to select ...

Страница 18: ...s paused search slow backwards or forward SUBTITLE Select subtitle language for video DISC POP UP MENU Access or exit the disc menu OPTIONS Access the advanced options when you play your audio video or media files see Audio video and picture options on page 19 Synchronize picture and sound If the audio and video are not synchronized delay the audio to match the video 1 Press SOUND SETTINGS 2 Selec...

Страница 19: ...ater to a home network with Internet access see Connect and set up a home network on page 13 2 Connect a USB storage device to your home theater 3 Press Home and select Setup 4 Select Advanced Local storage 5 Select USB 6 Select Advanced BD Live security Off to enable BD Live To disable BD Live select On 7 Select the BD Live icon in the disc menu and then press OK BD Live starts to load The loadin...

Страница 20: ...an Irish Polish Romanian Slovak Slovene and Sorbian Cyrillic Bulgarian Belorussian English Macedonian Moldavian Russian Serbian and Ukrainian Greek Greek Baltic Estonian Latvian and Lithuanian Asia Pacific and China Character Set Language Chinese Simplified Chinese Standard Albanian Danish Dutch English Finnish French Gaelic German Italian Kurdish Latin Norwegian Portuguese Spanish Swedish Turkish...

Страница 21: ...eo Subtitle Language Select subtitle language for video Subtitle shift Change the subtitle position on the screen Info Display information about what is playing Character set Select a character set that supports the DivX subtitle Time search Skip to a specific part of the video by entering the time of the scene 2nd audio language Select the second audio language for Blu ray video 2nd Subtitle Lang...

Страница 22: ...p music Note Make sure that the picture and audio formats are supported by your home theater see File formats on page 35 Radio Listen to FM radio on your home theater and store up to 40 radio stations Note AM and digital radio are not supported If no stereo signal is detected or if fewer than five stations are found you are prompted to install the radio stations again 1 Connect the FM antenna to t...

Страница 23: ...ress SOURCE repeatedly until MUSIC I LINK appears on the display panel 3 Press the buttons on the MP3 player to select and play audio files iPod or iPhone Connect a Philips dock to play music photos and videos from your iPod or iPhone What you need A Philips dock model Philips DCK306x sold separately for some models to purchase it visit www philips com welcome A yellow composite video cable 1 Conn...

Страница 24: ...theater mobile device and other DLNA compatible devices to the same home network For better video quality use wired connection whenever possible Personalize the network name for your home theater see Personalize the network name on page 15 Download Philips MyRemote application on your mobile device For iPhone or iPad search for the app in App Store App Store For Android based phone or tablet searc...

Страница 25: ...atically detected and displayed on the screen 3 Select a device on the network The folders in the selected device are displayed Depending on the media server the folder names may vary If you cannot see the folders make sure that you enable media sharing on the selected device so that the content is available for sharing 4 Select a media file to play 5 From the menu on your mobile device select the...

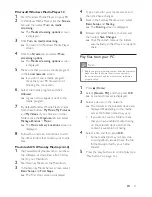
Страница 26: ...ters or mouse to navigate the web page USB HID mouse cursor does not work on SmartTV and open Internet pages The multimedia keys on some keyboards are not supported Clear browsing history Clear the browsing history to remove passwords cookies and browsing data from your home theater 1 Press Home 2 Select Setup and then press OK 3 Select Network Clear Smart TV memory 4 Press OK to confirm Rent onli...

Страница 27: ... set up a home network on page 13 2 Connect a Skype camera to the USB connector on your home theater 3 Press Home 4 Select Video call and then press OK 5 Log in to your Skype account If you do not have a Skype account follow the onscreen instructions to create it To enter your Skype name and password follow the onscreen instructions 6 Use the remote control to select onscreen options such as an au...

Страница 28: ...twork For better video quality use wired connection whenever possible Connect the computer and other DLNA compatible devices to the same home network Make sure that your PC firewall allows you to run Media Player programs or the firewall s exemption list has the media server software included Switch on your computer and the router Microsoft Windows Media Player 11 1 Start Windows Media Player on y...

Страница 29: ...ownload a free 30 day trial to your Macintosh 2 StartTwonky Media on the Macintosh 3 In theTwonky Media Server screen select Basic Setup and First Steps The First steps screen is displayed 4 Type a name for your media server and then click Save changes 5 Back in theTwonky Media screen select Basic Setup and Sharing The Sharing screen is displayed 6 Browse and select folders to share and then selec...

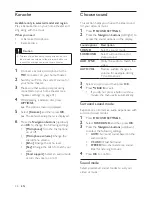
Страница 30: ...echo level Key Change the pitch to match your voice Vocal support Select an audio mode or turn the vocal on or off Choose sound This section helps you choose the ideal sound for your video or music 1 Press SOUND SETTINGS 2 Press the Navigation buttons left right to access the sound options on the display Sound options Description SOUND Select a sound mode SURROUND Select surround sound or stereo s...

Страница 31: ...ffects CLEAR Hear every detail in your music and clear voices in your movies WARM Experience spoken words and music vocals in comfort PERSONAL Personalize the sound based on your preferences 5 Press OK to confirm Equalizer Change the high frequency treble mid frequency mid and low frequency bass settings of the home theater 1 Press SOUND SETTINGS 2 Select SOUND PERSONAL and then press Navigation b...

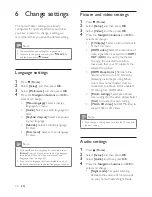
Страница 32: ...home theater uses the default language of the disc Picture and video settings 1 Press Home 2 Select Setup and then press OK 3 Select Video and then press OK 4 Press the Navigation buttons and OK to select and change TV display Select a picture format to fit theTV screen HDMI video Select the resolution of video signal that is output from HDMI OUT ARC on your home theater To enjoy the selected reso...

Страница 33: ...at support this feature Display panel Set the brightness of the home theater front panel display VCD PBC Enable or disable the content menu navigation ofVCD and SVCD discs with Play Back Control feature Energy saving settings 1 Press Home 2 Select Setup and then press OK 3 Select Preference and then press OK 4 Press the Navigation buttons and OK to select and change Screen saver Switch the home th...

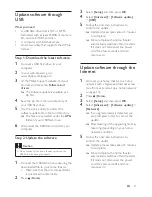
Страница 34: ...ersion is lower than the latest version available on the Philips support website upgrade your home theater with the latest software Caution Do not install a lower version of software than the current version installed on your product Philips is not liable for problems caused due to software downgrade Check software version Check the version of the current software installed on your home theater 1 ...

Страница 35: ...ning the downloaded file to your home theater Make sure that the disc compartment is closed and no disc inside 2 Press Home 3 Select Setup and then press OK 4 Select Advanced Software update USB 5 Follow the onscreen instructions to confirm the update Update process takes about 5 minutes to complete Once complete the home theater automatically switches off and restarts If it does not disconnect th...

Страница 36: ...hen locate the User Manual Upgrade Software The help update is available as a zip file 4 Save the zip file in the root directory of your USB flash drive 5 Use the archive utility to extract the help update file in the root directory A file named HTBxxxxeDFU zip is extracted under the UPG folder of your USB flash drive xxxx being the model number of your home theater 6 Disconnect the USB flash driv...

Страница 37: ...3 wma wav mp4 m4a flac ogg ra Available only in Asia Pacific and China Video avi divx mp4 m4v mkv m2ts mpg mpeg flv 3gp asf wmv rmvb rm rv Available only in Asia Pacific and China Picture jpg jpeg png Audio formats Your home theater supports the following audio files Extension Con tainer Audio codec Bit rate mp3 MP3 MP3 Upto 320 kbps wma ASF WMA Upto 192 kbps WMA Pro Upto 768 kbps aac AAC AAC HE A...

Страница 38: ...H 264 AVC upto HiP 5 1 25 Mbps WMV9 45 Mbps divx files in AVI container Audio codec Video codec Bit rate PCM Dolby Digital MP3 WMA DivX 3 11 DivX 4 x DivX 5 x DivX 6 x 10 Mbps max mp4 or m4v files in MP4 container Audio codec Video codec Bit rate Dolby Digital MPEG MP3 AAC HE AAC DD MPEG 1 MPEG 2 40 Mbps MPEG 4 ASP 38 4 Mbps H 264 AVC HiP 5 1 25 Mbps mkv files in MKV container Audio codec Video co...

Страница 39: ...0 40 Mbps Amplifier Total output power 550W RMS 0 5 dB 30 THD 440W RMS 0 5 dB 10 THD Frequency response 20 Hz 20 kHz 3 dB Signal to noise ratio 65 dB CCIR A weighted Input sensitivity AUX 2V Music iLink 300 mV Video Signal system PAL NTSC HDMI output 480i 576i 480p 576p 720p 1080i 1080p 1080p24 Audio S PDIF Digital audio input Optical TOSLINK Sampling frequency MP3 32 kHz 44 1 kHz 48 kHz WMA 44 1 ...

Страница 40: ...ing Risk of electric shock Never remove the casing of the product To keep the warranty valid never try to repair the product yourself If you have problems using this product check the following points before you request service If you still have a problem get support at www philips com support Main unit The buttons on the home theater do not work Disconnect the home theater from the power supply f...

Страница 41: ...tor on the subwoofer lights up If the wireless pairing fails repeat steps 1 to 4 to connect your subwoofer to the SoundBar Distorted sound or echo If you play audio from theTV through the home theater make sure that theTV is muted If the sound from the wireless subwoofer is interrupted or distorted make that the subwoofer is far away from microwave ovens DECT phones or other Wi Fi devices Audio an...

Страница 42: ...Make sure that the Blu ray disc supports BD Live features Clear memory storage see BD Live on Blu ray on page 17 Cannot play video or photos from an iPod or iPhone on the TV Browse and select videos and photos from the iPod or iPhone screen and play them on yourTV Make sure that the iPod or iPhone software has not been tampered with or illegally modified Cannot view pictures from an iPod or iPhone...

Страница 43: ...d disassembly are prohibited This product incorporates proprietary technology under license fromVerance Corporation and is protected by U S Patent 7 369 677 and other U S and worldwide patents issued and pending as well as copyright and trade secret protection for certain aspects of such technology Cinavia is a trademark of Verance Corporation Copyright 2004 2010 Verance Corporation All rights res...

Страница 44: ...te non commercial use in accordance with the terms of RealNetworks EULA End User is not allowed to modify translate reverse engineer decompile dissemble or use other means to discover the source code or otherwise replicate the functionality of the Real Format Client Code except to the extent that this restriction is expressly prohibited by applicable law RealNetworks Inc disclaims all warranties a...

Страница 45: ... plays DivX video Visit divx com for more information and software tools to convert your files into DivX videos ABOUT DIVXVIDEO ON DEMAND This DivX Certified device must be registered in order to play purchased DivXVideo on Demand VOD movies To obtain your registration code locate the DivXVOD section in your device setup menu Go to vod divx com for more information on how to complete your registra...

Страница 46: ...a 7574 Kurdish 7585 Lao 7679 Latina 7665 Latvian 7686 Letzeburgesch 7666 Limburgan Limburger 7673 Lingala 7678 Lithuanian 7684 Luxembourgish 7666 Macedonian 7775 Malagasy 7771 Magyar 7285 Malayalam 7776 Maltese 7784 Manx 7186 Maori 7773 Marathi 7782 Marshallese 7772 Moldavian 7779 Mongolian 7778 Nauru 7865 Navaho Navajo 7886 Ndebele North 7868 Ndebele South 7882 Ndonga 7871 Nederlands 7876 Nepali ...

Страница 47: ...change password 31 character set 18 clear BD Live memory 17 connect a digital device HDMI 11 connect to TV 10 connectors 7 control buttons disc 16 control buttons radio 20 control buttons USB 16 copyright protection 41 customer support 2 D data files 17 deep color 30 default settings 32 device name 15 disc language 30 disc menu 30 display panel 31 disposal 4 DivX 17 E Easylink HDMI CEC 12 eject di...

Страница 48: ... radio 20 recycling 4 region codes 35 remote control 5 repeat 19 S shuffle 19 sleep timer 31 slide animation 19 Smart TV 23 software update 32 software version 32 sound 28 speaker specifications 35 subtitle language 30 subtitle position 31 surround sound 28 synchronize picture and sound 16 T troubleshooting network 41 troubleshooting picture 38 troubleshooting play 39 troubleshooting sound 39 tune...

Страница 49: ...47 EN W watch 3D 16 wired network 14 wireless network 14 ...

Страница 50: ...Specifications are subject to change without notice 2013 Koninklijke Philips Electronics N V All rights reserved HTB5150KD_98_UM_e3 ...

Отзывы: