background image

4

EN

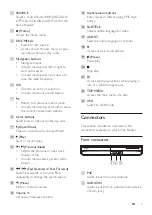
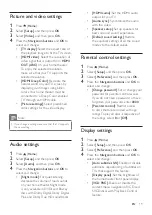
Front panel 

display

Indication

Coaxial In
HDMI ARC
Setup
USB

List of files on disc/USB

Mute

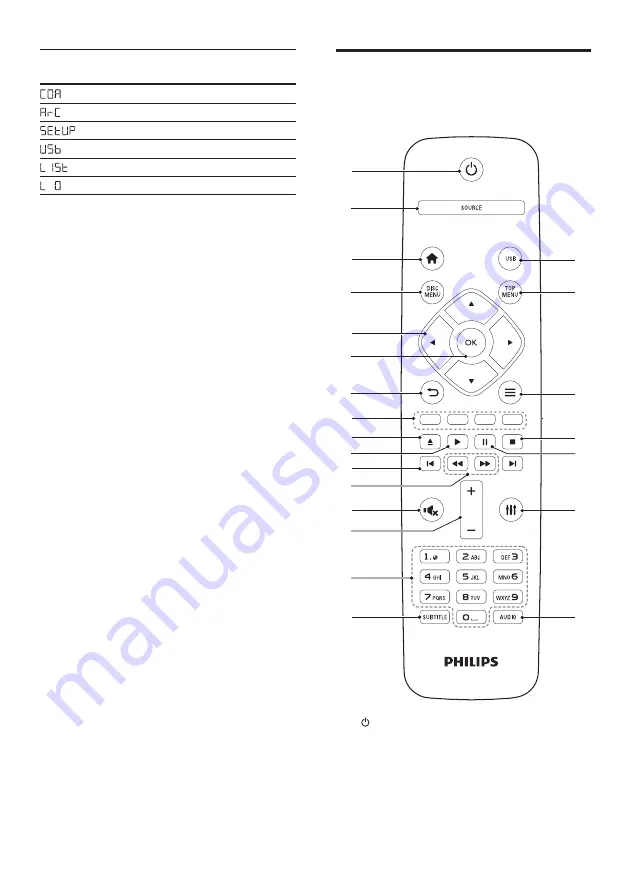
Remote control

This section includes an overview of the 

remote control. 


 (Standby-On)

•  Switch the home theater on or to 

standby.

•  When EasyLink is enabled, press 

and hold for at least three seconds 

to switch all connected HDMI CEC 

compliant devices to standby.

r

q

c

d

w

v

i

k

a

g

u

m

p

h

e
f

n

j

s

t

b

o

l

Содержание HTB2510

Страница 1: ...www philips com support User manual Always there to help you Register your product and get support at Question Contact Philips HTB2510 ...

Страница 2: ......

Страница 3: ...11 Discs 11 Data files 12 USB storage devices 13 Audio video and picture options 14 Radio 15 External audio device 16 Karaoke 16 Choose sound 16 5 Change settings 18 Language settings 18 Picture and video settings 19 Audio settings 19 Parental control settings 19 Display settings 19 Energy saving settings 20 Speaker settings 20 Restore default settings 20 6 Update software 21 Check software versio...

Страница 4: ...power voltage matches the value printed on the back or bottom of the product Never connect the product to the power outlet if the voltage is different Risk of injury or damage to this product Never place the product or any objects on power cords or on other electrical equipment If the product is transported in temperatures below 5 C unpack the product and wait until its temperature matches room te...

Страница 5: ...fiber cloth to clean the product Care of the environment Disposal of your old product Your product is designed and manufactured with high quality materials and components which can be recycled and reused Do not throw away the product with the normal household waste at the end of its life but hand it in at an official collection point or recycling By doing this you help to preserve the environment ...

Страница 6: ...Remote control This section includes an overview of the remote control a Standby On Switch the home theater on or to standby When EasyLink is enabled press and hold for at least three seconds to switch all connected HDMI CEC compliant devices to standby r q c d w v i k a g u m p h e f n j s t b o l ...

Страница 7: ...r resume play k Previous Next Skip to the previous or next track chapter or file In radio mode select a preset radio station l Fast Backward Fast Forward Search backwards or forward Press repeatedly to change the search speed m Mute Mute or restore volume n Volume Increase or decrease volume o Alphanumeric buttons Enter values or letters using SMS style entry p SUBTITLE Select subtitle language fo...

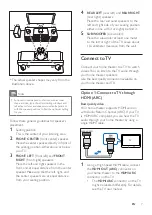
Страница 8: ...device g FM ANTENNA Connect to the supplied FM antenna 3 3 3 8 b a f e g d c 3 Connect and set up This section helps you connect your home theater to aTV and other devices and then set it up For information about the basic connections of your home theater and accessories see the quick start guide Note For identification and supply ratings see the type plate at the back or bottom of the product Bef...

Страница 9: ...NTER FRONT RIGHT REAR LEFT SUB WOOFER 4 REAR LEFT rear left and REAR RIGHT rear right speakers Place the rear surround speakers to the left and right side of your seating position either in line with it or slightly behind it 5 SUBWOOFER subwoofer Place the subwoofer at least one meter to the left or right of theTV Leave about 10 centimeter clearance from the wall Connect to TV Connect your home th...

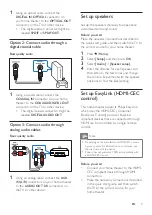
Страница 10: ...mTV and other devices on page 8 3 On yourTV turn on HDMI CEC operations For details see theTV user manual HDMI CEC is a feature that enables CEC compliant devices that are TV connected through HDMI to be controlled by a single remote control such as volume control for both the TV and the home theater see Set up EasyLink HDMI CEC control on page 9 4 If you cannot hear theTV audio through your home ...

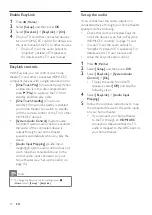
Страница 11: ...onnections described in the quick start guide and then switch theTV to the correct source for your home theater 1 Press Home 2 Select Setup and then press OK 3 Select Audio Speaker setup 4 Enter the distance for each speaker and then listen to the test tones and change the volume Experiment with the speaker positions to find the ideal setting Set up EasyLink HDMI CEC control This home theater supp...

Страница 12: ...matically when you play the device Audio Input Mapping Audio input mapping If system audio control does not work map the connected device to the correct audio input connector on your home theater see Set up the audio on page 10 Note To change the EasyLink control settings press Home select Setup EasyLink Set up the audio If you cannot hear the audio output of a connected device through your home t...

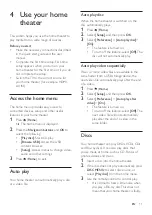
Страница 13: ... theater is switched on the disc automatically plays 1 Press Home 2 Select Setup and then press OK 3 Select Preference Auto play disc On The feature is turned on To turn off the feature select Off The disc will not automatically play Auto play video sequentially If two or more video files are available in the same folder from a USB storage device the next video file automatically plays after the e...

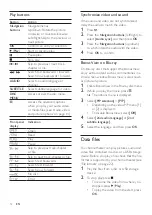
Страница 14: ...io to match the video 1 Press 2 Press the Navigation buttons left right to select Audio sync and then press OK 3 Press the Navigation buttons up down to synchronize the audio with the video 4 Press OK to confirm BonusView on Blu ray On Blu ray discs that support the BonusView enjoy extra content such as commentaries in a small screen window BonusView is also known as picture in picture 1 Enable Bo...

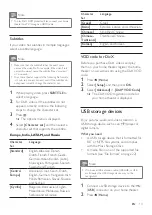
Страница 15: ...dTurkish Central Europe Albanian Croat Czech Dutch English German Hungarian Irish Polish Romanian Slovak Slovene and Serbian Cyrillic Bulgarian Belorussian English Macedonian Moldavian Russian Serbian and Ukrainian Character Set Language Greek Greek Baltic Estonian Latvian and Lithuanian Chinese Simplified Chinese Chinese Traditional Traditional Chinese Korean English and Korean VOD code for DivX ...

Страница 16: ...ange the subtitle position on the screen Time search Skip to a specific part of the video by entering the time of the scene 2nd audio language Select the second audio language for Blu ray video 2nd subtitle language Select the second subtitle language for Blu ray video Titles Select a specific title Chapters Select a specific chapter Karaoke Change the karaoke settings Angle list Select a differen...

Страница 17: ...you are prompted to install the radio stations again 1 Connect the FM antenna to the FM ANTENNA on your home theater For the best reception place the antenna away from yourTV or other sources of radiation 2 Press SOURCE repeatedly to switch to radio source If you have already installed the radio stations the last channel that you listened to is played If you have not installed any radio stations t...

Страница 18: ...urn the microphone volume to the minimum before you connect the microphone to your home theater Play karaoke music 1 While playing a karaoke disc press The options menu is displayed 2 Press the Navigation buttons to select Karaoke and then press OK The karaoke setup menu is displayed 3 Press the Navigation buttons up down and OK to change the following settings Microphone Turn the microphone on or...

Страница 19: ...d and then press OK 4 Press the Navigation buttons up down to select a setting Front panel display Indication Description Auto Automatically select a sound setting based on the sound stream Balanced Experience the original sound of your movies and music without added sound effects Powerful Enjoy thrilling arcade sounds ideal for action packed videos and loud parties Bright Spice up your dull movie...

Страница 20: ...e previous menu press To exit the menu press Home Language settings 1 Press Home 2 Select Setup and then press OK 3 Select Preference and then press OK 4 Press the Navigation buttons and OK to select and change Menu language Select a display language for menu Audio Select an audio language for discs Subtitle Select a subtitle language for discs Disc menu Select a menu language for discs Note If yo...

Страница 21: ...n DVDs and Blu ray discs with Dolby Digital Dolby Digital Plus and DolbyTrue HD soundtracks HDMI audio Set the HDMI audio output for yourTV Audio sync Synchronize the audio with the video Speaker setup Set up speakers for best surround sound experience Default sound settings Restore the equalizer settings of all the sound modes to the default values Parental control settings 1 Press Home 2 Select ...

Страница 22: ... settings 1 Press Home 2 Select Setup and then press OK 3 Select Advanced and then press OK 4 Press the Navigation buttons and OK to select and change Enhanced audio Select On to enable audio post processing at the speaker and enable karaoke settings if your product supports Karaoke To play the original audio of the disc select Off Tip Enable audio post processing before you select a predefined so...

Страница 23: ...ry Do not use a USB hard drive A computer with Internet access An archive utility that supports the ZIP file format Step 1 Download the latest software 1 Connect a USB flash drive to your computer 2 In your web browser go to www philips com support 3 At the Philips Support website find your product and locate the Software and drivers The software update is available as a zip file 4 Save the zip fi...

Страница 24: ...pg jpeg jpe jif jfif jfi A Audio formats Your home theater supports the following audio files Exten sion Con tainer Audio codec Bit rate mp3 MP3 MP3 Up to 320 kbps wma WMA Up to 192 kbps WMA Pro Up to 768 kbps aac AAC AAC HE AAC Up to 192 kbps wav WAV PCM 27 648 Mbps m4a MKV AAC 192 kbps ALAC Up to 192 kHz sampling rate mka MKA PCM 27 648 Mbps AC 3 640 kbps DTS core 1 54 Mbps MPEG 912 kbps MP3 Up ...

Страница 25: ...MOV container Audio codec Video codec Bit rate AC 3 MPEG MP3 AAC HE AAC MPEG 1 MPEG 2 40 Mbps MPEG 4 ASP 38 4 Mbps H 264 AVC up to HiP 5 1 25 Mbps mkv files in MKV container Audio codec Video codec Bit rate PCM AC 3 DTS core MPEG MP3 WMA AAC HE AAC DD FLAC DivX Plus HD 30 Mbps MPEG 1 MPEG 2 40 Mbps MPEG 4 ASP 38 4 Mbps H 264 AVC up to HiP 5 1 25 Mbps m2ts files in MKV container Audio codec Video c...

Страница 26: ...File system FAT16 FAT32 NTFS USB port 5V 1A Main unit Power supply 110 240V 50 60 Hz Power consumption 60 W Standby power consumption 0 5 W Dimensions W x H x D 340 x 55 x 279 mm Weight 1 87 kg Operating temperature and humidity 0 C to 45 C 5 to 90 humidity for all climates Storage temperature and humidity 40 C to 70 C 5 to 95 Speakers Center speaker Output power 50 W RMS 30 THD Speaker impedance ...

Страница 27: ...Disconnect the home theater from the power supply for a few minutes then reconnect Make sure that the touch buttons surface is not in contact with any conductive material like water drop metal etc Picture No picture Make sure that theTV is switched to the correct source for the home theater No picture on a TV connected through HDMI Make sure that you use a High Speed HDMI cable to connect the home...

Страница 28: ...sure that the home theater supports the region code of the disc see Region codes on page 22 If the disc is a DVD RW or DVD R disc make sure that it is finalized Cannot play a DivX file Make sure that the DivX file is encoded according to the HomeTheater Profile with the DivX encoder Make sure that the DivX file is complete DivX do not display correctly Make sure that the subtitle file name is the ...

Страница 29: ... technology is provided at the Cinavia Online Consumer Information Center at http www cinavia com To request additional information about Cinavia by mail send a postcard with your mailing address to Cinavia Consumer Information Center P O Box 86851 San Diego CA 92138 USA Open source software Philips Electronics Singapore hereby offers to deliver upon request a copy of the complete corresponding so...

Страница 30: ...a 7574 Kurdish 7585 Lao 7679 Latina 7665 Latvian 7686 Letzeburgesch 7666 Limburgan Limburger 7673 Lingala 7678 Lithuanian 7684 Luxembourgish 7666 Macedonian 7775 Malagasy 7771 Magyar 7285 Malayalam 7776 Maltese 7784 Manx 7186 Maori 7773 Marathi 7782 Marshallese 7772 Moldavian 7779 Mongolian 7778 Nauru 7865 Navaho Navajo 7886 Ndebele North 7868 Ndebele South 7882 Ndonga 7871 Nederlands 7876 Nepali ...

Страница 31: ...lu ray 11 BonusView 12 brightness 19 C change password 19 character set 13 connect to TV 7 connectors 5 control buttons disc 12 control buttons USB 12 D data files 12 deep color 19 default settings 20 disc language 18 disc menu 18 display panel 19 disposal 3 DivX 12 E Easylink HDMI CEC 9 eject disc 3 enhanced audio 20 environment 3 F factory settings 20 file formats 22 H HDMI ARC 7 HDMI audio 19 H...

Страница 32: ...s 22 remote control 4 repeat 14 S shuffle 14 sleep timer 20 slide animation 14 software update 21 software version 21 sound 16 speaker position 6 speaker setup 9 speaker specifications 22 subtitle language 18 subtitle position 19 surround sound 17 synchronize picture and sound 12 T troubleshooting picture 25 troubleshooting play 26 troubleshooting sound 26 tuning grid 16 U USB storage device 13 V ...

Страница 33: ...s of Dolby Laboratories This DivX Certified device has passed rigorous testing to ensure it plays DivX video To Play purchased DivX movies first register your device at vod divx com Find your registration code in the DivXVOD section of your device setup menu DivX DivX Certified DivX Plus HD and associated logos are trademarks of DivX LLC and are used under license The terms HDMI and HDMI High Defi...

Страница 34: ...Specifications are subject to change without notice 2015 Koninklijke Philips N V All rights reserved Trademarks are the property of Koninklijke Philips N V or their respective owners HTB2510_98_UM_V1 0 ...

Отзывы: