background image

23

The formats of these fi les are not 

supported.

USB device not supported

The USB device is incompatible with the 

system. Try another one.

Timer does not work

Set the clock correctly.

Switch on the timer.


Clock/timer setting erased

Power has been interrupted or the power 

cord has been disconnected. 
Reset the clock/timer.


No picture on HDMI connection.

Check if the HDMI cable is faulty. Replace a 

new HDMI cable.
Check if connected devices are authorized 

HDMI compatible. If not, the audio/video 
signal may not be output.

No sound on HDMI connection.

You may not hear any sound if the 

connected device is non-HDCP compliant 
or only DVI-compatible.

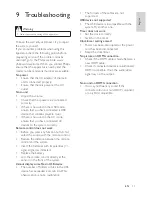
9 Troubleshooting

Warning

Never remove the casing of this apparatus. 

To keep the warranty valid, never try to repair 
the system yourself. 
If you encounter problems when using this 
apparatus, check the following points before 
requesting service. If the problem remains 
unsolved, go to the Philips web site www.
philips.com/welcome. When you contact Philips, 
ensure that the apparatus is nearby and the 
model number and serial number are available.

No power

Ensure that the AC adaptor of the main 

unit is connected properly.
Ensure that there is power at the AC 

outlet.

No sound

Adjust the volume.

Check that the speakers are connected 

correctly.
If there is no sound in the USB mode, 

ensure that you have connected a USB 
device that contains playable music.
If there is no sound in the AV mode, 

ensure that you have connected AV 
devices to the system correctly.

Remote control does not work

Before you press any function button, fi rst 

select the source with the remote control.
Reduce the distance between the remote 

control and the system.
Insert the batteries with its polarities (+/– 

signs) aligned as indicated.
Replace the battery.

Aim the remote control directly at the 

sensor on the front of the system.

Cannot display some fi les in USB device

The number of folders or fi les in the USB 

device has exceeded a certain limit. This 
phenomenon is not a malfunction.

English

EN

Содержание HSB2313/93

Страница 1: ...Register your product and get support at www philips com welcome EN User manual 1 Ⴌ߀ Ҭ HSB2313 93 ...

Страница 2: ...rs to the main unit 10 Attach the stand 10 Connect AV devices 11 Connect FM antenna 14 Connect power 14 Prepare the remote control 15 Set clock 15 Turn on 16 Enable Easylink 16 4 Play 17 Play from USB 17 Play connected AV devices 17 5 Listen to radio 18 Store radio stations in memory 18 Tune to a preset radio station 18 6 Adjust volume level and sound effect 19 Adjust volume level 19 Select a soun...

Страница 3: ...apparatus If damage is caused by failure to follow instructions the warranty does not apply Never insert objects into the ventilation slots or other openings on the apparatus Never remove the casing of this apparatus Place the apparatus on a flat hard and stable surface Place the set in a location with adequate ventilation to prevent internal heat build up in your system Allow at least 10 cm 4 inch...

Страница 4: ...ymbol attached to a product it means the product is covered by the European Directive 2002 96 EC Never dispose of your product with other household waste Please inform yourself about the local rules on the separate collection of electrical and electronic products The correct disposal of your old product helps prevent potentially negative consequences on the environment and human health HDMI and HD...

Страница 5: ...isten to music or play games Enjoy MP3 WMA music directly from your portable USB device Enjoy high definition performance from HDMI High Definition Multimedia Interface devices such as Blu ray Disc players digital receivers game consoles etc Listen to FM radio What s in the box Check and identify the contents of your package Main unit Speakers x 2 Digital subwoofer Remote control with battery Table ...

Страница 6: ...next track in the USB device Select preset radio station Overview of the main unit a SOUND SETTINGS GAMES MOVIE MUSIC Select a sound effect b IR sensor c Display panel Show current status d AV FRONT MP3 LINK AV input socket on the front panel Jack for an external audio device c g h e i d f a b OPTICAL HDMI OUT HDMI IN 1 HDMI IN 2 j k l m o q t n u p r s Eng l i sh EN ...

Страница 7: ...peakers from the main unit k DC IN Power supply socket l SUBWOOFER OUT Subwoofer out socket m DIGITAL IN OPTICAL Optical audio input socket n DIGITAL IN COAXIAL Coaxial audio input socket o VIDEO OUT Socket for composite video output p HDMI IN 1 HDMI input socket q AV1 IN VIDEO AUDIO L R AV input sockets r HDMI IN 2 HDMI input socket s HDMI OUT HDMI output socket t AV2 IN VIDEO AUDIO L R AV input ...

Страница 8: ...mode d Navigation buttons ALB PRESET Skip to the previous next album folder in the USB device Select a preset radio station Fast reverse or fast forward within a track in the USB device Tune to a radio station Start or pause USB play e COAX OPT Select the AV input source f Skip to the previous next track in the USB device Select preset radio station g VOL Adjust volume Adjust time h GAME SOUND Sel...

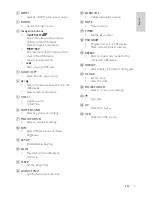
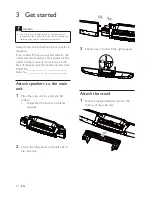
Страница 9: ...Always follow the instructions in this chapter in sequence If you contact Philips you will be asked for the model and serial number of this apparatus The model number and serial number are on the back of the apparatus Write the numbers here Model No __________________________ Serial No ___________________________ Attach speakers to the main unit 1 Place the main unit on a soft and flat surface Ensu...

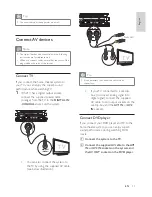
Страница 10: ...ayer OPTICAL HDMI OUT HDMI IN 1 HDMI IN 2 AUDIO OUT TV L R Not used Tip You can also mount the apparatus on a wall Connect AV devices Note The type of devices and connections in the following instructions are for reference only When you connect cables ensure that the color of the plug matches the color of the socket Connect TV If you connect the home theater system to yourTV you can enjoy the supe...

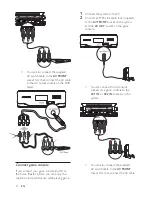
Страница 11: ...ble to the AV FRONT socket first then connect the AV cable OPTICAL HDMI OUT HDMI IN 1 HDMI IN 2 AUDIO VIDEO AUDIO OUT L R You can also connect the supplied AV switch cable to the AV FRONT socket first then connect the AV cable to the AV output sockets on the DVD player Connect game console If you connect your game console andTV to the home theater system you can enjoy the superb sound performance wh...

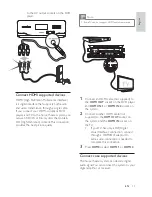
Страница 12: ...to select HDMI 1 or HDMI 2 Connect coax supported devices The home theater system can decode digital audio signal You can connect the system to your digital amplifier or receiver OPTICAL HDMI OUT HDMI IN 1 HDMI IN 2 HDMI OUT HDMI IN 2 TV to the AV output sockets on the DVD player Connect HDMI supported devices HDMI High Definition Muiltimedia Interface is a digital interface that supports both audio...

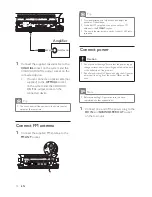
Страница 13: ...fore connecting AC power ensure you have completed all other connections 1 Connect one end of the power plug to the DC IN and SUBWOOFER OUT socket on the main unit 1 Connect the supplied coaxial cable to the COAXIAL socket on the system and the COAXIAL DIGITAL output socket on the connected device You can connect an optical cable not supplied to the OPTICAL socket on the system and the COAXIAL DIG...

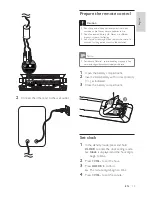
Страница 14: ...ecial handling may apply See www dtsc ca gov hazardouswaste perchlorate 1 Open the battery compartment 2 Insert 2 AAA battery with correct polarity as indicated 3 Close the battery compartment Set clock 1 In the standby mode press and hold CLOCK to enter the clock setting mode Clock is displayed and the hour digits begin to blink 2 Press VOL to set the hour 3 Press CLOCK to confirm The minute digit...

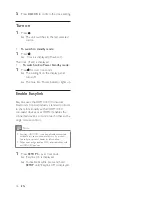
Страница 15: ... the HDMI CEC Consumer Electronics Control industry standard protocol to share functionality with all HDMI CEC compliant devices over HDMI It enables the connected devices to control each other with a single remote control Note EasyLink HDMI CEC is only applicable with certain criteria Terms and conditions may vary by product Consult your product dealer for information Philips does not guarantee 1...

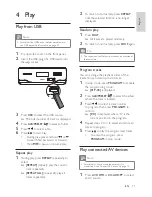
Страница 16: ...rogram 5 Press to play the programmed tracks To erase the program press PROGRAM in stop mode Play connected AV devices Note Ensure that you have made the necessary AV connections see Connect AV devices on page 12 1 Press AV HDMI or COAX OPT to select an AV source 4 Play Play from USB Note Ensure that the USB device contains playable music see USB playability information on page 23 1 Flip open the ...

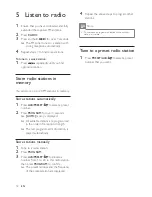
Страница 17: ...ions To tune to a weak station 1 Press repeatedly until you find optimal reception Store radio stations in memory You can store up to 20 FM stations in memory Store stations automatically 1 Press ALB PRESET to select a preset number 2 Press PROGRAM for over 3 seconds AUTO auto is displayed All available stations are programmed in the order of reception strength The last programmed radio station is ...

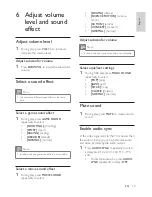
Страница 18: ... 1 Press AUDIO SYNC repeatedly to select a delay time 10 20 30 100 110 190 200 To disable audio sync press AUDIO SYNC repeatedly to select OFF 6 Adjust volume level and sound effect Adjust volume level 1 During play press VOL to increase decrease the volume level Adjust subwoofer volume 1 Press SUBW VOL to adjust the subwoofer volume Select a sound effect Note You cannot use different sound effect...

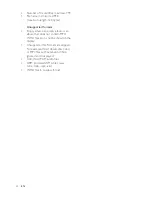
Страница 19: ... the minute 6 Press TIMER to confirm The mode indicator begins to blink 7 Press VOL to select ON on A clock icon appears on the display The system turns on automatically at the set time and switches to USB mode or tuner mode if there is USB device connected it switches to USB mode otherwise it switches to tuner mode To deactivate the alarm timer repeat steps above and select OFF off mode Set sleep ...

Страница 20: ...FAT32 sector size 512 bytes MP3 bit rate data rate 32 320 Kbps and variable bit rate WMA v9 or earlier Directory nesting up to a maximum of 8 levels Number of albums folders maximum 99 8 Product information Note Product information is subject to change without prior notice Product information General information AC power 220V 50Hz Operation Power Consumption 70W Standby Power Consumption 10W Eco S...

Страница 21: ...ms an empty album is an album that does not contain MP3 WMA files and is not be shown in the display Unsupported file formats are skipped For example Word documents doc or MP3 files with extension dlf are ignored and not played AAC WAV PCM audio files DRM protected WMA files wav m4a m4p mp4 aac WMA files in Lossless format EN ...

Страница 22: ...remains unsolved go to the Philips web site www philips com welcome When you contact Philips ensure that the apparatus is nearby and the model number and serial number are available No power Ensure that the AC adaptor of the main unit is connected properly Ensure that there is power at the AC outlet No sound Adjust the volume Check that the speakers are connected correctly If there is no sound in ...

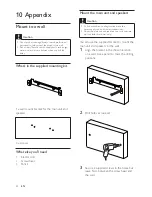
Страница 23: ... pencil to mark the drilling positions 2 Drill holes as marked 3 Secure 2 supplied screws in the holes but leave 5mm between the screw head and the wall 10 Appendix Mount to a wall Caution Risk of product damage Always consult professional personnel to safely mount the product to a wall Risk of injury Ensure that no supply ducts such as gas water or electricity are harmed when you drill the holes ...

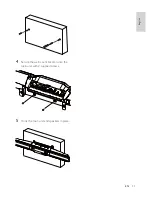
Страница 24: ...25 4 Secure the wall mount bracket onto the main unit with 2 supplied screws 5 Hook the main unit and speakers in place Eng l i sh EN ...

Страница 25: ... 2009 Koninklijke Philips Electronics N V All rights reserved Document order number HSB2313_93_UM_V2 0 ...

Отзывы: