background image

20 

Philips · Screeneo U3

8  Change settings

This section helps you change the following 
two system settings:
• 

Android system

• 

Projector system

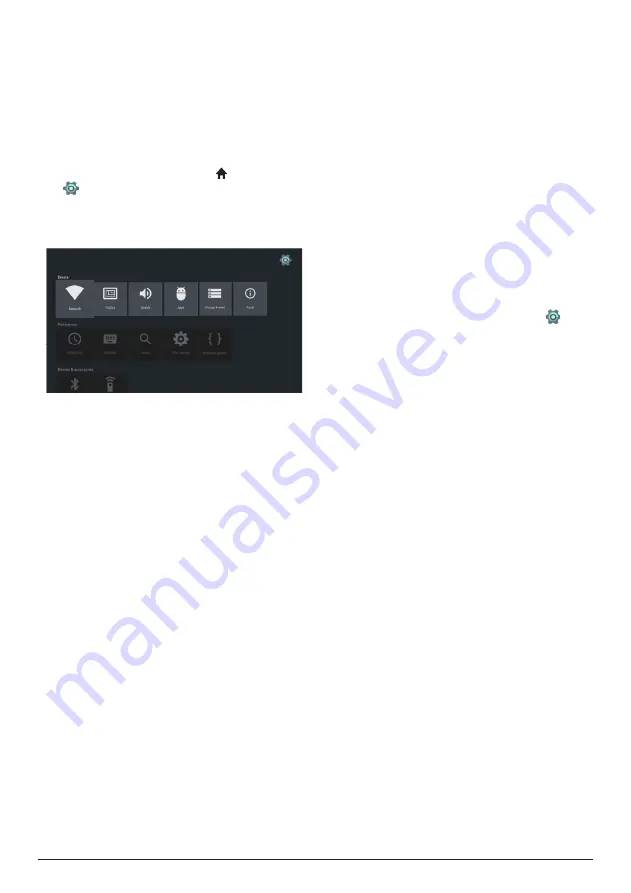
Android system settings

On the home screen (press  ), select the 

 icon, and then press 

OK

 to access various 

Android related setting options.

2  Use the 

Navigation buttons

 and 

OK

 to select 

and change settings.

Apps settings

Go to 

Apps

 or 

Security & restrictions

 to access 

the following settings.
• 

List downloaded/system/running apps,  
and memory used by each app

• 

Set various permissions for the installed 
apps, e.g. location, contacts, camera, 
microphone, phone and SMS, etc.

• 

Set security and restrictions for apps 
installation

• 

Uninstall or disable an application

• 

Clear data or cache

Keyboard and input methods

Go to 

Keyboard

 to access the following 

settings.
• 

Two keyboard options: 

Android Keyboard 

(AOSP)

 or 

Remote controller input method

• 

Adjust settings for 

Android Keyboard (AOSP), 

e.g. language, appearance and layout, 
gesture typing and text correction, etc.

• 

Adjust settings for Remote controller input 
method, e.g. language and input prediction, 
etc.

Image options

Go to 

Display

 to access the following settings.

• 

Select different screen resolutions

• 

Scale the screen up or down.

Sound options

Go to 

Sounds

 to access the following settings.

• 

System sounds:

 turn the system sound on 

or off.

• 

Dolby sounds: 

select a DRC (Dynamic 

Range Compression) mode for reducing 
dynamic range of sound output. For 
example, reduce the volume of the loud 
sounds when watching movie at night.

• 

Digital sounds:

 select an audio format for 

digital sound output

More settings

You can access more options under the 


settings.

• 

Check the total and used space for internal 
storage

• 

Reset to the factory default settings

• 

Set date and time

• 

Set different letter sizes for display

• 

Set volumes for media, alarm and 
notifications

• 

Create or log in accounts for popular apps

Содержание HDP3550

Страница 1: ...User Manual Register your product and get support at www philips com support Home Projector ...

Страница 2: ...m to Bluetooth speaker 13 5 Connect to playback devices 14 Connect to devices through HDMI 14 Connect to a computer through VGA 15 Connecting to devices through AV 15 Connect to devices through S PDIF 16 Connect to external speakers or headphones 16 Connect a screen through TRIGGER 17 6 Browse storage devices 17 Media playback 18 7 Wireless projection 19 Wireless projection with Android devices 19...

Страница 3: ...ng This symbol indicates tips that will help you in using this product more effectively and easily DANGER Danger of personal injury This symbol gives warning of danger of personal injury Physical injury or damage can result from improper handling CAUTION Damage to the product or loss of data This symbol gives warning of damage to the product and possible loss of data Damage can result from imprope...

Страница 4: ...if liquids or foreign substances leaked into the product Have the product inspected by an authorised service centre Always handle the product with care Avoid touching the lens Never place heavy or sharp objects on the product or on the power cable If the product gets too hot or emits smoke shut it down immediately and unplug the power cable Have your product checked by an authorised service centre...

Страница 5: ...the product see Cleaning page 23 Use a soft lint free cloth Never use liquid gaseous or easily flammable cleaners sprays abrasives polishes alcohol Do not allow any moisture to reach the interior of the product DANGER Risk of eye irritation This projector is equipped with a long life UHP lamp which emit very bright light Do not look directly into the projector lens during operation This could caus...

Страница 6: ...port on a computer e HDMI 2 connector Connect to an HDMI output on a playback device f HDMI 1 connector Connect to an HDMI output on a playback device g S PDIF connector Connect to an optical input on an audio system h AUDIO IN 3 5 mm audio input works only through VGA connection AUDIO OUT 3 5 mm audio output connect to external speakers or headphones i 5V 1A Used for charging a device e g a smart...

Страница 7: ...r entry d Android menu button When browsing apps access more options e Enable or disable on screen pointer f Increase or decrease volume g Adjust image sharpness h Color buttons Select tasks or options when using application services i Mute or restore volume j Access the home screen k Switch the projector to Bluetooth mode Disconnect the currently connected Bluetooth device to connect another Blue...

Страница 8: ... front of the projection screen see Placement page 8 You can also place the projector in the following three ways Front ceiling Mount the projector on ceiling with upside down in front of the projection screen A projector mount is required to mount the projector on ceiling Rear table Place the projector on a surface behind the projection screen A special rear projection screen is required Rear cei...

Страница 9: ...y Remove the batteries from the remote control if not in use for long periods of time 1 Open the battery compartment 2 Insert the supplied batteries type AAA with correct polarity indicated 3 Close the battery compartment When using the remote control point the remote control at the IR sensor on the projector and make sure there is no obstacle between the remote control and the IR sensor Power on ...

Страница 10: ...ed when you browse the Internet Before you can use the on screen pointer pair the remote control with the projector 1 When Step 4 is displayed follow the on screen instructions press and hold and on the remote control simultaneously for 5 seconds 2 Release the buttons and wait until the remote control is paired with the projector as indicated in the setup interface To use on screen pointer 1 When ...

Страница 11: ...een pointer page 10 4 After the network connection completes press to return to the network setup interface and select Next to proceed to the next step Step 7 time zone selection 1 When the time zone interface appears as Step 7 select and access the time zone option 2 After the time zone is set press to return to the time zone interface select Next to complete all the initial settings Image shape ...

Страница 12: ...nter page 10 Input text on web pages 1 Move the on screen pointer in the text field e g URL or search bar 2 Press OK on the remote control The text cursor appears in the text field 3 Use the pop up virtual keyboard to input text Apps management You may add or remove an application on the home screen by installing or uninstalling an application To browse search and install applications go to Aptoid...

Страница 13: ...luetooth device to pair with When the Bluetooth pairing succeeds the LED on the projector turns solid blue 5 Play audio on your Bluetooth device The audio streams to the projector Bluetooth re connection The projector is re connected to the last connected device automatically when the projector is switched to Bluetooth mode Connection to a second Bluetooth device 1 Press on the remote control to d...

Страница 14: ...he list The paired Bluetooth speaker is unpaired Connection to a second Bluetooth speaker 1 Unpair the currently connected Bluetooth speaker Or manually disable Bluetooth on the currently connected Bluetooth speaker 2 Then pair the projector with a second Blueooth speaker 5 Connect to playback devices Connect to devices through HDMI Connect a playback device e g a Blu ray player gaming console cam...

Страница 15: ...z 3 Press to access and select VGA Images are shown on the projection screen Notice Screen Resolution The projector supports the following resolutions VGA SVGA WXGA HD and FULL HD For best results please check the best resolution To output audio through VGA connection Establish the VGA connection Then using a 3 5 mm audio cable connect the AUDIO IN connector 3 5 mm on the projector to the analogue...

Страница 16: ...t external speakers or headphones to the projector With this connection audio from the projector is played through the external speakers or headphones DANGER Danger of hearing damage Before connecting the headphones turn down the volume on the device Do not use the device over a longer time at high volume especially when using headphones This could lead to hearing damage 1 Connect a 3 5 mm audio c...

Страница 17: ...and play data files stored on the local storage and connected storage devices e g a USB flash drive HDD camcorder or digital camera Notice Only the USB port marked 0 5 A on the projector can access the data files contained on a USB storage device for medai play 1 Connect a USB storage device to the port marked 0 5 A on the projector The USB port marked 1 A on the projector cannot access the data f...

Страница 18: ...files 1 In file selection mode select a file or folder The file folder name is ticked when selected 2 Access the menu to display editing options and select the file copying option To delete a file folder select the file deleting option 3 In file open mode navigate and open a folder to which you will paste the selected file folder 4 Access the menu again to display editing options and select file p...

Страница 19: ... mirroring feature name is also labeled as Screencast Screen Sharing or Multi screen etc 3 The connection invitation pops up on the screen of the projector Use the Navigation button and OK to select ACCEPT 4 After successful connection the screen content of your Android device is casted to the projection surface Wireless projection with iOS devices What you need Enable Wi Fi on your iPhone Make su...

Страница 20: ...AOSP or Remote controller input method Adjust settings for Android Keyboard AOSP e g language appearance and layout gesture typing and text correction etc Adjust settings for Remote controller input method e g language and input prediction etc Image options Go to Display to access the following settings Select different screen resolutions Scale the screen up or down Sound options Go to Sounds to a...

Страница 21: ...ns Cinema Ideal for very dark rooms and smaller screen sizes Daylight Ideal for bright environment Primetime Ideal for semi darkness Flow Motion Switch MEMC motion estimation motion compensation for motion interpolation to alleviate display motion blur Wall Colour Correction Adjust colour of the projected image to the coloured projection surface Advanced Colour Settings access the detailed colour ...

Страница 22: ...of the projection screen Rear Ceiling Mount the projector on ceiling behind the projection screen Sleep Mode Set time in minute at which the projector turns off automatically Screen Saver Set a time length after which the lamp of the projector turns off automatically if there is no input source Auto Power Down If this function is switched on the projector turns off automatically after three hours ...

Страница 23: ... Cleaning DANGER Instructions for cleaning Before cleaning always turn the projector off and disconnect the power cable Use a soft lint free cloth Never use liquid or easily flammable cleansers sprays abrasives polishes alcohol etc Do not allow any moisture to reach the interior of the projector Do not spray the projector with any cleaning fluids Wipe over the surfaces gently Be careful that you d...

Страница 24: ...emoving the lamp 2 Find the connector cover on the bottom of the left side panel of the projector Open the connector cover to find two small screws which fasten the lamp cover Then use an appropriate screwdriver to remove the two screws and remove the lamp cover CAUTION Do not connect the projector to power supply while the lamp cover is removed Do not insert your fingers inside the projector The ...

Страница 25: ...ting options 3 Select Firmware Update Automatic update If an upgrade is available you are prompted to start or cancel the update 4 Follow the on screen instructions to complete the update Update software through USB Download software Check the latest software version on www philips com support Find your product model number HDP3550 and locate Software and drivers On a computer download the softwar...

Страница 26: ...not the image from the external device Check if the cables are connected to the right sockets Check that the external device is turned on Check if the video output of the external device is turned on Check if the correct HDMI input is selected HDMI 1 HDMI 2 or HDMI 3 Only the initial screen appears and not the image from the connected computer Try a different resolution or lower the refresh rate s...

Страница 27: ...function is supported and how it can be enabled When I view videos the sound or the picture is sometimes distorted or the sound is not synchronized to the picture The available Wi Fi bandwidth is insufficient for sending the video flawlessly from the smartphone to the projector This can happen if one or more Wi Fi networks operate in the same frequency range nearby Certain IoT devices e g ZigBee e...

Страница 28: ... Dolby and the corresponding logo are trademarks of Dolby Laboratories 10 Appendix Technical data Technology Display technology Single 0 65 DarkChip3 1080p DLP Technology by Texas Instruments Light source Philips UHP Image life lamp Lamp type 250 watt UHP light source lasts over 10000 hours Colour wheel segment 6 segment RGBRGB Contrast ratio 200 000 1 Brightness 2000 colour lumen Displayable colo...

Страница 29: ...ufficient distance from a properly installed externally mounted antenna to satisfy the RF exposure requirements FCC ID 2ASRT HDP3550 CE statement The product shall only be connected to a USB interface of version USB 2 0 or higher Adapter shall be installed near the equipment and shall be easily accessible The operating temperature of the EUT can t exceed 35 C and shouldn t be lower than 5 C The plug...

Страница 30: ...t 2019 Screeneo Innovation SA Other notice Preservation of the environment as part of a sustainable development plan is an essential concern of Screeneo Innovation SA The desire of Screeneo Innovation SA is to operate systems respecting the environment and consequently it has decided to integrate environmental performances in the life cycle of these products from manufacturing to commissioning use...

Страница 31: ...lips and the Philips Shield Emblem are registered trademarks of Koninklijke Philips N V used under license Screeneo Innovation SA is the warrantor in relation to the product with which this booklet was packaged 2019 Screeneo Innovation SA All rights reserved Screeneo U3 EN ...

Отзывы: