background image

15

EN

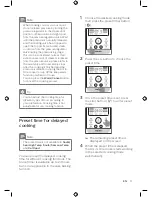
Pressure cooking

Note


Make sure the floating valve drops down 
before closing the lid.

Follow the steps in “Preparations 
before cooking”.

Turn the pressure regulator to the 
seal position.

Put the plug in the power socket.

Press the 

Pressure Cook

 button  

(   ) to choose a desired cooking 
function.


»

The selected cooking mode 
indicator flashes.


»

The default cooking time is 
displayed on the screen.

Press and hold the 

Start/Reheat


button (   ) for 3 seconds and the 
All-in-One cooker starts working in 
the selected mode.


»

You will hear two beeps after 
you press the start button.

When the cooking time has 
elapsed, you will hear two beeps 
and the All-in-One cooker switches 
to keep-warm mode automatically.


»

The keep warm indicator lights 
up.

Hold the top lid handle and turn 
the lid anti-clockwise until it cannot 
move any more, then lift it up.

Tip


You can adjust the cooking time for 
different types of food according to your 
preference. 

Содержание HD2178

Страница 1: ...HD2178 User manual ...

Страница 2: ......

Страница 3: ... before cooking 11 Cooking time regulating range 13 Non pressure cooking 14 Pressure cooking 15 Preset time for delayed cooking 17 Setting up child lock 18 Assembling and disassembling the pressure regulator 18 5 Specifications 19 6 Cleaning and Maintenance 20 Interior 20 Exterior 20 Accessories 20 7 Notices 21 Electromagnetic fields EMF 21 Recycling 21 8 Guarantee and service 21 9 Troubleshooting...

Страница 4: ...ith reduced physical sensory or mental capabilities or lack of experience and knowledge unless they have been given supervision or instruction concerning use of the appliance by a person responsible for their safety Children should be supervised to ensure that they do not play with the appliance If the supply cord is damaged it must be replaced by the manufacturer its service agent or similarly qu...

Страница 5: ...ner pot the sealing ring or the main body is damaged Do not let the power cord hang over the edge of the table or worktop on which the appliance stands Make sure the heating element the temperature sensor and the outside of the inner pot are clean and dry before you put the plug in the power outlet Do not plug in the appliance or press the buttons with wet hands Make sure the power socket is clean...

Страница 6: ...ent overflow Do not place the cooking utensils inside the pot while cooking Caution Never use any accessories or parts from other manufacturers or that Philips does not specifically recommend If you use such accessories or parts your guarantee becomes invalid Do not expose the appliance to high temperatures nor place it on a working or still hot stove or cooker Do not expose the appliance to direc...

Страница 7: ...d shells or excessive bone before cooking Do not place a magnetic substance on the lid Do not use the appliance near a magnetic substance Always let the appliance cool down to room temperature before you clean or move it Always clean the appliance after use Do not clean the appliance in dishwasher Do not pour water inside the unit if the inner pot has been removed Always unplug the appliance if no...

Страница 8: ...s in the box All in One cooker main unit Inner pot x 2 Rice spoon Soup ladle Measuring cup Steaming plate User manual Warranty card Power cord Recipe Booklet User manual http www philips com welcome Register your product and get support at http www philips com welcome Warranty Register your product and get support at http www philips com welcome Recipe Register your product and get support at ...

Страница 9: ...ct overview a Inner pot g Safety valve b Water level indication h Sealing ring c Control panel i Inner lid d Heating element j Main unit handle e Pressure regulator k Floating valve f Top lid l Lid handle h i l k ...

Страница 10: ...creen r Pressure Cook button n Slow cook Sauté Sear button s Start Reheat button o Multi Cook button t Warm Cancel button p Preset Timer and Screen Lock button u Cooking Time button q Decrease button v Increase button m n o p q r s t u v ...

Страница 11: ...th more than 1 2 full of food and liquid For rice cooking follow the water level indications on the inside of the inner pot Water level indication for rice refer to cup provided with the product You can adjust the water level for different types of rice and your own preference Do not exceed the maximum water level indication Make sure the floating valve falls down before cooking 3 Getting started ...

Страница 12: ... when the top lid is properly locked Note Make sure the sealing ring is properly assembled around the inside of the top lid Make sure the pressure regulator and floating valve are clean and not blocked Make sure the outside of the inner pot is dry and clean and that there is no foreign residue on the heating element Make sure the inner pot is in proper contact with the heating element ...

Страница 13: ...rs Stew Curry 90 C 10 C 1 hr 20 mins 10 hrs Pot Roast 90 C 10 C 6 hrs 2 12 hrs Bake 140 C 10 C 45 mins 10 59 mins Yogurt 40 C 10 C 8 hrs 6 12 hrs Warm 65 C 85 C 12 hrs Reheat 85 C 10 C 25 mins 8 25 mins The preheat time of Saute Sear Low Temp may take up to 3 minutes The preheat time of Saute Sear High Temp may take up to 5 minutes Pressure cooking programs Cooking function Default cooking time mi...

Страница 14: ...ng process is controlled by temperatures 6 Press the button to set the cooking time Non pressure cooking 1 Follow the steps in Preparations before cooking 2 Turn the pressure regulator to the Bake or Vent position When choosing Slow cook Stew Curry Pot Roast Yogurt and Reheat turn the pressure regulator to the Vent position When choosing Bake turn the pressure regulator to the Bake position When u...

Страница 15: ...time is displayed on the screen 7 Press and hold the Start Reheat button for 3 seconds and the All in One cooker starts working in the selected mode You will hear two beeps after you press the start button 8 When the cooking time has elapsed you will hear two beeps and the All in One cooker switches to keep warm mode automatically The keep warm indicator lights up 9 Hold the top lid handle and tur...

Страница 16: ...ently 11 Hold the top lid handle and turn the lid anti clockwise until it cannot move any more then lift it up 5 If you want to set a different cooking time press the Cooking Time button The cooking time flashes on the screen 6 Press the button to set the cooking time 7 Press and hold the Start Reheat button for 3 seconds and the All in One cooker starts working in the selected mode You will hear ...

Страница 17: ... in use You can press the Warm Cancel button to cancel the cooking process Tip You can adjust the cooking time for different types of food according to your preference Cooking time is not adjustable for rice cooking function Preset time for delayed cooking Note The preset time is not available in Sauté Sear High Temp Sauté Sear Low Temp and Pot Roast You can preset the delayed cooking time for dif...

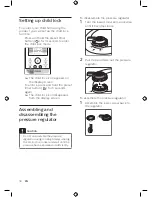
Страница 18: ...you can set up the child lock function Press and hold the preset timer button for 3 seconds to enter the child lock mode The child lock icon appears on the display screen To unlock press and hold the preset timer button for 3 seconds again The child lock icon disappears from the display screen Assembling and disassembling the pressure regulator Caution Do not disassemble the pressure regulator dur...

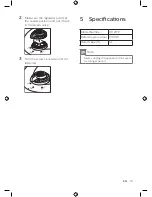
Страница 19: ...ated power output 1000W Rated capacity 6L Note Always unplug the appliance if not used for a longer period 2 Make sure the regulator points at the sealed position and put it back to the steam valve 3 Turn the screw clockwise until it is fastened ...

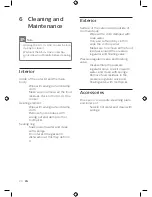
Страница 20: ...hpicks Accessories Rice spoon soup ladle steaming plate and inner pot Soak in hot water and clean with sponge 6 Cleaning and Maintenance Note Unplug the All in One cooker before starting to clean it Wait until the All in One cooker has cooled down sufficiently before cleaning it Interior Inside of the outer lid and the main body Wipe with wrung out and damp cloth Make sure to remove all the food r...

Страница 21: ...health effects Philips confirms that if its products are handled properly for their intended use they are safe to use according to scientific evidence available today Philips plays an active role in the development of international EMF and safety standards enabling Philips to anticipate further developments in standardization for early integration in its products Recycling Do not throw away the ap...

Страница 22: ...r pot before switching the All in One cooker on The heating element is damaged or the inner pot is deformed Take the cooker to your Philips dealer or a service center authorized by Philips Incorrect function or time was selected increase cooking time or change cooking method Air or steam leaks from under the lid The sealing ring is not well assembled Make sure the sealing ring is well assembled ar...

Страница 23: ...2 or E4 displays on the screen The All in One cooker has malfunction Take the appliance to a Philips dealer or a service center authorised by Philips Water steam leaks from pressure regulator valve Valve screw is loose or food residual is inside the valve Switch off appliance and let cool down to room temperature disassemble valve as per maintenance instructions The Start Reheat or Warm Cancel but...

Страница 24: ... 2017 Koninklijke Philips N V All rights reserved HD2178_UM_AUS_v2 0 ...

Отзывы: