background image

25

3

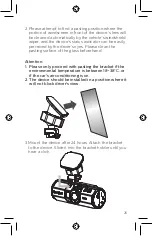
Mount the device after 24 hours. Attach the bracket 
to the device. Slide it into the bracket holder until you 
hear a click.

Attention: 

1.  Please only proceed with pasting the bracket if the 

environmental temperature is between 18

~

38

°C

, or 

if the car's air conditioning is on.

2.  The device should be installed in a position where it 

will not block driver's view.

2. Please attempt to find a pasting position where the 

portion of windscreen in front of the device's lens will 
be cleaned automatically by the vehicle's windshield 
wiper, and the device's status indicator can be easily 
perceived by the driver's eyes. Please clean the  
pasting surface of the glass beforehand.

Содержание GoSure ADR830

Страница 1: ...User manual 简体中文 3 English 22 ADR830 GoSure Size 75 w x127 5 h mm ...

Страница 2: ... 车内安装 5 2 3 自动打开 关闭电源 8 2 4 手动录音关闭 启动 8 2 5 取出存储卡 8 2 6 关于存储卡 8 3 用户界面 10 4 系统设置 11 4 1 设定日期和时间 11 4 2 功能设置 11 5 操作说明 13 5 1 录制视频 13 5 2 视频回放 14 5 3 删除视频 14 5 4 锁定视频 15 6 附加功能 16 6 1 WaveGuard 全天停车监控功能 16 6 2 疲劳驾驶提醒 16 7 技术规格 17 8 免责声明 18 ...

Страница 3: ...2 扬声器 3 Mini HDMI 接口 4 Mini USB 接口 9 抓拍按钮 10 紧急录像按钮 11 麦克风 12 返回按钮 13 左翻按钮 录音启动关闭按钮 1 2 3 4 6 8 7 5 5 重启按键 6 存储卡卡槽 7 镜头 8 WaveGuard停车监控指示灯 9 10 11 12 13 14 15 16 17 14 右翻按钮 15 菜单 确认按钮 16 OBD电源线 17 直流电转换盒 产品简介 1 ...

Страница 4: ...User manual キҀ 3 English 22 ADR830 GoSure 4 注意 1 该记录仪配有OBD电源线 OBD是汽车的车载自动诊断 系统接口 可以为记录仪提供稳定的电源 2 请参照汽车用户手册或者询问汽车经销商 确定OBD接 口的位置 3 请不要在开车时操作记录仪 4 为防止重要视频被覆盖 请将存储卡及时取出 支架 x 1 OBD电源线 x 1 用户手册 x 1 ...

Страница 5: ...5 2 1 插入存储卡 1 存储卡金属触点背向镜头 插入记录仪的卡槽 2 推动存储卡 直到其咔嗒一声锁定到位 然后盖上 保护盖 2 2 车内安装 1 撕去支架背面和镜头上塑料保护膜 快速入门 2 ...

Страница 6: ...必找到合适的粘贴位置 在通电状态下 观察并调整 记录仪的视野范围 让该记录仪镜头前的挡风玻璃可以通 过雨刮器自动进行清洁 同时 可以让驾驶员轻松看到该 记录仪的状态指示灯 另外 请务必提前清洁粘贴区域的 玻璃表面 注意 1 请仅在环境温度处于 18 38 C时粘贴支架 或开启汽车空调 2 请将记录仪安装至不影响驾驶员视线的位置 3 24小时之后再安装该记录仪 把支架连接到记录仪上 将支架滑入支架槽 直到听到咔嗒声 ...

Страница 7: ... 将OBD电源线的Micro USB插头插接到记录仪Micro USB 接口 6 将OBD电源线的OBD插头插接到汽车的OBD接口 7 请将OBD电源线的直流电转换盒粘贴在记录仪附近 注意 1 大多数汽车的OBD接口位于A B C D或者E区域附近 2 为避免OBD电源线悬挂高出车厢内壁10毫米以上造成危 险 请务必使用线夹将OBD电源线紧贴车厢内壁固定 3 记录仪和电源线的安装不能影响车内原有设备 比如安全 气囊等的运作 A B D E C 1 9 8 16 1 9 8 16 ...

Страница 8: ...动开机 2 如果您拔掉OBD电源线 记录仪自动关机 2 4 手动录音关闭 启动 1 当设置记录仪处于录音开启状 态时 按 І 按钮 即可关闭 录音 2 当设置记录仪处于录音关闭 状态时 按 І 按钮 即可启 动录音 2 5 取出存储卡 打开保护盖 并按下存储卡 使其从卡槽内弹出 2 6 关于存储卡 1 请使用容量不低于16GB 不高于64GB Class10 级别 以上的存储卡 2 首次使用时 请务必使用记录仪对存储卡进行格式化 3 存储卡的容量和录像时间的关系 ...

Страница 9: ...递数据 4 为使停车监控保护的时间更长 选择720P30的图像分辨率 保护时间比1080P30延 长1倍 选择停车监控的保护范围为 近 保护时间比 中 延长10 30 使用更高容量的卡 比如64G 保护时间比32G延长1倍 5 每张存储卡的都有一定的使用寿命 特别是应用于高低温 变化 剧烈震动的车载环境 进行大量的数据读写 请仅使用推荐的存储卡 当频繁提醒 卡异常 请格式化或换卡 请换新卡 存储卡 容量 视频分辨率 720P 30FPS 720P 60FPS 1080P 30FPS 32GB 520 分钟 340 分钟 320 分钟 64GB 1040 分钟 680 分钟 640 分钟 ...

Страница 10: ...10 编号 描述 1 录像 停止指示 2 分辨率指示 3 WDR 宽动态范围 开 关指示 4 录音开始 停止指示 5 紧急录像状态指示 6 录音时间 7 疲劳驾驶指数 8 ISO数值 9 日期 时间戳 10 状态指示灯 蓝色 录像状态 蓝色闪烁 紧急录像状态 紧急录像按钮被按下 灯灭 非录像状态 11 抓拍 3 5 4 7 2 1 6 8 10 用户界面 3 9 11 ...

Страница 11: ... 间 图标 按 M 按钮 进入 日期 时间设置菜单 3 要调整日期和时间字段 按 M 按钮选择该字段即可 4 按 І І 按钮选择数值 5 重复3 4步 调整其它字段 6 按 返回按钮保存所作更改 4 2 功能设置 编号 功能 菜单 图标 说明 1 媒体文件 查看 一般录像 文件 紧急录像 文件和抓拍 图片 用户可播放 暂停 删除 锁定或者解锁相 关视频文件 2 图像分辨率 将视频分辨率设置为全高清1080p FHD 超高清 60FPS HD 或者高清晰度 3 停车监控 设置停车监控的保护范围为远 中 近和分辨率 系统设置 4 ...

Страница 12: ...液晶显示屏 自动关闭 设置液晶屏自动关闭前的点亮时间 7 格式化 格式化存储卡 8 语言选择 中文或英文 9 录音 打开 关闭录音功能 10 曝光设置 调整曝光值 11 时间戳 打开 关闭视频上的日期 时间标记功能 12 宽动态 WDR 打开 关闭WDR功能 13 Wave Guard 指示灯 打开 关闭WaveGuard指示灯 14 疲劳驾驶 警示 打开 关闭疲劳驾驶警示功能 15 电瓶保护 电压 调整电瓶低压保护阈值 16 恢复出厂 设置 将记录仪所有设置恢复为出厂默认 17 系统版本 固件版本以及其它相关的信息 ...

Страница 13: ...d指示 灯将闪烁 录像功能立即被 重新启动 如果接下来的10秒时间内没有发生其它移动事 件 则录像功能关闭 所录制的视频文件都将保存在 一般 录像 文件夹 5 1 2 紧急录像 1 若碰撞监测功能启动 该记录仪将自动监测碰撞事件 生 成紧急视频文件 并将其存入 紧急录像 文件夹 行车 过程中 紧急视频将显示事件发生前后的情况 停车状态 时 紧急视频只能显示事件发生后的情况 2 正常录像时 您可以随时按下紧急录像按钮 启动紧急 录像功能 确保每一个值得关注的瞬间都可以被记录 3 为保证全天停车监控所必需的磁盘空间 紧急录像文件最 大数量限定为12个 超过后 将在汽车点火启动后自动删 除较旧文件 请及早备份 操作说明 5 ...

Страница 14: ...按 M 按钮进入主菜单 2 按 І І 按钮 选择 媒体文 件 图标 并按 M 按钮 3 按 І І 按钮 选择 一般录 像 或者 紧急录像 文件 夹 并按 M 按钮 4 按 І І 按钮 选定视频文件 并按 M 按钮 然后选择 播 放 来播放该视频 5 播放视频时 按 M 按钮停 止 按І 按钮快进 按 І按钮 快退 按返回按钮返回 5 3 删除视频 1 按 І І 按钮 选定视频文件 之后按 M 按钮 选择 删除 移除该视频 ...

Страница 15: ...15 2 选择 删除全部 删除所有未 被锁定的视频文件 3 确认信息出现在屏幕上 按 І І 按钮 选择 是 并按 M 按钮确认删除 5 4 锁定视频 锁定视频 防止视频文件被覆盖 1 按 І І 按钮 选定视频文件并 按 M 按钮 4 使用相同的方法给视频文件解锁 3 对该视频加锁 然后自动返 回到视频列表 2 按 І І 按钮 选择 锁定 并按 M 按钮 ...

Страница 16: ...停车状态下 如果记录仪监测到汽车碰撞 亦会开始录像 并保存在 紧急录像 文件夹 6 2 疲劳驾驶警报 为帮助驾驶员有效预防疲劳驾驶 考虑到与生理和行 程相 关的各种参数 例如当前时间和驾驶时长等 疲劳指数 会显示驾驶员疲劳的变化状况 当疲劳指数 达到80时 记 录仪即会提醒驾驶员 且每连续驾驶2小时 记录仪亦会提 醒驾驶员 开启疲劳驾驶提醒功能时 屏幕上会显示疲劳指 数 当疲劳指数小于60时 屏幕上会显示绿色数值 在疲劳 指数达到80之前 屏幕上会显示黄色数值并同时发出一声提 醒音 当疲劳指数大于80时 屏幕上会显示红色数值并同时 发出三声提醒音 此外还会弹出疲劳图标提醒用户 用户 开启疲劳驾驶提醒功能时 需准确的设置系统时间 附加功能 6 ...

Страница 17: ... 显示屏 1 5英寸液晶显示屏 480x240 光圈 F 1 8 定焦镜头 六玻广角镜头 可视角135度 对角线 文件格式 MOV PCM音频压缩技术 H 264视频压缩技术 随机存取存储器 64M x 16bit 1Gbits DDR3 SDRAM 内部存储器 64Mb SPI闪存 储存卡 Micro SD存储卡 不低于16GB Class10 及以上 推荐32GB 录像时长 32GB 全高清320分钟 64GB 全高清640分钟 系统时间保持 5天 工作温度 10 C 55 C 储存温度 20 C 65 C 随机附件 OBD电源线 支架 用户手册 接口 Mini USB2 0 接口 Mini HDMI 接口 存储卡接口 麦克风 扬声器 语言 英文 中文 供电电源 12V转 5V 1A OBD电源线 尺寸 长 宽 高 108 8 x 41 0 x 38毫米 技术规格 7 ...

Страница 18: ...自 动断开电源 停止视频监测保护功能 冬季气温过低 汽车电瓶年代已久或者电量未充满时 会 导致该记录仪有效录制时间减少 若记录仪镜头前面的挡风玻璃因雨 雪 沙尘或者其它自 然 人为因素变脏 该记录仪将无法获得有效录像证据 处于雨 雪 晃动的树枝或者繁忙的街道 停车场环境时 有时可能导致视频持续录制 因而大大降低该记录仪的有 效保护时间 带自动启停功能的汽车当发动机重启时 有可能因电压被 拉低到电瓶低压保护阈值 造成记录仪的重启 有些汽车贴膜不仅干扰GPS全球定位系统 雷达 ETC系 统等 还会影响WaveGuard的监测范围 若通过调节系 统设置仍然无法满足您对汽车录像保护范围的要求 请将 其更换为质量更好的汽车贴膜 或在汽车贴膜上 开 一 个小窗 判断车膜会否影响WaveGuard功能 站在车头 挥手 红灯闪烁 则没问题 免责声明 8 ...

Страница 19: ...明显破损 错误使用或疏忽而造成损坏 不适当安 装或因天灾造成损坏等 保用服务立即失效 维修时请携带此卡原件和发票原件 并随产品一起提供给销售商 否则 将不能保证保修服务的正常提供 保修卡和发票若经修改 将不能获得保修服务 请联络您所购买的产品的销售商 此销售商将协助您进行产品的保 修服务 对不依照上述保用条例办理之用户 本公司对上述条例负有解释权 姓名 详细地址 电话 邮编 以下信息由用户填写 以下信息我们将严格保密 仅用于维修联络之目的 请务必填写准确联系信息 以下信息由零售商填写 以下信息由厂商填写 故障描述 1 2 客户服务热线 8008 201 201 手机用户调拨打 4009 201 201 合格证 已检验 零售商 负责人 地址 电话 型号 机身编号 若购买日期与发票日期不符 或无相关信息 将按出厂日期顺延一个月算起 ...

Страница 20: ...铅 Pb 汞 Hg 镉 Cd 六价铬 Cr Ⅵ 多溴联苯 PBB 多溴二苯醚 PBDE 主机 附件 部件名称 序号 1 2 有害物质或元素 按要求填O或X 产品有毒有害物申明 O 表示该有毒有害物质在该部件所有均质材料中的含量在GB T 26572规定的限量要求以下 X 表示该有毒有害物质至少在该部件的某一均质材料中的含量超出GB T 26572规定的限量要求 X X O O O O O O O O O O ...

Страница 21: ...ing the Micro SD Card 27 2 6 About the Micro SD Card 27 3 User Interface 29 4 System Settings 30 4 1 Setting Date and Time 31 4 2 Function Settings 31 5 Operating Instructions 32 5 1 Recording Videos 32 5 2 Video Playback 32 5 3 Deleting Videos 33 5 4 Locking Videos 34 6 Add On Functions 35 6 1 WaveGuard Parking Monitoring 35 6 2 Driver Fatigue Alert 35 7 Technical Specifications 36 8 Disclaimer 3...

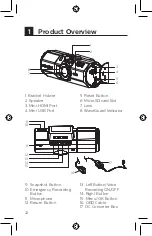
Страница 22: ...pshot Button 10 Emergency Recording Button 11 Microphone 12 Return Button 1 2 3 4 6 8 7 5 5 Reset Button 6 Micro SD card Slot 7 Lens 8 WaveGuard Indicator 9 10 11 12 13 14 15 16 17 13 Left Button Voice Recording ON OFF 14 Right Button 15 Menu OK Button 16 OBD Cable 17 DC Converter Box 1 ...

Страница 23: ... is the car s On Board Diagnostics interface and can provide a constant power supply to the device 2 To find your car s OBD port please refer to the car s user manual or ask the car dealer 3 Please do NOT operate the device while driving 4 Please take the Micro SD card out of the device after any incident to prevent important videos from being overwritten ...

Страница 24: ...ard with the gold contacts inward toward the back of the device 2 Push the Micro SD card until it clicks into place and close the protective cap 2 2 Installing in a Vehicle 1 Peel off the protective plastic film from both the bracket and the lens Quick Start 2 ...

Страница 25: ...8 C or if the car s air conditioning is on 2 The device should be installed in a position where it will not block driver s view 2 Please attempt to find a pasting position where the portion of windscreen in front of the device s lens will be cleaned automatically by the vehicle s windshield wiper and the device s status indicator can be easily perceived by the driver s eyes Please clean the pastin...

Страница 26: ...cable should NOT interfere with the normal operation of vehicle s original equipment such as the airbag etc 4 Loosen the knob to adjust the device into the correct position Then tighten the knob to make sure the device securely locked 5 Connect the micro USB connector of the OBD cable to the Micro USB port of the device 6 Plug the OBD cable into your vehicle s OBD socket 7 Paste the DC converter b...

Страница 27: ...with the device before usage 3 Relationship between card capacity and recording time 2 4 Manual Voice Recording Off On 1 When the voice recording setting in System Setting is OFF press І to switch on voice recording 2 When the voice recording setting in System Setting is ON press І to switch off voice recording 2 3 Automatic Power On Off 1 Once the power of the vehicle is on the device automatical...

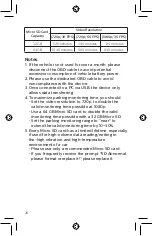
Страница 28: ...e a 64 GB Micro SD card to double the valid monitoring time possible with a 32 GB Micro SD Set the parking monitoring range to near to extend the valid monitoring time by 10 30 5 Every Micro SD card has a limited lifetime especially if used for high volume data reading writing in the high vibration and high temperature environment of a car Please use only a recommended Micro SD card If you frequen...

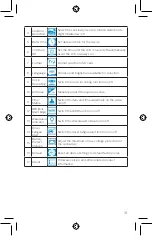
Страница 29: ... ON OFF indicator 5 Emergency recording status indicator 6 Recording time 7 Driver fatigue index 8 ISO value 9 Date and time stamp 10 Status indicator Blue Video recording status Blue blink Emergency recording status when the Emergency recording button is pressed Off Non recording status 11 Snapshot button 5 4 3 7 2 1 6 8 9 10 11 User Interface 3 ...

Страница 30: ...he value 5 Repeat steps 3 4 to adjust the other fields 6 Press the return button to save your changes 4 2 Function Settings No Function Menu icon Description 1 Media Files Watch and operate normal and emergency video files and snapshot pictures Users can play pause delete lock and unlock the video files 2 Resolution Set the video resolution to Full HD 1080p FHD HD Premium 60 FPSHD or HD Premium HD...

Страница 31: ...ch the voice recording function on off 10 EV Value Manually adjust the exposure value 11 Time Stamp Switch the date and time watermark on the video on off 12 WDR Wide DynamicRange Switch the WDR function on off 13 WaveGuard Indicator Switch the WaveGuard Indicator on off 14 Driver Fatigue Alert Switch the driver fatigue alert function on off 15 Battery Protect Voltage Adjust the threshold of low v...

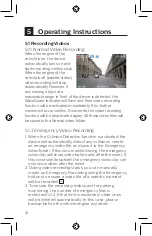
Страница 32: ...cy Video Recording 1 When the Collision Detection function is activated the device will automatically detect any collisions create an emergency video file and save it in the Emergency video folder If this occurs while driving the emergency video clip will show video before and after the event If this occurs while parked the emergency video clip can only show video after the event 2 During video re...

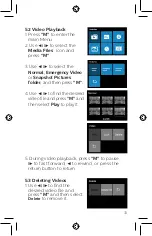
Страница 33: ...ideo or Snapshot Pictures folder and then press M 4 Use І І to find the desired video file and press M and then select Play to play it 5 During video playback press M to pause І to fast forward І to rewind or press the return button to return 5 3 Deleting Videos 1 Use І І to find the desired video file and press M and then select Delete to remove it ...

Страница 34: ... and press M to confirm deletion 5 4 Locking Videos To lock videos from being overwritten 1 Use І І to find the desired video file and press M 2 Use І І to select Lock and press M 3 You will be automatically returned to the video list and the selected video will be locked 4 Use the same method to lock unlock other video files ...

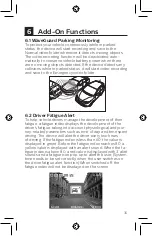
Страница 35: ...development of their fatigue a fatigue index displays the development of the driver s fatigue taking into account physiological and jour ney related parameters such as time of day and time spent driving The device will alert the driver every two hours of driving If the fatigue index is less than 60 the value is displayed in green Before the fatigue index reaches 80 a yellow value is displayed with...

Страница 36: ...e F 1 8 Fixed Lens 6G wide angle lens FOV 135 Diagonal File Format MOV PCM audio compression H 264 video compression Random Access Memory 64 M x 16 bit 1 Gb DDR3 SDRAM Internal Memory 64 Mb SPI Flash Recording Media external memory Micro SD card at least 16 GB class 10 or higher 32 GB recommended Recording Time 320 min 32 GB for full HD 640 min 64 GB for full HD RTC 5 days Operating Temperature 10...

Страница 37: ...ime will be reduced If the windshield becomes dirty in front of the device s lens due to rain snow sandstorm or other natural or human factors the device will not record effective video evidence Rain snow swaying tree branches or busy streets park ing lot environments will sometimes cause the video recording to be continuously activated so the effective protection time will be greatly reduced When...

Страница 38: ......

Страница 39: ......

Страница 40: ...3241 922 01681 Lumileds is the warrantor of this product Philips trademarks are used under license from Koninklijke Philips N V 2018 Lumileds Holding B V 2018 All rights reserved ...

Отзывы: